Categories
Crops & Gardening

How To Plant An Orchard Of Fruit Or Nut Trees

The best time to plant a tree was 20 years ago. The second best time is now.”

There’s a lot of truth in this oft-repeated phrase, widely described as an old Chinese proverb. To plant a tree—particularly a fruit or nut tree—is to invest in the future. The reward might be years away, but the sooner you get started, the sooner you’ll reap a bountiful harvest.

No farm is complete without an orchard of fruit and nut trees. Many older farms are stocked with mature trees planted by farmers of the past. But if your farm isn’t so fortunate—or if its established trees are fading with old age—perhaps it’s time to follow the proverb and plant a new orchard of your own.

Starting from scratch might seem like an imposing task, but with a little planning and a lot of digging, you can lay the foundation for a beautiful orchard that will produce annual harvests for decades to come.

It doesn’t have to be a full-scale commercial orchard. And it certainly doesn’t need to be complicated. A few well-placed trees in your backyard can form a productive orchard. If you’re able to commit a few acres to the project, all the better.

Because we can’t time travel 20 years into the past, there’s no better time to plants some trees than now. Let’s dig in!

Choosing Foundation Trees

What varieties of fruits and nuts would you like to grow? Apples, pears, peaches, plums, walnuts, almonds, pecans—the possibilities go on and on and will be determined largely by personal preference and your local climate.

The USDA Plant Hardiness Zone Map is the place to begin when narrowing down choices of which trees to plant. This colorful map divides the United States and Puerto Rico into 13 zones based on average annual minimum temperature. Lower numbers are colder, so if you live in Zone 3—where temperatures dip down into the -30 to -40-degree-F range each winter—you shouldn’t consider planting trees that are only hardy to Zone 5.

Size Matters

For fruit trees, another question beckons. Do you want to grow standard, dwarf trees or semidwarf trees? Dwarf trees are smaller (more on that later) and don’t produce as much fruit, but harvesting is easy, and they’re perfect for small spaces.

Standard trees take up considerably more space and require ladders and/or tools for picking the highest fruit. But they also bear abundant crops and grow to become stately specimen trees.

The Spice of Life

Regardless of which direction you take, it’s wise to plant several different varieties of fruit trees within the same species. While some fruit trees are self-fertile, including apricots and peaches, others require pollination from another variety within the same species.

Black Ice and Toka plums, for example, form a perfect pair for pollination. The key is to combine compatible varieties that blossom during the same window of time. Nurseries often suggest trees that can be planted in groups for proper pollination.

On the other hand, employ caution when planting certain species together. You might dream of growing fruit trees in the sunny field just south of your walnut orchard. But the roots of walnut trees exude a chemical called juglone that is toxic to apple and pear trees.

When planted too close to walnuts, your fruit trees may suffer debilitating side effects.

fruit nut trees tree orchard plant planting
Daniel Johnson

Where To Put Down Roots

Choosing the right location for your orchard is critical to ensuring the long-term health and success of the trees you plant.


As a general rule, deep, well-drained loam soils—particularly sandy loams—with plenty of nutrients will produce the best results. Soil pH preferences vary from species to species, but a rating in the 6.0 to 6.5 range will be acceptable for a variety of fruit and nut trees.

Just as important is the amount of sunlight afforded by your chosen location. Fruit and nut trees love full sun. With a few exceptions, they need at least six hours of sunlight—eight is even better—for optimum production.

But a wide-open field with hardly a tree on the horizon might not be the best choice if you live in a windy location. Heavy winds can damage fruit-laden branches and bring bitter cold temperatures during the winter. So ideally your orchard will be shelteredbut not excessively shadedby a row of windbreak trees or buildings to moderate the prevailing winds.

If you’re trying to grow trees in a cold region pushing the limits of what they can tolerate, the difference between a north-facing and south-facing slope is another factor to consider.

Temperature swings are milder on north-facing slopes. This can encourage delicate trees to stay dormant longer and not awaken prematurely. It will lessen the likelihood that they’ll suffer damage from temperatures rising and dipping back down too quickly.

By Design

Designing the layout of an orchard before you plant your trees is one of the most enjoyable steps. But take care, since it’s difficult to make changes later.

Location, Location

It’s important to consider the mature size of each tree when choosing locations. A 4-foot, bare-root apple tree might seem unimposing at planting time. But it can grow to an impressive size if left unchecked.

Even with pruning, standard apple trees commonly spread their crowns 20 feet or more. So if you plant two such trees 10 feet apart, they’ll wind up fighting to occupy the same growing space.

With this in mind, it’s wise to plot your orchard layout on paper before you start digging holes. Use a long tape measure or an online service like Google Earth to determine the dimensions of the area you’ll be planting. Then outline the perimeter on graph paper to provide an accurate scale guide for choosing tree locations.

If you allow each line on the graph paper to represent a 20-foot increment, then each square will denote the 20-by-20-foot area required by a well-pruned standard apple tree at maturity.

If you want greater precision for plotting small detailssuch as the locations of dwarf trees or bushesadjust the scale of your graph by using a 5- or 10-foot increment for each line. Using graph paper will allow you to rationally consider the area available for planting and factor the size of mature trees in a way that’s difficult to imagine when looking at a tiny sapling tree.

When marking locations, you can distinguish between various tree species by using colored-coded markers.


Read more: Planting trees on raised ground presents a number of challenges.


Looking Ahead

Whether you’re purchasing trees from a nursery, website or mail-order catalog, consult the descriptions of your trees to determine the height and width they’re expected to reach at maturity.

Many factors can influence the final size of any given tree. Some varieties naturally grow taller or shorter than others. Pruning, too, can further influence shape and size. Left to their own devices, some standard apple trees can exceed 40 feet in height, with a similar spread.

We’ll assume you’ll perform some pruning to control size and promote healthy growing patterns well-suited to fruit production. A standard fruit tree can be expected to spread more than 20 to 25 feet at maturity. (Dwarf trees will remain less than 10 feet wide.)

You can achieve other sizes through more vigorous pruning of standard trees or by planting semidwarf varieties instead.

Aw, Nuts

Nut trees can be a different story. Walnuts and pecans sometimes exceed 100 feet in height while spreading their crowns 50 feet or more.

Though they require many years to reach such impressive sizes, afford nut trees plenty of room to grow without crowding each other.

The best time to plant a tree was 20 years ago, but only if the planter did a good job planning for the future!


Read more: An orchard of nut trees can provide profitable protein in the years ahead.


Double Check

Once you’ve laid everything out on paper, walk the area with a long tape measure and handheld GPS to make sure your plan fits with the lay of the land.

You might realize the location you’ve marked for an apple tree is a problematic low spot that habitually gathers water. In this case you’ll want to revise your plan rather than plant the tree in a water-logged location.

Local nurseries might offer a service to help you plan and plant your orchard—just ask.

If you’re working over a couple acres or more, establish the corners first and determine all future measurements and calculations from there. To mark the corners, a GPS can be a lifesaver, keeping your lines straight and your corners square to boost the overall integrity of your measurements.

It’s true that GPS data is only accurate down to a few feet—a tape measure is better for short distances. But this margin for error has a minimal impact when marking the corners of a larger area.

Placing stakes to mark corners is also helpful. And tying rope between two corners provides a clear visual line for marking other points along the way.

To fine-tune your corners and confirm they are square, a little geometry goes a long way. The Pythagorean theorem (a2 + b2 = c2, where a and b are the triangle sides and c is the hypotenuse) can be used to ensure corners are true right angles. (Who knew high school geometry would actually come in handy?)

Consider the Harvest

You should also consider the aesthetics and logistics of harvesting fruit when laying out an orchard. Within reason, personal preference can determine whether you plant your trees in tidy rows or scattered haphazardly across a field.

It’s your orchard, and whatever design strikes your fancy is worth pursuing.

But if you plan on frequently using large machinery in your orchardtractors for landscaping or hauling water, mechanical harvesting machines for harvesting fruit, etc.then planting trees in rows with ample driving space between them will make it easier for machinery to maneuver through your orchard in an efficient manner.

Commercial orchards plant trees in a variety of geometric patterns such as squares, triangles, quincunxes, etc. to facilitate easy harvesting and achieve the highest productivity per acre. You can each chart each design on graph paper, and geometric patterns are straightforward to measure when the time to start digging holes arrives.

fruit nut trees tree orchard plant planting
Daniel Johnson

Tips for Planting Trees

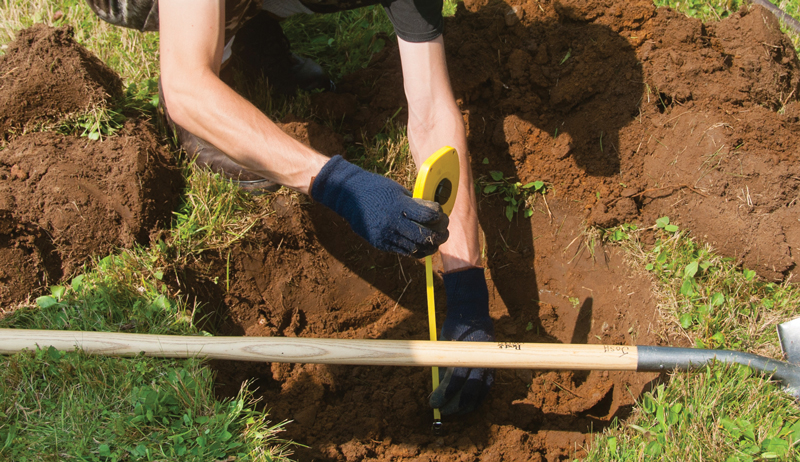
Whether you plant bare root specimens or potted trees, preparing a proper hole is essential for giving them the best chance to thrive. Start by digging a hole two to three times the width of the root ball.

This way, when you backfill the hole, the tree will be surrounded by loose soil, making it easier for the roots to get established.

For the same reason, you should dig the hole a few inches deeper than necessary, backfilling the bottom with loose soil prior to planting so the roots can easily grow downward. If a potted tree is root-bound, take a knife and slice some of the outermost roots to free them up and encourage outward growth.

Aim to plant the top of the root ball level with or slightly below the surrounding ground. The latter approach will form a shallow bowl to promote water retention.

Speaking of which, young trees need plenty of water when getting established. Potted trees in particular are thirsty specimens, requiring daily watering for at least the first few weeks, and weekly watering for a year or two.

Bare root trees are a bit more resilient and can be watered once a week through their first year in the ground.

Once your trees are planted, it’s a good idea to mulch the bare ground around their trunks. Doing so conserves water, cuts down on competition from weeds, and provides a layer of protection from cold temperatures during the winter.


Read more: Follow these 5 tips to build a better deer fence and protect your crops.


Protecting Your Orchard

Congratulations! You’ve planted your foundation trees and have taken the first step toward growing a productive orchard. But before you rest on your laurels and await the first blossoms, there’s one more task to tackle: protecting your trees from damage.

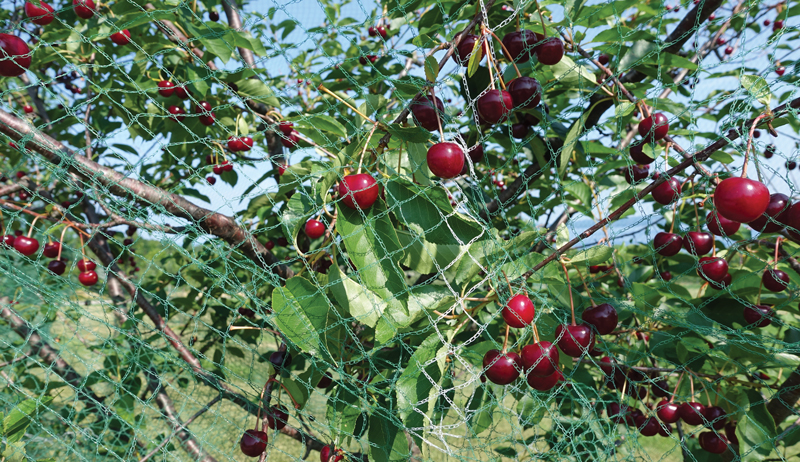
Young trees can come under siege from a variety of threats. Animals are the most likely source. Hungry deer munch on branches, while rodents and rabbits eat bark and girdle trunks. But winter weather can also be troublesome, with severe temperature swings causing sunscald and frost crack.

Even a careless caretaker can inflict injury by getting too close with a string trimmer.

Protecting your trees from myriad threats is a multi-step process. Wrapping the trunks with plastic tree guards will effectively guard against girdling and careless mowing, while white fabric wraps will help reflect sunlight and protect trees from winter injuries.

The key is to make sure protective guards and wraps aren’t installed in a manner that will restrict the growth of the trees, which can cause significant damage in and of itself. Plastic guards worn year round should be installed loosely, leaving room for growth and ventilation. Fabric wraps must be wrapped tightly by design, and so should only be used during the winter when the trees are dormant.

fruit nut trees tree orchard plant planting
Thomas Barrat/Shutterstock

Formidable Fencing

As for deer and other browsing critters, if they’re numerous in your area, the only guaranteed protection is to install formidable fencing to protect your trees. If you opt for a perimeter fence surrounding your entire orchard, make sure it’s at least 8 feet high—otherwise, deer may attempt to jump it.

As an alternative, two shorter fences—one inside the other, spaced five or six feet apart—can present a similarly imposing barrier. Refrain if possible from installing a horizontal support across the top of your fence, since this gives deer a visual cue for judging its height.

Slanting the fence outward can further confuse deer and lessen the likelihood that they’ll try to jump over.

If constructing a perimeter fence isn’t practical for budgetary or logistical reasons, another option is to construct a fence around each individual tree, leaving some room for branches to grow outward. Fences like these can be shorter—6 feet or so—since deer are unlikely to jump into such an awkward, confined space.

Welded wire attached to metal T-posts can be an effective (and easily adjustable/removable) solution, protecting your trees until they’re large enough to fend for themselves.

Planting an orchard requires a significant investment in time, money and effort. But with proper planning and care, you’ll reap rewards for decades to come.

Categories
Crops & Gardening Homesteading Poultry Urban Farming

Here Are 7 Top Causes (& Fixes) When Hens Stop Laying

From shorter day lengths to nutritional deficiencies—or serious health issues—there are many reasons hens stop laying. Understanding why your flock has gone on strike is critically important—especially if you hope to get things back on track.

Going Dark

Whether they’re wild bluebirds or your favorite buff Orpingtons, light triggers specific responses in all birds.

“As the day length gets shorter, they think it’s time to start getting ready for winter and migrate,” says Darrin M. Karcher, an associate professor and extension poultry scientist at Purdue University. “[Chickens] are going to shed some weight by no longer producing eggs. The reproductive tract regresses and becomes very small.”

They’ll also lose old feathers and grow new ones. As fall turns to winter and winter to spring, the hens, now exposed to more daylight, begin to lay again. Rather not go eggless? You can stimulate egg production with artificial lighting.

“Maintain about 16 hours of daylight for laying hens every day,” Karcher says. “That doesn’t mean you have to have a light on for 16 hours. It just means that, between artificial light and Mother Nature, you need to add up to 16 hours of light.”

You can put your light on a timer that comes on early in the morning, shuts off during the daytime, and comes on again in early evening. Just make sure the duration of daily light is consistently 16 hours.

(A malfunctioning timer can cause enough disruption to send some hens out of production.)

Eat This, Not That

Recent changes in your hens’ diet can also halt egg production. Did you switch to a new feed? Have you been offering too many treats?

“You may inadvertently be changing what they’re consuming, so they’re not getting a balanced diet anymore,” Karcher says.

Be consistent with the type and amount of food you provide. You might also want to supplement their protein occasionally.


Read more: Mealworms can provide your chickens with a protein boost.


H2Oh!

Eggs contain lots of water, and, without fresh water, your hens won’t have what they need in order to lay. During warm weather, algae can bloom in poorly maintained waterers. In winter, water supplies can freeze.

To keep yourself in eggs, make sure your waterers are clean, full and flowing.

Ectoparasites

Hens with external parasites like lice or fowl mites can also stop laying. To check for these pests, you need to examine your hen’s hindquarters.

“You would invert the bird, look at the cloaca, and, if you have lice, you’d see them on the skin,” Karcher says. “There would be small white nits at the base of the tail feathers and surrounding the cloaca.”

As for fowl mites? “You’d see what appears to be dirt on the feathers, and, if you pull a feather and look really closely, you’ll see all that ‘dirt’ is moving,” he continues. “Those are northern fowl mites.”

In the case of ectoparasites, prevention’s worth a pound of cure. Keeping your chicken’s run, roosting areas and nest boxes clean and dry is paramount. But, if you discover lice or fowl mites, there are organic and chemical treatments you can apply.

Worm Woes

Some creepy-crawlies aren’t as obvious. Gastrointestinal issues like necrotic enteritis—an irritation of the gut lining—and tapeworms, roundworms and other internal parasites, can also hinder egg-laying.

If your chickens’ litter is especially wet or if their droppings look runny or bloody, they may be hosting some of these parasites.

As with ectoparasites, various organic and chemical treatments are available. If you use a chemical de-wormer, you’ll want to deep clean the coop and replace all of the hens’ litter.

“We’re essentially paralyzing the worms,” Karcher explains. “It doesn’t kill them, so it doesn’t do us any good to worm our birds, have all of those worms go into the litter, and then have the chickens reinfect themselves as they pick through the litter later.”


Read more: Here’s your guide to treating internal parasites in chickens.


The Spooky Coop

If you noticed some soft-shelled eggs leading up to the cessation of laying, you might have a peeping predator.

“Your coop could be predator-proof from the standpoint that nothing can get in, but can something come up to a window and spook them?” Karcher asks. “What can happen is, if predators startle those birds, the birds may quickly pass the eggs through the shell gland, and you won’t get a complete shell.”

Stressed-out hens eventually may stop laying altogether.

Senior Citiz-hens

Hens that are 2 years old and younger should lay reliably, but egg production naturally slows in older hens. You can choose to replace your birds every couple of years or enjoy them as pets—whether they’re laying or not.

Categories
Poultry

The Right Feed For The Age & Stage Of Your Chickens

Knowing what types of carbohydrates, vitamins and proteins go into poultry feed is the first step to providing your backyard chickens with the nutrition they need to grow and thrive. The next step is ensuring your flock receives those nutrients in the proper percentages.

Complete feed producers such as Nutrena, Purina, Manna Pro and Kent scientifically formulate their products. They target them specifically for specific ages and stages of development.

Feeding a baby chick too much calcium or a laying hen grower formula can result in dire health issues.  To make certain you offer your flock the right diet at the right stage, follow these feed guidelines.


Read more:Be careful not to feed your chickens these items, which can make them sick.


Newly Hatched to Six Weeks

Only offer formulated chick starter feed at this crucial early stage of a chicken’s life. This crumbled feed should contain between 20 to 22 percent protein and approximately 1 percent calcium.

Too high a calcium content—even just 4 percent—can result in permanent damage to a chick’s kidneys, cause improper bone formation, and result in decreased egg production when a pullet reaches laying age.

Avoid offering supplements at this stage. The complete feed has all the nutrients a baby chick requires.

Seven Weeks to 16 Weeks

Juvenile chickens can begin to eat grower feed at seven weeks of age. Like starter feed, you can get grower feed (which contains minimal calcium) in crumbled form.

Less protein is needed at this stage of development. Grower feed contains approximately 18 percent of this nutritional essential. Fat and fiber content levels remain the same as for baby chicks.

As juveniles, young chickens can start eating table scraps in moderation—nothing they cannot finish in about 10 minutes. They can also start foraging for bugs and tasty plants, especially if they have a mother hen guiding them.


Read more: Learn all about the terms associated with feeding your chickens!


Four Months Plus

At this stage of development, chickens have reached point-of-lay and, while not completely full grown, are considered adult birds. You can now offer layer rations. These come as both crumbles and pellets.

I offer my bantams crumbles and my large fowls pellets. There is no difference in formula between the two. Crumbles are simply crushed pellets.

Layer rations contain approximately 4 percent calcium, which hens require to produce strong eggshells and maintain bone density. Protein content, however, decreases to approximately 16 percent, as mature birds are no longer actively developing.

Adult birds can actively forage and eat table scraps. Since overfeeding your flock these treats can throw off the nutritional balance offered by complete feeds, limit table scraps to what chickens can finish in 20 minutes and ensure nothing is rotten or left out overnight.

Medicated vs. Unmedicated

You can typically find starter and grower feed in both medicated and unmedicated formulas. The medicated formula contains a medication called a coccidiostat, which is added to help prevent coccidiosis, a parasitic disease affecting a bird’s intestinal tract.

Coccidiosis can damage a chicken’s immune system, make is vulnerable to Salmonella, and cause stunted growth due to poor nutrient absorption through the affected intestines. If you are raising your flock organically, opt for the unmedicated feed.

Feeding Meat Birds

Broilers and roasters develop at a different pace than egg-laying birds and have different nutritional requirements. If you are raising meat birds, offer starter rations from hatching through three weeks of age, then switch to grower feed through six weeks of age.

From seven weeks on, offer your meat birds finisher rations, which contain the high levels of protein and fat (approximately 18 percent protein and six percent fat) necessary to complete their growth as sources of meat for human consumption.

Categories
Animals Poultry

Protect Your Chickens From Common Poultry Predators

Your chickens are being watched. Whether you know it or not, critters around your farm are waiting for their chance at an easy chicken dinner. All it takes is a coop door left open after dusk or a damaged hole in the fence.

Because our chickens are so prone to predation, we have to think like predators in order to convince them that invading our coop isn’t worth their time.

An Unfriendly Environment

Make your coop and surrounding yard and pasture distasteful and inaccessible to predators. Employ a stock companion, such as a well-trained dog or an older child looking for extra pocket money, to deter hawks from landing and frighten ground predators away from chickens.

Geese are also good guard companions with their loud warning honks. A gander’s hiss and threatening wings can chase off stubborn wildlife.

A rooster is very helpful in free-range and contained flocks. A rooster will hustle his girls inside or under cover as soon as a threat appears. One guy for 10 girls is a good ratio.

Interestingly, roosters have different calls for predators approaching chickens from the sky or the ground.

Hang bright ornaments around the coop, such as CDs, bird-scare ribbons, wind chimes, bells or plastic owls. Place solar-powered night animal predator lights around the coop. Read instructions carefully as you’ll need to hang the light at the right level for certain animals.

Take away any food, such as birdseed, suet and food scraps. Don’t leave out pet food, and secure the lids on garbage cans.


Read more: Check out these 10 tips for keeping chickens safe from predators.


Hunters by Sky

The beautiful hawk, soaring majestically, is a sight to behold. But it’s one that makes our chickens nervous.

Your free-range chickens are particularly in danger from hawks that can land on them, kill them and eat them right then and there.

It’s important to have predators on your land to keep prey such as rabbits and voles from causing crop damage and contamination, but a hawk sees rabbits and chickens as the same thing: food.

Don’t get discouraged. You can still work in harmony with your resident raptors. And if you have a resident raptor you’re caring for your land correctly!

First of all, do not wipe out the hawk’s habitat. Raptors are federally protected under the Migratory Bird Treaty Act, so you can’t harass it in any way or try to force it off your property. You can only deter it.

chickens chicken predator predators
Justin Buchli/Shutterstock

Know Your Enemy

Hawks are diurnal, so they hunt during the day. You may have seen them perching high up, such as on a dead tree or telephone pole. What they are doing is looking for movement.

Red-tailed hawks are the raptors that take the biggest animals, such rabbits and squirrels, so learn to identify this hawk. Red-tailed hawks have a reddish hue on the tops of their tails, a dark bellyband and dark wingtips. (Check out All About Birds for more information.)

Once a hawk discovers that chickens are an easy food source, it will continue to hunt until it’s no longer worth its time.

To break the hawk’s behavior, keep your chickens in a coop or in a safe enclosure for a month or two, until the hawk keeps getting thwarted. You can also employ the guardian animals mentioned previously.

You can protect the outdoor run by covering it with plastic mesh fencing or by crisscrossing string over the top.

Always give your chickens a place to hide while out in the pasture. This can be a hay wagon, a raised coop, small hutches, hedges or a simple plank over two large buckets. Place food and water in protected areas.

If the hawk continues to attack, you may have to forgo free-ranging altogether. You can bring fresh clipped grass to your hens as long as it’s free of chemicals and as long as you have poultry grit available.


Read more: Identify the predators on your land by the tracks they leave.


Hunters by Land

Wildlife can’t bother your animals if you take away every opportunity to enter the coop. You want a large yard where chickens have room to explore but still offer protection.

Raise your coop off the ground by at least a foot. Block the space underneath the coop with chicken wire buried 2 feet below the ground to discourage digging. Do the same with your permanent fence surrounding the coop.

If burying the fence isn’t an option, extend your fencing along the ground for a few feet. (Both burying and extending is not necessary with electric mesh fencing.)

Surround your coop with a quality wire that dissuades climbing. And make it high enough (at least 6 feet) to stop coyotes and foxes from jumping over. Raccoons can reach through a fence and grab a bird if they don’t have enough room to get away.

If your coop is small, such as a movable arc, consider using a smaller meshed hardware cloth instead of chicken wire. Because raccoons will easily tear a screen, hardware cloth is a good choice for windows.

Secure door latches against busy paws with snaps or carabineers.

Teach your resident livestock that your fence is not to be trifled with by stringing hot wire across the top of the fence or setting up a electric mesh poultry fence around the coop or free range area. (These fences are easily moved and can be solar-powered.)

One shock is all it will take to keep most predators away from your chickens for good. However, make sure to check your fence from time to time with an electric fence tester to make sure it’s still hitting.

For free-rangers, don’t let the pasture grow so long that the chickens can’t see what’s creeping up on them. Make sure there is open space so your birds will have a chance to get away.

If nothing works, you may have to set up a humane trap or call a company that specializes in trapping and releasing animals. Skunks can be difficult to trap for obvious reasons! Wildlife usually roam in a set area, so removing a frequent visitor and releasing it into a wild area should remove the problem for good.

Wildlife made their home on your property long before you arrived, so it’s natural for them to assume your chickens are part of their world.  It’s up to you to make them change their minds in a humane and fair way and let them know that your chickens are off the menu.

This article originally appeared in the September/October 2020 issue of Hobby Farms magazine.

Categories
Uncategorized

The Challenge Of Living Off-Grid Is Easier Than Ever

Perhaps you’ve noticed listings for land during a search for your dream property that notes it’s an “off-grid parcel” or “perfect for off-grid living”?

Maybe there’s already an existing house with an off-grid system in place or even just a generator? Or the land sounds wonderful and the pictures look just like what you’ve been dreaming of but the closest power is pretty far?

What would it be like, you wonder, to truly live off-grid? And if farming is in your plans, is this even possible? Would life there feel like a never-ending power failure?

After 17 years spent living and farming off-grid, I’ve developed a pretty good sense of what that’s like—the good and the not-always-so-good. I hope that sharing some of my experiences from living this will give you a better understanding of the process and arm you with the questions you need to ask yourself if you’re considering off-grid living.

Home, Sustainable Home

My adventures in off-grid life began in 1994 when I was shown a parcel of land up on a mountain in central Vermont. I’d been looking for a while, but nothing I had seen felt right. Lots of heavily (and badly) logged properties, weedy former Christmas tree farms and even worse seemed to predominate.

This parcel felt different. I liked it immediately. The real estate agent noted that there wasn’t any power to the parcel. But I was already pretty open to living off-grid, so that didn’t phase me.

Back then, the off-grid world was rather different than it is now. There weren’t any grid-tied systems that I was aware of, connected to the grid and receiving credit or payment from the electric utility for power generated.

There were only a few companies devoted to providing off-grid supplies. Off-gridders were truly off-grid.

Federal tax credits for off-grid systems didn’t exist, and there weren’t many companies involved in this field. Those of us who opted for off-grid living felt like we were joining a small club of sorts. Equipment was rather limited and expensive.

living farming off-grid off the grid
John Englart/Flickr

Getting off the Grid

I contacted the local electric utility to see if they’d come out and give me an estimate for hooking up to the grid just in case I wanted to. But they weren’t too interested in doing that and expected payment of several hundred dollars just to come and take a look.

Several hundred dollars was a fair amount of money in 1994. (It still is!) Given this, I decided that it was clear I was meant to live off-grid and never looked back.

I’m not going to recommend specific equipment in this article, nor will I go through install details. This information changes regularly, and other resources cover this well.

I do hope to give you a taste for how I decided on my off-grid system, what sorts of appliances and other devices I used in my home and what it was like living this way year-round. Plus, as I was moving to the land in order to farm, I’ll share what it’s been like farming off-grid.

Power System

There are a number of options available for someone who’s going to live off-grid. These include wind, PV (solar) and hydro systems for those where the intent is to generate electricity via a natural means and store it in a battery system to use later.

Some just opt to use a generator, which charges their battery bank. Others only use propane, opting for propane lights and refrigerator and even a propane heating system, instead of or in addition to wood.

One of the things you’ll need to think about is how you’ll use this property and what sort of electric-generating potential exists on the site: solar exposure, wind, running water for hydro?

How big a system will you install? Your budget also plays a big role here.

My budget was quite limited, so that dictated the size of the system. Some people choose to look at their electric utility bills and try to replicate a system that will produce that amount of power. I personally think that’s a rather wasteful (and expensive) approach, although often favored by system installers.

The only way I would suggest following that approach would be if you desired to live exactly as you did when connected to the grid while using the same appliances found in grid-tied homes. Oh, you’ll need to have tons of money to pour into that type of system!

To replicate the power consumed by even a reasonably power-frugal grid-tied person with off-grid power generation results in a large and costly off-grid infrastructure.


Read more: Emergency preparedness is essential to living off-grid.


My Example

Looking at my own situation on this piece of land, I opted to pair a small PV system with a small wind generator. At the time, there was a brand-new, small wind generator just out which could be mounted on a metal pole and secured to an outbuilding such as a barn or shed.

The property had an awesome southern exposure, which would result in lots of power generated on sunny days. And it was high up on a mountain and often quite windy.

The wind gen was to help fill in the gaps during the winter or when the sun wasn’t shining. I didn’t have any hydro options, or I would certainly have considered using that as well.

Power Up

I opted to install both AC and DC (12-volt) wiring in my house. The AC system had a circuit breaker box and the DC system had fuses for each appliance.

The majority of the house was wired for AC. This meant that ordinary small appliances—blender, coffee grinder, computer, printer, lamps, etc.—could be plugged into AC outlets and function as they did when grid-tied. The AC power was generated by having an inverter convert the DC battery bank power to AC.

An inverter, while running, uses up some power just to operate. Given the small size of my system, I didn’t want to waste power having an inverter running for long periods of time.

As well, if items need to frequently cycle on and off, such as a fridge or well pump, this would mean that the inverter needed to continually go on and off as well.

Thus, I opted to have some DC runs of wiring in my house in order to operate DC appliances such as a 12-volt well pump, ceiling fan and, later on in time, a 12-volt fridge and freezer. They ran directly off of the battery bank and no inverter was needed to operate them. I even had an outlet for a DC light bulb to use when brooding chicks.

Utilities & Appliances

I was fortunate to find a piece of land with a spring that I was able to have developed. This provided gravity flow to just below the floor of the house. Thus, the 12-volt water pump was small, located inside the house and fed the water to a small pressure tank.

A tankless, on-demand propane water heater supplied hot water.

living farming off-grid off the grid
Albert Pego/Shutterstock

Warming Up

Home heating was a critical need in the long, frigid winters. Two wood-burning stoves—one centrally located, the other only used occasionally—provided my main heat.

Back-up heat was provided by a centrally located large console propane heater vented to the outside. It was not very fuel-efficient but didn’t require any electricity, unlike other oil- or gas-heating systems. This provided heat in case I was out all day.

It also satisfied the requirements of the home insurance company.

Keep Food Cold

In the early years, I opted for an ancient (older than me!) propane fridge. Eventually, after adding a few more PV panels, I was able to install a 12-volt fridge and a 12-volt freezer.

The fridge was essentially a chest freezer with a different thermostat. It was admittedly a pain to use. It also failed after just a few years of use due to defective coolant lines. The freezer worked quite well, though.


Read more: Take your chickens off the grid with a solar-powered coop!


PV System

I was fortunate to have a handy friend able to install the system. As I was building the house (with friends), the roof was designed to have a southern exposure with the proper angle to generate PV throughout the year.

I economized by using angle irons to mount the PV panels to. They worked quite well with never a problem. In fact, I’d have to say that the PV system behaved flawlessly.

Wind Gen

The wind gen was mounted up above the barn roof on a metal pipe. It failed during its first year of operation. Evidently these wind gens were failing in high wind speed areas! I had to have it removed and sent back to have the innards exchanged for those of the next model year.

Other than that, it worked quite well and definitely generated power when the sun wasn’t shining. Looking out and seeing the little red light on its belly lit up and hearing the blades whirring away always gave me a good feeling.

For batteries, I used a bank of deep-cycle batteries, sometimes marine batteries and other times golf cart ones. They had to be checked and have water added to their cells as needed.

I kept the system simple, so besides an inverter (one that could recharge the battery bank using a generator plugged into it), there was only a charge controller (for the PV system) and a voltmeter for the battery bank.

Two separate thunderstorms took out the original charge controller and the voltmeter. Thankfully, neither cost too much to replace.

Life off the Grid

My goal was to have my house operate such that a guest could come in, turn on a light, cook a meal, use the bathroom, take a shower, etc. without needing an instruction manual. (I knew someone with an off-grid house that had a thick operations manual.)

I wanted to have the house set up so that while I needed to understand the system and its “care and feeding,” guests in my home didn’t need to know anything special other than to turn off the lights when done using them. I’d say that I succeed with this goal.

In the early years, when the system was very small, we were more limited. We still used a computer, printer, blender, VCR and TV, lights, coffee grinder, etc.. We never used any electrical appliance that generated heat (toaster, hair dryer), though.

My inverter was limited in its operating capacity for watts (and surge capacity). So I needed to use a generator to operate the washing machine or power tools.

Later on I was able to add a few more PV panels and thus switched to a 12-volt fridge and freezer. As technology became more affordable, I replaced the desktop computer with a power-frugal laptop.

living farming off-grid off the grid
Phakorn Kasikij/Shutterstock

Seasonal Sufficiency

Did we have enough power? That depended on the time of year.

In summer, we had plenty of power. In winter, it was more limited. November and February tended to be the worst months for power generation in my region. There were times we had to go with candle­light dinners!

My son had to learn that a cloudy day spent doing a movie marathon while I was out might mean no power that night.

If I’d had the money for a larger system, I would definitely have opted for that as well as a more powerful inverter able to handle a washing machine, microwave, etc.

Costs for PV panels and inverters have dropped significantly from what they were back then. So this won’t likely be as big an issue for someone starting out now unless they are purchasing used equipment.


Read more: This couple finds meaning in organic farming and sustainable, solar-powered living.


Power Aware

I think the biggest difference to life on the grid is that when you’re off it, you always have to think about the power supply and the level of charge in the battery bank. Unless you’ve got tons of money to throw at installing a system, you’ll by necessity be more limited in your usage.

When you’re grid-connected, you can essentially use as much electricity as you want, limited only by your ability to pay the bill each month. When you’re off-grid, you’re limited by how much power is produced and stored in your battery bank.

While I sometimes had a generator available and could then recharge the battery bank using it, I didn’t opt to do this often. To my mind, that’s very wasteful of fossil fuels. A stretch of cloudy/rainy days while on a PV system means that you need to cut back your power consumption.

If using a wind gen, a stretch of calm quiet weather means that less power is being generated.

This forces you to be hyperaware of the weather. It gives new meaning to the concept of “living within one’s means.” It also means that you will become quite vigilant about turning lights off and not wasting power.

Having lived off-grid for so many years, now while living in a grid-connected home, I notice that my electric bills are always so much lower than those of others.

If you’re considering taking the plunge to living and/or farming off-grid, I support that wholeheartedly. I’m currently living in a grid-connected home but wouldn’t hesitate to return to living off-grid should I make another move to a house inaccessible to the grid.

An extra benefit of living totally off-grid is that you’ll only notice there’s a power failure when lightless neighbors come a-knocking needing water!


Sidebar: Off-Grid Farming

How does living off-grid impact farming? I think the answer to this depends a lot on what sort of farming you’re intent on doing.

Livestock Farming

Livestock of all kinds can be securely contained within fencing that doesn’t require any electricity. I used electric fence, wire and netted, energized by solar chargers. These chargers were connected to a deep-cycle battery that I recharged off my generator.

I found this to be a very workable solution.

If your intent is to have very long runs of electric fence on extensive pasturage, though, you’ll likely have to use several solar fence chargers. It’s also critical to keep the grass well trimmed that abuts the fencing. I used chicken wire for the outdoor chicken yard. This wasn’t electrified.

The use of gasoline/diesel tractors, mowers, tillers, etc. and growing hay or field crops shouldn’t be any different being off-grid. I had lights in the barn, which I used only when necessary, such as early morning/after-dark feeding or milking.

I only milked a few goats, which I did by hand. If you plan to milk a larger number of animals, you’ll want to look at milking systems that can run off a generator. Or explore how the Amish handle this.

The chicken coop wasn’t electrified so I didn’t use lights in there during the winter. Obviously, I didn’t use heated water buckets.


Read more: Learn milking by hand for off-grid dairy production.


Growing Produce

I was mostly a fruit and veggie farmer. The biggest challenge for me doing this off-grid was the lack of refrigeration.

Having a small system, I couldn’t operate any walk-in coolers. This necessitated harvesting leafy greens in the wee hours of the morning when they were crisp and still cool. I washed and packed them quickly, and stored them in a cool northern storage room in the house.

If your budget allows for a walk-in cooler that can be operated off-grid, that would be quite useful, but, again, it’s not a necessity. I needed to time the harvest of perishables—berries, for example—such that they were delivered to their retail buyers as soon as possible after picking and packing. I

couldn’t harvest days in advance of a farmers market. Timing of picking was critical.

For the large grow tunnels/hoop houses, I relied solely on non-mechanical ventilation, opening up the ends and rolling up the sides as required. I purchased, but never got around to installing, some window vents that were temperature controlled. These look like a good idea though, especially if you are located in an area with hot summers.

I rarely needed to use supplemental heat in the tunnels. In a few emergency low-temp situations, I utilized kerosene heaters that didn’t require electricity to operate.


Sidebar: Lessons in Living

Living and farming off-grid meant that sometimes I had to utilize simpler and more basic methods to do things. When electricity is limited, one has to be more clever about how to get a job done. It also eliminates the use of a myriad of time-saving appliances.

I found other ways to dry food, as using an electric food dehydrator wasn’t possible. When I had the gas fridge, I was able to utilize the waste heat produced by the burner to dry food in a rack set above the heat vent.

Instead of a toaster, I used a cast iron griddle on top of the stove. Coffee was made via a French press after heating the water in a kettle on the stove. Laundry was hung out to dry on a clothesline in good weather and inside on drying racks near the woodstove in more inclement weather.

Canning food on my propane kitchen stove wasn’t any different than in a grid-tied home, though. Oh yes, my propane cook-stove didn’t have electric ignition; it had old-fashioned pilot lights for the burners and oven.

This article originally appeared in the September/October 2020 issue of Hobby Farms magazine.

Categories
Equipment

4 Reasons To Start Preparing Your Farm For Winter Early

Just the other day, I was pushing hard to finish some fence repairs before the first snowstorm of the season. Using a garden tractor, I drove a large wagonload of supplies out to the site. The snow arrived while I was working, and by the time I’d finished there was almost an inch of snow on the ground.

Suffice to say, my garden tractor was unprepared for the sudden change in conditions. On the way back to the barnyard, it started slipping and sliding on a modest uphill slope.

In the end, I had to disconnect the wagon to get my tractor back to the garage. All I could think was, “Why didn’t I start preparing for winter sooner?”

In my defense, winter struck early this year, and with shocking suddenness. One week temperatures were warm and conditions were dry. The next week, a chill filled the air. Weather forecasts called for snowstorms every other day into the foreseeable future.

Such occurrences reiterate the importance of preparing your farm for winter well in advance of the first snowfall. Here are four reasons why early prep beats late prep every time.


Read more: Here are 4 types of tractors you should consider for your farm.


1. The Arrival of Winter Is Unpredictable

Officially, winter begins on Dec. 21. But seasonal weather shifts rarely abide by astronomical definitions.

Up on my northern Wisconsin farm, winter arrive somewhere between the middle of October and the middle of November. If you’re lucky, snow holds off as late as possible and you gain an extra month of quality working weather.

But you definitely can’t count on it. So it’s better to have critical pre-winter tasks completed well in advance of potential snowfall.

2. Simple Tasks Are Harder in Cold Weather

Every year, I wrap the trunks of my young fruit trees with plastic and cloth tree guards to protect them from hungry rodents.

Installing the guards (and taping/tying them in place) is almost impossible when wearing bulky winter gloves. So I try to hit a fine line between wrapping the trunks after the growing season is over, but before frigid weather and snow set in.

I want to be able to take my gloves off without risking frostbite!


Read more: Check out these tips for enduring arctic, subzero temperatures.


3. Unprepared Equipment Leads to Struggles

The incident with my struggling garden tractor is just one example of how equipment can be caught unprepared for the sudden onset of winter weather. At the start of autumn, you should start readying your tools and machines for the coming snow season.

Just for starters, exchange the mower deck on your garden tractor for a snow blower attachment. Or perform annual maintenance on your standalone snow blower.

Go ahead and install tire chains on tractors, and a plow on your farm truck. Gather up hand tools like snow shovels, digging bars, etc. to deal with snow and ice.

Park seasonal equipment like hay balers and wagons in protected places where they won’t be problematic through winter or early spring.

The goal is to avoid waking up one morning to find a foot of snow on the ground while your shovels are trapped in a toolshed and your snow blower needs new spark plugs. That’s just asking for a challenging day.

4. Frozen Ground Makes Some Projects Impossible

Have you ever tried to replace a broken fence post when the ground is frozen? I hope not, because it falls somewhere between difficult and impossible.

Even if you manage to extract the post (a feat in and of itself!), finding enough loose dirt to backfill around the replacement post will be a challenge. Any projects that require shifting dirt around (replacing fence posts, digging compost, grading a driveway, etc.) should be completed well before freezing temperatures settle in.

Once you’re done preparing your farm for winter, you can sit back and “let it snow, let it snow, let it snow” without worry.

Categories
Animals Large Animals

Llamas Make Great Small-Farm Livestock

Llamas are members of the camelid family.

The llamas seen today in fields and pastures throughout the U.S. and Canada are the descendants of llamas imported from South America.

This importation began in earnest in the 1980s. During that time, importers brought in hundreds of animals.

The traditional role of the llama in South America was as a pack animal, moving goods from farm to town. Today in North America llamas serve a number of purposes, including:

  • packing
  • hiking
  • cart driving
  • fiber production
  • therapy animals

To some extent, what a llama will do depends on its temperament and individual personality.

Llamas are a suitable livestock choice for hobby farmers due to the animals’ relatively small size compared to horses, ponies or cattle. Their unique digestive system and highly efficient use of forage means llamas require less acreage per animal.

Four grazing llamas use about the same acreage as one horse or cow/calf unit.

Because they are herd animals, a single llama can serve as a superb guard animal for goats, sheep and other camelids. The llama bonds with its flock, so it will protect and defend the animals against dogs and small predators.

But if it has no other animals to guard, it should be with another llama.

Llama Concerns

Before you get a llama, consider the following.

  • Can you provide grass hay or a pasture? Plenty of fresh water is a must.
  • Is there a large animal vet in your area who is willing to treat a llama? Consider your state’s veterinary teaching hospital.
  • At a minimum, a llama needs one annual vaccination, shearing and toenail trimming.
  • Can you provide shelter from excessive heat and cold?

The importance of being able to catch and halter your llama can’t be stressed enough. So if you can’t catch and halter your llama, what will you do if an emergency arises?

There are a number of ways to set up your area with a small catch pen to make catching and haltering easier. A 9-by-9-foot pen will suffice, and  you can train your llama to go into the area.

There are several ways to halter. Find a reputable breeder or trainer to teach you. Llamas are not typical livestock. Roping a llama isn’t recommended or necessary.

When searching for help, be cautious. A great deal of misinformation is on the internet and on social media. Find a reputable breeder or trainer to help you. For more information, visit the Rocky Mountain Llama and Alpaca Association website.

This article originally appeared in the September/October issue of Hobby Farms magazine.

Categories
Animals Large Animals

Breed Profile: Get To Know Large Black Hogs

The Large Black is a docile heritage breed of swine originating in England improved from the Old English Hog from the regions of Devonshire and Essex.

Large Black Hogs posses a stellar reputation for mothering abilities. This extends to the boars as well, who often tend the young. Births are easy, with average litters being between nine and 12 piglets.

After an extensive census performed by The Livestock Conservancy, the Large Black was put back on the critically endangered list. Actual registered animals have fallen to a mere 273.

The Large Black Hog Association and the conservancy have been working with Purdue University in Indiana on an artificial insemination project over the past several years.


Read more: Small farms are perfect for pasturing heritage hog breeds.


Into the World

In February, the program dispersed several piglets born of semen frozen for nearly 20 years. And in July, 25 half U.K./U.S. piglets headed to their forever homes of those who donated sows/gilts to the project.

These incredibly special piglets will, in turn, bolster the Large Black population in the U.S.

Selective breeding and semen collection from these pigs will then be sent to the USDA Germplasm bank. This will ensure that the unique qualities of this breed never go extinct.

slow pork large blacks pigs hogs
Amanda Slater/Flickr

Pasture Pride

Most LBH breeders adore their animals and liken them to having enormous dogs. Each animal has a unique personality. They will graze the pastures rather than rooting like many breeds.

Large Blacks are wonderful additions to most farms, large or small. They may grow slower than other breeds, but it’s well worth the wait.

You can butcher LBHs at any size. Chefs prefer the small size of 240 pounds, while many enjoy the large hog of nearly 400 pounds or more.

The robust and flavorful meat has time to develop the deep, rich rose color that conveys those succulent flavors. Many purveyors of the pork, in fact, comment that they feel as if they never truly tasted pork before enjoying the meat from Large Black Hogs.

This article originally appeared in the September/October 2020 issue of Hobby Farms magazine.

Categories
Crops & Gardening Homesteading

6 Ways To Increase Community Food Security For Winter

Wintertime is the long stretch between the natural productivity of most landscapes, including farms, gardens and wild ecosystems. Sometimes is it the dry season, while during other times the land is blanketed with snow.

In all cases, though, the natural environment produces less bounty. This is true in both human-managed landscapes, like farms with vegetables, or wild landscapes such forests with blueberries. As such, storing food over the winter and planning for scarcity is a big part of community food security.

Food security, in its simplest sense, means access to food for a community—especially good-quality food. And I would add to this definition access to local food, which is more secure in uncertain times and not prone to disruption in global food supply chains from transport issues or global economic upheaval.

How food secure are your family and community going into the winter?  If the answer is “not very” (or even “I don’t know”), these six tips can help.

1. Freezing

Freezing food is a great way to put food aside for winter. Not only does it allow you to stock up on many foods available in bulk in the autumn months, but it is also a quick way to process items for storage.

Sometimes a simple freezer container or freezer Ziploc is all you need. Other times, you may need to blanch to improve storability.

An important, if obvious note: Make sure your freezer is always plugged in, and safeguard against a door being left open.


Read more: Make your harvest last by building a root cellar in your home’s basement.


2. Root Cellar

You don’t need to bust out the shovels for a massive building project. A root cellar can be as simple as a Rubbermaid bin with carrots layered in sand in your cold entranceway or garage.

As long as the temperature stays around 32 degrees Fahrenheit, root vegetables will store nicely. Root vegetables want 95 percent humidity and 32-37 degrees F to store through winter. This includes carrots, beets and storage radish.

Want something bigger? You can build a small root cellar cache outside. Consider a small dugout in the side of a hill, lined with cedar logs and covered over with 3 to 4 inches of soil.

If you’re on a larger farm, an in-ground or barn cold storage can store plenty of food. You’ll find various root cellar designs online.

winter cold food security produce
Zach Loeks

3. Drying

Drying food is another great way to put food up for the winter.  You can dry everything from mushrooms to apples, carrots to tomatoes. These dried foods can rehydrate easily in soups and stir-fries, or you can use them in baking. Or, simply snack on them in a trail mix.

You can dry in your wood stove or electric oven, or you can use a dehydrator. Peruse the many online resources with recommendations for drying techniques.


Read more: Learn more about dehydrating (and rehydrating) produce using a wood stove.


4. A Pantry

A pantry space that is cool, dark and dry can provide ideal storage for bulk beans, rice, and other staples.  It can also store garlic, onions, squash and other storage crops that like dry conditions.

You can easily build a pantry in a house on the ground level. A closet is a great place to retrofit for larger pantry space.

5. A Leaf Cellar

I use the term “leaf cellar” for my habit of growing an abundance of cold-hardy leafy greens outside, which I then simply protect with row cover or in a small, unheated greenhouse (or cold frame) for easy access in wintertime.

Crops like kale, spinach, mizuna and other hardy greens will stay fresh deep into the winter. These plants, even if frozen, will liven up when they thaw in your house.

6. Relationships With Neighbors

What you do not grow, store or buy in bulk, you may find through relationships with like-minded neighbors. Continue to share and exchange your food stuff with neighbors.  Specialize in a great crop and barter for other food stuff from honey to sheep cheese, from meat to popcorn.  Food security is a community effort.

Keep it fresh,

Zach

Categories
Crops & Gardening

Produce Profile: Go For Garlic In Your Garden

Halloween is my favorite holiday, but that doesn’t make me a fan of vampires. Nor does it make me a fan of bland food. Garlic takes care of both of these worries.

My first garlic-growing experience was on a farm where I lived and worked in 2013. I didn’t arrive in time for planting. Rather I watched hundreds of plants awake from their winter slumber and green up seemingly in tune with the trees throughout spring.

We harvested in June, hung them in the rafters of a barn, and shared them with farm customers (and amongst ourselves) for the next 10 months.

With all the rush to get seeds in the ground in springtime and harvest everything you can before frost, I like the break in the pattern that garlic offers. Plant it in early fall—some say before first frost, but I rarely get mine in by that time—and harvest it once your spring and summer crops are planted. Garlic fits into the rhythm so well and gives me something green to look at in the garden during the winter.

Hardneck vs Softneck Garlic

There are two types of garlic—hardneck and soft neck—and each type has its own varieties.

As far as I’m concerned, hardneck garlic is the way to go because, when you grow hardneck garlic, you get scapes. Scapes are eighty percent of the reason I grow as much garlic as I do. I love them.

In the spring, hardneck garlic sends up garlic-flavored flower shoots. Unless you’re trying to collect seed, you need to remove these shoots so the plant puts its energy into producing larger garlic bulbs, not a beautiful flower. Having a delicious, fresh, garlic-like harvest a month before garlic is actually ready to harvest is a treat.

Softneck garlic’s advantage is that it stores longer. When you purchase a head of garlic in the grocery store, it’s likely a softneck variety. I never have grown softneck but would like to try because I think garlic wreaths are the prettiest, and softneck garlic is needed to make those.


Read more: Try this delicious recipe for garlic-rosemary bread!


How to Source Seed Garlic

I have never started garlic from seed, rather from cloves. I grow a variety that was developed by friends to thrive in my area of Kentucky.

You could purchase organic garlic at the grocery store, as it wouldn’t have been treated with growth retardants. It’s better to purchase reliable, disease-free seed garlic from a trusted source, whether that’s a farmer or a seed company.

How to Grow Garlic

You know what garlic looks like: That head forms underground, so the soil needs to be loose enough for the cloves to fill out.

Plant each clove, pointy-end up, about 6 inches apart in rows 1 foot apart. I’ve read different spacing requirements, and this is what works for me. Push the cloves into the ground to about twice the clove’s depth.

Mulch to insulate it through the winter and also to suppress weeds. You’re in this crop for the long haul—it’ll grow for 8 or so months—and you don’t want to have to weed your garlic constantly.

Pull back the mulch to cultivate once after the stalks emerge in the fall and once after the weeds emerge in the spring.

Garlic wants regular watering to get established and again in the spring as heads are growing.

How to Harvest Garlic

Harvest is generally in June around here.

Wait until the bottom two leaves on the plant have died. Test-dig a garlic head to see how it looks. The skin will be pliable. You want to see a head with individually formed cloves and skin running between each clove. If your garlic head looks more like an onion, with one big head but no cloves, give the crop another couple of weeks. (Eat the head you dug—it will be delicious.)

You’re going to want to try to pull up the garlic by its top, but save yourself the frustration. You’ll pull the tops off more heads than not, and you need the tops to cure the garlic properly.

Instead, use a digging fork about 1 foot away from the plant to loosen the soil. The whole plant, head and all, should come up easily.

Sort through your garlic heads to separate out the largest—save these for planting next year—and any that are damaged (use these first).


Read more: Read more about harvesting and curing homegrown garlic.


How to Store Garlic

The curing process is important. I’ve done this several ways and will explain my preferred method.

After harvest, knock off mud clinging to the head. Don’t hose them off, though.

Cut the stringy roots off the bottom of the head. Be careful to not cut the bottom of the head itself.

Make bunches of six or so garlic stalks, and tie one bundle on each end of a piece of baling twine. I use a slip knot so the bundles remain secure as the garlic dries.

Hang each piece of twine from the rafters of a barn or garage—someplace dry with good airflow.

I leave mine hanging until I need them or the first frost arrives in the fall—whichever comes first. After this, move them to mesh bags or baskets in a cool, dry place in your home, out of direct sunlight.

How to Eat Garlic

I’d probably have an easier time writing about the dishes in which I don’t use garlic. It’s likely you’ll find me adding an additional clove to what the recipe requests. Garlic improves nearly everything, including bread, simple roasted potatoes and salad dressing.

I have even made garlic chocolate chip cookies.

Give garlic a go in your garden this fall. You’ll have aromatics to flavor your meals, protection from blood-sucking monsters and an excuse to make this cute yucca leaf basket while you gaze longingly at seed catalogs this winter.