Categories
Crops & Gardening Homesteading

Store Crops For Winter With Dehydration Techniques

Dehydration is a great method of food preservation, with many advantages. The finished product requires less storage space, and it doesn’t require the attendant electricity of using a freezer or the quantity of special equipment needed for canning.

Though it may not be the best way to preserve everything, there are times when you can’t beat its usefulness. The method comes in particularly for:

  • A large harvest from the garden
  • Preserving a crop that has an especially brief season or is costly out of season
  • Any occasion when dehydrated produce is either a useful food-prep timesaver or helps to produce a superior eating product

After covering some of the nuts and bolts, read on to see my crop recommendations to use dehydration as a real homesteader helpmate, along with some favorite varieties.

The Basics

Pretreatments

Often used on produce destined for dehydration, pretreatments are desirable because produce is being “degraded” by enzymes during dehydration and in storage. Pretreatments act to slow enzymatic activity, thus preserving color, flavor, texture and nutrients.

Fruits can be dipped into a variety of preparations. (See “In for a Dip,” at bottom.) Almost all vegetables—onions, sweet peppers and mushrooms being a few exceptions—should be blanched after they are sliced.

As well as preserving quality, blanching shortens drying time by softening tough tissues that would otherwise prolong it. Blanching times are similar to those used when freezing vegetables. It’s important to remember, whether dealing with dipped fruit or blanched vegetables, to blot dry before you begin dehydration so that there is no extra surface moisture.

Drying & Storage

Different foods dehydrate to different levels. Vegetables are not fully dry until they are either brittle (such as green bush beans) or leathery (beets, for example). Fruits, on the other hand, may end as pliable, leathery, leathery and sticky, or leathery and crisp when fully dehydrated.

You will want to find a listing for each fruit and vegetable so that you know what to look for.

To further protect their quality, store your dehydrated foods in airy, cool locations. Anywhere from 50 to 60 degrees Fahrenheit is optimal. Also, long-term storage should be in a darkened room or cupboard, though tinted jars allow for short-term storage in lit areas.

Dehydration or Rehydration

Some enthusiasts will rehydrate vegetables and serve them as a simple side dish, returning them to a fairly good equivalent of their previous appearance and flavor. Maybe you would like to try roasted asparagus tips in November?

It requires 1 1/2 cups of boiling water to rehydrate a cup of dehydrated produce. Vegetables absorb all of the water they can in two hours or often less, while fruits require at least two hours or may be left overnight for full absorption.

You should note that adding salt, sugar or spices to your rehydration water can interfere with absorption and should not be done—at least not until the later portion of your soaking process. Rehydration can also be done with an electric steamer, or it can take place while cooking in a dish, such as a soup, stew or casserole.

Many believe the winter soup pot the ideal way to use dehydrated vegetables and, with it, will make use on everything from broccoli to summer squash. Dehydrated fruits are universally popular whether they remain dehydrated or are eaten re-hydrated or cooked.

Dehydrated foods can be further processed to make them ready for use. Garlic, onion, hot pepper and tomato are good candidates for grinding into powder with a food processor or blender, then using as a spice or secret ingredient. Fruits can also be treated in this fashion.

This year, I used some dehydrated strawberries to make “fruit flour.” With the addition of milk and eggs (and heat), we should be making some tasty strawberry custard this winter.


Read more: Read some tips for dehydrating and rehydrating produce using a wood stove


Herbs

Many herbs are simple to grow and simple to dehydrate, whether you are after the leaves (most popular), flowers or seeds of the plant. Plus, they make a great difference when cooking.

The plant oils that make herbs so wonderful are at their peak just prior to a plant flowering, making this the best time to harvest leaves. This is often a brief period of time, which is why they are such great candidates for dehydration.

Dehydrated herbs shouldn’t be crushed during storage, as this will release precious oils and lead to quality deterioration. Also, they may be stored individually or as a mixture (such as a bouquet garni), which will create an even more distinct, delicious flavor for your food.

Varieties: Use peppermint and tulsi for tea; oregano, marjoram and thyme for cooking

crops vegetables dehydration
Veronika S/Shutterstock

Apples & Other Fruits

At harvest time, you may pick apples from your own orchard or look for them on sale at quantity discounts. But not all apples store well into the winter, or you may run out of space. This is the perfect time to dehydrate!

They can be cut into rings, slices or cubes, depending on what you intend to do with them. We cube ours so they are ready to be rehydrated and added to cakes, cookies, breads or hot cereal.

Though apples are a great choice, you need not limit your dehydration to them. Strawberries or blueberries? Peaches or cherries? Sea buckthorn?

Varieties: The heirloom Wolf River is a favorite of ours as it is a very large, soft-fleshed fruit that doesn’t store well. However, try others, especially with a soft flesh (e.g. McIntosh) or poor long-term storage (e.g. Golden Delicious).

Mushrooms

Whether in a controlled environment, field production or being grown from kits, mushrooms tend to come in flushes. And it’s amazing how little space they require once dehydrated.

In cooking, they function well as sponges and can be used to your advantage if you have a soggy spaghetti sauce or gravy that you wish to thicken up. Let your mushrooms pick up the slack.

Varieties: Try button and shiitake.
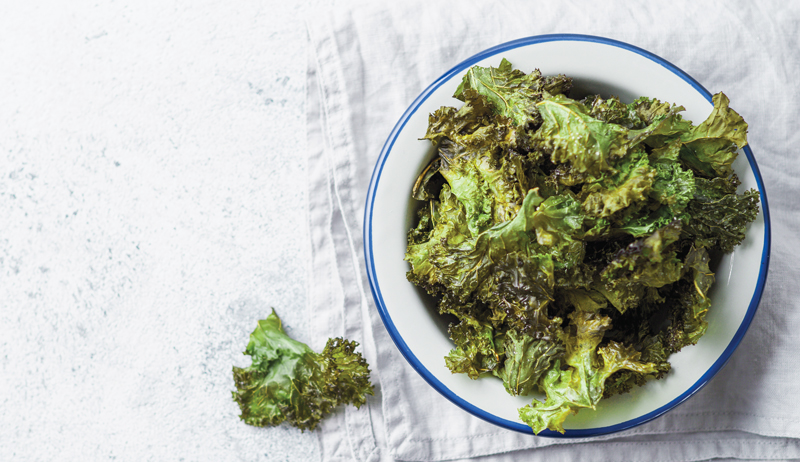
crops vegetables dehydration
Fascinadora/Shutterstock

Kale

There always seems to arrive a time when you are busy eating all of the “new” crops in the garden, but the reliable kale is still growing. It’s wonderful to have this leafy green on hand in winter. We find it’s a cheering as well as a nutritious addition to soups and stews.

Additionally, it absorbs excess moisture from your recipe and makes for a thicker bowl of goodness. Casseroles are another excellent dish for your kale to ultimately adorn. You can also steam it on its own.

Varieties: Start with Winterbor and Redbor.

Carrots

Dehydrated carrots occupy a special place of importance to us as one of the ingredients in our homemade chicken broth. Chicken broth isn’t usually a final food product but a step on the way.

It’s a real benefit to take advantage of any time-saving options you can for such preliminary work, and dehydrated carrots can simply be poured right to the stockpot. Even though they are a crop that stores fairly well, dehydrated carrots store longer!

Varieties: Try Bolero, Mokum and Purple Haze.


Read more: Grow your own carrots for a flavorful treat.


Celery

Dehydrated celery also stores longer. We use so much celery in soups, stews and salads. Being able to preserve what we grow in summer for winter and spring use is a great way to save money.

And if you use your dehydrated carrots, celery, onion, garlic and herbs to make your chicken broth instead of beginning with everything from scratch, it will be a snap to bring it all together.

Varieties: Try any you like, but it’s a great use for Redventure or any celery that is struggling to be succulent.

Onions

Your reason to dehydrate onion depends on the type of onion. Sweet onions have a relatively short shelf life. Cooking onions have excellent storage, but space limitations may come into play. 

Even dehydrating part of your harvest will help. Really, you’ll be able to store onions of any kind longer through dehydration and can avoid having to buy them. Plus, dehydrated onions are convenient on a busy day and so very nutritious. Tthey should be used often and generously in cooking.

Varieties: Use any globe-type that you wish to have stored in a small space! But don’t stop there; I dehydrate leeks, scallions and shallots as well.

crops vegetables dehydration
StockImageFactory.com/Shutterstock

Garlic

Again, garlic stores very well, so why would you dehydrate it? There are some varieties of garlic that don’t store well for extended periods. You may want to save them for later use by dehydrating them.

Additionally, if you aspire to supply your own garlic for the entire year, it will help to switch to the dehydrated garlic supply when the following June arrives and almost all garlic is getting a bit soft.

However, I dehydrate garlic for a very particular reason: to make my own garlic powder.

You might think that garlic powder is easy enough to buy and there is no need to make your own. You’ll change your mind the first time you try your own!

Varieties: Hard-neck varieties don’t store as well as soft-neck and could be used preferentially, but any garlic you have in abundance is the one to dehydrate.
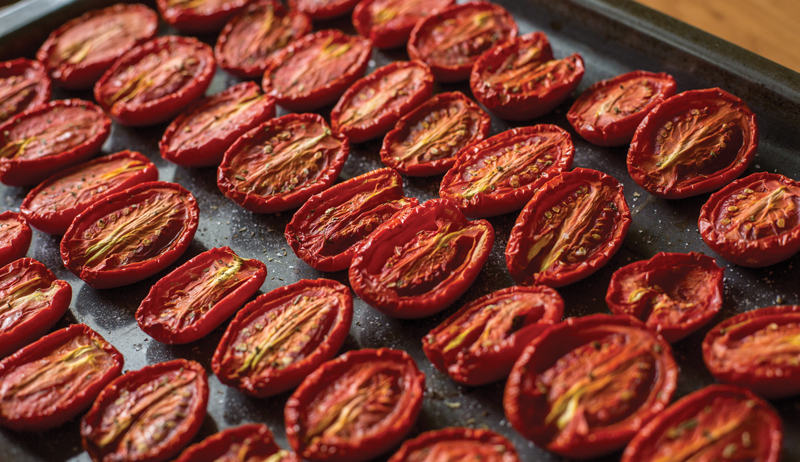
Tomatoes

We dehydrate tomatoes solely in order to pack them in oil, and they are one of the more labor-intensive dehydration products we make. But they are wonderfully sweet and super nutritious, superior on both counts to any tomato you will find out of season. (And they cost less).

Use them in vegetable or pasta salads, on garlic bread, in sandwiches, cooked into a sauce, or wherever your imagination takes you. Our stored tomatoes are kept until there is a need to revitalize winter fare with a touch of the late summer harvest.

Varieties: Principe Borghese, an Italian heirloom cherry tomato that resembles a tiny paste tomato, has few seeds, little juice and a thick flesh. It’s the only tomato we dehydrate.


Read more: You can make your own sun-dried cherry tomatoes at home!


Hot Peppers

Cayenne powder, chili powder or even chipotle powder (if you feel like smoking some jalapeños) can all be produced in your home. If you frequently use these nightshade-derived spices, I highly recommend you give this a try.

Those who grow hot peppers know that production is what they thrive at, giving you lots to work with. Thinner-skinned peppers such as the cayenne will even air-dry readily.

Varieties: We grow a special heirloom pepper called Siberian Home, which makes a great stand-in for store-bought hot sauce once powdered.


Your dehydrating pursuits can be involved or simple. You can purée fruits to dehydrate as fruit leather, make beef or fish jerky, or simply stick to the spice rack with herbs, alliums and hot peppers.

Don’t be afraid to try things. I have read that dehydrated basil and parsley are of “disappointing” quality, but my spaghetti sauce and chicken noodle soup (with chicken broth) would lose tremendous flavor without them. So see what works for you.


Sidebar: In for a Dip

There are a few options with dips that pretreat fruits for dehydration. In all cases, place the fruit into the dips as quickly after slicing or chopping as possible. The dip options are:

Salt Water Dip

Combine 6 tablespoons of flaked pickling salt with 1 gallon of lukewarm water. Soak the fruit for no more than 5 minutes, or it will develop a salty taste.

Ascorbic Acid Dip

Combine 2 tablespoons of ascorbic acid crystals or powder with 1 quart of lukewarm water. Remove the fruit 1 or 2 cups at a time.

Fruit Juice Dip

Use 1 quart undiluted pineapple juice or 1 quart lukewarm water into which 1/4  cup lemon or lime juice has been stirred for this dip. Soak fruit for 5 to 10 minutes. This is a popular option for peaches and apples.

Honey Dip

Into 3 cups of hot water, combine 1 cup of sugar, and additionally 1 cup of honey when the mixture is lukewarm. Remove the fruit 1 or 2 cups at a time.


Sidebar: Technique Tips

Air drying, sun drying, convection ovens and dehydrators can all be used to dehydrate. Each method has pros and cons.

Air Drying

Used mainly for herbs (leaves, flowers, seeds), air drying is simple and cheap. Hang your materials indoors in an airy, warm, dry location out of direct sunlight. Paper bags can be used to cover your product and keep debris off it, if needed. There are some challenges, however.

Sun Drying

Inexpensive and simple, sun drying is simply leaving your product (vegetables, fruits or herbs) in the sun to dry on racks built to allow for good top and bottom airflow.

The downside to sun drying is rather substantial. It’s unpredictable and uncontrollable.

Humid air conditions greatly hinder this method, fluctuating daytime temperatures prolong it, and nighttime critters and morning dew make it necessary to move your setup (which should be insect and bird-proof) inside and out again until dehydration is complete.

Convection Oven

Though this option offers an even temperature and has none of the “dangers” of being outdoors, ovens have poor air circulation and require you to leave their door ajar in order to use a fan to blow the moist air out.

Dehydrator

This is the most costly option. Though many dehydrators are energy-efficient, it’s the greatest investment in specialized equipment. However, it offers even temperature and great air flow (thus, consistent results), and extreme convenience, as it can run all day whether you are in or out of the house and overnight as well.

This article originally appeared in the September/October 2020 issue of Hobby Farms magazine.

Categories
Animals Beginning Farmers Large Animals

Healing From Invisible War Wounds At Little Mountain Ark Farm

“My husband and I are both disabled combat veterans and suffer from post-traumatic stress disorder,” says Jennifer Woolwine, the founder of Little Mountain Ark Farm in Virginia’s Blue Ridge Mountains.

Woolwine and her husband originally considered moving to Florida when her brother-in-law persuaded them to check out a horse farm for sale in Virginia surrounded by 6,000 acres of national forest.

“The farm had gorgeous green rolling pastures and hills, with views of the Blue Ridge Mountains,” recalls Woolwine. “There were apple, cherry and pear trees with a large riding ring for horses.”

Overwhelmed by a feeling of peace and serenity, Woolwine says the two veterans “knew right away that the farm was where we were meant to be.” Since embracing farming life, Woolwine has also taken to documenting the daily operations of Little Mountain Ark Farm on her Instagram account.

We spoke to Woolwine about living with peafowl and caring for donkeys. We also heard the inside story on the farm’s herd protector named Rocky.

Healing From War Wounds

https://www.instagram.com/p/CGNHDing8ou/

Woolwine says that Little Mountain Ark Farm has become a “sanctuary.” She credits moving to the farm with playing “a pivotal role in healing from invisible wounds of war.”

She adds that, one day, they hope to share the Little Mountain Ark Farm experience with other disabled veterans.


Read more: Combat veterans play an important role in restoring heritage chicken breeds.


Getting To Know Peafowl

https://www.instagram.com/p/CGANmRxASon/

If you check out Little Mountain Ark Farm’s social media accounts, you’ll notice that the venture involves raising some particularly vibrant looking peafowl. The birds live in their own coop that features various roosting spots and a spacious amount of room to roam.

Woolwine calls the animals “easy keepers” to care for, and feeds them a mix of all-flock pellet food, sunflower seeds, scratch feed, black oil sunflower seeds, cat food and wild bird food.

When Peafowl Mix With Other Animals

https://www.instagram.com/p/CEVBvLdAOqF/

“Our peafowl get along great with our chickens and ducks except when the peahen was laying,” says Woolwine, when asked about how the birds integrate with the other animals on the farm. “She became very protective of her nesting area and would chase the other animals out.”

Introducing The Farm’s Donkeys

https://www.instagram.com/p/CF9q_qKgLDJ/

Alongside peafowl, Little Mountain Ark Farm also hosts a drove of donkeys. “I had zero experience with equines,” recalls Woowline. “However, I was fascinated by donkeys’ big ears and their charismatic personalities.”

Woolwine characterizes her donkeys as “companion pets,” but mentions that they also take on a role as “guardians against predators such as coyotes, foxes, raccoons and possums.”


Read more: Animal breeds can play an important therapeutic role in mental health.


Living With Social Donkeys

https://www.instagram.com/p/CEPCZdugW8b/

When it comes to the personality of Little Mountain Ark Farm’s donkeys, Woolwine calls them “very social animals” and says that they get along well with other equines.

“They love to roll in the sand and play and they form extraordinarily strong bonds with other donkeys and other animals,” she explains. “Once you gain your donkey’s trust, it will strengthen your bond even more. Donkeys have hilarious personalities, and we really enjoy having them on the farm.”

Let’s Meet Rocky

https://www.instagram.com/p/CEt18HRAQTD

Rocky is a donkey who’s become the herd protector at Little Mountain Ark Farm. “He takes his job very seriously,” says Woolwine. “His trust took the longest to gain, but it was so worth it. He is a big old softie and loves butt scratches and will smile for the camera.”

If you were wondering, Rocky’s favorite treats include iced oatmeal cookies.

Follow Little Mountain Ark Farm at Instagram.

Categories
Animals Poultry

Get A Gumball Machine To Dispense Chicken Treats

Treats! All God’s children love treats, especially when those children are backyard chickens. They love them some treats. And you love giving them treats. Admit it. Which begs the question: How to store treats so they’re always handy? And the obvious answer: Store them in a backyard chicken treats gumball machine.

This idea had been bouncing around in my head for a while. A colleague owns a retail nursery with a very large garden pond. A rocky waterfall aerates the pond for hordes of koi. There’s a dock on the shore.

On the railing of the dock there’s a gumball machine. And the gumball machine harbors fish food pellets. The koi flutter up to the dock as soon as they hear the clacking of the turnkey on the gumball machine.

I asked myself if I could do that with my chickens and have a dry, secure place to store treats outside, near them but not in the coop. If that gumball machine full of fish food could hold pellets made for fish, certainly they could hold dried mealworms, perhaps old garden seeds and even scratch.


Read more: Build a vending machine feeder for your flock with these simple instructions!


Gumball Machines

The first vending machine didn’t hold gumballs. It dispensed holy water in Egypt more than 2,000 years ago. The coin-operated machine was invented by a Greek fellow in Alexandria with the classy name of Hero. He also invented the first machines (toys really) to use steam and wind power to move objects.

A couple centuries later, the Romans figured that if people would pay to get some holy water, they might also pay to get rid of some not-holy water and came up with the pay toilet.

In the 1600s, the English recognized the value of addiction and fashioned small brass machines that swapped your coins for tobacco. Two hundred years ago, London bookshop owner Richard Carlisle recognized the value of temptation and created a vending machine that offered banned books.

In the late 1800s, the English took a turn for the pedestrian and concocted modern vending machines that dispensed gum, envelopes, postcards, paper, etc.

By the 1880s, vending machines were showing up on subway platforms in New York City selling gum. Candy-coated spheres that we know as gumballs rolled into history in 1907. But sometimes, even gumball machines were determined to be illegal temptations.

During the Prohibition Era, gambling was also outlawed. Gumball machines that returned every tenth penny to a buyer were ruled to be “gambling machines.”

Nowadays, snacks, drinks, candy and gum dominate the American vending machine territory. But that doesn’t mean you can’t also get e-gadgets, lottery tickets and even fish bait from these machines. Japan really got innovative with vending machines. Drop some coins or slide a credit card for your sushi, sake, batteries, beer, flowers, fresh fruit and vegetables.

But nowhere have I seen a chicken treats gumball machine.

chicken gumball feeder
Frank Hyman

Get You One

So, a quick tour of the internet brings you to the Gumball Machine Factory, where I bought the Pro Line Candy Gumball Machine. It looked like the sturdiest and most reliable for outdoor conditions. You can buy them with a tough metal stand, but the ground is uneven near our coop, and I wanted to build a small booth to keep rain, snow and ice off the machine, so the turnkey and key slot couldn’t get frozen or rusty.

I chose the version that doesn’t require any coins to get treats.

When you order it, be sure to specify that you want it with the “candy” wheel. The “gumball” wheel will release too many treats.

If you’re mechanically inclined, you may want to check out a vintage vending machine. There are lots of charming opportunities there. But with some age on them, they may or may not work perfectly in the long run.

Station Location

At first, I thought to put the booth and machine inside the pen. We store a folding chair in there so my wife can visit with the chickens. They sit on her lap—or her shoulder when they’re feeling friendly—while she feeds them treats and hears about their day.

But they might be in the corral. Or they might have escaped from the corral. Or when they’re in the pen, we might not want to get our shoes mucky.

The optimal spot turned out to be hanging it outside the hen pen but right by the gate so we can fill up a bowl on our way in to visit our hens.

Booth Building

Finding everything I needed to build a booth for the my chicken treats gumball machine and mounting it only required making three stops. But all of them were on my property, so it only took a few minutes:

  1. I found a flimsy wooden crate the right size hiding in our attic.
  2. Scraps of 3/4-inch plywood would stiffen up the bottom, back and top of the crate. They were neatly stacked in the garage.
  3. A scrap of copper roofing, scavenged from a friend’s job site, had been waiting patiently for a decade in the shed behind the garage for its starring role.

Throw in some screws and a few copper nails from my bins of fasteners to hold everything together, and I had the makings of a booth without spending a dime.


Read more: Check out these 5 recipes for homemade chicken treats.


Build Your Own Booth

You may have a different size machine, or you may be handy and have your own idiosyncratic stash of building supplies. If so, here are the basic issues you’ll need to address.

  1. Make the floor about 4 inches wider than the base of the machine, so you can reach both hands around it when you need to remove it.
  2. Make the three sides at least 8 feet higher than the machine if you want remove the lid and refill it without taking it out of the booth. If you don’t mind moving it each time to refill it, you still want about 3 inches of space between the roof and the top of the machine so you can leave the key that opens the top in place. That’s better than searching for it in the house each time you need to refill it.
  3. Make the roof at least 3 inches deeper than the floor so it overhangs the open front side and keeps precipitation out.

If you get the same machine as I’m using, then you will want the floor to be 10-by-14 inches. The two sidewalls would be 10-by-24 inches. The back wall would be 14-by-24 inches.

The roof would be 14-by-14 inches. Three-quarter-inch plywood will be sturdy enough. You don’t need a huge sheet of plywood. You can buy sheets of plywood that are 1-by-2 feet, 2-by-2 feet or 4-by-4 feet.

Screw the five pieces of plywood together with a dozen 1 1/2-inch screws. Cover the plywood roof with scraps of roofing tin, roof shingles and a handful of roofing nails. If using metal roofing, you’ll need to predrill some holes through the metal.

Whatever material you use, make sure the roofing extends about an inch beyond the front and sides of the booth to shed rain. A couple coats of paint in and out will protect the wood.

chicken gumball feeder
Frank Hyman

Mounting Advice

Find the spot where you want to mount the booth. Ours is on a post close to the gate to the hen pen, but it doesn’t conflict with the gate when it’s open. We chose a height that made it easy for children to turn the dial and catch the treats.

With one person holding the booth, another person can draw a line on the post to mark the bottom of the booth. Any scrap piece of rot-resistant wood about 6-inches long can then be screwed to the post. The top of the scrap should align with your pencil mark.

Two screws will keep the scrap wood stable. With the scrap in place, you can rest the booth on it. While your helper holds the booth upright, drive three 3-inch screws through the back of the booth and into the post. It’s not going anywhere.

Fill the gumball machine with chicken treats and place it inside the booth so that the chute extends just beyond the floor, making it easy to catch the treats in your hand or in a bowl that can be stored on its side (so it doesn’t hold rain) next to the machine.

Presto! You now have a treat-friendly chicken habitat.


Sidebar: Get a Gumball Machine

If you want to get a gumball machine for your chicken treats, check out these online shops.

Gumball Machine Factory: This online shop sells the gumball machine I used, as well as a machine that holds rubber chicken slingshots!

eBay: The Collectible Vending Machines category on this popular small-business site has vintage machines that dispense just about anything.

This article originally appeared in the July/August 2020 issue of Chickens magazine.

Categories
Poultry

5 Essential Chicken Feed Nutrients For A Healthy Flock

As poultry keepers and small-flock owners, we hear a lot regarding the importance of providing our chickens with nutrition for their specific stages in life. We read about how we need complete feeds with scientific formulation. We know the importance of offering chicken feed with the right balance of nutrients necessary for proper development.

But what exactly is it that we are balancing?

Most of us barely know what we as humans should eat to stay healthy! To help you better understand what goes into … well, into a bird, here’s a summary of the five essential components that comprise most commercial complete feeds.

Carbohydrates

Carbohydrates—compounds consisting of carbon, hydrogen and oxygen—are the biggest building block of your chicken’s diet. They also serve as the main energy source for your flock.

Typically sourced from barley, corn, millet, rye, wheat and other cereal grains, these chicken feed nutrients break down into two forms:

  • digestible (starch and sugar)
  • indigestible (cellulose, also known as crude fiber)

Crude fiber may assist with maintaining intestinal health. But an overabundance of it in a chicken’s diet can stunt growth and lead to digestive issues.


Read more: Also check out this quick breakdown of the essential nutrients your flock needs.


Proteins

Proteins—compounds consisting of amino acids—are essential for the development of muscles, skin and cartilage. Laying hens require these nutrients in their chicken feed to create the whites for their eggs, while molting birds draw on protein to regrow and replenish the feathers they have lost.

During digestion, proteins break down into amino acids, which then absorb into the blood. As with carbohydrates, there are two types of amino acids:

  • nonessential (generated by a bird’s body)
  • essential (not produced in the amounts needed for the bird to live and grow)

More than 20 amino acids are found in feed. Of these, half are essential, including methionine and lysine, which are crucial to egg productivity and overall health.

Since no single protein serves as a source for all of the essential amino acids a chicken requires, poultry feed consists of a variety of vegetable proteins, including soybean meal and corn gluten. Occasionally, manufacturers use animal-based proteins such as bone meal and fishmeal in chicken feed. The latter, however, tends to produce a fishy flavor in poultry meat and eggs.

Feeds also contain supplements of lysine and methionine, to prevent deficiencies which would adversely affect a flock.

Fats

Fats consist of fatty acids, which are essential for cell-membrane health and the production of hormones. They are also nutritionally required for the absorption of vitamins A, D, E and K. Manufacturers use them to improve the flavor of chicken feed and as a concentrated source of dietary calories, especially for meat birds.

Beef tallow, pork lard and poultry fat are frequently used in feed as fat sources while corn oil, canola oil and soy oil are usable but, due to their high costs, not economically feasible. There are many different fatty acids, but the most crucial one is linoleic acid, an essential fatty acid that poultry cannot produce on their own.

Researchers have determined that the fatty acids found in the yolk of an egg are influenced by the fatty acids in a hen’s diet. Too high a level of omega-6 fatty acids can result in cardiovascular disease, rheumatoid arthritis and cancer in humans consuming these eggs.

Flaxseed and camelina, which are rich in omega-3 fatty acids, are healthier for layers and for those consuming their eggs.


Read more: Want more like this delivered to you inbox? Sign up for our email newsletter today!


Vitamins

Vitamins—organic compounds essential for regular body function, growth and reproduction—are classified into two categories: fat-soluble vitamins and water-soluble vitamins.

For proper development of skin and internal tissues, bone development, blood clotting and egg-shell production, chickens need the fat-soluble Vitamins A, D, E and K.

The water-soluble B Vitamins (including biotin, niacin, riboflavin and thiamin) are essential for metabolism.

Poultry produce their own Vitamin C and absorb Vitamin D from sunlight. All other essential vitamins must be supplied by poultry feed to avoid deficiency-driven diseases and disorders.

Minerals

Birds use minerals, or inorganic compounds, for:

  • skeletal, eggshell and blood formation
  • muscle function
  • digestion
  • other chemical reactions

Grains contain little in the way of such essential minerals as calcium, sodium, potassium, phosphorous, iron, chlorine and iodine. So producers supplement commercial feeds with mineral-rich ingredients. These include limestone, oyster shell and bone meal.

Mineral deficiencies can drastically affect a chicken’s development and vital functions, resulting in stunted growth and flock mortality.

Categories
Crops & Gardening Equipment

Don’t Wait To Figure Out Your High Tunnel Irrigation System

In 2016, my family began what was then the largest project on our farm: a high tunnel measuring nearly 2,100 square feet. We estimated that completing the project would take many months. However, building the structure was only the beginning of finishing the high tunnel.

If you’re new to growing in protected space such as greenhouses and high tunnels, such setups can become your most profitable and productive ground if you manage them well. The first year, using around 600 to 800 square feet of our tunnel, that small space outperformed 3,000 square feet of field space.

Twenty-four bell pepper plants in the tunnel produced more than twice the yield as 48 plants in the field. The potential benefits of protected growing spaces include higher and better yields, less disease and pest pressure, and far greater profit per square foot.

That said, such spaces present distinct challenges, including irrigation. By nature, such a space requires either manual or automated irrigation. The type of irrigation you use in a high tunnel depends on a number of factors, such as:

  • What crops do you plan to grow?
  • Do you plan basic irrigation or also fertigation (adding nutrients to the irrigation water)?
  • Will you use well or city water?
  • What water regulations apply to your operation regarding food safety?

Here are some lessons we learned from constructing our high tunnel.


Read more: Here are some reasons to consider getting a greenhouse of your own.


Irrigate Properly

Our first tip: Include irrigation in your high tunnel build and budget. For us, a high tunnel was a big project. We have no heavy equipment and very little flat land on our farm. The best place to site our tunnel happened to have six old concrete footers that needed removal.

The tunnel is a bit larger than our current house and had rocks in the way as well. (We have rocks in the way of everything on our land, the kind of rock that not even a rock breaker can bust).

We got so wrapped up in the tunnel that several related matters, such as irrigation, fell off our radar. Fortunately, the site had a hydrant inside the footprint of the tunnel. While not ideally placed, it meant we had water in the tunnel, which is part of why we didn’t spend too much time thinking about irrigation beyond “We know we have water.”

If you don’t have a water source such as this, include water in your plan. It’s far easier than getting water in after the tunnel is built. Water comes first, and the structure itself, second.

We plan to move the hydrant to a location that lets us make full use of the tunnel. We should have done this earlier when we had equipment on site, so learn at our expense of future hand labor. Getting a machine in there now isn’t an option and would disturb our growing beds and much-improved top layers of soil.

high tunnel irrigation greenhouse watering
John Moody

Options

A reliable water supply is only one part of irrigating a protected growing space. Our next tip? Know that your crop choice, layout and weed-management approach affect irrigation options.

With our high tunnel, I originally dreamed of creating a highly mixed environment of a dozen crops. The first year, I planted “blocks” of various plants to see how they did compared with field counterparts and for the benefits of diverse plantings.

Unfortunately, this approach made laying irrigation just about impossible. Each block was composed of plantings with different layouts and spacing and water needs—potatoes next to ginger next to peppers next to fennel next to tomatoes.

While the blocks were productive, they required almost daily—and sometimes twice daily—time-consuming hand watering.

The zones are best to run longways. When choosing what to plant in each zone, consider issues of sun and shade that a zone or block might create for adjacent plantings.

I previously wondered why many high tunnel growers plant only a few crops at a time. But after a few years, it makes sense. It radically simplifies management and irrigation.

However you decide to use your high tunnel, a few things will help ensure you avoid certain pitfalls and mistakes.

Go Visit

Find a few successful high tunnel growers in your area and visit them. Honestly, this is probably the most important thing you can do before you build as well as afterward, during layout, design and similar tasks.

Local is best. What works for people in other regions and climates might not work for your operation in your region and climate.

No Limits

Don’t limit yourself to what others in your area are doing. But at the same time take advantage of the wisdom and experience that established growers can share. High tunnel growers are now everywhere, so finding a few to visit within an hour’s drive should be relatively easy.

Book It

Read a few good books on high tunnel growing. While this is a sparse category, I recommend The Greenhouse and Hoophouse Grower’s Handbook: Organic vegetable production using protected culture by Andrew Mefferd and The Year-Round Hoophouse: Polytunnels for all seasons and all climates, by Pam Dawling.

Plan on Paper

Once you know what you want to grow and how, compose some possible layouts, and include all parts and pieces—weed fabric, paths, irrigation. This will force you to see and plan for what’s needed.

Your choice of weed management—mulches, geotextiles, cultivation, flame weeding—will affect your irrigation setup. Plastic irrigation pipe doesn’t play nicely with cultivation or flame weeding. Laying geotextiles requires that you first commit to a particular planting layout and to first lay the appropriate irrigation setup.

Once it’s in place, it’s difficult to change for that growing cycle or season. Living mulches might increase watering needs. Weigh and consider each option for how it will affect your irrigation system.

high tunnel irrigation greenhouse watering
John Moody

Be Prepared

Our third lesson: Get irrigation operational as soon as you can. Irrigation needs to go in with or before the plants, preferably before. Running irrigation after plants are established is not user-friendly.

Depending on your weed-management approach, your high tunnel management will go something like this:

  1. Plan crops.
  2. Purchase weed control and appropriate irrigation for plant and weed-control approach.
  3. Set up irrigation at right spacing and intervals.
  4. Lay weed control measures.
  5. Plant.

Notice that planting comes last, but it’s the first choice you must make because all other options depend on it. The spacing, types and mix of plants—all this drives what kind of irrigation you employ and how you set it up.


Read more: How can you control pests in the greenhouse? Here are some tips.


System Requirements

The most basic approach to watering plants involves drip tape. It’s nothing more than polytape with spaced slits that allow water to escape. Many other options exist, though, including sprinklers, spikes, tapes and wobblers.

The question becomes: Is it worthwhile to complicate the simplicity of drip tape? Even if you use a bit of extra water with drip tape versus some other method, is that small bit of water savings worth the extra setup, cost and possible complications?

It’s worth figuring out before you spend extra money for a specialty system.

Setting It Up

Setting up and taking down irrigation takes more time than you might expect, but it saves so much time over the growing season you won’t care.

Installing irrigation isn’t difficult. You need no special skills for basic or even intermediate systems. However, it does take time and a number of basic tools, especially a good knife or similar tool to cut pipe and drip tape.

Like many farm tasks, it’s much easier with two sets of hands, so a helper makes it go faster and easier. It’s best to get everything set up during a less busy season—such as late winter or early spring—rather than deferring it to busy late spring.

Also note: Depending on a number of factors, irrigation goes up and down. If you are no-till or just cultivating, sometimes you can get away with rotating crops through beds without having to move or pull all your irrigation.

high tunnel irrigation greenhouse watering
John Moody

Other Factors

Our farm’s water is very hard, so our irrigation water adds a fair amount of mineral to the soil inside the high tunnel. We factor this irrigation factor into the overall fertility and amendment program for our tunnel.

Also, the hard water can clog certain types of irrigation equipment and build up in the lines. We might eventually switch to rain catchment water if the well water creates too much trouble. Because it’s well water, testing for contamination—especially bacterial—is important.

For some growers, testing might not be enough, and a filtration system (such as an inline UV setup to disinfect) might be necessary. The crop might also determine which setup is best or required—leafy greens and similar raw vegetables or items commonly consumed cooked?

Depending on such issues, the rather simple task of keeping your plants moist might become a bit more complicated.

Sort out all these questions and issues during your original planning stage for the tunnel. They’re easy to miss or otherwise minimize or overlook. While addressing them all might slow you down slightly on the front side, it stands to save you a lot of head, heart and pocketbook ache on the backside of the build.

So take the time for due diligence while you plan your tunnel so you can realize all the benefits that one adds to any farm or homestead as quickly as possible.   

This article originally appeared in the July/August 2019 issue of Hobby Farms magazine.

Categories
Equipment Farm Management

A Wildlife Camera Has Many Uses On The Farm

Looking to have some farming fun while simultaneously adding a useful new tool to your collection? Look no further than a wildlife camera.

These simple devices go by many different names—trail camera, remote camera, game camera, etc. But they all describe the same item: a weatherproof camera designed to automatically record pictures (and even video) without human supervision.

Design Basics

Overall, their design is straightforward. A typical wildlife camera is powered by batteries and installed in an area of interest, perhaps overlooking a pond or secluded section of forest. The camera uses motion and/or heat sensors to detect wildlife and record their actions.

Advanced models feature solar panels to recharge their batteries and a cellular connection to upload photos directly to cloud services. This can save you the trouble of frequent camera maintenance.

Time-lapse photography is also possible. These cameras takes pictures at predetermined intervals regardless of whether motion has been detected.

There are many wildlife camera models on the market, and buyers can easily spend a lot of time weighing the merits of details such as:

  • resolution
  • lens quality
  • nighttime flash options (visible light or infrared?)
  • sensor range
  • trigger speed
  • power choices
  • storage options

But rather than get caught up in the nitty-gritty details, let’s ask a simpler question—why might you want a wildlife camera on your farm?


Read more: Here are 4 steps to building a simple, effective garden fence.


Plenty of Reasons

The reasons are numerous.

Perhaps you wish to identify the variety of wildlife traveling your land, not necessarily for hunting purposes (as the “game camera” name implies), but for curiosity’s sake. It can be an enjoyable project to keep a record of every animal your camera encounters.

On my farm, I’ve captured remote photos of deer, squirrels, birds, coyotes and even black bears. Moving your camera to a new location every few weeks will give you a nice cross-section of which animals frequent which locations.

Recording wildlife photos can serve a practical purpose too. Maybe a critter of some sort is raiding your garden every night, but you haven’t been able to identify the culprit. A wildlife camera can capture the invader in action, helping you plan an appropriate response.

Police Traffic

You can also gauge the frequency of wildlife traffic. Perhaps you’re planning to put up a deer fence to protect an orchard, and you know the fence will block a well-worn deer path. Placing the camera along the path for a few weeks will give you an idea of how many deer travel the trail … and if it’s half a dozen every night, you’ll known your fence should be formidable!


Read more: These 5 tips will help you build a better deer fence.


Occasionally, you might want a remote camera for security purposes. Are you concerned about trespassers crossing a hard-to-access border of your property? The far corners of your farm, particularly those running through woodlands, can be difficult to keep a close eye on.

Remote cameras will save you the trouble, especially if they can notify you by cell service when motion is detected. Just be sure your cameras are hidden from obvious view (camouflage models help).

Once you get started with wildlife cameras, you’ll wonder how you ever got along without them. Have fun!

Categories
Animals Large Animals

Goat Health Basics To Keep Your Herd Kicking

“Why do you have goats?” In the 20 years we’ve kept these engaging animals on our hobby farm, my husband and I have fielded this question a lot. People ask if we milk them (no) or if we eat them (no) or if we show them (no). Since a practical answer seems expected, I explain how our current herd of five wethers excel at brush control and tree trimming.

But here’s the real reason: We keep goats because we love them. They amuse us and make us happy, and we try to make them happy, too.

This happiness equation, however, hinges on our thus-far hardy goat herd’s continuing good health. Aside from being more fun to live with, a goat herd with good health performs jobs better, be it blackberry control, milk production or winning ribbons. A sick, injured or (horror!) dead goat? Not so much.

Read on for six important ways you can help your goats thrive, too.    


Read more: Why get goats? The list of reasons is long!


1. Monitor for parasites, then control when necessary.

Parasites are greedy organisms that live on or inside another host organism, stealing nourishment while providing no benefit in return. In fact, they can be quite harmful to your goats.

“Parasite problems are far and away the biggest goat health problem we encounter in our practice,” says Chris Duemler, D.V.M., who has treated small ruminants for 44 years and owns Brodhead Veterinary Medical Center in Brodhead, Wisconsin.

External

Goats can suffer from a number of external parasites, such as biting and sucking lice, keds, ticks and several mite species. Depending on the pest, infestations can irritate and infect the skin, transmit disease and lead to anemia and hair loss. In short, you could end up with some unthrifty and possibly very itchy goats.

A veterinarian can help you identify the culprit and advise on an appropriate treatment, often a topical insecticide.

Internal

Internal parasites affecting goats include tapeworms, liver flukes, coccidia and roundworms such as Haemonchus contortus, the notoriously drug-resistant barber pole worm. Meningeal worm, transmitted in the droppings of white-tailed deer, is also a concern.

While all goats carry some internal parasites, high levels can lead to illness and even death. Signs to watch for are diarrhea, weight loss, anemia, poor coat and/or swelling of the lower jaw. Animals with meningeal worm may stumble or show weakness or paralysis of the hind legs.

According to Duemler, parasite problems vary in prevalence across the country. For instance, the barber pole worm tends to afflict herds more in the warm, humid South than in Wisconsin or my own state of Washington, where winters run colder.

Additionally, control has become more complicated due to the serious issue of parasite resistance to dewormers. Goat raisers should work with a local veterinarian to implement a prevention, monitoring and treatment program tailored to their herd. We’ll talk a little more about preventing diseases—including some caused by parasites—next. 

goat health
Bogdan Sonjachnyj/Shutterstock

2. Shield your herd from diseases with biosecurity tactics.

Chronic, contagious diseases such as Caprine Arthritis Encephalitis (CAE), Caseous Lymphadenitis (CL) and Johne’s disease rank as the next most common goat health issues encountered by Duemler in his Wisconsin practice. Respiratory infections like pneumonia are routine, too, frequently caused by inadequate ventilation in barns over the winter.

Like parasites, prevalent goat diseases can vary from location to location and herd to herd, he says. That said, the list of viral and bacterial diseases capable of sickening our caprine friends is a lengthy one guaranteed to keep a fond goat-keeper awake at night.

The Rogue’s List

For example, CL produces abscesses in the lymph nodes and internal organs. The five main forms of CAE lead to either arthritis, encephalitis, mastitis, pneumonia or chronic wasting. Goats that contract Johne’s disease experience rapid weight loss. Animals with tetanus—caused by a clostridium bacteria entering a wound—suffer muscle spasms and rigidity before dying.

Sore mouth, or contagious ecthyma, produces blistering/scabbing of the lips and other areas. Several diseases can induce does to abort, including toxoplasmosis and chlamydial infections. Young goats are especially susceptible to enterotoxemia Type D (overeating disease), which causes diarrhea, abdominal pain and convulsions.

OK, sorry—I’ll stop.

Keep in mind that a goat herd and flock of sheep will share many of the same health maladies, often transmittable between the two species. Even scarier, some livestock diseases have zoonotic potential. That is, they can be transmitted to humans. Sore mouth and leptospirosis are just two examples.

Take Care

How to ward off these dangerous organisms for optimal goat health?

“The No. 1 way to protect your goats from disease is to keep a closed herd,” Duemler says. In other words, no other livestock come to your farm and your own animals don’t go where they’ll be exposed to other livestock.

“Getting back to parasites as an example—if you bring in an animal from another part of the country that has resistant barber pole worm, you can never get rid of it,” he says. “I see this happen all of the time.”

But what if you need to replace a deceased doe, bring in a new buck, or have your heart set on showing?

“If you do bring any new animals in, have them tested for disease and isolate them for several weeks from the rest of your herd,” Duemler says. “If you’re showing, you can do things to prevent exposure, too. I sign up for an extra tack pen on each side of my goats to prevent nose-to-nose contact with other animals.

“You can also quarantine your show goats when you get back.”


Read more: Learn how to conduct fecal egg counts on your heard to save time and money.


Biosecurity Basics

Other biosecurity basics include keeping your goat’s quarters clean and well-ventilated, sanitizing shared equipment, restricting other livestock-keepers’ access to your herd (their vehicles, too), promptly treating and isolating sick animals, and controlling rodents.

You can also protect your goat herd’s health by vaccinating them yearly for tetanus and clostridium perfringens Types C and D. With few other vaccines approved for goats, though, Duemler recommends talking to your vet about which diseases threaten herds in your area and how to test for and protect against them. Acquaint yourself with the warning signs of illness and get prompt veterinary help when warranted.

If the worst happens and one of your charges dies from a mystery illness, follow up with diagnostic testing and/or a necropsy to determine cause of death. This can help you and your vet formulate a plan to prevent more casualties and heartbreak.

3. Feed your goats the right diet (easier said than done).

Like their fellow ruminants cattle, sheep and deer, goats get their nutrients from plants by digesting them in a specialized four-chambered stomach. Much pickier than their tin-can eating reputation implies, they adore browsing on certain shrubs, trees and weeds, and to a lesser degree on grasses.

Forage and clean, quality hay should form the foundation of your herd’s diet, along with goat-appropriate minerals and an ample supply of clean water. Beyond these essentials, however, deciding on a balanced ration for your animals can be tricky.

Goats are vulnerable to a number of nutritional diseases caused by improper feeding and/or supplementation. What’s more, pregnant or lactating does, kids, bucks and wethers all have different nutrient requirements, as do animals used for different purposes, such as dairy, meat, fiber or pet.

A milking doe, for instance, will probably require calcium-rich alfalfa and supplemental grain to remain healthy and productive. By contrast, a pet wether prone to plumpness will do fine on grass hay.

“I tell clients that wethers don’t need grain after their first winter,” Duemler says.

goat health
Dipson Hamal/Shutterstock

Location, Location

Furthermore, nutrition is hugely local. “Forage in different parts of the country contains different levels of nutrients,” he says. “For example, in our area of Wisconsin, we don’t have to supplement copper, but we do have to provide selenium and zinc.”

Duemler notes that location is also an important consideration in the prevention and treatment of urinary calculi, a painful, diet-driven urinary blockage affecting wethers and bucks. “In the West, raisers deal with oxalate stones because of forage high in oxalate. In the Midwest, struvite stones are a big concern, caused by high levels of magnesium and calcium in our hard water.”

Because no one size diet fits all, Duemler recommends seeking advice from a vet or livestock nutritionist who’s familiar with forage and feed conditions in your area. He also advises regularly performing a hands-on check of each animal’s body condition.

Rutting bucks, for example, can rapidly lose weight.

“I do a lot of necropsies on bucks that don’t have any meat on them,” he says. “If they’re getting way too thin, you need to pull them away from the does and feed them separately.”

Whatever ration you ultimately decide to serve your herd, be sure to avoid any sudden dietary changes. 

4. Give your goats regular hoof trims.

Goats’ hooves grow constantly, just as our nails do. So unless they live 24/7 on rocky terrain like their wild relatives, you’ll need to give your herd regular trims to prevent overgrowth that can cause lameness and predispose them to foot rot.

My husband and I perform this health chore on our goat herd about every two months, but how often you need to tackle this task will depend on your farm’s terrain, your climate and the individual animal.

A stanchion comes in handy for this procedure, as does positive training with treats. If you’ve never trimmed goat hooves yourself, ask an experienced raiser to show you the correct procedure. 


Read more: Here are some tips for trimming goats’ hooves.


5. Prevent accidents & injuries with goat-/predator-proofing.

While I hesitate to describe goats as accident-prone, they are extremely curious, mischievous and agile. This means that accidents and injuries sometimes happen. Still, you can keep mishaps to a minimum by taking some sensible precautions.

Help keep your capricious friends out of the road or a predator’s jaws with sturdy, well-maintained fencing that is as escape- and predator-proof as possible. We prefer a mix of nonclimb horse mesh and heavy-duty stock panels at least 4 to 5 feet in height on our farm.

We’ve learned that keeping our livestock in secure night housing also stymies predators.

Check fences, structures and enclosures regularly for hazards such as exposed nails, loose twine, wire, ingestible items, and holes or gaps that might capture a head, leg or horns. Keep in mind that goats love to “assist” when you’re working. After cleaning up a few too many spilled nails, we’ve learned to banish ours to another enclosure until our job is finished.

Never tether a goat unless you’re right there to watch. This dangerous practice can result in strangulation or limb entanglement, plus make your goat extremely vulnerable to attack.   

Familiarize yourself with plants poisonous to livestock and eradicate them from your farm. Check out this partial list at “Poisonous Plants to Livestock” by North Carolina State University Extension.

To be on the safe side, politely ask neighbors to refrain from feeding yard trimmings to your herd as well.

“A common thing that happens here is people will trim a Japanese yew and toss the branches to their neighbor’s goats,” Duemler says, noting that this tree contains a potent cardiac glycoside. “[In fact,] if a client has one of these trees planted in their yard, I tell them to remove it, because it will eventually kill their goats when they get out.”


Read more: Start keeping goats right with these tips and tricks.


6. Boost your herd’s mental well-being.

Goats are social, playful and intelligent. Like us, they need companionship, room to exercise and a stimulating environment. (Think climbing toys.) Provide for these mental health essentials, and I promise you won’t be sorry.

Cheers to your goat herd’s good health!


Sidebar: Daily Goat Check

goat health
RGtimeline/Shutterstock

Have you taken the time to really observe your goats today? Or did you merely glance at them while speeding through your chores? As we rush through our distraction-filled lives, we might not even realize we’re neglecting this essential task. I know I’ve been guilty of this for sure. But by making a conscious effort to slow down and focus on our herds each day, we learn what’s normal for each individual — and more easily spot what’s not. Bonus: Goats are super fun to watch!

The following signs of illness/injury should raise a red flag:

  • Unusual lethargy or agitation
  • Keeping away from the rest of the herd
  • Eating much more or less than usual. Ditto for drinking
  • Abnormal weight loss or weight gain
  • Swollen abdomen
  • Unusual vocalizations, or vocalizing more than usual
  • Vomiting, diarrhea or constipation
  • Discharge from nose, ears, eyes, teats, etc.
  • Unusual skin swellings
  •  Straining to urinate
  • Tremors, shivering, staggering or paralysis
  • Coughing or other respiratory distress
  • Limping, hunched back posture
  • Bleeding, blood in urine or stool
  • Hair loss, dull coat and/or extreme itching
  • Pale gums or eye membranes
  • Teeth grinding

This article appeared in Hobby Farm‘s Best of Goats 101 2020 annual, a specialty publication produced by the editors and writers of Hobby Farms magazine. You can purchase this volume, Hobby Farms back issues as well as special editions such asBest of Hobby Farms and Living off the Grid by following this link.

Categories
Animals Large Animals

3 Tips For Reducing Cold Stress On Your Dairy Goats

Dairy goats are better equipped to handle the cold better than their caretakers. They prefer the cold to the heat because they naturally grow a thick hair coat, according to Linda Coffey, an Agriculture Specialist for the National Center for Appropriate Technology (NCAT).

Coffey has raised goats for 20 years and has had Saanens and Alpine dairy goats. The bigger problem, Coffey says, is when there is a sudden change in weather.

“If we get a gradual normal winter, the goats get a thick coat and it’s not bad,” she said. “Here in Arkansas it can drop 50 degrees in a day and that can be a problem.”

Goats suffering from cold stress are more susceptible to pneumonia, but that’s not the only challenge. Researchers in Spain also published the 2017 study, “Physiological and lactational responses of dairy goats to cold stress,” which found additional consequences for lactating dairy goats.

The researchers found that dairy goats suffering from cold stress had, “decreased milk production, increased milk fat and protein contents, and incremented blood NEFA and glucose levels despite similar insulin values.”

Coffey encourages farmers to think about their goat’s winter production stage. In the winter, her does are usually dry because they are pregnant.  In late pregnancy, the nutritional needs jump dramatically, and growing kids take up the room available inside the goat.

“The best, most digestible hay needs to be fed early so the does have a chance to eat enough,” she said.  “This is a critical time to set her up for having strong, healthy kids, great quality and quantity of colostrum, and a strong lactation and to avoid pregnancy toxemia, too.”

Here are three tips for reducing cold stress in your dairy goat herd.

Head Into Winter With a Good Body Condition

The healthier an animal is before winter, the better chances they will have for handling cold stress. The body condition score, or fat cover, offers clues to the animal’s energy. In goats, body condition scores are measured on a scale of 1.0 to 5.0 and use .5 increments. According to Michigan State University experts, “healthy goats should have a body condition scoring between 2.5 to 4.0.”

Michigan State University uses the following scores and descriptions as guidance.


Read more: Here are 6 tips to get your goats ready for winter.


Body Condition Score (BCS) Ratings

  • BCS 1.0: The goat is visually emaciated and weak. The backbone is highly visible and forms a continuous ridge. The flank is hollow and ribs are clearly visible. There is no fat cover, and fingers can easily penetrate into the intercostal spaces.
  • BCS 2.0: The goat’s backbone is still visible with a continuous ridge. Some ribs can be seen, and there is a small amount of fat cover. Ribs are still felt, and intercostal spaces are smooth but can still be penetrated.
  • BCS 3.0: The backbone is not prominent, ribs are barely discernible and an even layer of fat covers the ribs. Intercostal spaces are felt using pressure.
  • BCS 4.0: The backbone and ribs cannot be seen. The side of the animal is sleek in appearance.
  • BCS 5.0: The backbone is buried in fat and the ribs are not visible. The rib cage is covered with excessive fat.

“For dairy goats, the main thing is to be sure internal parasites are under control and that you are continuing to offer ample quantities of forage and enough energy to keep them in good condition,” Coffey said.

Provide Good Nutrition

As ruminants, dairy goats rely on the digestion of forage to warm them from the inside out. Increasing their forage rations is key to ensuring they are getting enough nutrition to stay healthy when the temperature drops.

Generally, Coffey’s goats aren’t lactating in the winter because they are pregnant. However, she still increases their ration to ensure they are getting enough high-quality forage.

“Dairy goats don’t have fat like other animals, and they need good quality and enough nutrition to generate heat from processing the forage,” she said. “Dairy goats need to eat 5 percent of their body weight every day. Unfortunately, they can be picky.”

Coffey offers her goats a mixed-grass hay with some legumes, and she top dresses it with a small amount of alfalfa to boost intake.

“Never try to ‘make them clean it up.’ It’s nice if you have other animals that are not as picky and will eat what the goats won’t,” she said.


Read more: Here are some important lessons in livestock from experienced farmers.


Provide Relief From the Elements

All animals need refuge from driving rains and winds. Dairy goats are leaner than other livestock, so it’s critical they have space to escape inclement weather.

Bringing them into a barn works for farms with space to do so. But for others, a three-sided shelter or windbreak made from trees, stacked bales, etc. can suffice.

“I prefer three-sided shelters that are open to the east in my location,” she said. “Everyone needs to see what the prevailing winds are like in their own location. Beware of buildings with a narrow door. That allows a bossy goat to guard the entrance and keep others out in the cold.”

She also recommends a dirt floor, which drains and stays drier than a bedded floor, keeping the animals clean and dry.  If you’re unsure what your dairy herd needs in advance of this winter season, Coffey encourages farmers to call the NCAT help line at 800-346-9140. Staffers answer the line Monday through Friday from 8 a.m. to 5 p.m. CST.

“It is answered by specialists, most of whom are farmers who love to help other farmers solve problems,” she said.

Categories
Crops & Gardening Recipes

Grow Some Collard Greens, Then Try These Delicious Recipes

Collard greens have a long history dating back at least a few thousand years, when people of the northern Mediterranean started cultivating wild cabbage. From that one plant, which most likely originated in Asia before its recorded history, farmers created plants as diverse as the human population.

Broccoli, cauliflower, Brussels sprouts, kale, savoy, kohlrabi and collard greens all belong to the same species, making them siblings on the taxonomic family tree.

Many cuisines around the world boil greens. This practice is ubiquitous in African countries. One of my favorite dishes is gomen wat, a vegetarian Ethiopian stew (wat) that combines spices and boiled greens (gomen). The dish is transported from plate to mouth with pieces of injera—a delicious, spongy textured, fermented flatbread.

African slaves in the United States tried to replicate dishes reminiscent of their native countries by combining unwanted collard greens, vegetables and meats. The leftover juices, known as pot likker, were consumed by soaking it up with cornbread.


Read more: Collard greens offer growers year-round nutrition.


Headless Powerhouse

Collards are more heat- and cold-tolerant than many other vegetables, allowing for an extended growing season. They contain a lot of protein and minerals but few calories. One cup of cooked collard greens provides 212 percent daily value of vitamin A, 39 percent vitamin C and 18 percent calcium.

In that same single serving, collards provide nine times the daily value of vitamin K.

Although a member of the cabbage family, collards don’t form a central head. They are part of the acephala group. (Acephala is Latin for “without a head.”) The word “collard” comes from the Anglo-Saxon word colewort, which means cabbage.

These headless cabbages are then, of course, grown for their leaves, which taste sweeter after a light frost. As the temperature drops, collards, just like their siblings, break down their stored starch into glucose and other sugars, resulting in a sweeter taste.

Growing your own collards lets you harvest the leaves at the optimal time.

collard collards greens
Gardening Solutions/Flickr

Growing Greens

To prepare the soil, dig to at least 10 inches, as collards’ roots can extend 2 feet or more. The loosening of the soil allows the small feeder roots to expand their search for nutrients and water. Add organic matter if the soil is mostly sand or clay.

Spread a layer of 4-inch compost over the planting area.

Plants can be started from transplants or directly sown in the garden. Transplants always work better for me. Collard seeds germinate when the soil temperature reaches 45 degrees Fahrenheit. On average, the seeds come up after 6 to 12 days.

The colder the soil is, the more time the seeds take to sprout.

For a fall crop, plant seeds 80 days before the frost date. (For the spring crop, I start the seeds in my greenhouse about a month before I want to transplant them into the ground.) Space seedlings 18 to 24 inches apart.

Using hay-bale twine, I tie the small plants to a piece of wood or bamboo to ensure they grow straight.

Collards require a lot of nitrogen to develop dark green leaves. If plants become a pale green, add a little more fertilizer such as a 10-10-10. One cup of fertilizer for a 10-foot row should be enough.

Water the plants thoroughly once a week if it doesn’t rain. Because of the canopy of the collards, weeds are usually not a problem. If weeds persist, pull them or carefully remove them using a hoe. Unwanted plants steal collards’ nutrients and water.

Common pests include aphids, harlequin bugs and cabbage loopers.

  • Aphids suck the plant juices and are found on the underside of leaves.
  • Harlequin bugs also suck the plant juices, causing the plant to wilt and the leaves to turn brown.
  • Cabbage loopers feed on the foliage and resemble a light green, pale yellow or white inchworm.

For organic pest options, manually remove the bugs or use a Bt-based insecticide and sulfur, which can help with many diseases. Neem oil also helps if plants show spots on the leaves, indicating a fungus.


Read more: Row cover offers protection from pests and extends your growing season.


Varieties for Your Garden

  • Georgia Southern (Creole) is a pre-1880 heirloom that produces a huge yield. Tasty and flavorful. 70 days
  • Morris Heading yields a loose head that is dark green and slow to bolt. 45 days
  • Top Bunch is a Georgia-type hybrid with semi-savoyed leaves that grow 18 to 26 inches. 50 days
  • Vates originated in the 1950s, when it was admired as a “new, dwarf strain.” Like all collards, it’s longstanding and heat resistant. 75 days
  • Yellow Cabbage collards were originally cultivated in North Carolina in 1887, and this variety is tenderer and less bitter. It’s reminiscent of spinach but can handle heat and humidity. 45 days

Harvesting Help

While some people harvest the entire collard green plant, it’s more common to remove a few of the lower leaves from each plant. This lets the plant keep growing and produce more leaves.

If the central stem of the leaf is greater than half an inch, it can be tough and unpleasant to eat. Cooking such leaves for half a day softens them up. For fast recipes, remove the stem with a knife by folding the leaf in half. You can save the stem for vegetable stock.

You can also add the stalks to a bag of frozen vegetables such as carrot knobs, celery leaves, herb stems and onion skins, all of which make a delicious soup base.

Once you have a pile of destemmed collards, roll them and give them a rough chop. Place the chopped leaves into a deep water-bath for half a minute to remove the debris.

Now you’re ready to start cooking a mess o’ greens. 


Recipes

collard collards greens
Aimee Lee Studios/Shutterstock

Ethiopian-Style Collards

Ingredients

  • 3 pounds collard greens, washed and torn
  • 6 cups water
  • 3 tablespoons olive oil
  • 1 onion, diced
  • 8 cloves garlic, chopped
  • 1 bell pepper, diced
  • 3 tablespoons lemon juice
  • 1 tablespoon salt
  • 1 tablespoon ground turmeric
  • 6 tablespoons fresh ginger root, minced
  • 1 tablespoon paprika
  • 1 tablespoon ground allspice

Preparation

Bring to a boil chopped collard greens in 6 cups of water and then reduce heat to low.

Cover for 20 minutes until collards are tender.

Heat olive oil and onions over medium heat until brown.

Stir in garlic, cooked collards and their liquid.

Simmer uncovered for about 10 to 15 minutes until liquid is almost evaporated.

Add green pepper slices, lemon juice and remaining spices. Cook for an additional 5 minutes.


Vegetarian-Style Collards

Ingredients

  • 1 medium onion, diced
  • 1 tablespoon olive oil
  • 1 tablespoon butter
  • 1 teaspoon red pepper flakes
  • 1 clove garlic, finely chopped
  • 1 pound collard greens, washed and torn
  • 3 cups vegetable stock
  • 2 tomatoes, chopped

Preparation

In large pot, sauté onion in oil and butter over medium heat until softened. Add red pepper flakes and garlic, cooking for an additional minute

Add collard greens, cook another minute. Add vegetable stock and simmer for 40 minutes until greens are tender.

Serve with chopped tomatoes.


Southern-Style Collards

Ingredients

  • 3 pounds collard greens, washed and torn
  • 2 to 3 ham hocks
  • 5 cups water
  • 1 bell pepper, diced
  • 2 teaspoons salt
  • 1 teaspoon black pepper
  • 1 onion, diced
  • 2 teaspoons apple cider vinegar
  • 1 tablespoon garlic, minced

Preparation

Cook ham hocks in water in slow cooker on high for 3 hours or until tender.

Sauté collard greens, onions, peppers, garlic, vinegar and seasonings. Add wilted vegetables to slow cooker. (They need to be wilted first to fit into the slow cooker).

Cover and cook on low for 4 to 6 hours.

Serve with cornbread.

This article originally appeared in the May/June 2019 issue of Hobby Farms magazine.


Categories
Crops & Gardening

Grow, Pick & Enjoy Some Peppers In Your Next Garden

If I had to choose just one vegetable to grow, it would be a pepper. Peppers are consistently one of my favorite garden staples and for good reason: From a culinary standpoint, they’re hard to beat. They provide flavor and heat to any dish and are represented in many spices and blends.

In any given year, I typically grow around 100 pepper plants. This gives me plenty of variety to use in the kitchen, grind into spices and have available for trading.

Which Peppers to Grow?

Peppers come in different sizes, thicknesses, colors—green, yellow, orange, red, brown—as well as a range of flavors and heat. It’s the latter that receives the most attention, and even seed catalogs typically separate them into sweet and hot.

Capsaicin, which is prominent in the seeds of the pepper, is the chemical compound responsible for the heat, or intense burning sensation, depending how hot the pepper is.

The amount of capsaicin in a given pepper is measured using the Scoville scale—named after Wilbur Scoville, an American pharmacist who devised a test for pepper heat while working at a pharmaceutical company in 1912. Knowing the range of heat that you’re comfortable with is the first step in determining which peppers you should grow.

One year, I tried habaneros, which typically range from 150,000 to 300,000 Scoville units. I also grew mustard and chocolate varieties. My then-3-year-old son discovered them in the dehydrator.

Being accustomed to seeing apple slices in the dehydrator, he helped himself to one of the mustard habanero slices. Suffice to say, it was not the result he was anticipating.

When I break into a sweat just by eating a pepper, even I have to admit that 300,000 Scovilles might exceed my range of comfort. I’ve learned to stay well below that. Once you establish your range of acceptable heat, it becomes mostly about flavor.

There are a great many varieties available, so feel free to experiment! When the seed catalogs arrive, I skip past everything else and go straight to the peppers. Each year, I choose at least one new variety to try.


grow garden peppers
Dan Adams

Personal Recommendations

You’ll find hybrid and open-pollinated varieties. Hybrids will sometimes have better disease resistance and higher yields, but you’ll be unable to save seeds. For that reason alone, I prefer open pollinated.

If you have a cooler climate—peppers love heat—or a shorter growing season, you’ll have to take that into account.

I live in Kentucky, and our growing season is pretty good. With an early start on a heat mat and growing hot peppers for transplant, I have enough of a season to grow most varieties. Here are some of my personal favorites:

Hungarian Hot Wax

Mildly hot, this pepper ripens from light green to yellow, deepening to orange, then to red. I use these on pesto pizza or add them to our tomato base, among other things. They make a great addition to a breakfast dish as well—potatoes, onions, garlic, Hungarian hot wax peppers and eggs. (Seriously, try it!)

Jalapeño

This one is great for pickling, for use in jam and for dehydrating for a salsa blend spice.

Georgia Flame

This prolific pepper is great for adding to salsa.

Paprika—Alma & Feher Ozon

For pap­rika, we grow these two varieties and combine them. They have a sweet and slightly spicy taste; you’ll never go back to store-bought paprika after growing these peppers yourself.

Cayenne

This pepper is my benchmark for heat. I generally grow peppers around that range on the Scoville scale. Paprika and cayenne are mainstays in my garden plan. The reason for this is simple: Both are used frequently in my family’s favorite spice blends.


Read more: Want to bring the heat? Ghost peppers are Carolina Reapers will spice up the garden!


Starting From Seed

You can certainly purchase pepper plants instead, but I prefer to start from seed. There is nothing quite like pursuing a seed catalog in winter, a blanket of snow on the ground and dreaming of what you’ll grow in the spring.

I start my peppers indoors and then transplant. My family put shop lights and LED grow lights that we had built ourselves and had running off-grid over a propagation table. Pepper seedlings are particularly susceptible to diseases, so going with peat pellets to start or a soilless potting mix is something to consider. Keeping the plants separated is also a way to keep diseases from spreading.

A heat mat is almost a necessity, as peppers like a relatively high soil temperature for germination. Around 77 degrees Fahrenheit (75 to 95) soil temperature is a good spot, regarding both percentage of germination and the number of days for the seeds to sprout.

Growing

You can grow in pots or a good garden plot with proper spacing between the plants. It’s typically recommended to give them 18 to 24 inches. I like to add spacing beyond what is recommended in the rows so that I can walk and pick.

I find growing peppers to be insanely easy. They require plenty of sun, love warm weather and require a consistent amount of water. Peppers want to be on the drier side as opposed to overwatered. I rotate the pepper plot, but always spread goat manure into the garden space each year. The soil should be deep, rich and loamy.

Pepper’s nutrient requirements are high in nitrogen, potassium and phosphorus. As with tomatoes, too much nitrogen can cause the plant to grow really well, but not fruit properly. Peppers love warmth and are susceptible to cold temperatures, so you’ll want to wait until you’re well past the danger of frost. As I grow mine from seed indoors, that also means that I’ll be transplanting them. I gradually expose them to outdoor conditions, as it will mean they are less stressed when they’re planted.

As they start to grow and develop flowers, pinch off early blossoms. It will allow the pepper plants to direct their energy into growing first and fruiting later. Don’t worry; you’ll be rewarded later!

You’ll need garden stakes of some kind. If the conditions are right, you’ll get highly productive and top-heavy plants. I find the smaller T-posts to work great as the stakes.

If you do grow peppers in pots, you can bring them indoors and overwinter them. They’re actually perennials, it’s just that cold temperatures kill them. So, bring them indoors and enjoy them for years!

Isolating

Pepper flowers are called “perfect flowers.” They are self-pollinating. The seeds they produce are pure and produce the same pepper type. Because we have insects, cross-pollination is also common.

Commercial growers use distance to isolate the plants; 500 feet is usually considered sufficient for seed purity. However, because don’t work on the same scale of seeds needed commercially, we can use other methods.

You can isolate a single plant using a screen cage. The materials you use to surround the plant include nylon screen, which you can buy at building-supply stores, or spun polyester.

Individual pepper flowers can also be bagged. Leave the netting on until the peppers have fully formed and are ripe for picking.

Harvesting & Seed Saving

Peppers are ready to be harvested and processed when they’ve reached maturity. Select the larger ripe peppers, which show no signs of disease. Avoid collecting seeds from the first few peppers, which might be smaller than later ones, and avoid seeds from the last peppers of the season, which might have lower germination rates than midseason peppers.

Small, thin-fleshed peppers can be air dried easily, then crushed when they are dry to separate the seed. Larger peppers need to be cut open to expose the seeds, which you scrape off.

If you work with really hot peppers, wear latex gloves while handling them. If you’ve ever cut open a hot pepper and then rubbed your eyes, you know what I’m talking about.

Lay them out on a paper towel, which wicks moisture, or a coffee filter to let the seeds dry, and keep them out of direct sun. When they are sufficiently dry, the seeds must be stored. Seeds are generally viable for two to three years if you keep them in a sealed canning jar and store them in a cool place.

I knew someone who placed the seeds in a labeled, sealed envelope with a pack of silicon gel desiccant, then placed them in airtight plastic containers and stored in the refrigerator. He had seeds 18 years old that still germinated using this method. Seed banks vacuum seal them and store them in a freezer, where they are viable for 50 years. For my purposes, three years is fine.


Read more: Here are 5 ways to store your garden goods that don’t involve a canner.


Dehydrating

We use peppers fresh while they’re in season, but the main reason we grow so many pepper plants is to replenish our spice cabinet and have extras to trade.

Cayenne and paprika also happen to be frequent ingredients in many spice blends we make, including sausage seasoning and creole seasoning. Georgia Flame and Jalapeño make a great blend and fantastic addition to salsa. Many peppers and combinations exist, so experiment and see what you like.

For dehydrating, we use a 9-tray dehydrator for everything. To start, wash the peppers and cut them to a size that fits on the trays. It’s a matter of personal preference as to whether to leave the seeds in.

Depending on thickness, some might be ready before others. In that case, just remove the peppers that are finished and continue dehydrating the rest. You’ll know that the peppers are ready when they are brittle enough to crush between your fingers. At that point, I put the dehydrated peppers into quart or gallon canning jars with lids until I’m ready to grind them.

grow garden peppers dehydrated ground
Dan Adams

It’s a Grind

It’s worthwhile to keep track of which peppers you placed on which tray. I grow so many varieties that I can lose track of which peppers I have dehydrated. In that case, I grind a few varieties together and label it as “mixed.” Oddly, theses mixed batches typically end up being some of my favorites; it’s a shame I don’t remember which varieties I combined.

For grinding the dehydrated peppers, I use a blender. You can often find these cheap at yard sales. With the type I use, the threads on the base match regular-mouth canning jars. I take a quart-sized jar, cram it full of dehydrated peppers and grind the peppers until I can see no larger pieces.

We’ve covered how to get started with peppers, beginning from seed, growing and harvesting, saving seed and grinding them for spices. Now for the fun part: Choose some varieties that interest you, and get obsessed with growing great peppers.

This article originally appeared in the May/June 2019 issue of Hobby Farms magazine.