Categories
Beekeeping

A Few Things To Consider Before Getting Honeybees

Taxonomy is complicated. The classification of animals and plants into family, genus, species and so on is subjective and often depends on who does the classifying and when.

This much of the lineage of honeybees is agreed upon. They belong to the genus Apis in the family Apidae. There are four to seven other members of the genus, all but one of Asian origin. Apis melifera, which is native to Europe and Africa, is the one that populated the Americas after being brought here by settlers in the early 17th century.

(Although North America is home to around 4,000 species of bees of the Apidae family, it has no indigenous honeybees.)

A. melifera, our adopted honeybee, itself has as many as 20 subspecies, each with its own distinctive characteristics. Does that sound confusing? Take heart.

It turns out that selecting a breed of honeybee is not that difficult. And it’s not nearly as important as selecting a source and a method of shipping.

Bee Choosy

It’s arguable that honeybees in North America are mutts—a mix of traits that don’t represent any pure subspecies. In their natural habitats in the old world, they developed in isolation, prevented from interbreeding by natural barriers such as mountain ranges.

They were imported to this country in waves. In the beginning, the particular subspecies depended on the region from which the settlers who brought the hives originated. Eventually, importers brought queens in commercially, with various subspecies coming into vogue at different times.

At first, there were A. melifera melifera, the small, dark, German bees. They were good honey producers but were aggressive and susceptible to disease. The Italians, A. m. ligustica, even better producers, possessed a gentler disposition and an attractive, yellow color.

A. m. carnica, commonly known as Carniolans, came from middle Europe. Their habit of cutting back on brood rearing during ebbs in nectar flow enhanced their ability to overwinter successfully in cold climates. But their rapid buildup in the spring required careful management to prevent losses from swarming.

Caucasians, A. m. caucascia, were particularly gentle but produced inconveniently large quantities of sticky propolis. For various reasons (mostly because they’re mean), subspecies imported from North Africa, Cyprus and Egypt didn’t catch on at all.


Read more: Check out these 5 guidelines to follow when feeding your honeybees.


Blurred Lines

Queen breeders maintained popular varieties, but the others lived on. Swarms established feral colonies in which indiscriminate mating eventually blurred the distinctions between subspecies. Because (short of artificial insemination) it’s next to impossible to select the drones that a queen mates with, even the commercially maintained subspecies probably underwent some genetic drift.

Then, in 1922, Congress passed the Honeybee Act. This banned all importation of honeybees in an (ultimately unsuccessful) attempt to prevent the introduction of Asian parasites.

For almost 100 years, the various subspecies of honeybees in this country have evolved in isolation from their European and African progenitors. The sole exception is the migration, through our southern border, of a South African subspecies accidentally released in Brazil.

The Africanized honeybees (“killer bees” in popular parlance) have added their genes to the mix in our southern states. But that’s a topic in itself.

With all that said, the choice of stock for a beekeeper today is between the only two readily available subspecies: Italians and Carniolans. Italians remain the most popular and widely sold, but I (and others) personally prefer the Carniolans. Of course, it isn’t quite that simple.

Various Varieties

Researchers have bred several varieties, sometimes called lines, genetically selected for desirable characteristics. Most development in the past 20 years occurred in an attempt to produce honeybees resistant to varroa mites—one of the greatest challenges facing bees and beekeepers today.

Some notable lines include:

  • Minnesota Hygienics (the University of Minnesota Bee Lab)
  • Russian Honey Bees and Varroa Sensitive Hygiene honeybees (the U.S. Department of Agriculture research lab in Baton Rouge, Louisiana)
  • New World Carnolians (the University of Ohio)
  • “Ankle biters” (Purdue Honey Bee Lab)

Though these lines offer advantages, they aren’t always easily available. Beekeepers should also know that genetics associated with desirable traits quickly dissipate as swarming and succession take place and new queens mate with drones from other colonies.

The best option is to purchase quality bees, whether Italian or Carnolians, from a reputable source. The conditions under which breeders raised the bees might impact the health of the colony more than their genetics.

Think of the difference between buying a dog from a respected breeder and getting one from a puppy mill.

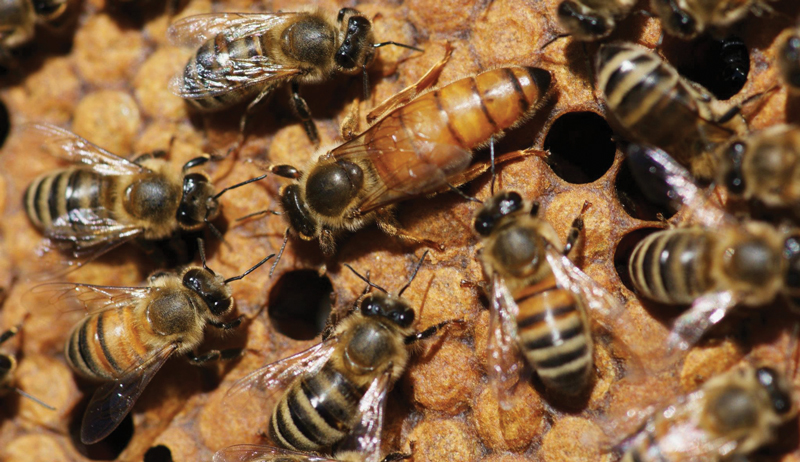
The essential factor is a good queen. Because she is the only bee capable of laying fertile eggs, the viability of the colony depends on her.

You want a young but well-mated queen—qualities impossible to determine by inspection. That’s why the reputation of the seller is important.

You can ask experienced local beekeepers and members of beekeeping associations for advice on where to buy. Some groups arrange bulk purchases for members, which reduces cost and can expedite shipping.


Read more: Should market farmers keep honeybees? Yes! Here are 6 reasons why.


On the Move

Your bees’ transportation method matters more in establishing a successful colony than you might think. There are three ways for a new beekeeper to acquire bees:

  • Buy an established hive
  • Buy a nuc
  • Order a package.

Established hives, and the complications that come with them, can be overwhelming for a new beekeeper.

Nucs (short for nucleus hives) are starter colonies. They come in smaller boxes with fewer frames, and they contain about 10,000 bees. Quality nucs have the advantage of having an accepted, laying queen, as well as drawn out comb, some brood and some food stores.

Unfortunately, they are in short supply—produced to order—and have to be contracted for well in advance. Most beekeepers order bees by the package. These are wood-framed, screened shipping containers, also holding about 10,000 bees, with a queen in a separate small container inside the larger package.

Bee Aware

Packages and nucs are usually sold by large commercial operations in California and the South. Early warm weather and plentiful nectar sources in these areas enable a buildup of bees and queens. Suppliers then ship bees to other areas of the country where spring is just beginning.

That means that most new bees originate far from their ultimate destination.

The method of shipping should be the first consideration for the purchaser. Avoid shipping by mail. Bees loaded on pallets in a tractor-trailer or the hold of a plane can be subjected to extremes of temperature for several days. Some might be dead on arrival or have less obvious health damage resulting in shortened lifespans.

It’s better to order through a local beekeeping supplier who handles transport in person and offers a guarantee. Or you can work with a group, rent a vehicle (if necessary) and have one or two members handle the move themselves.

If neither of those is possible, express shipping (though expensive) is another option.

In short, the most reliable way to acquire bees is to order either Italians or Carnolians from a reputable producer through a local dealer. To paraphrase the standard reply of expecting parents, “It doesn’t matter which it is, as long as they’re healthy.” 

This article originally appeared in the May/June 2019 issue of Hobby Farms magazine.

Categories
Animals Beginning Farmers Poultry

Sociable Serama Chickens Help Keep Things Ticking At Little Farmer Me

Marion Petersen runs a hobby farm in the city of Temecula in Southern California that specializes in raising Serama chickens. These eye-catching birds are instantly recognizable by virtue of their extra frizzled looks and adorably dinky stature.

Naturally, when Petersen started an Instagram account named Little Farmer Me to document the daily goings on at her hobby farm, the Serama chickens quickly became the star attraction.

We spoke to Petersen about the charms of Seramas as well as discussed caring for these delicate birds. We also got into the companionship that chickens can offer to humans.

A Ranching Heritage

https://www.instagram.com/p/CFpnNX-gtae/

Petersen says that “farming is in my blood.” She credits her interest in hobby farming to an upbringing on a large ranch that featured “over 50 head of buffalo, lots of horse and several small animals.”

She adds that her current 3-acre hobby farm is a “smaller version of my childhood,” and is presently populated by horses, goats, dogs and the Seramas.

A Social Type Of Chicken

https://www.instagram.com/p/CF0faI6guPi/

Three years ago, Petersen decided to focus on Serama chickens, the stars of Little Farmer Me. “I realized out of all the chicken breeds, I found Seramas to be the most social,” she explains. “They truly love the companionship of humans.”


Read more: Check out these four ornamental chicken breeds to add to the yard.


Dealing with a Delicate Bird

https://www.instagram.com/p/CFx3EPSgBzZ/

On a day-to-day basis, Petersen says that maintaining a healthy Serama flock is all about realizing just how delicate the birds are. It’s also about providing appropriate care and maintenance.

“I have lost several,” she explains. “Losing them, I learned a lot of really good stuff about keeping flocks healthy—stuff you can do to be proactive about keeping healthy birds.”

Big Personalities on the Farm

https://www.instagram.com/p/CGAhH5dg3L5/

When it comes to the personality of Serama chickens, Petersen characterizes them as being a bird that packs a “giant personality into a tiny little body!”

Petersen adds that her Seramas “love human interaction and love to be held and snuggled.” Her birds are also adept at chatting to humans and following people around in the fashion of a puppy.

“They are such kind creatures!” she says.


Read more: Do chickens have emotions? Here are 4 feelings your chickens may experience.


A Rewarding Lifestyle

https://www.instagram.com/p/CFKoO5VA-Ov/

Petersen grew up around farming and ranching culture. But these days she says there are a couple of things in particular that she finds most rewarding about the lifestyle.

“It’s the company and the friendship the Seramas have given me,” she explains. “And watching the love that they bring to others just warms my heart.”

Follow Little Farmer Me on Instagram.

Categories
Animals Poultry

Coop Maintenance Is Easier With The Deep-Litter Method

Chickens are notoriously messy, so achieving a cleaner chicken coop may seem impossible without investing lots of time. However, by following a few simple practices, you can have an amazingly ship-shape coop that only needs refreshing a couple of times per year.

The practices used to maintain a cleaner coop with less work are collectively called the deep-litter management method. In this method, you allow the droppings and bedding material to accumulate and decompose inside the coop instead of regularly scooping out and replacing the soiled chicken litter.

Although this may sound detrimental to your chickens’ health, it’s actually beneficial.

Background

The deep-litter technique originated in Ohio in the 1940s and was an important development in poultry management because it dramatically reduced poultry disease and the labor necessary to successfully keep chickens.

It introduced a sustainable method of managing chicken litter in the coop. Many flock owners, in turn, adopted it.

However, as small flocks slowly disappeared from backyards, the practice was somewhat lost. Today, with the resurgence of backyard birds, it’s being rediscovered.

Basically, the idea is that you start with a 6-inch layer of pine shavings or other highly absorbent bedding material. Throw in chicken scratch so your chickens aerate the shavings. Then, let nature compost the litter and chicken droppings in the coop.

Just as with a garden compost pile, there are brown “pine shaving” (high carbon) and green “chicken dropping” (high nitrogen) elements that need to be managed. When the proportion of green to brown gets too large, additional pine shavings are added to the mix.

The compost gets deeper over time and eventually some should be removed. What does get removed makes great garden fertilizer.

deep-litter chicken coop method chickens
lunamarina/Shutterstock

Benefits

Using the deep-litter management method includes some terrific benefits.

  • Once you have this method working in your coop, it’s only necessary to partially clean out the litter when the bedding gets too deep. This means less time and labor for you.
  • Chickens housed in coops using this method are generally healthier than those housed in coops using other methods. This results in fewer health issues.
  • The composting bedding naturally generates heat and provides an insulating layer thereby keeping your flock warmer in winter. There’s no need to insulate the coop.
  • The bedding that you do clean out has already been composting. It’s free natural fertilizer for your garden.

Why It Works

When materials high in nitrogen—such as spent crops or manure—are mixed into a pile with materials high in carbon—such as pine shavings or dry, mulched leaves—under the right conditions, microbes multiply rapidly in the pile.

Adding moisture and oxygen make conditions favorable for decomposition. Microbes use the nitrogen as an energy source to breakdown the high-carbon materials. And the end result is highly fertile compost.     

In addition to compost, the byproducts of the decomposition process include vitamins K and B12, health-enhancing compounds and heat. According to the Food and Agriculture Organization of the United Nations, “Microorganisms thrive on the manure in litter and break it down. The microflora produces growth factors, notably vitamin B12 and antibiotic substances, which help control the level of pathogenic bacteria. Consequently, the growth rate and health are often superior in poultry raised on deep litter.”


Read more: Keep these things in mind when choosing the right chicken coop for your home.


Doing the Deep

To get the deep-litter method working in your coop, start with a 6-inch layer of a high-carbon litter material—such as pine shavings or dry, mulched leaves—on the coop floor. The finer the high-carbon material, the faster it will begin composting. If the coop floor is dirt, then a sufficient number of microbes and moisture should be available to start the decomposition process as the chickens add their droppings.

If the coop floor is wooden or concrete, then it may be helpful to introduce some active compost (adding the microbes) to jump start the process. Moisture is necessary to initiate the process too. But since chicken droppings are about 80 to 90 percent water, it’s seldom necessary to add water.

Note: If you do have a wooden coop floor, it’s a good idea to coat it with something like a protective paint (e.g., spar urethane) or cover it with vinyl flooring before implementing the deep litter method. This will protect it from slow rot. 

Aeration is Key

Oxygen (or aeration) is essential for decomposition, but the chickens will help aerate the litter if you sprinkle scratch into their bedding on a daily basis. The number of chickens in the coop should be limited to one chicken for every 3 to 5 square feet of coop space in order for them to be effective aerators.

At one chicken for every 5 feet of coop space, it’s likely that the chickens will mostly handle aerating duties. But at one chicken for every 3 feet of coop space, the chicken-keeper will likely need to help turn the litter (i.e. more chickens create more droppings and work). You can easily accomplish this with a pitchfork or shovel, turning litter when crusty “caps” form on the litter.

Good coop ventilation is essential in any chicken coop. However, it’s particularly important when using the deep-litter method.

Chicken droppings give off ammonia. As the proportion of chicken droppings to litter increases, the amount of nitrogen will eventually overwhelm the carbon in the mix and start generating ammonia (nitrogen + water = ammonia).

Add more litter to the coop before this happens. But good ventilation is necessary to remove any ammonia before it harms the chickens’ delicate respiratory systems. It’s also necessary to remove any excess moisture in the coop.

Avoid DE

Some chicken-keepers add food-grade diatomaceous earth to their coops in an effort to prevent worms, lice or mites. However, that practice is not recommended when using the deep-litter method.

Veterinarian Melissa Holahan, creator of Goat Melk Soaps and co-owner of Chubb E Acres Farm, has been using the deep-litter method since 2010.

“It’s a great way to maintain a clean coop and reduce ammonia buildup with less labor,” she says. “One of the questions I get asked is whether to add food-grade DE to the bedding. DE is hazardous to health when inhaled and should not be used. If chicken owners are having issues with internal (intestinal worms) or external parasites (lice or mites), they should consult their veterinarian for recommendations on safe alternative treatments.”


Read more: When it comes time to clean, follow these 10 steps for a spin’n’span coop.


Maintaining the Method

Once you have your bedding material in place, then it’s just a matter of monitoring the litter and making sure that everything is working properly. The amount of litter, chicken droppings, moisture and aeration need to be balanced to promote decomposition.

The chickens will do much of the aeration work. But it’s a good idea to turn the bedding at least once per week and verify that breakdown is progressing. The rate of decomposition in the coop will depend on:

  • how often you turn the litter
  • the number of chickens you have
  • how moist it is in the coop

Those that live in drier regions may need to moisten the litter to hasten decomposition. In wetter regions, though, it may be necessary to add litter more frequently. If you’re doing things properly, you’ll slowly see the litter turn to compost. 

The coop shouldn’t smell bad and it should never smell like ammonia. If the coop smells like manure or ammonia, then add more bedding material and turn more frequently.

deep-litter chicken coop method chickens
Indy Edge/Shutterstock

Cleaning the Coop

Once the litter depth in the coop exceeds a foot, some of the bedding is normally removed.

Many chicken-keepers just clean out enough to return the litter depth to about 6 inches. Others remove all the litter and do a thorough coop cleaning. Typically, this occurs one to three times per year in the spring, summer or fall.

Normally, keepers don’t do a clean out during the winter because everyone wants to maximize heat production and litter depth (for insulation). Just remember, if you remove all the bedding material for cleaning, you’ll want to return about 6 inches of deep-litter back to the coop so that the decomposition process can continue.

There are many different options for managing chicken coop cleanliness. However, by using the system outlined above, chicken-keepers can save time and labor. In addition, the chickens stay healthy and the coop stays clean.

It’s no wonder the deep litter method is gaining popularity again!

Categories
Poultry

A Few Facts About Feeding Your Flock Supplements

As the mother of four strapping boys, I have spent years ensuring that my sons eat a healthful diet that provides them with the nutrients essential for their stage of development.

They might not always agree with my choices—there was an uproar when I switched my now-17 year old to adult vitamins and when I added vitamin D-rich foods to my youngest’s diet. But the meals I prepare provides them with the nutrition their bodies need.

The same dietary rules apply to my flocks. Different birds with different needs get different feeds. Our ducks, for example, eat feed fortified with niacin. Our molting layers, however, are fed rations with a higher protein percentage to help them rebuild their feathers.

The vast variety of poultry feeds these days almost rivals the abundance of options at human supermarkets. With so many choices available, confusion regarding the right feed for your flock is only natural.

It wasn’t so long ago that chicken flocks were expected to forage for their food, after all. So how different could all these feeds possibly be?


Read more: Here are 6 quick fixes in case you ever run out of chicken feed.


Feeding Your Flock Scientifically

Quite different, actually. It’s not uncommon for chicken keepers to mistakenly offer their birds the wrong feed, assuming these are interchangeable. In actuality, each type of commercial poultry feed available has been scientifically formulated to provide the correct balance of nutrients for a specific age and stage of bird.

Decades of poultry nutritional research conducted at universities and at facilities owned by Nutrena, Purina and other producers have determined the proper percentages of protein, carbohydrates, fats, minerals and vitamins necessary not only for your birds’ proper development and overall health but also for the production of eggs and meat.

These “complete feeds” provide your chickens with the exact nutrients needed at each stage of life.

This information is readily and widely available. But who here has actually sat down to read the fine print on their feed sack? On the flip side, some flock keepers may expect too much from commercial feeds. This month alone I’ve received three messages from chicken owners asking what feed would quickly fatten their late-season baby chicks so they can better survive the coming winter.

(The answer: None. Use chick starter for proper growth and development, and consider hatching earlier in the spring).

Getting to know the types of feed will help you select the best and most appropriate nourishment for your birds. It will also help you avoid medical issues caused by feeding your flock the wrong formulated feed.


Read more: Here’s a quick look at what to feed your chickens based on age and purpose.


Supplemental Issues

Everything is okay in moderation, right? When it comes to giving your chickens supplements in addition to their complete feed, even moderation may be too much.

Each complete feed is scientifically balanced to provide a specific set of nutrients to your birds. Change that balance by adding a supplement and the results could prove deadly. Corn, for instance, is a high-energy ingredient frequently found in feeds. Chickens love corn and many flock owners treat their birds to fresh kernels, corn on the cob and scratch.

But the excess corn metabolizes as fat. In laying hens, this is usually gets deposited on the liver. This can result in Fatty Liver Hemorrhagic Syndrome, in which the liver becomes soft, with blood vessels that rupture easily during egg laying.

Similarly, feeding your flock supplemental protein can also cause problems, as hens excrete protein as nitrogen-high urea and feces. The result—high ammonia and nitrogen levels within the coop. This can lead to footpad lesions, hock burns and breast blisters as well as respiratory issues and inflamed eyes.

Too much dietary protein can also increase the risk of such digestive issues as necrotic enteritis, a swift and deadly condition. If your flock is in molt, provide them with a boost of feather-building keratin by temporarily switching their feed to a starter formula rather than by adding a pure protein supplement to their existing feed.

A good rule of thumb for flock owners is to stick with the complete feed, as any imbalance of nutrients caused by adding a supplement can be detrimental to your birds … or worse.

Categories
Equipment

Tires Keep Your Farm Equipment Rolling

Regardless of whether it’s a wheelbarrow or a 10-ton tractor, it won’t roll when a tire goes flat. Let’s look at some ideas on tire inspection, tire sealants, inner tubes, leaks, repair and basic tire-maintenance equipment.

Tube or Tubeless

Tires continue on their long evolution from hard, solid leather bands around wheels to pneumatic tubes designed to cushion the sharp blows from rocks, potholes and bumps that cause vehicles to shake, rattle and roll. They are the interface between a vehicle and the road.

As such, they take quite a beating.

In the early days, rubber tires were unreliable, at best. And every automobile tool kit contained equipment to remove a tire from the rim and patch the inner tube.

Embedding steel cords in the rim of each tire made it possible to seal the tire against the rim. This eliminated the need for an inner tube.

Use of synthetics has greatly improved the lifespan and reliability of tires to the point where many commuters have never known the trials and tribulations of changing a flat tire on the shoulder of an interstate highway with trucks whizzing past just a few feet away at 70 mph. Improvements in materials and manufacturing have given us tires so reliable that they’re easy to overlook as part of routine maintenance.

Let’s start with what tires have in common, then look at some of the special requirements of the tires you have on the farm.

tractor tires tire
Warren Design/Shutterstock

Tread on Me

Tread helps keep your vehicle moving—and stopping—in the desired direction. Intuitively, it might seem like the more tire that touches the road, the more traction you get. But unless you’re running on a drag strip, a bald tire can be quite dangerous.

The tread on a passenger car is designed to channel water to avoid hydroplaning (where the tire rides on the surface of the water, resulting in loss of control) and provide some grip on snow or shallow mud. A four-wheel-drive pickup, on the other hand, is less about comfort and more about getting there. The deep tread gives the most possible traction in snow and mud while providing suitable highway performance.

The general rule is to put a penny into the tread. If you can see the top of Lincoln’s head (about 1/16th-inch deep), it’s time to consider new tires.

The tread also tells you things about your vehicle. For example, if there is more wear on one edge of the tire than the other, the vehicle probably needs a front-end alignment. If there is more wear on both edges of the tire, you’re probably running it with less than the optimum air pressure.

This generates more wear on the tire and increases fuel consumption. More wear on the center of the tire indicates too much pressure.


Read more: Are radial or bias tires best for farm equipment?


Plies

One term that causes some confusion is the number of plies. Tires are manufactured in layers in which fibers run in different directions—much like plywood—for strength and flexibility.

More layers mean stronger tires capable of handling more pressure and heavier loads but also add expense.

For example, my passenger car has six-ply tires rated for a maximum pressure of 35 pounds per square inch, while my 3/4-ton, four-wheel-drive truck has 10-ply tires, and my 10,000-pound-capacity trailer has tandem 12-ply tires that inflate to 50 psi.

Under Pressure

Most tires have a maximum pressure listed on the side, and a vehicle’s manual provides a range of pressures. Keeping the tire at the minimum recommended pressure provides a bit more traction on snow and mud.

Running at the maximum pressure gives a rougher ride but improves fuel mileage. I run tires at the maximum pressure for this reason.

It’s easy to miss seeing a low tire on trucks and trailers with dual or tandem wheels, so take the time to check their pressure, too. At the very least, thump them with a bat or tire iron. If any have a lower pitch or produce a “flat” thud, check the pressure, and inflate or repair if necessary.

To get the maximum use from your tires, rotate them as indicated in the owner’s manual. That way, any uneven wear is distributed, and all tires will be ready for replacement at the same time.

Dealing with Leaks

Air has the irritating habit of trying to escape high pressure inside the tire. Keeping it where it belongs can be a challenge. As a general rule, if I can drive a vehicle to the repair shop before a tire goes flat, I do it, because a mechanic can remove the tire, repair it and replace it in less time than it takes me to find a lug wrench.

Of course, this might not be possible with a big tractor tire. To be safe and save time, take the tractor to a shop equipped to handle large tractor tires or have a mobile repair unit visit your place, which isn’t cheap.

Sometimes a slow leak can actually fix itself. If the valve is not seated, after airing up the tire several times, it might seal properly. The easiest way to test for this is a bit of saliva—or soapy water, if you prefer—on the valve. If bubbles form, you’ve found the problem, and you can probably fix it by pressing on the valve stem a couple of times to re-seat it.

After a while, it should become habit to give the valve the “spit test” every time you air up a tire.

tractor tires tire
Ioan Florin Cnejevici/Shutterstock

Next Steps

The next step in diagnosing a slow leak is to inflate the tire to the maximum pressure and spray soapy water on it. Look carefully for bubbles caused by air emerging from a leak. If you see none, move the vehicle or tractor to rotate the tire halfway and try again.

A nail can also cause a slow leak. In fact, it’s possible for the tire to seal around the nail tight enough that you don’t even detect it. If a tubeless tire has a nail or small puncture, use a kit—available in farm-supply stores—to plug it while the tire is still on the vehicle. This is an especially attractive option for tractor tires, as long as they are not liquid-filled.

The third common cause is separation of a tubeless tire from the rim, as can happen when you hit
a pothole. Again, soapy water is a good way to check for this. If the rim isn’t bent, a tire repair shop can fix it.

A bent rim on a highway vehicle means replacing the wheel. But you can save yourself some money on a tractor wheel by putting in an inner tube. It doesn’t rely on a tight seal between the tire and rim to hold air.

If you aren’t certain whether your tractor tire contains a tube, deflate it (if it isn’t already flat) and push on the valve housing. If you can push it in, there is a tube. Be careful not to push the valve stem all the way into the wheel, or you might have to remove the tire to retrieve it.


Read more: Check out these 4 creative uses for old tires around the farm.


“Off-Road” Vehicles

For nonhighway tires (on wheelbarrows, garden tractors, log splitters and low-speed trailers) filling a tire with foam can work. Because it doesn’t require the tire itself to hold air pressure, it’s a permanent fix. Some liquid sealants are also available.

Before resorting to them, be sure the leak is on the tread of the tire and not on the side, in the valve or between the tire and rim. These aren’t recommended for tires that run at highway speed. Also, once you use them, other repairs to the tire are impossible because patches will not stick.

Finally, tires on vehicles you don’t use often might have plenty of tread but be cracked to the point where they could go flat at any time—especially if you hit a pothole or road debris while hauling a load.

Before you haul your tractor to the tire shop, make sure your trailer tires are up to the task. A blowout on a trailer hauling a tractor that has a flat tire would be more than a double whammy. It would be downright dangerous.

This article originally appeared in the May/June 2019 issue of Hobby Farms magazine.

Categories
Animals Large Animals

Vaccinate Your Sheep For An Ounce Of Prevention

Since I’m only in my second year of owning sheep, there is a painfully large amount of knowledge that I do not have.  You can do a lot of reading before you get your animals—which I did—but knowing what is important and not so important is something that comes with experience.

Slowly but surely, I’m learning.

In fact, sheep are not my first venture into livestock. I’ve raised chickens for the better part of 20 years.

Having a sick animal of any kind is distressing. There’s one thing, though, that I’ve learned from chickens that applies to sheep as well.  Keeping your animals healthy is the best way to keep them from getting sick.

Sound obvious? Possibly. But you cannot overlook the wisdom of maintaining sanitary conditions for your sheep, like clean bedding if you keep them in a barn or clean water that is offered all the time. Also, it’s important to make sure there are no pesticides or other toxic substances that the sheep can get into.

Nutrition is a big part of keeping your animals healthy. So is ensuring that your sheep don’t eat down pasture too far that they kill the grass and eat too closely to their own manure.


Read more: Sheep need protection from predators, too. Here are a few methods to keep them safe.


Preventing Illness Is the Best Cure

But I have come to the conclusion that there are still some things I can be doing to ensure my sheep have good health.  One is to treat them for internal parasites—this means worms.  The other thing that I can do is to vaccinate my sheep on an annual basis.

What you vaccinate your sheep for depends on what you are going to do with them (show them? keep a closed flock?) and what part of the country you live in. It’s always best to consult with a local vet or county extension office to learn what diseases are prevalent in your area.

The one vaccine that I now give my sheep and lambs on an annual basis is one for clostridial diseases. In fact, according to the Maryland Small Ruminant site (a really great resource for sheep and goat owners),  this is the only universally-recommended vaccine for sheep and lambs. The vaccine is most commonly called CDT, which affects three of the clostridial diseases including overeating and tetanus.

There are other versions of this vaccine that protect against several more of the clostridial diseases. But most of the sites I found noted that the three-way CDT is probably sufficient for most small flocks.


Read more: You can medicate your own livestock to safe time, effort and money.


Administration

What is a clostridial disease? Simply put, it’s a disease caused by bacteria that’s present in the sheep’s environment, including the soil and feces. It can cause sudden death before you even know your animal is sick. So it’s better to vaccinate your animals before they get it.

The shot itself is not hard to administer. We use an 18- or 20-gauge needle (1/2 inch or 3/4 inch length is fine) and give the shot high up in the neck, pulling the skin and plunging the needle at the base. I’ve read also that it’s OK to give the shot over the ribs or behind the armpit. I just find that it is easiest to vaccinate sheep high in the neck, so that’s where I do it.

Lambs get two doses, preferably 21 days apart, and then annually after that.  It’s recommended that a pregnant ewe should get vaccinated in the last month before they give birth. This gives their lambs some protection for a few weeks after birth.

We were especially interested in that bit of advice, as we are purchasing a ram and going to breed some of our ewes later this fall.

That in itself will be another adventure and—I am sure—will offer many more lessons for us in keeping our sheep safe and healthy.

Categories
Animals

Be Careful When Providing Minerals To Your Livestock

Livestock diets are justifiably different than what’s on your dinner table. By consuming primarily forages, your animals are reliant on the unique geography of your area to provide them with the balanced nutrition they need.

Most of the time Mother Nature provides. However, there can be times when we need to step in and help.

Some farmers, depending on their management system, feed their livestock concentrate and mixed rations that already contain a balance of macro- and micronutrients, including minerals. If this is your case, you’re likely already aware of your animal’s needs and/or work closely with a feed supplier or nutritionist to make sure the balance is appropriate.

Many other smaller hobby farms, however, feed a forage-based (e.g., pasture, hay) diet. In these cases, minerals and other supplements may be provided free choice, meaning livestock animals decide for themselves how much to eat.

The time of year, the age and/or physiologic state of your livestock, and quality of the forage all influence an individual animal’s nutrient requirements, from caloric density to the need for minerals. And of course there are important species differences to be aware of, too. For these reasons, before making any change in your animals’ diet, discuss it with your veterinarian, university extension agent or nutritionist.

Here are a few tips to keep in mind when considering supplements for your farm.


Read more: It’s important to know which minerals your goats actually need.


Salt

Salt (sodium chloride) supplementation is unarguably the most common you’ll see on a farm and it’s highly likely you are already providing it to your animals. Most diets are deficient in salt and adding it can be tricky as it impacts palatability. Ever had a meal where too much was added?

For this reason, salt licks or blocks are a very convenient method of salt supplementation. Animals can control their own intake, and the body is great at telling them when they need more and when they’ve had enough.

If you already supply a salt block, you’ve probably noticed some animals use it more frequently than others. This is a good example of the individualized tastes and needs of each individual.

You may notice that some salt blocks are pink, while others are white. The pink blocks are actually mixed mineral licks, containing more than sodium and chloride. Read the labels for these mineral blocks carefully as they may be only for a particular species based on what they contain.

Magnesium

Magnesium is a good example of how seasonal changes can impact an animal’s diet. In the spring, although pastures are lush with new grass, this grass is typically low in magnesium. This mineral is essential for muscle and nerve function and lactating ruminants, especially older animals, can become so deficient in the spring, they can succumb to what’s called grass tetany.

Frequently, these animals are simply found dead in the field. If you catch it early, they may lack coordination or appear twitchy. Talk to you veterinarian about your spring pastures to see if your herd is a candidate for spring magnesium supplementation.


Read more: Here are 5 basic principles to remember when feeding sheep.


Copper

This mineral is essential for many enzyme-based reactions in the body. Copper deficiency in cattle can result in reduced fertility and broken, mis-colored hairs in the coat. A “typical” copper deficient cow that is supposed to have a black coat will appear faded and red.

Copper, however, is a great example of important and differing species requirements.

Sheep are extremely sensitive to copper. Their bodies store this mineral in the liver so elevated levels pile up, resulting in an overdose. Copper toxicity in sheep results in yellow mucous membranes, weakness and “port wine” colored urine as a result of kidney failure. Usually by the time signs are visible, there is no cure.

The best practice is prevention. If you keep sheep and cattle together, do not provide a cattle supplement to the entire group.

Selenium

Many parts of the U.S. are deficient in selenium. This mineral is closely tied to vitamin E, and both are essential for both skeletal and cardiac muscle function.

When deficiencies occur, this results in a condition called white muscle disease. Seen commonly in young stock, affected animals appear stiff and painful. If prolonged, they can die of heart failure.

However, this disease can be managed by supplements, dietary or injectable, depending on need.

Categories
Homesteading Urban Farming Video

How To Disassemble Pallets Without Destroying The Wood

When I spy a towering pile of pallets, I can’t help but see a whole lot of possibility. I also see some decent scrap wood up for grabs. Reclaimed, reconfigured pallets are the basis for myriad DIY projects. Still, I have no illusions about the work it can take to free up all of those little spruce, pine and fir boards without splintering them in the process.

Fortunately, there are a few simple ways to dismantle wood pallets that don’t require tons of fancy equipment.

In this video, I show you what to look for—and what to avoid—when picking pallets for your own wood projects. For instance, most pallets are stamped with a series of letters and numbers. These help signal which ones may have been chemically treated and which ones haven’t.

(Some pallets in circulation have been fumigated with methyl bromide which is toxic to insects—and hazardous for humans.)


Read more: Here are some ideas for putting reclaimed barnwood to use.


I also show you one foolproof way to disassemble a pallet that’ll leave you with a decent bit of usable wood. All you need is a hammer, a crowbar, saw and safety glasses.

Rather go low-tech? I came across two other methods worth mentioning. One requires just two long planks and a clever bit of leverage. For the other, you’ll need four small scraps of wood and a hammer.

I’ve had success with each of these alternative methods on most—but not all—types of pallets.

Of course, if you plan to make a habit out of reworking pallet scraps, you could spring for a pallet-busting tool or purchase plans to make your own. And, no matter how you choose to break them up, be sure you have permission to grab those pallets before carting them home.

Categories
Beginning Farmers Equipment

The Value Of The Drive Shed Barn Design

Here in Canada (and especially around Ontario), farmers are fond of a particular outbuilding design called the “drive shed.”

You may refer to this barn style by another name (or not grant it a title at all). But the drive shed can be best understood as a long storage building that has multiple bays used to store equipment, tractors, tools and supplies.

They are often built quickly and affordably by sinking large poles (4 by 4, 6 by 6, or even up to 12 by 12) into the ground 6 feet deep to serve as the footings. But the poles rise all the way to the height of the walls to serve as the main support for wall framing. They also support the beams and rafters that carry the roof.

This can eliminate the need to pour concrete. Or you can pour a concrete slab and frame the shed on top.

drive shed barn outbuilding
courtesy of Zach Loeks

All in the Design

So you have plenty of options, but for the purpose of this article we will mainly discuss the design of these barns as highly accessible structures for farm tool, equipment and supply storage. The point (and reason for specific nomenclature) is their layout, door organization and overall shape compared to typical barns.

In comparison to a typical barn, the drive shed is designed to allow many pieces of equipment or loads of supplies to come in and out and keep them accessible and organized at all times.

Typical barns are usually square or rectangular. Although they can be organized for various interior operations, they can quickly get clogged when equipment is placed inside, blocking movement. Drive sheds are more often a long rectangle providing more bays with doors to move tractors in or drop supplies on pallets off.

Think of it as a long-covered row of parking spaces.

On a market garden or larger farm, this may provide a space to park several pieces of tillage equipment or a space to park the farm truck. It could serve as a spot for parking a tractor and multiple bays to receive bulk cover crop seed, and even house a wash station.

Each bay is assigned a duty, and all are accessible to the south with their own garage or sliding door.


Read more: Keep these things in mind when building a homestead barn.


Size Matters

It’s a matter of scale. You could easily design a small drive shed for a home or homestead. It could include bays for parking a driving lawn mower and a walk-behind tractor. You can organize your hand tools on the back wall of one bay. Another space could store bagged compost.

The concept remains: accessibility is key. If you cannot access your equipment and tools and supplies, you cannot stay efficient during the growing season. The drive shed, no matter the scale, keeps these items out of the weather and ready for use.

Drive sheds can be 5 feet by 15 feet, 10 feet by 30 feet, 20 feet by 60 feet…. You get it—three times longer than the depth. Usually a drive shed’s depth will not be greater than 32 feet, while continuing to be longer to integrate more bays.

Larger drive sheds can have bays with poured concrete floors and even in-floor drains to help clean up spills. You could build a smaller drive shed with packed stone or patio stones. It is up to you, your scale and budget.

But the quintessential drive shed recipe remains the same: accessibility for supplies, weather protection for tools and equipment, and an organized layout. Beyond that, the design can be up to you!

Keep growing,

Zach

Categories
Crops & Gardening

Produce Profile: Fall Squash for Winter Dining

Fall is the best food time of year, and fall squash are proof of that. I love fall squash so much, my friend and fellow Hobby Farm writer created our own holiday centering these vegetables: Squash Fest.

Fall is not, of course, the time of year to be planting fall squash, but this is the time of year to harvest it. It’s also the time to begin planning for next year’s fall squash crop.

What is Fall Squash?

Fall squash are part of the cucurbit family—close relatives of summer squash, zucchini and patty pan. These fall varieties mature to have tough skins that allow them to keep for months after harvest with no refrigeration. In fact, they won’t last as long if you refrigerate them.

There are several types of fall squash, and each has multiple varieties:

  • Butternut squash: My favorite, with a sweet, dense orange flesh that lends itself to sweet and savory dishes. It’s an excellent storage squash.
  • Acorn squash: The pale-orange or deep yellow flesh of the acorn squash is a bit less sweet; more for savory recipes. It also stores well.
  • Delicata squash: As the name implies, delicata is more delicate. On the plus side, its skin is edible; on the negative, it doesn’t store as long as butternut and acorn.
  • Spaghetti squash: These are size of a football, with pale yellow flesh. Grow this squash to amaze your non-farming friends, if for no other reason. When cooked, the flesh is scraped from the skin with a fork to form spaghetti-like threads.
  • Kabocha squash: There are a number of types of kabocha, and they range in color and flavor. There’s something for everyone in this category.

Read more: Patty pan squash is zucchini by another name.


How to Grow Fall Squash

Cucurbits are hard, as you probably know, for growers using organic methods, because of insects and fungal diseases. Fall squash have a long growing season, so you need to keep plants healthy for 85 to 100 days or more. These are not a beginner’s crop, which is why I say fall is the time to start planning for fall squash.

Fall squash are heavy feeders, requiring lots of nitrogen, phosphorus and potassium. Start with a soil test in the fall, and then amend your soil with all of the phosphorus and potassium and half of the nitrogen that your plants want. Side dress with the other half of the nitrogen as fruits begin forming in the summer.

Direct seed or transplant your fall squash into friable soil soon after your last frost to give them the most time to grow. This year, my direct-seeded plants produced at nearly the same time as the transplants.

Read your seed packet for the proper spacing, as each variety differs. These plants take up a lot of space and vine out. Don’t crowd them, or fungus is more likely to set in.

Keep your plants covered with row cover until blossoms begin to form. This will keep off insects when the plants are young. By the time blossoms come on, plants have a better chance of standing up against the bugs.

Cultivate at least once, maybe twice, while the plants are small. As the leaves grow, they’ll shade out most weeds. Pull by hand any problematic weeds that show up as the season goes on.

Alternatively, plant into a plastic mulch, or mulch your beds with straw.

Fall Squash Cultivation Alternatives

There is no shortage of ideas for how to grow fall squash most successfully.

I love the idea of squash rings, and in fact I’m raking leaves this weekend with those in mind.

A friend had great success growing butternut squash vertically on his deer fence this year—except for the one that deer nibbled through the fence.

And of course there’s the indigenous people’s three-sisters garden planting technique, which grows storage corn as a trellis for pole beans (that provide nitrogen fixation) alongside squash, whose large leaves and vines shade out the weeds.


Read more: Learn about planting in squash rings for a better fall squash harvest.


How to Harvest and Store Fall Squash

When the vines start dying back, it’s time to harvest. Use pruners, as the stems are tough, and watch where you put your thumb when you’re cutting. (Written from experience.)

Put your squash in the greenhouse or in your car with the windows cracked for a few days to cure them. This will seal their hard skins and concentrate their sugars, making a hardier squash for storage and a tastier one for eating.

After curing, store in a cool, dry place, like in your garage, your pantry or a box under your bed.

How to Eat Fall Squash

This subject deserves its own article. I could go on, but here’s a short list of my favorites:

  • Butternut: Soup; polenta; chili; and in every baked good imaginable
  • Delicata: Stuffed with curried lentils; over a salad with a fruity dressing; and on top of pizza
  • Acorn: Soup; pureed and added to quiche; and drizzled with cinnamon butter and maple syrup
  • Kabocha: Soup; mashed with cheddar cheese; and gnocchi
  • Spaghetti: Fritters; like pasta with pesto; and Southwest-style cheesy sausage, bean and salsa casserole

Fall squash: You plant it in the spring, eat it in the fall and winter, and worry about it all year long. It’s worth it, though. Get your pumpkin-spice latte in hand, and head to the garden to start working on next year’s squash plot.