Categories
Uncategorized

10 Tips For Keeping Chickens Safe From Predators

It hurts to lose a chicken you’ve lovingly raised from a cute, fluffy chick—to go out one morning and find Henny Penny mysteriously missing or worse, discover a shocking scene of bloody, feathery carnage. Not only does it hurt emotionally, but for those whose livelihoods depend on their flocks, it hurts financially, too.

So it seems almost a sacrilege for me to confess the following.

Even though I adore my chickens and hate to sacrifice even one to a coyote or other wild thief, I don’t blame the predator for doing what predators do to survive. Furthermore, I refuse to take a lethal approach to retaliate for any depredations—with one exception.

Blame it on my volunteer work at a zoo as a teenager and, later, a seven-year stint as a wildlife park keeper. Working around tigers, cougars, wolves, foxes, raccoon, eagles and other predators, I became completely enamored with these oft-maligned animals’ beauty, intelligence and strength—not to mention their critical role in nature, keeping prey populations in check.

My deep affection for predators has lasted to this day.

And yet—I really, really don’t want them eating my chickens. Happily, my husband and I have lost surprisingly few birds in almost 30 years of keeping various poultry on our Washington hobby farm. I hope our time-tested tactics below will help you protect your chickens from predators, too, to avoid the pain of losing a feathered friend.

1. Figure out Who Done It

Unfortunately, chickens are vulnerable to a dismaying number of predators, from petite weasels to brawny bears. Some—think raccoon and coyote—are widespread, occurring in country and town, while others have more limited ranges.

In general, though, raisers residing in different areas deal with a slightly different cast of potential poultry thieves. On our farm, for instance, we’ve only seen a fox and signs of a bear once. Raccoons, opossums and great horned owls, however, visit regularly.

If you’re new to an area or new to chickens, ask neighboring livestock raisers about predators they’ve encountered and their strategies for foiling them. Anticipating which species may visit—and what their modus operandi is—can help you better protect your flock. (See “The Dirty Half Dozen,” below.)

Tip: Keep in mind that predation can vary with season and migration patterns, too. We’ve learned to be especially vigilant during frigid or snowy weather.

chickens chicken poultry predators predators
RudiErnst/Shutterstock

2. Think Like a Predator

Survival for a predator poses a daily life or death challenge. They can’t afford to expend an enormous number of calories pursuing prey or expose themselves to an enemy—say a human with a gun.

Sure, coyotes, wolves and many other predators can and do kill healthy animals. But typically they have better success going for easier meals: the old, sick, young and weak. This is one reason why predators are so important for healthy ecosystems.

It’s also why our domesticated biddies—confined, exposed, less wary than wild birds—make such tempting targets. So look at your poultry set-up/routine as if through a sneaky, opportunistic predator’s eyes. And keep reading for suggestions on how to make your chickens as hard for predators to get as possible.


Read more: Here are some additional tips for protecting chickens from predators.


3. Tuck Your Birds In

Many poultry thieves prefer operating under cover of darkness, or in the early morning and evening hours. Allow your birds to range and roost freely during this timespan, and you’ll likely lose some.

Over the years, we’ve had this lesson drilled into us a few times—most recently when a reckless hen hid out one night. Try as we might, we couldn’t find her. The next morning, all that remained of our clucky friend was a trail of pretty barred feathers leading to the fence.

Fortunately, chickens are creatures of habit and easy to train. We start by confining our growing pullets to their permanent coop until they’re larger and less vulnerable. At the same time, we show them that home is where the food and yummy mealworm treats happen.

We also use treats to teach them to come when called. Once released into the great outdoors, our hens normally return to roost as the sun sets or when summoned. Then we lock them in for the night, resting easy that they’ll be safe.

4. Build an Impregnable Fortress

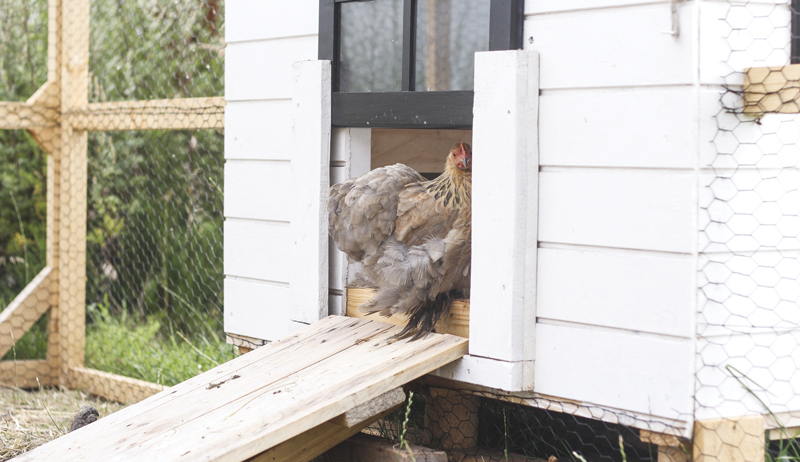
The coop structure where our Barred Rock hens spend each night consists of an outer pen constructed of strong, tight hardware cloth well-stapled to a wooden frame, with a solid corrugated plastic roof. The girls climb a ramp and enter through a pop-hole door into an upper “apartment” roost/nest-box area made of sturdy cedar boards.

I like having this portion of the coop elevated because predators can’t move in below the chickens. All outer doors have secure latches, and the pen frame sits on flat concrete blocks to help thwart diggers. We’ve had this coop for over three years now and thus far it’s kept our flock safe and sound.

Would it stand up to a bear? Probably not. But as noted, bears visit our farm rarely, if ever.

When choosing or constructing a coop/pasture pen, steer clear of flimsy chicken wire or any gap-ridden pen covering that allow weasels to slip in or raccoons to reach through with their dexterous paws.

We once had a raccoon rip right through some chicken wire—with deadly results.

chickens chicken poultry predators predators
jaco van der ende/Shutterstock

5. Mount a Perimeter Defense

Years ago, after tragically losing a sheep and several ducks to roaming dogs, my husband and I resolved to boost our property’s perimeter defenses. A fence now surrounds our 5 acres, and much of our land also has an inner buffer fence for extra protection.

Additionally, we’ve used interior fencing to block our poultry from entering a woodlot and the exposed pastures distant from the house. Our barriers include a mix of 4- to 5-foot welded-wire field fence, hog panels, wooden fence and nonclimb horse fence.

We especially like the latter because of the small openings. My husband once watched a coyote squeeze through some regular field fence.

Remember that fences won’t discourage every predator. Coyotes are excellent jumpers and diggers, for instance, and raccoons are talented climbers.

Some raisers bury their fencing to bar diggers or use hot wire along the top for added security. Others swear by livestock guardian dogs to protect their charges.

Tip: Consider motion-sensitive security lights near the coop area as another deterrent.


Read more: These farm fencing fundamentals will help you keep things secure.


6. Check Defenses Frequently

We discovered the dangers of neglecting this task years ago after a coyote picked off two free-roaming chickens in as many days. When we belatedly surveyed our fence, a massive hole had been dug beneath one secluded section.

Simply filling the excavation with large rocks, coupled with banning our flock from the pastures, persuaded the coyote to look for prey elsewhere.

These days we’re much more careful about performing regular fence and coop/pen checks. When scrutinizing your own defenses, watch for signs of digging, damage to fences/wire mesh, and new holes, tunnels or gaps.

7. Don’t Feed Predators

Avoid feeding predators on your property—even cute ones like raccoons. Doing so can cause predators to lose their fear of humans, hang around and at some point they may turn their hungry attention on your chickens.

If you can, also refrain from leaving food outside for your pets. Or promptly remove it after they’ve eaten their fill.

Leftovers can attract wild predators to your property, along with feral dogs and cats. Ensure feed and garbage cans are properly secured against wild raiders, too. And don’t forget to collect eggs daily. Letting them pile up can attract hungry critters as well.

8. Provide Appropriate Cover

Many raisers protect their flocks by keeping them confined 24/7 in covered pens. If your birds live in uncovered digs or roam by day, however, trees and shrubs can offer protection.

A friend of mine, for example, has a large, spreading fir tree that her flock hurries to hide beneath when raptors appear. My own hens often shelter beneath a sprawling grapevine.

Remember, though, that low vegetation crowding your birds’ home can serve as unintentional cover for a sneaky raccoon, fox, weasel and the like.

chickens chicken poultry predators predators
Joe Thongsan/Shutterstock

9. Be Diligent on Rodent Control

While a a full-sized chicken has little to fear from a rat, a tiny chick is extremely vulnerable to these stealthy omnivores. Additionally, an abundant population of rodents living among your poultry will attract hunters who may get sidetracked by the prospect of a chicken dinner.

On our farm, we attempt to keep rat populations down by eradicating potential nest sites and hideouts—like brush or junk piles—and cleaning up feed messes. Here’s where we make an exception to our no-kill policy, using snap traps when necessary and with caution to avoid killing nontarget animals.

We never use poison baits, which endanger pets and wildlife.


Read more: Keep rodents in control in and around the coop with these tips.


10. Provide Protection for Chicks

Again, remember that your adorable peeps are defenseless. If you’re raising chicks in a brooder set-up, secure it against rats, pets and small children. We raise our chicks in a mudroom rather than a garage or outbuilding, just to be on the safe side.

If you let a hen raise her brood, consider keeping the family in a protective pen instead of letting them roam free—at least until the chicks grow large enough not to be easy crow, rat or snake bait.


Sidebar: The Dirty Half Dozen

You can’t know what to do if you don’t know who’s doing what. Before you implement your predator-proofing plan, find out what potential threats are likely in your neck of the woods.

Dog

Man’s best friend has been one of the most frequent and damaging livestock predators on our farm. While wild animals generally hunt to eat, roaming dogs will kill for the fun of it.

Look for birds that have been killed or maimed but not taken away or eaten.

Raccoon

The clever raccoon is omnivorous, dining on frogs, mice, eggs, fish, fruit and more. Along with helping to control prey populations, they also disperse plant seeds in their droppings.

Look for bite wounds on the chicken’s back, plus gnawed heads and breasts. Given the opportunity, a raccoon will also reach into pens to grab slumbering birds and pull them partly through the wire (ick).

Coyote & Fox

These savvy predators will usually snatch chickens whole and skedaddle, leaving scattered feathers in their wake. Both are omnivores who eat a wide variety of foods, including rodents, rabbits, insects, carrion and fruit.

Some studies have shown that lethal control of coyotes can actually increase populations and livestock predation.

Weasel

These sinuous carnivores are exceptional hunters of rodents, rabbits and other small animals. Capable of squeezing through very small holes, weasels usually deliver a killing bite to the back of the head.

Sadly for farmers, a weasel triggered by panicking fowl may kill more birds than it can eat—not for fun but due to its high metabolism, voracious appetite and caching instinct.

Hawk, Great Horned Owl or Eagle

Sometimes these powerful raptors will carry off the entire chicken, but often a hawk will eat their prey at the scene. Look for lots of plucked feathers scattered around. If the carcass remains, a munched head and neck indicate an owl, a bird that also normally operates by night.

Birds of prey are legally protected, and for good reason. If it weren’t for these incredible hunters, we’d be up to our ears in rodents, rabbits and more.

Rat

If you’re missing chicks in the morning or find one partly eaten, a rat is the likely culprit. Female brown rats begin reproducing early and can have up to five litters a year.

Left unchecked, rat populations can explode fast.

Categories
Poultry

6 Reasons Why You Should Keep Cochin Chickens

When it comes to eye-catching chickens, very few breeds surpass the magnificence of the Cochin. This majestic bird, originally developed in China for its plentiful meat and its large eggs, almost single-handedly started the “Hen Fever” craze that swept through England in the 1840s.

Who could blame those 19th-century fanciers? So accustomed to scrawny, scruffy chickens, they must have became instantly enamored of this fluffy, full-bodied Asian fowl.

As the bicentennial of this bird’s introduction to England approaches, here are six convincing reasons why 21st-century flock owners should consider keeping Cochin chickens.


Read more: Here are a few important tips to keep in mind when you start keeping chickens.


They’re Poofy

The Cochin’s multitude of feathers is the initial thing most people notice at first glance. Cross a jumbo feather-duster with a feather boa and you’ll get the picture: Cochin chickens are spectacularly fluffy.

They seem to have layer upon layer of feathers but, in actuality, their plumage is simply long and very densely packed, adding to the breed’s already sizable appearance.

Their characteristic tail is a rounded bouffant bun of ultra-soft feathers. Their slender, sturdy legs are covered in feathers. Even their toes are feathered.

And just when you think a Cochin couldn’t possibly get any poofier, along comes the frizzled variety, whose curled, twisted feathers add even more volume. Do note that if your yard or run tend towards the muddy, this walking puffball isn’t for you, as its feathered feet require a dry, preferably grassy surface.

Cochin chicken chickens
Ana Hotaling

They’re Sweethearts

Very few breeds are as gentle and docile as the Cochin. Their calm, friendly dispositions make them ideally suited for families with children and for older adults, as even the males of the breed are non aggressive.

Cochins are also very easily tamed. My fluffballs learned quickly to assemble whenever I entered their run in the middle of the afternoon. They knew this meant kitchen scraps or other treats, something the other breeds never picked up on until they saw the Cochins happily munching away.

Several of my Cochin girls were also perfectly happy being carried around and cuddled by my sons and, yes, by me on occasion. Although, to be honest, they preferred sitting on my lap in the sunshine.

As you can surmise, the gentle-natured, affectionate Cochin also makes a terrific pet.

They’re Cold Hardy

Michigan winters arrive early and stay late, with -20º days being a hallmark of this harsh season. During these bitterly cold months, I’d haul myself out of my nice, warm bed to grumpily open the my coops. But I knew full well that nobody would set one toe outside their pop door.

No one, that is, except the Cochins.

Without fail, they’d troop outside and wander around as if it were a balmy summer day. My husband and I would have to shovel paths through the snow just so the Cochins could stroll. Thanks to their abundant feathering and their efficiency at converting fuel to body heat, Cochin chickens can survive the bleakest of chilly climes.

Not only that: Cochins still lay regularly throughout the winter, earning their keep while the rest of the layers take the snowy season off.


Read more: This guide will help you help your chickens during cold weather.


They’re Approved by the Queen

Cochins aren’t just beautiful, bountiful birds. They’re also royal … or as close to royal as chickens can get.

Cochins were a particular favorite of Queen Victoria, who had a palatial aviary built just for the dazzling birds her explorers brought back from Shanghai. The Queen was known to spend many an afternoon there, enjoying tea amongst her beloved fluffs.

Queen Victoria eagerly distributed her flock’s fertilized eggs to relatives all over Europe. This kicked off the “Hen Fever” for exotic, elegant poultry that took the continent—and eventually America—by storm.

Cochin chickens chicken
Ana Hotaling

They Make Great Mothers

If any breed gives the Silkie a run for its money, it’s the Cochin. Mama Cochin chickens will happily brood anything from golf balls to goose eggs. In fact, they are the preferred broody when it comes to hatching ducklings and poults.

Cochins are so inclined towards broodiness that roosters have been known to set eggs.

Cochins will brood more than one clutch per year and will happily mother all manners of baby poultry. Just make sure that your hatching eggs have strong shells. Due to their size, Cochin hens have been known to accidentally crush any thin-shelled eggs they are setting.

They Come in Different Sizes

Cochin chickens are quite formidable in the size department, beaten out in size by only the Jersey Giant and the Brahma. An adult male weighs approximately 11 pounds, while the female averages between 8 and 9 pounds.

Because of their size, Cochins are not known for their flying skills. They can be contained by a two-foot fence, and they usually require a low perch, especially as they get older.

Concerned that these gentle giants might take up all your coop space? Not to worry: Cochins are available as both large fowl and bantam, with adult bantams averaging between 2 and 3 pounds in size.

Categories
Animals Equipment Poultry

Tips For Improving The Doors In Your Chicken Coop

How many doors does your house have? In our little two-bedroom house, I count 16. That includes screen doors and closet doors as well as attic and basement doors. But that’s not counting the refrigerator door, cupboard doors and even the door to the dryer in the basement.

So it should come as no surprise that even for a small coop and hen habitat, you’ll want at least six doors (and in this case, gates equal doors).

  1. a gate into the pen
  2. a chicken-sized automatic door from the pen into the coop
  3. a keeper access door, also from the pen into the coop
  4. one, if not two, coop clean-out doors outside the pen for scooping poop into one or two compost bins
  5. a hatch into the nest box
  6. a doorway into the chunnel (a chicken tunnel to a fenced foraging area)

Swing in or Swing Out

For the doors on the coop it’s better that they open out. If they were to open in, they would conflict with the bedding and poop.

Plus, you’d have to leave a gap at the bottom so they could swing in above the floor. That would create drafts and a space for snakes and mice to enter.

The same issues apply to the gate. If the hens have scratched a bunch of debris in front of the gate, it will be difficult to open if it swings in. Installing doors so that they open out also makes it easier to install the hinges.

chicken coop doors
Frank Hyman

All Squared Away

How many gates have you seen that are sagging? Plenty, right? The remedy to sagging gates is to incorporate a diagonal piece of wood. In construction, triangles are more stable than rectangles.

I have a gate built of cedar branches, and each corner has a short wooden brace that’s at a 45-degree angle. It forms a triangle at each corner to stiffen the gate and keep it square.

If you go this route, be sure to predrill a hole at each end of the diagonal brace. That allows a screw to slip through easily and then bite into the frame of the gate.


Read more: Keep your flock safe with this coop security checklist.


Automatic Doors

One common feature of coops promised to interfere with our goal of enjoying two-week vacations. They’re called pop doors. This is the small door on a coop that allows hens to go out in the morning and back in at dusk.

My wife Chris and I are compatible in many ways. One being we both firmly believe in “early to bed and late to rise.” Neither of us is inclined to get up at daybreak to let the hens out of their coop.

We considered three ways to resolve this quandary and you may want to choose one of these.

A: If you’re confident that the fencing of the hen pen is secure against predators, then you could actually forgo an operating pop door. It is, after all, just a second layer of security if the pen is well made.

B: A chicken-activated door seems ideal to me. Andrew Wells in England appears to have figured it out. Watch his YouTube video and read his comments.

When all of his chickens have climbed on the roost, their combined weight shifts the roosting bar so that cables and pulleys lower the pop door. When they hop off the roost, it shifts again and opens the pop door. And the counter-balancing milk jugs, partly full of soil, look adjustable to allow for changes in chicken population (and weight!).

C: Automatic coop doors are available online. This is the route we chose. There are several designs on the market. Chris was more than happy to pay if it meant we could wake up in a leisurely way while listening to the happy clucking of hens in their pen.

(Editor’s note: Not sure where to start? AdorStore offers a few models that are both easy to install and durable.) 

Now a Caveat

Most of the automatic doors that I’m aware of depend on a common timer that turns living room lamps on and off while you’re away. Plug the cord into the timer. And plug the timer into the outlet. You’re all set to go on a road trip. That is unless the power goes out.

If the power goes out overnight, then the chickens will stay sequestered in the coop until you either prop the pop door open, prop open the keeper door or are able to reset the timer when the power returns.

This is the one downfall of some automatic doors. And a good selling point for using a solar panel.

If this happens while you are out of town, it may be tricky to get a neighbor to reset the timer as the process is a bit counter-intuitive. (Consult the instructions!) For our out-of-town trips, we sometimes turn the door off and leave it open, so the chickens can come and go freely.

Because we have a predator-proof pen, we don’t worry about their safety.


Read more: What’s the best coop roof design? Here are 3 reasons to consider the skillion.


Keeper Access Door

I wanted a door into the coop so that I could lean in and do any maintenance. From the keeper access door, I can reach:

  • the automatic door
  • the roosts
  • the nest box
  • the floor
  • the inside of the walls
  • underneath the roof
  • all the vents of the coop

It also gives me a position from which I can sweep out or even hose out the floor of the coop. All the spent bedding can flow out through the clean-out doors on the opposite side of the coop and into the compost bins (more about that later).

chicken coop doors
Frank Hyman

Clean-out Doors

Clean-out doors are built just the same as the keeper access door, with thick plywood and exterior-grade hinges. The differences are that I recommend a pair of clean-out doors wide enough so that the entire width of the coop can be open for ease of cleaning out.

That way you won’t have any hard-to-reach corners.

I also recommend a pair of doors so that each door can be aligned with a compost bin. And since a raccoon could stand on the bins, you want to use raccoon-proof latches like swivel safety hasps.

Hatch for Nest Box

Whoever came up with the idea of putting nest boxes on the outside of the coop should get a medal … and a pension … and a monument on the National Mall. It’s a great time-saver.

However, most nest boxes are accessed through the roof of the nest box. That makes it kind of difficult to clean the boxes. Also some members of the family may not be tall enough to reach that far.

We wondered: Why not let the wall of the nest box open into a tray, as we saw on one coop tour? It gives you someplace to put your carton while you gather eggs. It also makes clean-out easier, and, best of all, shorter members of the family can help with fetching eggs.

For the hatch to form a counterlike surface when it’s open, you’ll need a wooden “arm” that will swing out under it for support. I use scrap 2-by-2 pieces of lumber, but any dimension will do really.

I cut the pieces about 10 inches long with a 45-degree bevel on each end for a more finished look.

Predrill a hole through the middle of each arm that’s just wider than the screw threads. Choose a screw that’s short enough that it won’t come up through the floor of the nest box and poke a chicken. Or line up the screw so it comes up through the floor and into one of the walls so it doesn’t poke anyone.

Slide the screw through the support arm, and screw it up into the floor of the nest box. It shouldn’t be so tight as to keep the arm from rotating.

When the arm is put away, it should be flush with the hatch when it’s closed. When I want to open the hatch, I just swing the arm out 90 degrees, release the latches and gently swing the hatch down to rest on the support arm.

This arrangement keeps out drafts and critters. When we want to collect eggs, we have easy access. When we want to clean out the nest box, we leave the support arm where it is and let the hatch hang straight down.

This article originally appeared in the September/October 2020 issue of Chickens magazine.

Categories
Crops & Gardening

Dealing With Invasive Apple Trees? Let Some Grow To Maturity

Believe it or not, apple trees can be one of the more stubborn invasive species on farms. A few years back, I described the surprising but not especially uncommon way wild apple trees can take root in abandoned fields and eventually grow to large sizes.

Usually farmers remove these marauding apples before they reach maturity. After all, who wants to lose a farm field to wild trees?

But maybe we shouldn’t be so quick to grab the pruning loppers.

There are many less desirable invasive species to worry about, and besides … wouldn’t it be interesting to let a few of these unheralded specimens mature and produce fruit, if only to test their taste?


Read more: What makes a good pair of pruning loppers? Here are a few tips for buying.


Let It Grow

Remember, proven apple cultivars have been carefully chosen for desirable traits. And they’re reproduced through grafting—not by seed.

Let natural pollination work its wonders, and each apple seed becomes an experiment in unplanned genetic mixing. The resulting tree might produce small and/or sour fruit. Or it might turn out to be the next McIntosh or Wolf River apple.

Both of these famous varieties of apple trees were discovered growing wild and subsequently reproduced through grafting.

Through the years, I’ve allowed a large handful of wild apple trees to reach maturity on my farm, with mixed results. My fascination began with a quirky little tree growing horizontally out from beneath the lower branches of windbreak spruce trees.

I cut off a few of the overhanging branches to give the apple tree more light, and was delighted to see it blossom beautifully the following year. Ultimately it produced 750 large crabapples, shiny and light red in appearance.

Sour? Absolutely. Pretty? Definitely.

Another tree, growing along a fence line, has likewise favored beauty over taste. Every year it produces huge blossoms, nearly 2 inches across. And the first year it produced apples, I was excited by their bright red and glossy appearance—truly a sight to behold.

I brought one back and cut it open. Inside, the flesh was white and crisp. It looked delicious! But appearances were deceiving, and that apple ranks among the sourest I’ve ever tasted.


Read more: Check out these 5 trees that are great to plant for a windbreak.


Promising Futures

About a week ago, I was cutting a trail through a wooded section of my farm and came across an apple tree growing in the midst of birch and maple trees. I’m not sure how it gets enough sun to grow fruit, but somehow it had found the means to produce a scattering of medium-sized yellow apples.

I picked one, gave it a taste … and was pleased by something vaguely resembling a sweet flavor! My pleasure lasted for a few seconds, just long enough for a sour aftertaste to kick in.

Still another wild tree, growing in full sun on the edge of a field, caught my attention a few days later. I’ve had my eye on it for years, watching it grow slowly but surely, and this year it delivered a surprisingly large crop of lovely red, striped apples.

Undeterred by my previous experiences with wild trees, I gave one a try. I discovered a mildly sweet flavor without the typical sour undertones!

I took a second bite—it was just as good. Not anything to write home about, but certainly edible. I broke the core apart to check the color of the seeds. They were mostly brown, but not fully colored, so with a little more time to ripen, the sweet flavor of the fruit might grow even stronger.

Suffice to say, I’m looking forward to further taste-tasting this promising new variety. If you have invasive apple trees growing on your farm, I encourage you to follow the same path and let a few reach maturity.

It’s fun to sample the flavors, and who knows? Perhaps you’ll discover the next McIntosh or Wolf River!

Categories
Animals Large Animals

Breed Profile: Get To Know Pineywoods Cattle

The history of the Pineywoods Cattle breed in North America began when Spanish explorers deposited a small herd in the Gulf Coast centuries ago. The harsh environment of the South shaped a true landrace breed that established and thrived for centuries without the aid or err of humans.

The vast open pine timber was filled with cattle that bore the prized marks of ownership of settlers in the region. Utilizing the breed for milk, beef, leather, tallow and draft power allowed a herding culture and way of life to be sustained.

These families isolated cattle into distinct strains that became critical genetic goldmines for the following benefits:

  • longevity
  • hardiness
  • calving ease
  • mothering
  • disease resistance
  • thriftiness
  • fertility
  • carcass quality
  • milking
  • intelligence

Read more: Here are 7 things to look for when selecting grassfed cattle for your herd.


Changing Times

Despite the value of the breed and the role it played in shaping early cattle production, industrial preferences shifted over time to larger framed animals. Very few pure animals remained after the implementation of this shortsighted trend.

Coupled with emerging fence laws that ended open-range grazing, the Pineywoods Cattle became endangered of being cross-bred out of existence. In 1999, a group of breeders who had preserved pure herds joined together to form the Pineywoods Cattle Registry and Breeders Association.

The PCRBA’s mission is to educate, promote and preserve Pineywoods Cattle with purpose. Breeders today range from hobby farmers, seed stock, cow/calf, beef production and homesteads.

An Adaptable Breed

The adaptability of Pineywoods cattle make them suitable to raise and thrive in nearly any environment, especially those classified as fragile due to their thrifty nature and light footprint. A hardy and fertile breed that calves unassisted in harsh conditions makes life simpler for breeders.

Pineywoods Cattle have a varied palate. They will fully utilize a native range or silvopasture by consuming grasses, legumes, forbes, brush and browse.

Their rich milk provides rapid calf growth. And the breed’s strong mothering instincts ensure the calves are safe and healthy.

A docile and calm nature makes them a great breed for a family farm. And larger producers value this mild temperament for frequent penning, sorting and transport.

Their smaller frame increases productivity per acre as well as carcass yields for beef production. Butchers and chefs desire the carcass quality for tenderness, taste and profitability.

Combining all these important traits make Pineywoods Cattle an equally great fit for a commercial producer or homestead that wants to utilize them as a multipurpose breed.

Categories
Animals Large Animals

How To Conduct Fecal Egg Counts For Your Goat Herd

Resistance to deworming medications is a growing problem. With no new drugs on the horizon, preserving the efficacy of the available products is critical. Parasite control based on fecal egg counts rather than a continuous rotational deworming protocol can be effective for preventing infestations and avoiding resistance.

Basing treatment on the results of fecal testing can be costly in large herds. However, the supplies are readily available and with basic training, livestock owners can learn to run their own.

Emaly Leak owns Autumn Hill Llamas and Fiber in Duanesburg, New York, and has been running her own fecal egg counts since she was 15. She teaches others to do the same and says goat owners can experience the same benefits she has.

“One of the biggest misconceptions is that it takes a veterinary-related degree,” she said. “You do need to follow the protocol with a good amount of attention to detail, and it can be tedious to count potentially hundreds of eggs, but it isn’t hard.”

DIY fecal egg testing can reduce costs compared to sending samples to a veterinarian or university. And it gives you the ability to test whenever needed, like weekends when labs are closed.

Although Leak performs most of her own, she sends samples out to be tested to make sure what she is seeing is accurate.

“It’s a good checks and balance,” she said.


Read more: Help control parasites in your goat herds with rotational grazing.


Sampling Frequency

Leak uses the Modified Wisconsin Sugar Flotation Method to evaluate fecal samples, which was developed by the University of Wisconsin’s Parasitology Laboratory. This method uses a sugar- or salt-saturated solution, which causes the eggs to float to the top of the sample.

She runs fecal egg counts on her small herd of three to four times a year. For larger herds, experts recommend testing 10 percent of the herd. She also tests any new animal within two weeks of arrival or after a return from shows.

“Spring is often an important time to test as the animals are going back out on the pasture where contamination is happening,” she said. “And females are often delivering their young, which makes them more susceptible to parasites.”

Equipment for Conducing Fecal Egg Counts

Leak says retailers like Amazon and livestock supply companies carry the items needed to perform on-farm fecal testing. Supplies include:

  • microscope (with a movable stage if possible)
  • centrifuge
  • test tubes that will fit the centrifuge
  • glass slides
  • glass cover slips
  • popsicle sticks
  • paper/plastic cups
  • tea strainer
  • gloves (latex, rubber, vinyl, etc.)
  • plastic baggies or small Tupperware containers
  • float solution (saturated sugar solution in water)
  • small scale (postage scale)

A Step-by-Step Guide

  1. Collect fresh samples.
  2. Weigh 3 grams from each sample and place in a plastic baggie or Tupperware container.
  3. Mix sample with float solution (volume will depend on the size of the test tube used). Stir to break up the sample.
  4. Strain the mixture, add the liquid to the test tube and discard the remaining solids. Add additional float solution to the tubes if necessary, to give them all an equal volume. Clean the strainer well between samples.
  5. Centrifuge the tubes for 10-15 minutes.
  6. Add more float solution to fill the entire tube leaving only a slight bubble on top.
  7. Add a glass cover slip to the top of the test tube. The liquid should touch the cover slip but not spill over.
  8. Let the samples sit for at least 10 minutes and up to four hours so the eggs float to the top and attach to the cover slip.
  9. Remove the cover slip by pulling straight up and place it on a glass slide.
  10. Examine the slide for parasite eggs. Divide the number counted by three to determine the eggs per gram (EPG).

Parasite prevention and management does not equate to fecal samples with zero EPG. That is the biggest change in thinking as the industry has moved away from rotational deworming to an approach based on fecal egg counts.

“It’s important to retain a population of parasites in your herd that are still susceptible to medication,” Leak said. “You’re never going to have no parasites in an animal.”


Read more: Here are some pointers for sustainable parasite control for your goats.


Tips for Getting Started

Leak says it’s best to learn the process from someone else and recommends finding a mentor to teach the process. Classes are also often available, though these may be harder to find amid the coronavirus pandemic.

“A lot of people are happy to teach one on one,” she said. “It is hard to learn without seeing it in person, and it is very helpful to have someone to answer questions once you get started on your own.”

Finding a good visual resource for identifying parasite eggs and keeping good records of your testing and results is also important, Leak emphasized.

Categories
Crops & Gardening

Truffles Are A Delicious, Desirable Crop To Grow

If you haven’t eaten truffles, you might be wondering what all the fuss is about. After eating my first plate of pasta covered with thin truffle slices, I understood what the fuss was about but couldn’t explain it. I just knew that if my sense of smell were strong enough, I, too, would be down on all fours like a pig, snarfing up truffles, dirt and all.

So on a trip to Tuscany, Italy, my wife and I hired someone to find and feed us some truffles. Massimo, our truffle forager, introduced himself as a “littermate” to his dogs. He had grown up with them. His father and grandfather were also long-time truffle hunters in San Miniato, a short drive west of Florence. His sister, Letitzia, would serve us lunch made with the truffles we found.

Massimo loaded Stella, a knee-high black and white truffle dog, into her crate in the back of his car and we were off. Ten minutes later, we pulled into a patch of woods. Now loose, little Stella was so happy that she pogo-jumped several times.

Her head bobbed up nearly as high as mine.

In a few more minutes, Stella sat down to mark a spot where she smelled a truffle just below the surface of the soil. Immature truffles are also close to the surface, but they don’t give off an aroma until they are ripe.

The truffle is an underground mushroom. Regular mushrooms can release their spores to the wind. Underground truffles have to give off a strong aroma to attract certain species of mammals to dig them up, eat them and then poop out their spores across the countryside.

Dogs don’t think of truffles as food. Pigs, however, do eat truffles. In the old days, truffle hunters used pigs to sniff them out. Which leads to an equally old joke: How do you tell a truffle hunter who uses pigs from one who uses dogs?

The one that uses pigs is missing a few fingers.

Where & When?

The U.S. has delicious, native truffles: The pecan truffle in the southeast and the Oregon white in the Pacific Northwest are a couple examples. Growing these in their native range would probably be the least expensive option for a hobby farmer.

Foragers can also seek them out with a trained dog and a landowner’s permission. (Hint: Know any pecan orchards?)

The most sought-after truffle is the Italian Alba White, but no one has been able to cultivate it. You’ll need a Tuscan truffle hunter like Massimo to help you find it in winter when it’s ripe.

Some people grow a few Mediterranean truffles here with uneven results. The French Black Perigord has been grown on oak tree roots in California and the southeast. Burwell Farms and Mycorrhiza Biotech grow springtime white Bianchetto truffles on loblolly pines in North Carolina with success.


Read more: You can grow mushrooms on compost for a delicious fungal feast.


Inoculation

If you want to grow a new plantation of either native or Mediterranean truffles, you’ll have to buy young trees that have had their roots inoculated with your preferred truffle.

Getting specific truffles to attach themselves to your host trees takes a bit more science than most DIYers can manage. Growers should not expect their first harvest for 3 to 5 years and may wait up to 10 years for a profitable harvest—if they’ve maintained their planting well.

Bottom Line

At 500 trees per acre, you could spend $10,000 just to buy the trees. Depending on variety and the market, you could sell truffles you grow for $300 to $1,000 per pound. After 10 years, mature production could be 100 pounds per acre or more.

A well-maintained, mature plantation could gross $25,000/acre per year.

grow truffles growing farm
Frank Hyman

Lime It Up

If you want to grow Mediterranean truffles in the eastern U.S., you’ll need to invest in lime-spreading equipment and lime—lots of it. Mediterranean truffles expect a pH of about 8. That doesn’t sound very far away from the 5 commonly found in the eastern U.S.

But the scale isn’t linear. It’s exponential.

That means that if you want to raise a plot of land from 5 to 6, the soil test might recommend applying one ton. If you want to raise that plot from 6 to 7, you’ll have to apply another 10 tons. And to get from 7 to 8, you’ll have to apply another 100 tons—perhaps every year.

Granted, lime is less expensive than most fertilizers. But it will be a substantial annual expense for materials and labor. Traditional farmers have used dolomitic lime because it has magnesium.

Farm truffle master Richard Franks at Burwell Farms is experimenting with less expensive calcitic lime. No one is sure if the truffles really need the magnesium, so he’s decided to find out.

Go Dogs Go!

Dogs have to be trained to sniff out special things such as bombs, narcotics, fugitives and, of course, truffles. You can buy a dog already trained for that if you have about $5,000 lying around. But any lively, trainable dog with a decent nose can be trained at home if you have the time and the discipline.

With some of your target truffle in hand you’ll need to get your dog to associate that with something that matters to them: a treat, a ball to chase, a toy to chew on. There are resources online for dog training such as Truffle Dog Co.


Read more: Explore weird, wild mushrooms with forager liana Antonova.


Some Truffles Are Weeds

So is it as simple as putting the trees out, keeping the pH up and then spending a lovely day with your dog gathering thousands of dollars worth of truffles? Hey, you’re a farmer. You know better.

There are such things as weed truffles.

The Field Guide to North American Truffles shows just 90 species of the many native truffles you may have to contend with. Only a few in the field guide are tasty. The rest are described as palatable, insipid, inedible or even poisonous.

And they will compete for space on the tree roots, especially if you don’t keep conditions in an optimal range for your cultivated truffles.

Declining Harvests in Europe

One mystery of the truffle trade in Europe is the falling size of annual harvests. Some put this down to loss of habitat from growing cities and expanding farms. Some think climate disruption is the problem.

But no one has really been able to pin down an answer.

I have a theory that could explain poor production in the wild and in cultivated plantings. I wonder if the lack of truffle productivity comes from their spores not being spread in the fashion they evolved with—being eaten by pigs and spread across the countryside.

My suspicion felt confirmed when a truffle farmer showed me a technique that has improved production on some farms. The technique is called Spanish Wells.

Dig a hole at the edge a truffle tree’s drip line, and fill it with a wet mixture of spores and earthy soil mix. Come back to the spot in a year and harvest plenty of truffles that have attached where the roots were cut by the digging.

This sounds very similar to what would happen when a pig roots around for truffles: roots get cut, spores—in an ideal substrate—are deposited and new truffles get started.

But I also wonder if turning loose some pigs at the ragged end of your harvest season—after you’ve already gathered nearly an entire season’s worth of truffles—wouldn’t bump up the next year’s harvest.

Plus, just think of what you could charge for pigs that have chowed down on truffles before slaughter.

Categories
Beginning Farmers Crops & Gardening Farm Management

Make Your Own Amendments With The “Regenerative Grower’s Guide To Garden Amendments”

Title: The Regenerative Grower’s Guide to Garden Amendments
Author: Nigel Palmer
Cover Price: $24.95
Publisher: Chelsea Green Publishing

The Regenerative Grower’s Guide to Garden Amendments
Chelsea Green

If growing your own food isn’t quite DIY enough for you, “The Regenerative Grower’s Guide to Garden Amendments” is the book you’ve been waiting for. Within it, Nigel Palmer both makes a compelling case as to why making your own garden amendments should be an important part of gardening. He also provides detailed instructions for doing so.

Buckle Up

The book is not for the faint of heart. It’s prone to detailed scientific explanations and spends time walking you through answers to questions like, “If 35 pounds of gypsum were added to 1 acre of land, how much calcium and sulfur are actually added in parts per million?”

But, if you’re willing to put in the work that the book requires, its rewards are substantial. Both the serious home gardener and the professional grower will come out the other side with more than enough knowledge to begin making their own garden amendments.

So, why consider making your own garden amendments at all? The well-known farm consultant John Kempf makes the case in the foreword. 

“We cannot,” he says, “have a sustainable agriculture as long as growers are dependent on importing mined or synthesized fertilizers.”

Throughout the book, Palmer returns to this point as well. How can we call our growing practices sustainable if they rely on extracting non-renewable resources? Homemade amendments, on the other hand, can be made from resources that already surround us. And they require hardly any transportation costs or fossil-fuel inputs.  


Read more: Check out these 8 great soil amendments for your garden.


Other Benefits

Palmer enumerates the other benefits of homemade amendments as well.

Beyond being sustainable, they can be custom-made to target the needs of a particular grower. Homemade amendments can also frequently be made from waste-products (like weeds or fish scraps) that would otherwise end up unused. 

Conventional fertilizers supply the plants with individual nutrients (nitrogen, phosphorous, etc.). But many of Palmer’s amendments aim to promote the biological health of the soil. As Palmer explains, “biological diversity facilitates the digestion of the soil constituents into compounds the plant and soil ecosystem can utilize.”

After making the case for home-made amendments , Palmer dedicates much of the rest of the book to detailed instructions and recipes. These sections feel almost cook-book like. They guide the reader through the process of making everything from apple cider vinegar (though not the kind you’d want to ingest) to fermented fish.

Here, the value of the book feels especially apparent. In its recipes “The Regenerative Grower’s Guide” offers clear instructions for transforming everyday waste products into valuable fertilizers.

For the dedicated grower, the book promises to open numerous doors into a deepened relationship with the process of growing one’s own food.

Categories
Beginning Farmers Crops & Gardening Farm Management Homesteading Uncategorized

Striving Toward Self-Sufficiency From The Ground Up

Daniele Kasper and her horse trainer husband always knew they wanted their own barn and farm. “When we first met we quickly realized that being self-sufficient was a goal we both had in common,” Kasper recalls. “Having a farm and being able to provide our own food was something we worked really hard for early on.”

That initial self-sufficient dream has now bloomed into From The Ground Up, a 50 acre backyard country homestead set in Weidman, Michigan. Kasper runs and shares the homestead with the world via her Instagram account.

Taking time out from tending to From The Ground Up, we spoke to Kasper about the importance of self-sufficiency and key home farming lessons. We also got into tomato canning.

Learning Early Hobby Farming Lessons

https://www.instagram.com/p/CDC9SSkg_kV/

“I very quickly learned how little I actually knew,” admits Kasper when looking back on her original forays into hobby farming. “Having a farm is so much harder than it seems. It is so involved and in depth—just growing your own food could be a four-year college degree. There are so many intricacies to gardening, from soil type and what zone you live in to which kinds of plants can be planted next to each other.”

Kasper adds, “I had these delusions of grandeur that it was going to be so simple and easy. Toss a few seeds in the dirt, water and boom, ready set garden! It was nowhere close to that.

“In fact, my husband saved my garden several times this year when I forgot to water. It is a lot more work than one would believe just starting out.”


Read more: Check out these 15 tips for a water smart garden.


Embracing Self-Sufficiency

https://www.instagram.com/p/CD2Wkyog6sc/

Kasper says that her goal of striving towards self-sufficiency is a vital part of From The Ground Up. “It’s so important to me to feel like I am not just taking from this planet but contributing to it in some meaningful way.”

Being able to provide her own food allows Kasper to feel like she’s “taking a little less burden off the shoulders of the planet because I am not relying on anyone else to do it for me.”

Kasper adds that an important part of self-sufficiency is also that it allows for the support of small farm businesses and local farmers. “I can grow a lot. But I can’t grow it all, and we are all in this together,” she says.

Self-Sufficiency Tips

https://www.instagram.com/p/CCTulnSADWn/

If you’re looking to move toward self-sufficiency, Kasper advises doing as much research as possible.

“Learn as much as you can before starting a garden or having animals,” she says. “Get on social media and join groups of other homesteaders and hobby farmers. I have learned so much from them. Instagram has been an incredible place to make friends, get tips and advice and troubleshoot problems.”

After reaching out to other self-sufficiency advocates, ask questions—”even ones you think are silly”—and be prepared to make mistakes.

“That’s all part of the process,” Kasper says. “The more you know, the better you do in the future.”


Read more: These side hustles can help you reach your end goal of self-sufficiency.


Carrot Crops and Canning Tomatoes

https://www.instagram.com/p/CFGRWIwgx75/

This year, Kasper is most proud of her crop of carrots, which she usually roasts with chicken and broccoli or adds to beef stews. With tomatoes just beginning to ripen, Kasper’s also getting into making her own tomato sauce, which is based on her mother-in-law’s recipe, and which she plans to can.

Just make sure you clearly label everything you plant.

“I forgot to label everything I planted this year. So as things started to sprout it was like a little mystery to see what was growing. Also, squash and tomatoes should not be planted next to each other.”

Hobby Farm Dreaming

https://www.instagram.com/p/CCttO78ALdg/

If you’re been toying with the idea of taking your first steps into the world of hobby farming, Kasper says take a chance and go for it.

“It may be hard at times, and it can be very frustrating. But the reward is incredible. Don’t think that you’ll get the hang of it right away. It could take a few years to really get into a routine where you feel like you know what you are doing, and that is totally okay.

“Everyone has their own strengths and weaknesses. Utilize friends and neighbors and do not be afraid to seek help. It is completely worth it.”

Follow From The Ground Up on Instagram.

Categories
Beekeeping Urban Farming

Video: Performing A Late-Summer Hive Check

The last thing any beekeeper needs is an ill-advised, late-season swarm. Ditto for an overwhelming Varroa mite infestation or failing queen—particularly right before winter. That’s why, if you have your own hives, a late-summer (or early fall) hive check so important.

I recently looked in on my top-bar beehive first through its observation window and later, smoker in hand, one frame at a time. I wanted to see:

Honey

In my top-bar hive, the bees had to build all of their own comb. I supplied wooden slats painted with a little bit of beeswax along the bottom edges to help get the bees started, but that was all.

It takes several pounds of nectar to make a single pound of beeswax. So I was impressed to see that they’d not only built out much of their hive this year, but that their stores are at pretty respectable levels, too.

They need about 60 pounds of honey to make it through winter. I probably could’ve gotten away with taking a little bit of honey for myself. But I decided they should keep it all. (We’ll talk again this spring!)


Read more: Thinking of getting bees? Consider these things first.


Space

My bees now occupy more than 20 full frames. They still have a little room towards the back of the hive to grow.

That’s good news, since hives with large populations and very successful queens can be tempted to swarm even though our nights have begun to cool. (Swarm control is extra important this late in the season, since building up a new hive now would be an uphill battle for a just-issued swarm.)

I didn’t see any swarm or supersedure cells during this check.

Healthy Queen

If I don’t spot the queen but I do see fresh eggs, I surmise she was laying a few days ago. You can also tell a lot from the type and configuration of brood.

Is the pattern uniform or spotty? Mostly drones? Do the capped brood cells look normal?

I didn’t see my queen this time, but I did find eggs, larvae, capped brood and a lot of pollen. Also, the bees acted and sounded purposeful—another good sign.

Finally, I didn’t see obvious disease, deformity or Varroa mite explosions during my late-summer hive check. With fingers and toes crossed, I just might make it to winter with a large number of healthy bees.

Capped brood and queen photos (included in video) by Waugsberg (Creative Commons BY-SA 3.0).