In order to have happy and healthy chickens that meet your egg or meat needs, it’s crucial to provide a balanced diet. Selecting the right type of feed is important because you can do more harm than good if you buy the wrong types of feeds.
For instance, you can’t feed a growing chick layer feed because the amount of calcium in the mix can cause kidney issues. And too many calories and protein fed to an adult chicken cause weight gain and fatty liver.
Types of Feeds
Commercial feeds are balanced nutritionally for each stage of growth and to maintain health and production. However, if you look at the labels you’ll see that the ingredients aren’t much different. It’s the ratio that matters, particularly for protein.
But selecting feed can be confusing if you don’t know what you’re looking for.
Pellets cook a little longer than crumbles, which makes them a bit more digestible. Spilled crumbles tend to get mixed in with the floor litter where pellets do not. But some birds don’t care for pelleted feed.
The following are general types of feeds you’ll encounter. Note: Some feed companies have a “complete feed” that can be fed to a higher age range. You’ll also see feed in crumbles (or mash) and pellets.
Starter/chick feed is for chicks aged 0 to 6 weeks and is made with 20 to 22 percent protein, an important factor for growing birds. You can also find a medicated choice that includes a coccidiostat to prevent an intestinal disease spread through droppings called Coccidiosis.Check the label carefully if you have other animals on your farm. Some medications, such as Monensin, are toxic to horses. You shouldn’t feed a medicated product if your chicks have been vaccinated for coccidiosis, as the coccidiostat or antibiotic can negate the vaccination.
Grower feed is for developing pullets aged 6 to 20 weeks. The protein is less for this group at 14 to 16 percent. Grower feed may also be medicated and can be fed up to 18 weeks.
Layer feed is appropriate for egg-laying hens aged 20 weeks and older. The protein is 15 to 18 percent and the calcium is 2 1/2 to 3 1/2 percent. If you notice cracked or brittle-shelled eggs, switch to a layer feed with a higher percentage of calcium.
Broiler feed provides a balanced ration that will support fast growth. The protein is 20 to 23 percent. Meat birds eat a lot. A broiler chicken will put away 10 pounds of feed in the first six weeks.
This feed may also contain a coccidiostat or antibiotic.
Finisher feed is to be fed to meat birds up to their finished age (Cornish and Cornish crosses are finished around 6 to 8 weeks. Other meat birds are finished from 9 to 11 weeks. All breeds are usually finished at 6 pounds). The protein is 18 percent. Discontinue use of medicated feeds one week before slaughter.
All-purpose feed is safe and suitable for every age, and is a good middle-of-the-road option. Protein is 16 percent.
Dark Light Photography/Shutterstock
Optional Food
Table scraps such as vegetables, fruit, stale bread or crackers are all fine types of feeds, however, use them as a treat and remove moldy or picked-over scraps. Avoid foods such as onions or garlic as they can affect the taste of the eggs.
Fresh grass is a good source of nutrition and one of the best ways to supplement your feed. If your hens aren’t out on pasture, you can feed lawn clippings. Chickens can’t digest dried plant material, so make sure to offer freshly cut grass.
Do not feed grass that has been treated with herbicide or pesticide.
Scratch grains, such as oats, corn and barley are low in protein but high in calories, and as such aren’t balanced feeds. However, they can help alleviate boredom by providing a more natural way of eating.
Toss scratch grains into the coop only after your chickens have eaten their morning meal. Put out only enough grain for them to eat in 20 minutes.
An average laying hen will need around 4 ounces of feed a day, but it’s difficult to portion out feed for each chicken, especially if you have a mixed coop of breeds. However, since chickens self-regulate, you can feed free choice.
And don’t forget to put out fresh water every day.
A chicken’s natural tendency is to scratch around on the ground to find their food. If you place your feeder on the floor, chances are they will tip it over. Either hang your feeder or set it on a platform (such as a cinder block) so that it’s at the level of the chicken’s back.
Put out enough feeders so that everyone can eat at once.
Chickens need grit to “chew” their food. If you feed a balanced diet or if your chickens pasture (they can find rocks and grit themselves), you won’t need to offer grit necessary. However, if you feed grain, grass clippings, or table scraps, you’ll need to augment with grit.
Commercial grit is cheap and goes a long way. Offer it in a small bowl and your hens can help themselves. Oyster shell isn’t the same as grit because it’s too soft, however it’s good for digestion.
A wisely chosen commercial feed, augmented with some fun snacks, will help your chickens look and feel their best.
This article originally appeared in the September/October 2020 issue of Hobby Farms magazine.
Log splitters are a great tool, but they come in many different sizes and have a wide variety of specifications to consider. To help you sort through all the options, here’s a guide to the key features and things to consider when shopping.
Electric Or Gas?
Log splitters are usually powered by electricity or gas, with each source of power offering advantages and disadvantages.
It’s difficult to beat the simplicity of electricity. Plug it in and you’re good to go and free from the exhaust of a gasoline engine. You can split logs in a building if you desire.
However, many electric log splitters aren’t nearly as strong as ones powered by gasoline engines. So for large, tough logs that are difficult to split, a powerful gasoline splitter is the way to go. Although they are heavier, more difficult to move around and require the typical maintenance of any small engine, gasoline log splitters carry their power with them and don’t have to be used near an electrical outlet.
If you’ve got a log pile on the edge of your property, far from your buildings, you can take your log splitter to the pile rather than the other way around. Many gasoline log splitters are even designed to be towed by vehicles. That’s a bonus if you need to frequently transport it across your farm.
DR Power Equipment
How Much Strength?
The strength of log splitters is measured in tons.
Small electric splitters might produce from 5 to 7 tons of force. Larger electric and gasoline splitters are much stronger; 20 tons or more of force is common, with many generating more than 30 or 35 tons.
The type of logs that you’ll be splitting is the main consideration when choosing the strength of your splitter. Generally, coniferous trees—pines and spruces—have soft wood that splits easily. Deciduous trees—maples and oaks—have much harder wood that requires more power to split.
The diameter of the logs is also important: The thicker the log, the harder it is to split. You might discover that a machine capable of splitting a maple log with a 6-inch diameter might not be able to split a maple log that’s 15 inches thick.
The cycle time of a log splitter measures the time it takes for the machine to split a log and get back in position to split another.
Depending on the model, cycle time can vary from around 10 to 20 seconds. So if you’re planning to split dozens or even hundreds of logs, opting for a splitter with a shorter cycle time can save you a lot of time in the long run.
Other Features to Consider
For gasoline log splitters, the capacity of the fuel tank is something to consider if you’re planning on splitting lots of logs far from a gas supply.
Their small engines can run for a long time on surprisingly little fuel. But a splitter that can hold 1 1/2 gallons of gas will run longer than one with a 1/2-gallon tank.
The orientation of the splitting process also varies. Some models require you to place the log horizontally across the top of the splitter. Others are upright and require you to place the log vertically against the splitter. Some units are adaptable and can do both, depending on your preference.
Keep in mind that log splitters can’t split a log of any length. They all have a maximum log length that they can handle, because logs of any greater length would not physically fit in the splitter.
A larger splitter that can handle longer logs—say, 25 inches—means that you won’t need to cut large logs into as many small pieces as you would if using a splitter with a 20-inch maximum length.
By evaluating the number and type of logs that you’re planning to split, and analyzing the key features of available log splitters, you should be well on your way to finding the perfect machine that can serve you well for years to come!
This article originally appeared in the July/August 2020 issue of Hobby Farms magazine.
There are so many ways to use T-posts (and other reusable metal posts) on farms. Whether you’re putting up fencing, staking a fruit tree or just marking a rock in a field, T-posts are a handy asset no farmer should be without. Of course, T-posts aren’t very useful unless you have a way to install them. That’s where post drivers come into play.
There are two main types of standalone post drivers on the market: manual drivers and gas-powered models. Manual drivers rely on your muscles and their own weight to install posts in the ground. Gas-powered drivers, on the other hand, typically employ 2-stroke or 4-stroke engines to pound posts into place with thousands of strikes per minute.
Both designs are useful for different purposes, so let’s explore some of the pros and cons offered by each.
Certainly the biggest advantage of a manual post driver is its simplicity. There are no moving parts, nothing that requires maintenance or fuel—it’s just a solid piece of steel. You lift it up, you drive it downward onto a post, and the post inches its way into the ground.
Repeat the process until the post has reached the correct depth, and you’re good to go.
This simplicity means manual post drivers are perfect for tossing into the back of a wagon for hauling around whenever and wherever you might need one. Aside from a little rust in the long term, they won’t suffer for living an outdoor life.
Manual post drivers are also lightweight compared to gas-powered drivers (generally coming in between 10 and 30 points), and because they’re simple, they’re less expensive too. You might be able to find a smaller one for $20 or so.
Cons
Manual post drivers can be tiring to use for extended periods of time because you must lift and thrust down the driver five, eight or 10 times per post (maybe more), depending on the size of the post and the conditions of the ground.
For driving the occasional post, this isn’t a problem, but if you’re installing dozens for a fencing project, you’ll eventually wear yourself out. This goes double if you’re installing large-diameter posts in hard ground with a driver weighing ~30 pounds or so.
A gas-powered post driver does most of the work for you! There isn’t much muscle power required.
You simply hoist the driver on top of the stake and push the trigger, prompting the driver to rapidly pound the post into place. Gas-powered post drivers are particularly helpful for installing large posts (3-4 inches in diameter) or dozens of posts all at once.
Such projects can be exhausting with a manual driver, so a gas-powered model will save you a lot of effort. Just as importantly, vibration-absorbing designs reduce the pounding felt by the user.
Cons
Gas-powered post drivers are heavier than manual drivers, often tipping the scales between 30 and 45 pounds. This makes them a little less convenient to carry around.
They require routine maintenance just like any other tool with a small engine, and they’re considerably more expensive than manual drivers, costing hundreds or even thousands of dollars.
Of course, you don’t necessarily have to choose one over the other. If you’re frequently installing large posts and know a gas-powered model will save you a lot of time and effort, by all means make the investment.
But if the simplicity and convenience of a manual post driver sounds appealing for quick jobs, why not add one to your arsenal? They’re not very expensive, and sometimes having both types is the perfect recipe for maximum productivity.
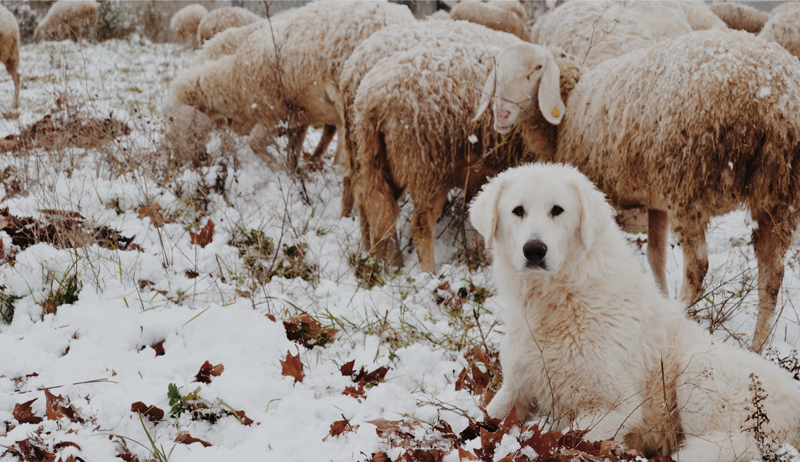
Before we even got sheep, my husband and I discussed various ways of keeping our sheep safe from predators. Having had poultry for 15 years, I know how important it is to protect your livestock.
We discussed an LGD (livestock guardian dog), donkeys and even a llama. But not everyone uses livestock guardians.
And then a herding dog clinician who has many decades of experience and knew of our set-up said to us, “I’d just put them up at night.”
So that got me wondering: What is the best way to protect your sheep against predators? Well, the best (and least satisfying) answer truly is … it depends.
Livestock Dogs
I spoke to Denice Rackley, owner of Clearfield Stockdogs and a sheep producer for 20 years. She has a large farm in southern Indiana and uses several livestock guardian dogs (LGD) to keep her sheep safe.
For her, the LGDs are the best and most workable option. She says they live out with the sheep 24/7, are gentle with the sheep (or should be if you are going to use them) and ferocious with anything that comes in or near the field that should not be there.
Like her border collies are her partners when moving the sheep, the LGDs are her partners in protecting the sheep.
But, according to Denice, getting the right dog for the job is probably one of the most important choices you will make when looking to protect your sheep. In fact, she says one of the biggest mistakes people make in selecting an LGD is “not being selective enough in finding a breeder.”
Finding a breeder who breeds dogs specifically for this job is key, she says.
Denice is also an accomplished writer and has a great three-part series in Acres USA about choosing, raising and training an LGD.
We decided—for now—against an LGD because of our small space and close proximity to neighbors. LGDs do much of their work at night, including barking, which would not make us popular in the area.
Donkeys and llamas are also another option. A sheep-keeper friend who lives nearby swears by her two miniature donkeys as awesome protectors against neighborhood dogs and coyotes. Female donkeys (also called a jenny) are probably better than the males (called a jack) to live with sheep.
The donkeys may get to know your working dogs, but they could kick a pet dog that wanders into the sheep pasture. And it’s best to be careful with donkeys when you are lambing, as they could harm a small lamb. Denice told me that if you were going to get a jenny, it would be best to raise a young one with your sheep so that she could bond with them.
One upside of both donkeys and llamas is that they eat the same stuff as the sheep. That makes taking care of them a lot easier.
A potential downside for some people is that, if they use stock dogs to move their sheep, they most likely will have to tie up or pen the donkey or llama before allowing a stock dog to do its work.
Llamas have worked really well for some people, but from what I have read, success in using them is not as significant. And, bear in mind that they will need to be sheared.
If you keep wool sheep, this might not be a big deal. But for those with hair sheep, that’s a job they would probably just as soon forego.
Alfred Kenneally/Unsplash
Fencing: Hot or not
I think it’s safe to point out that good predator protection of any kind starts with a good fence. But a fence alone may not be the answer.
I’m very lucky to have a number of friends and acquaintances who are experienced and are very good at raising sheep. So, when I was researching the sheep-predator protection issue, I got in touch with a friend in Kentucky who has had sheep for many years. The last time I saw her, she had a very protective donkey in her field,
To my surprise, she told me that these days she has replaced her donkey with a hotwire around the perimeter of her fence. She says she uses it everywhere she can keep the fence line clear and uses electro netting in the places where the brush precludes a hotwire.
“Guard animals are great, but I have to say, I don’t miss taking care of an extra animal, sorting off when I work the sheep and the varying levels of protection. Electricity is a sure-fire deterrent, in my opinion.”
In the end, we decided to go with what is loosely called “nighttime penning.” In the truest sense of the term, it means bringing sheep together near a building or near humans at night as a way of keeping predators away.
We have two main pasture areas, so we decided to put the sheep up each night in a locked barn and let them out each morning.
Denice did warn me about taking the sheep to the same place each night as a way of exposing sheep to and building up a worm problem. So, to that end, we are adhering to a fairly strict schedule of worming the sheep to ensure this doesn’t cause problems.
Penning the sheep each night and releasing them each morning might not be the solution for everyone, but we have raised poultry for 15 years and it has become part of our daily routine here on our farm.
Sidebar: Dealing With Dogs
In my part of the country, the greatest threats are coyotes and neighbors’ dogs. UC Davis has a table that looks at the various ways to protect your sheep against different predators.
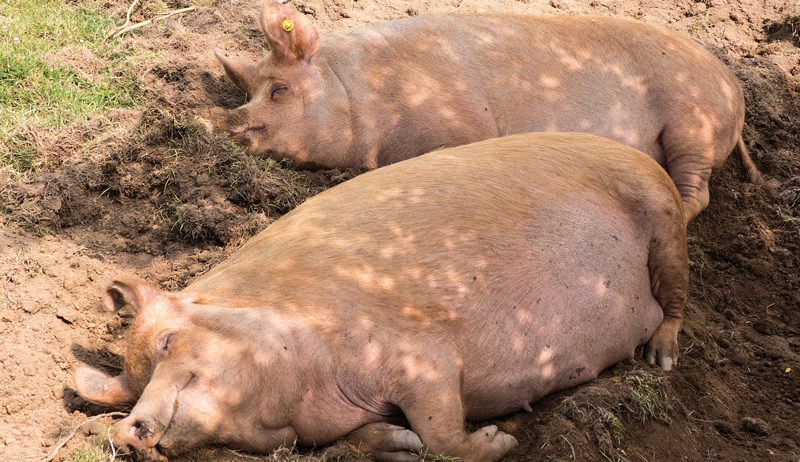
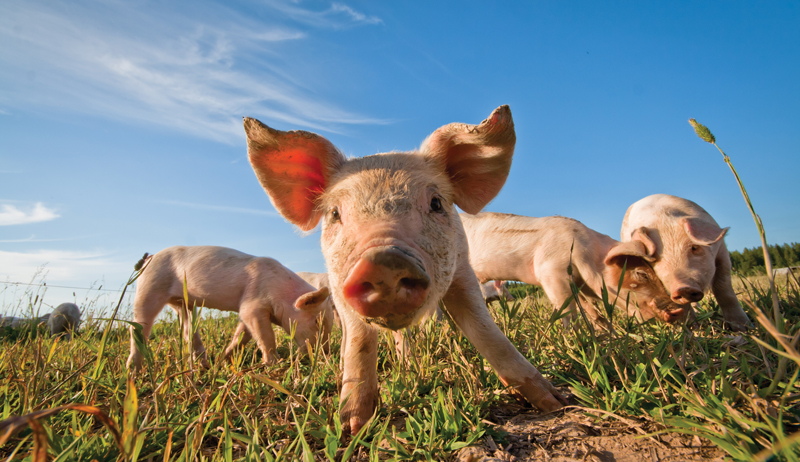
Whether seeking out a single farming enterprise or a way to diversify your operation, pasture pigs can make great additions to a small farm. Popular pasture pig breeds include the Idaho Pasture Pig, Kunekune, Large Black and Tamworth.
Outside of producing pork for home use or sale, you can also use pigs for clearing brush-filled areas, rototilling gardens during the winter months or even sealing shallow ponds.
One significant lure of raising your own pigs is the amount of control you can exact over what, from feed to medication, goes into your animals.
“You’ve got the ability to raise these pigs the way you want them to be raised,” says Jodi Cronauer, registrar of the Idaho Pasture Pig Registry. Cronauer raises Idaho Pasture Pigs and Kunekunes on her Wisconsin-based White Bison Farm. You can choose, for example, what vaccinations you will use, if any at all, and how to address deworming.
Another reason is the improved taste of the meat. Fans of pasture-raised, heritage-breed pigs claim that their meat tastes far superior to that of pigs raised commercially. And the hogs themselves benefit from being raised outdoors on a nutrient-rich pasture.
Land & Forage
If you are convinced that raising pigs is for you, the first step includes assessing your property to assure it’s a viable operation.
Heritage breeds, such as those mentioned, prefer forest or pasture areas. Forested areas should have available fruits, acorns and nuts, collectively known as mast. Any area you are considering should also have available water sources for hydration as well as areas where wallows will develop for cooling.
If these areas are available on your property, can they be fenced?
Finally, ask yourself if you have enough land that you can rotate pastures to prevent soil erosion. A variety of factors influence land requirements. You can consult your county extension agent or soil conservation service about your specific needs.
Because of his location, Bill Wehlage of Bacon Acres Farm in Oklahoma requires a larger area for his pigs.
“If you rotate diligently, you can run five pigs on 5 acres, rotating half-acre paddocks every couple of weeks,” he says. Wehlage has supplied farmers in 28 states with registered Tamworth breeding stock, also selling pork online and locally.
As long as there is availability, type of grass isn’t as big of a concern.
“The thing about pigs is anything with more of a broadleaf mixture is going to be better for them,” says Jason Johnson, who raises Large Black pigs on his Lucky George Farm in Iowa. “It’s going to improve their ability to digest.”
Johnson also prefers to have some clover in the mix. If necessary, pigs can also be fed hay. Grass hays mixed with properly harvested alfalfa are preferred over timothy.
There are key differences and similarities among the breeds. “We wanted pigs that would do very well with the kids,” Johnson says. “For pigs, they [Large Blacks] are one of the most docile and easy to manage. It’s not all about the look. Large Blacks are good on pasture with marginal forage.”
Wehlage, meanwhile, is thrilled with his Tamworth pigs.
“We find them to be very hearty, sound in feet and leg, easy breeders, great mothers, and easily trained to electric fencing and nipple waters,” he says. “They also have an excellent feed conversion rate for a heritage breed and are very tasty and lean.”
Cronauer is equally enthusiastic about her Idaho Pasture Pigs and Kunekunes. She touts that she can’t think of another breed of pig that grazes as well as these. She also says that both breeds are very friendly. Size-wise, Kunekunes are slower-growing, smaller pigs that tend to be better producers of lard.
Irrespective of selected breed, Cronauer emphasizes choosing by conformation.
“I always say look at a pig as if you are going to eat it,” she says. “You want a pig with a nice long back, big butt and nice front shoulders so you can say ‘look at what we are going to get off of this pig.’”
ChristopherDart/Flickr
Processors
Regardless of whether or not you choose to resale packaged pork online from home, locally at a farmers market or even if you are raising pigs for your own food source, you’ll need to locate a processing facility.
Any pork sold not on the hoof must be butchered and packaged at a USDA processing plant. Requirements are slightly less stringent when butchering and packaging for home-use alone.
Shelter & Containment
One of the many benefits of pasture-raised pigs is that the required infrastructure is minimal. “A few pigs can live in a crude hut or shelter,” Wehlage says. “In the summer, many of our pigs have no shelter at all as long as they have shade from trees and good mud holes.”
Johnson takes a similar but slightly different approach. “You have to have some sort of shelter, but that can be made from a lot of different types of things,” he says. “You can take a cattle panel and bend it and put a tarp over.”
For her operation, Cronauer makes use of A-frame shelters year-round. The shelters can also be used for farrowing. She feels that the design of the A-frames helps to position the sow during farrowing and prevents the piglets from getting laid on.
As for fencing, different types have advantages and disadvantages. For example, panels can work well but can be burrowed under. The general consensus among those that raise pigs is that electric fencing is the most economical.
“If you have five pigs on 10 acres, that’s going to be a big enough space that they are not going to get bored and try to break out,” Johnson says.
Smaller lots will require fencing that the pigs will respect. Pigs have to be trained to an electric fence or they will run through it. Electric fencing should be approximately 6 inches off the ground to prevent pigs from escaping under it.
Electric fence netting can be used to train piglets to an electric fence.
Cattle or horse trailers are the preferred method for transporting pigs for processing.
“A week before the big move, begin to feed the pigs in the trailer,” Wehlage says. “The morning they go to the processor, they will hop right in. The rule of thumb is that you can’t get in a hurry with pigs. Take your time. And plan how to make them ‘want’ to go where you need them to go.”
Cascade Creatives/Shutterstock
Feeds & Supplements
According to Wehlage, pigs perform best when fed a consistent diet that includes 14 to 16 percent protein, with a good nutritional pack mixed in. Different age pigs have various nutritional requirements, but small farms may settle for a standard ration.
Non-GMO and organic feeds can be a good option, but they are expensive. Local feed-supply stores often offer a comparable and more affordable bagged feed option. To keep feed bills in check, Wehlage emphasizes that it’s time to begin looking at bulk feed options when you reach a sustained herd of more than 12 hogs.
Wehlage cautions against over dependence on scraps and slop. “Inconsistent diets affect digestion and therefore growth, adding fat to carcasses that make no money,” he says. He also warns about the potential biosecurity risks involved if scraps and slops are obtained from gathering cull vegetables or restaurant trash bins. (Infected humans can pass viruses to pigs.)
Although pigs raised on pasture do ingest a great deal of the minerals they need from the soil, they may also need supplementation. To accommodate, Johnson supplies mineral blocks. Pigs usually manage well with a mineral block as long as free choice water is available.
Because pigs can develop a salt toxicity, Cronauer has concerns about providing minerals via a block and instead prefers to mix her own.
“The majority of the United States is deficient in selenium,” she says. “So, if your pig is also deficient in selenium, and you have a mineral block sitting there, they will lick or chew on it trying to get the selenium from it.
“But what’s happening is as they’re doing that, they’re getting more and more salt and other minerals coming with it and because they have a salt toxicity they can get very, very sick and can eventually die.”
Watering Systems & Feed Containers
Most commercial pig waterers are designed to raise pigs on a scale. Rather, because pigs are notorious for their destructive capabilities, large rubber bowls are often the preferred method for delivering water on small farms.
“They can turn these over, stand in them, chew on them, and they won’t break them,” Johnson says. “They work great for feeding, too.” Cronauer uses a 55-gallon drum on her farm with a gravity-fed nipple on the end that the pigs are trained to use.
“It works fantastic for us,” she says.
Vaccinations, Deworming & Treatment for Sick Pigs
Many small farms prefer not to vaccinate their pigs. “Our pigs do build up a natural immunity,” Cronauer says. “They don’t very often get sick.”
Instead, when her animals do get sick, she treats with a broad-spectrum antibiotic. In addition, buyers of breeding stock often prefer to establish their own vaccination and deworming protocols. The cooperative extension service, however, recommends vaccinations dependent upon the pig’s age and use.
Pigs can be dewormed orally or with an injectable solution according to their weight and the type of worm you are attempting to control. One common dewormer is doramectin for the treatment of gastrointestinal round worms, lungworm, lice and mites. Others include ivermectin and fenbendazole.
To avoid resistance, it’s best to periodically rotate among the drug classes.
Whenever dewormers are used, always observe appropriate meat withdrawal periods according to the label. For those opposed to deworming, there is anecdotal evidence that some natural products can help to control but not eradicate worms.
Cronauer deworms with ivermectin twice per year—in the spring before the piglets start arriving and in the fall after the sows have had their last litter for the year.
talseN/Shutterstock
Other Veterinary Care
Piglets have needle teeth that require monitoring for possible clipping should they cause injury through the biting or scratching of their littermates or the sow’s udder. In addition, pigs will generally require periodic hoof trimming.
The frequency depends on the individual pig.
Finally, boars are sometimes castrated. Producers can be trained to perform each of these skills, or they can be completed by a veterinarian.
Because they know their pigs so well, many who raise pigs on a small scale find identification methods such as ear tags or notching to be unnecessary. Others will tag pigs with specific types of tags to designate pig lines.
Outside of tagging, other recommended types of record keeping include:
the sex of any piglets born
dates and types of any vaccinations and dewormers administered
any illness or disease the animal may have experienced along with the treatment
Certain forms must be completed if the pigs are to be registered with a breed registry. They will also need ear notching or tags, as well as DNA typing.
Slaughter Weight
Pigs raised on pasture do take longer than those raised commercially to reach slaughter weight. Though Kunekune pigs are typically butchered at a smaller size, the average weight at size of butchering is around 250 pounds.
The time to reach this weight can range, on average, from seven to 10 months depending upon the breed and grass-to-feed ratio in the pig’s diet.
Large Black pigs can take up to a year or more to reach the desired size. By comparison, hogs raised commercially can reach slaughter weight in around six months. When raising pasture pigs, it is best to focus on the quality of the meat rather faster growth rates.
While raising pigs isn’t for everyone, they can be an enjoyable addition to your small farming operation.
This article originally appeared in the July/August 2020 issue of Hobby Farms magazine.
You want to grow food and just opened new land to make your first garden. Great! But what crops will work in a first-year garden?
Not just any crop will do. In fact, during the first year of production, you may not even have the right conditions to grow most crops. But in this article we will look at new garden soil and the process of making a new garden from scratch.
We’ll also look at three crops that can allow you to get a jump on growing food in your first-year garden, all without compromising the process of building proper weed-free, fertile and living soil!
Converting Land for Growth
Most new, built-from-scratch gardens are established in former lawns, hay fields or crop fields. This means they have weeds, are depleted in nutrients, and have suffered compaction and other conditions harmful to life in the soil.
The process I use to bring new land under production includes getting rid of major perennial weeds, improving fertility and enhancing soil life activity. A great way to do this is to apply a compost or composted manure 1 to 3 inches thick in the new growing area, then cover it with a poly tarp or weed barrier for a full season.
The compost adds nutrients. The tarp or weed barrier will fry the current ground cover, releasing more nutrients and building up soil organic matter. Together, both will encourage the conditions for soil life to thrive.
An abundance of available plant matter will decompose, releasing moisture and warmth. When I pull back a weed barrier after a few months I see tunnels of worms and other micro arthropods.
You save energy by not tilling and cultivating aggressively, as well as avoid chemicals that are harmful to you and the environment.
However, it takes way more time to remove these weeds by slowly frying them with the heat buildup under tarp cover instead of using herbicide or heavy tillage. And most growers want to get growing right away and not lose another moment!
That’s understandable, of course, whether the goal is to to get income as soon as possible or just start saving by growing food immediately. Thankfully, some crops not only can be grown in the first year, but they will also help the soil forming-process and benefit from the weed barrier method of building new garden plots.
First, though, let’s look at some crops that don’t work in a first-year garden.
We must stay clear of the following:
direct-seeded crops that are usually grown from seed rather than transplanted because they cannot be planted into the weed barrier
crops that aren’t competitive against weeds, like carrots
any root/tuber crops, like potatoes, that can suffer from root-eating organisms in the soil in the first year out of grass (wire worm is one example)
Zach Loeks
Checklist
The crops that do work in a first-year garden are those that will:
suitably transplant into a weed barrier
survive the increased heat of the weed barrier environment
manage easily in newly forming soil.
So, crops that work in these constraints include squash, tomatoes and husk cherries (ground cherries). All three of these crops fit the bill.
Because they are grown from transplant, they can easily be planted through a cut hole in the weed barrier. Also, all of these crops need extra heat units in most gardens, especially northern gardens, which the weed barrier will provide.
Furthermore, none of them have below-ground roots or tubers that can be harmed by wire worm. In addition, the clean environment of the weed barrier facilitates picking.
What is more, sprawling crops like squash (could be cucumbers or melons, also) and large plants like husk cherries or tomatoes will cover the weed barrier, helping to hold it down against wind and even improve the aesthetic of your new garden spot during this “ugly phase” that would otherwise just be a rectangle of weed barrier in your lawn.
So, in this way you have achieved a passive, chemical-free, low-energy way of improving soil and building a new garden spot, all while preserving a beautiful and productive area in your first-year garden. What is more, these crops offer a good start to learning the skills and knowledge to grow a successful garden.
As our summer crops slip away, garden beds are making themselves available for planting that next round of what will nourish us. On this week’s garden to-do list: Plant fall radishes.
I look forward to the first roasted watermelon radish the same way I look forward to the first Cherokee Purple tomato. It marks the change to true fall much the same way the tomatoes bring in the summer.
Fall radishes—like watermelon, daikon and black Spanish radish—are unlike spring radishes in that they take a bit longer to grow and they have a stronger taste. The tradeoff is their hardy, long-keeping nature going into winter and, in the case of black radish, at least, their health benefits.
I classify fall radishes, or winter radishes, as watermelon radish, black radish and daikon radish—each varieties of Raphanus sativus. They have a spicy flavor in common but, apart from their root vegetable nature, don’t appear too similar.
Watermelon radish is the mildest and my favorite of the bunch. Cut one of these globe-shaped radishes open, and you’ll understand where it gets its name.
Black radish looks like a Halloween prop, with its thick, rough black skin and ghost-white flesh. This globe-shaped radish is the spiciest with a peppery bite.
Daikon radish has a completely different look, growing elongated in a cylinder, like a thick carrot, and can serve as a food crop for humans as well as a cover crop for compacted garden areas. If you decide you don’t want to eat them, let them continue growing and breaking up your soil.
How to Grow
The reason these aren’t called summer radishes is because watermelon radish, black radish and daikon radish like the cool weather. Direct seed them in full sun in late summer. Thin them to 4 inches or so, and they’ll grow to fill the space.
Fall radishes take about two months to mature to full size and can continue growing after a frost but not necessarily a freeze.
If there’s a hot spell, watermelon, daikon and black radishes could bolt, leading to woody roots. Assuming your fall weather is “normal,” these roots will grow right up until the freeze.
How to Harvest
Watermelon and black radishes regularly grow to 3 inches around. Daikon don’t get the round growth so much as the long growth.
Kentucky farmer friends of mine have grown them 12 inches long, and I saw several bunches that were at least 16 inches long at a farm stand in South Carolina last December! You can harvest each of these when they’re much smaller if you got a late start with planting, your crop is bolting or you’re impatient.
Radishes are easy to harvest. Grasp them singly by the greens close to the root, and tug. You should have no problem popping each out of the ground. The daikons might need the help of a digging fork, if your soil is parched.
Rinse or brush the soil from the radish roots. Allow them to dry and remove their greens before storing.
Keep fall radishes in a root cellar—they are roots, after all—or in the crisper drawer of your fridge. Wrap them in a damp paper towel or plastic bag for extra-long storage.
Maybe I shouldn’t admit that I’ve kept fall radishes in the fridge for a couple of months, but I have. I ate them, and they were excellent. These are the definition of a storage vegetable.
How to Eat Fall Radishes
First of all, don’t let the haters tell you radish greens aren’t worth eating. They are. Cook them as you would any other greens, as radish greens tend to have tiny spikes that would be unpleasant raw.
For the fermenters out there, daikon radishes are an essential ingredient in kimchi. Daikon, black and watermelon radishes all make interesting, flavorful ferments. Try mixing these with beets and carrots for a varied root-veggie ferment.
My favorite way to eat any of the fall radishes is chopped and roasted with olive oil and salt, as roasting concentrates their natural sugars. Served alongside a roasted chicken … this is a date night in itself.
Excellent leftover meals resulting from this meal are stir fry and fried rice.
Some people love them, but raw fall radishes are a hard sell for me. Slice them uber-thin and toss them with salt and rice vinegar or make a quick pickle, and we can talk. The spice is more than I care to have.
Boil a peeled black radish, and mash it with potatoes or purple-top turnips for a horseradish-like kick.
I have not tried this, but I’ve read about black radish “chips”—sliced thin, tossed with salt and oil, and roasted—and I would be willing to give this a try.
I’m looking forward to seeding my fall radishes, knowing I’ll have nutritious storage vegetables ready to harvest in a couple of months. Try growing a few this fall so you can eat well into the winter.
Even when people declare they know nothing about mushrooms, there’s one they almost always ask about in the next breath: “Have you ever found any chanterelles?”
A charming name, an egg-yolk color, the fragrance of apricots (sometimes) and a flavor described as spicy or nutty conspire to make chanterelles among the most sought-after wild mushrooms. Foragers in the Pacific Northwest ship 5 million pounds a year to Germany alone.
Chanterelles (Cantharellus cibarius) can be served sautéed, in a soup or casserole, or, most commonly, in omelets. (Even store-bought mushrooms should not be eaten raw.) Chanterelles can be dried, but they don’t rehydrate well. If you have a surplus, sauté them in butter or bacon fat for a few minutes, scoop them into a muffin tin (so they don’t freeze in a big clump) and briefly freeze them before tossing into plastic freezer bags.
Chanterelles—or “chants” as foragers call them—show up between May and September in the East, September to November in the Northwest, and in winter in California. They collaborate with tree roots, so you’ll find them on the forest floor. That also means they can’t be grown as a crop.
At full height, they are no bigger than a day-old chick (and are almost as cute!).
Forager, Beware
They are also the mushroom most likely to get novice foragers into trouble. Twenty years ago a friend of mine, relying only on a foraging book, was sure he had found a patch of chanterelles. A chef of his acquaintance was equally sure and offered to buy them. He declined, having committed himself to preparing them as part of a romantic dinner for his wife.
The mushrooms were delicious, the dinner was romantic and, in fact, it led to a bonding experience for them both: the shared misery of three hours spent hugging the toilet. They weren’t chanterelles, but Jack O’Lantern (Omphalotus olearius) mushrooms.
This story points up three things.
One, books are helpful in your foraging education, but they are no replacement for spending time with an experienced forager.
Two, while poisonous plants sometimes warn you off by tasting nasty, poisonous mushrooms can taste delicious.
And three, it isn’t mushrooms themselves that are dangerous. They don’t jump in your mouth. It’s careless foragers who are dangerous.
So how do you tell the difference between chants and the vaguley similar Jack O’Lanterns? It’s actually easy, and you only need to know two things to keep them straight.
First, slice the mushroom open. Chants will be white on the inside. Jacks will be as orange inside as out.
Second, there’s a difference in the gills. A Jack’s gills will all be perfectly parallel and deep, but the gills of a chant (they are really “false gills” but no need to go into that now) will be shallow and have several forks and crossings.
So if the gills cross and the inside is white, you can indeed cook them, enjoying a romantic dinner with your partner.
What if there was a tool for harvesting chanterelles and other mushrooms without bending over? And what if that tool also had other uses: a walking stick, snagging mushrooms up on a tree, ripping through spider webs in the woods instead of using your face, raking back leaves that cover short mushrooms, and avoiding being face-to-face with the occasional snake?
Woody Collins has invented a DIY mushroom picker that solves all those problems. He is what the young folks might call a “maker.”
Before he became a mushroom hunter in the Lowcountry of Beaufort County, South Carolina, he spent 30 years on shrimp boats as mate and captain. As those who work in farming and fishing know, sometimes the budget isn’t there to buy some dandy tool so you have to make one yourself. And sometimes those tools are concocted with stunning creativity, especially when you’re several miles at sea.
Retired from shrimping, Collins now gathers many pounds of chanterelles that he finds in the Lowcountry’s Gothic forests of live oaks draped with Spanish moss. He’s still plenty spry, but when he wanted a quicker way to get those mushrooms into his basket, he put his maker skills to work. That’s how he invented this DIY mushroom picker.
Here’s what you need to make a DIY mushroom picker of your own.
Frank Hyman
Parts
a 4- to 5-foot length of round fiberglass rod about 1⁄4- to 1⁄2-inch thick. Some hardware stores sell them as posts for an electric fence.
15-inch length of No. 9 tie wire (also found in hardware stores). When it’s long, it’s limber; when it’s short it’s stiff.
a roll of duct tape
optional: bright-colored tape or paint for the handle, so you don’t lose it in the woods.
Tools
tape measure
speed square or some other way to determine angles
hand saw to cut fiberglass to length, if needed
bolt cutters to cut wire to length
vice grips (or as we professionals call them, “the wrong tool for every job”) to bend wire into shape. Pliers will work, too.
hammer, to modify angle of the bent wire
hard surface—stone, masonry or metal—for supporting the wire as you lightly hammer it
Wipe the light coating of oil off the wire with some paper towels, and cut it to length. (Cut the fiberglass rod, too, if need be.)
Three inches from the end of the wire, use the vice grips to bend it double.
The apex of the bend will be U-shaped. Rest it on a hard surface. Tap it with the hammer to get the bend into a V-shape.
Then with the vice grips, ease the wire back out to a 30-degree angle. That’s your picker. If held parallel to the ground, it’s at the correct angle for snagging a soil-borne mushroom and holding the stem securely.
About 5 inches from the apex of the V, bend the wire to a 40-degree angle. Make it perpendicular to the V, so the V will be parallel to the ground for picking. You may need to adjust this angle a bit to account for your height as you use it.
Tear off one 3-inch strip of duct tape to secure the straight end of the wire to the fiberglass rod.
Continue wrapping 3-inch lengths of tape around the wire and rod until you cover the entire wire. Make sure the tape is snug as you go.
Test-drive the mushroom picker with any soil-borne mushrooms with a firm stem: chanterelles, morels, milkies, blewits, boletes, etc. You may need to adjust the 40-degree angle a bit to get the V parallel to the ground. And for your first model, you may need to adjust the V itself until it holds a mushroom well.
Pick mushrooms from the ground. Cut or brush off any dirt. Drop in basket or paper bag.
Jump in the air, and kick your heels in joy over your quicker pace and not having to bend over to gather mushrooms.
Finally, Forager…
Granted, not everyone has the skills or the interest in making even a low-tech tool like this DIY mushroom picker. It may be a good opportunity for the handiest members of a mushroom club to make and sell them as a fundraiser for the club. Or a self-employed mushroom hunter may want to offer them for sale to the public as I do at my foraging classes.
And, of course, in my mind, I’ll thank Capt. Woody every time I use my own DIY mushroom picker!
This article originally appeared in the July/August 2020 issue of Hobby Farms magazine.
Because much of my mother’s side of the family came from Damascus, Syria, I grew up eating many traditional Syrian foods. One of them—sometimes spelled “cousa,” “kousa,” or “koosa”—is a small specialty squash stuffed with a mixture of meat, spices and rice and dressed with cooked tomatoes.
Just as there are multiple spellings for the dish, there are even more incarnations of the recipe itself.
Some cooks make cousa with lamb. Others use ground beef. I decided to make a vegetarian version with meat substitute. And, although I tried my best to approximate the recipe my grandma might’ve used, that proved tricky.
After all, Grandma relied on her memory and the look and feel of ingredients much more than on printed recipes.
Enter the Eight Ball
My grandma also had access to just the right squash, which she also called “cousa.” It was a small zucchini-like variety perfect for hollowing to stuff with goodies. I’ve looked for its doppelgänger but haven’t yet found it.
The closest I’ve come? The Eight Ball squash. (If you’d prefer a close heirloom variety, try Tondo Scuro di Piacenza.)
You can always direct-sow these seeds. However, because I wanted to get an early start, I planted mine indoors a couple of weeks before our average last frost.
(Before planting, soak seeds in warm water for several hours. This softens their tough exteriors and can boost germination rates.)
Not sure how many plants you’ll need? One Eight Ball squash plant can produce a sizable number of compact, rounded fruits. It’ll also take up a lot of space in the garden if you let it. (I planted mine too close to my bush beans and these squash utterly overtook them.)
Eight Ball squash does best in rich, well-draining soil. Space individual plants every two feet. Space entire rows of squash five or six feet apart.
As with most other squash, Eight Ball is susceptible to powdery mildew, squash beetles and other pests. Check your squash daily for insect eggs, squash vine borers or disease, and head these off before they take over.
An Eight Ball squash is best-suited for stuffing when it’s about the size of a baseball.
Using a sharp knife, cut the fruit’s stem at an angle in order to separate it from the plant. At this stage, the squash will be very fragile, so take care not to accidentally knick its flesh with your knife or a fingernail.
Want to make my variation on the many different cousa recipes out there? Or maybe come up with your own? For reference, here is one fairly traditional recipe for Lebanese-style “koosa”—although it uses yellow squash. And what follows are the ingredients and process I used.
(Just keep in mind ingredient amounts are approximate and will depend on the total number and individual sizes of your own squash.)
First, rinse off the outside of your squash. Next, cut across the its top, in order to remove the stem and gain access to the guts of the squash. Using a small paring knife and spoon, slice 1/8 of an inch in from the outside wall of the squash. Scoop out the seeds and insides and set these aside.
Now, let your hollowed-out squash shells soak in a bowl of salt water while you work on the stuffing.
For the stuffing, crumble up and combine the Beyond Burger patties with the dry rice, cinnamon, allspice, nutmeg and about one-quarter cup of cooked, diced tomatoes. Remove the squash shells from their soak and spoon in the stuffing.
Leave some room at the top of each squash to accommodate expansion of the rice.
Cover the bottom of a saucepan with some olive oil. Pack the stuffed squash upright in the pan.
(If you’re concerned your squashes might tip over during cooking, you can add stability by linking them together with toothpicks.)
Spoon the lemon juice and remaining tomatoes inside and around the squash. Add a dash of salt and pepper and then fill most of the remaining space in the pan with water.
Place on high heat and bring to a boil. Once the mixture is boiling, cover the pan, reduce heat to medium or medium-to-low, and cook for 25 to 30 minutes. Then lift cousa out of its cooking bath and serve hot.
Whether you raise poultry for market or maintain a backyard flock, chicken coops are a magnet for rats and mice.
Rats often appear in the fall, when their external food sources are depleted by harvest. They emerge from the fields, where they live in burrows, to forage and feed around buildings. In contrast, mice will establish colonies within buildings and might never venture outside.
A rat can produce more than 40 droppings per day and a gallon or more of urine per year. A single mouse can produce more than 80 droppings per day and more than a quart of urine per year. A variety of human and livestock diseases are spread through contact with rodent excrement, including:
cryptosporidiosis
toxoplasmosis
leptospirosis
brucellosis
almonellosis
Rats can also become predatory, killing and feeding on adult chickens, but they can be especially hard on young chicks. Because rodents are mainly nocturnal feeders, it’s easy to seriously underestimate their numbers and impact on your coop.
Here are a few steps you can take to help minimize a rodent problem around your chicken coop.
1. Clean the Coop
Keeping the area around the chickens’ coop tidy will help deter rodents, especially rats, by leaving them without a place to set up house.
Make sure grass around your coop is always cut neatly, and remove any scrap lumber or brush piles that are near the area. Throw away empty feedbags or store away for future use. Don’t let them pile up outside the door.
Repair doors and floors to help restrict access to the coop. Total exclusion might not be practical for larger operations. Mice can squeeze through an opening the size of a person’s little finger.
If possible, line the corners of small, elevated coops and chicken tractors, especially where walls and floors meet, with sheet metal or 1⁄4-inch mesh hardware cloth. It’s best if this is done from the outside to prevent rodents from chewing an entry point through the wood.
3. Store Feed Properly
Chicken feed should always be stored in a covered metal container. Heavy, industrial drums that have been thoroughly cleaned are best at keeping out rodents.
Drums come in 30- and 55-gallon sizes and can often be purchased from farm-supply dealers. A simple metal trashcan works as an alternative if you don’t have access to drums. Make sure the container’s cover fits tight. Otherwise, rats and mice will scale walls to jump into the container.
Also remove the chickens’ waterer from the area at night when they roost. Rodents often show up in droves in late summer, especially if it’s been hot and dry, looking for moisture.
Be sure to replace with fresh water in the morning.
If you find yourself with a rodent infestation, physically remove them. Traditional snap traps can be very effective for mice and rats. However, you will want to keep them out of reach of your chickens.
Most hardware stores sell trap/poison containment boxes. These boxes typically hold a couple traps, protecting them from anything that can’t enter the small entrance hole.
Rodents naturally concentrate their travels against walls, so these boxes or stations should be placed in their natural line of travel around the coop. The entrance hole should be parallel and closest to the wall. Bait can be used, but isn’t absolutely necessary in this situation.
Traditional baits, such as peanut butter or chocolate, will work fine.
Larger boxes and traps can be placed around the perimeter of the coop to catch rats looking for a meal. Rats are extremely wary of anything new in their territory and might avoid the boxes until they get used to them.
In this case, the boxes should be installed a couple weeks before putting the traps in them to help overcome their natural wariness.
5. Set Colony Traps
Colony traps are multi-catch traps, meaning they can hold more than one mouse at a time. The small metal boxes have an entrance hole on either end that contains a one-way door, meaning mice enter and can’t get out.
The nice part about them is they’re on duty 24/7 without maintenance, except removing trapped mice. Again, no bait is needed if placed against the wall in the normal travel route.
All mice caught in a colony trap will be alive if you check them frequently, so you will need a plan for dealing with them. Mice are not at all wary of these devices and will enter them readily.
Colony traps for rats are like small cages. Again, the rats will hesitate entering them at first. My experience is once one finally goes in, they all go, but it might take days or even weeks.
6. Call a Professional
If you find yourself overwhelmed by rodents around the coop or simply just don’t want to deal with the mess, search the internet to find a professional in your area.
This article originally appeared in the September/October 2020 issue of Hobby Farms magazine.