TJ, CJ and Margie all hatched on the same sunny June day. Mama Hen Natalya hovered over her brood, teaching them where and how to eat and drink and caring for them like a good mother bird.
The three little chicks spent every moment of their days and nights together. Before long, their fluffy down was gone and tiny feathers had started sprouting all over their growing bodies.
CJ and Margie soon looked like miniature versions of adult Orpingtons. TJ, however, looked like a miniature version of CJ and Margie. For some reason, while his clutchmates grew by leaps and bounds, TJ’s growth inched—centimetered—forward.
In all my years of raising poultry, I had never seen anything close to what TJ was experiencing. I hit the books, contacted extension offices, and emailed my poultry experts for their take on this case of tiny bird-itis.
Should you have a chick or juvenile whose growth appears delayed, one of these four causes might be the cause.
Egg Condition
When setting eggs, either with an incubator or with a broody hen, make certain to select eggs that are uniform in size and shape. Eggs that are smaller than others from the same layers often contain less yolk to nourish a growing embryo.
Eggs that are misshapen—narrow, bullet-shaped, round—frequently feature constricted interior space in which a chick can develop. Both of these conditions may result in a smaller chick at hatch time.
A chick that hatches more than a day behind the rest of its clutch starts life behind the 8-ball. Known as a “cull chick,” this latecomer spends its first 24 to 48 hours recovering from its pipping ordeal while the rest of the brood is already dry, running about, and eating starter rations.
As a result, it behaves tentatively amongst its more outgoing siblings. It is more susceptible to stress, which can suppress growth.
Ana Hotaling
Bantam Background
In flocks comprised of both standard and bantam birds, the possibility always exists that a bantam egg might have been collected for hatching along with standard eggs. The potential for this increases when the large-fowl breeds being raised are small-sized birds that lay small eggs, such as the Hamburg and the Lakenvelder.
In flocks where bantams and standards interbreed, hatching these crossbred eggs would result in chicks of varying sizes. This includes tiny chicks occurring alongside ones of normal size.
All three are caused by a mutated or recessive gene. Thyrogenous dwarfism, caused by the (td) gene, results in stunted birds that do not reach sexual maturity.
Autosomal dwarfism, due to the (Adw) gene, yields growth-delayed birds approximately 30 perecnt smaller than their counterparts.
Sex-linked dwarfism, connected to the recessive (dw) gene on the Z sex chromosome, manifests every now and then in purebred flocks and results in miniature, proportionate versions of normal birds. These tiny chickens breed and lay just like large fowl, albeit on a smaller scale.
Since TJ’s egg was perfectly normal in size and shape, and since his body is proportional and not stunted, my conclusion is that his size is due to sex-linked dwarfism and the (dw) gene, especially given that he comes from a long line of purebred Orpingtons.
We have nothing to worry about, health wise. He might be tiny, but he’s as active and voracious as his siblings and definitely here for the long run.
I’m a big proponent of organizing job-specific toolboxes so that whenever a project comes up, everything you need is at your fingertips. For example, I have one toolbox specifically organized for repairing fences.
This time-saving convenience can’t be truly appreciated until you give it a try yourself.
Yet I’m also keen on compiling more generic collections of commonly-used tools. You never know what job you might wind up tackling in a given day. Tractor toolboxes, I believe, should be stuffed full of as many small hand tools and supplies as they will hold. This includes a hammer and multi-in-one screwdriver.
But not every tool fits inside a handy toolbox. That’s why I’ve taken my organization to an ever greater level. I stock anentire wagon with my favorite tools.
Yes, my trusty red wagon—so frequently used for hauling tree debris, compost, rocks and more—doubles as a portable toolshed for most of the year. Virtually every day through the spring, summer and fall, I’ll fire up my garden tractor, hook up my red wagon, and travel the farm on missions of maintenance and improvement.
The contents of my wagon shift with the seasons, but the goal is always the same. I want to have every tool I might want available when I need it, regardless of where I am.
To give you an idea of how useful a wagon filled with larger tools can be, consider the following sampling of items I typically haul around in my red wagon at any given time:
In addition to its intended use, I use a snow shovel during warmer months for moving large amounts of dirt or compost.
Digging Bar
Primarily a tool for prying loose large rocks when digging, a digging bar is also good for chipping ice and even weighing down tarps. Sometimes you just need a heavy object to pin something in place against the wind!
100-foot Cloth Tape Measure
A 25-foot metal tape measure is useful too, but I prefer my 100-foot cloth tape measure. I constantly find myself measuring extended distances, often to determine the best location for planting orchard trees.
35-gallon Leg Tank
I use this for hauling water to my orchard trees and pumpkins. A 35-gallon leg tank pretty much lives in my red wagon for three seasons, along with its accompanying hose.
By keeping my pruning loppers and hand saw handy, I can quickly tackle these light pruning jobs as I spot them, without making a special trip. Even better, I can toss the debris in my wagon and haul it away without delay.
T-posts and T-post driver
Yes, I try to keep a few T-posts and a driver around. If an apple tree branch is sagging under the weight of its own load, I can quickly prop it up. If I’m traveling through tall grass and come across a rock or other obstacle I don’t want to hit with a mower or haybine, I can easily mark the spot.
The point is, when tackling general farm maintenance tasks, one job tends to prompt another. Before long you’ve seamlessly transitioned into a completely different project than you’d originally intended to tackle.
Having a wide variety of tools available will save time, increase your productivity, and help you make the most of every precious daylight hour.
So why delay? You should organize a wagon full of tools, too!
You installed fencing, built shelters, stocked up on feed and filled water tanks. Now all that’s left to do is bring home livestock you’re raising and watch them graze, root or browse in the pasture—well, not so fast!
Raising cattle, goats, sheep, pigs, alpacas or other livestock requires a significant commitment, expert partners and a wealth of knowledge. Experienced farmers share tips that will ensure that the animals—and the farm—thrive in your care.
Find a Mentor
There might be lots of information about raising livestock in books, magazines and online. But Maureen Macedo believes there is no substitute for a knowledgeable mentor who can answer questions and provide guidance in unfamiliar situations.
“It can be as easy as being comfortable with the person you purchased your alpacas from,” she says.
Macedo, who raises alpacas at Macedo’s Mini Acre in Turlock, California, also suggests looking for mentors through breed-specific associations such as the Alpaca Owners Association.
Marie Minnich of Marushka Farms seconds the suggestion to join a community familiar with the livestock breed who can provide essential resources and support to help you succeed in raising them. The support team for the Romeldale-CVM sheep on her Danville, Pennsylvania, farm includes the breeder, veterinarian, shepherds, a shearer and the local extension agent.
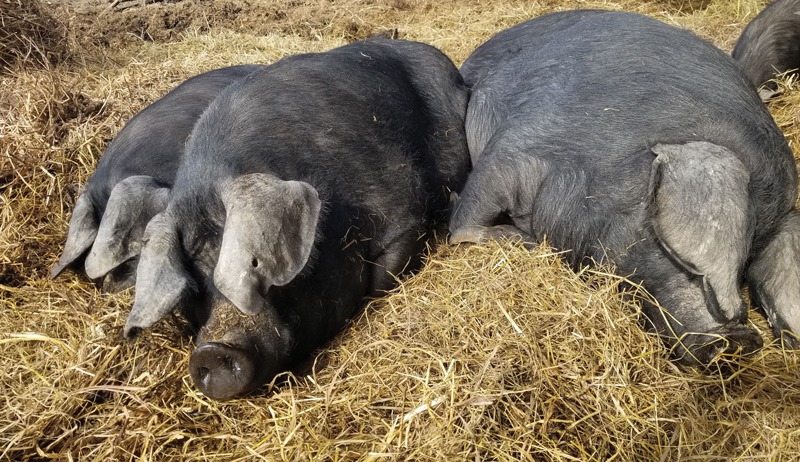
Mark Bengston can’t count the number of times BF Farm in Huggins, Missouri, has received calls from regretful pig owners asking to buy back their Kunekune pigs because the novice farmers couldn’t handle them.
It might be tempting to go “whole hog” and establish an entire passel or purchase a breeding pair and plan for the first litters. But those who are new to livestock should start small, Bengston advises.
See how it goes with a pair of sows. If it feels like a good long-term venture, purchase a boar or additional stock.
Focus on Fencing
Darren and Felicia Krock have a simple requirement for the fencing on Triangle K Ranch, their Kenton, Ohio, farm: It must be strong enough to keep their Large Black pigs in and predators out. The couple uses perimeter fencing plus electric fencing for rotational grazing.
At White Bison Farm in Laona, Wisconsin, Jodi Cronauer has high-tensile electric fence around most of her pastures. But she prefers electro-netting around the “maternity ward” where Idaho Pasture pigs are raising their piglets. The holes are smaller, making it impossible for the newborns to go through and get tangled.
The fencing must also be strong enough to withstand the snow and ice that are common during Wisconsin winters.
Schubert also choses fencing with maximum 4-by-4 openings to ensure that lambs can’t crawl through, leaving their mommas on the other side. She adds, “A dam and her lambs, separated by a fence, with both ‘baa-ing’ like crazy from the stress is something I don’t want either to go through if it can easily be prevented,” she says.
Six Wags Over Texas
Prevent Parasites
Choosing parasite-resistant breeds can be an important first step in protecting the livestock you’re raising. Kiko goats and Romeldale-CVM sheep are known for their parasite resistance. But, Minnich adds, “It’s still important to understand the care of sheep regarding evaluating for and minimizing their exposure to parasites.”
Pasture rotation, multispecies grazing and regular sanitation can help minimize parasite pressure. But a regular prevention program, including a deworming protocol, can help keep livestock parasite-free. Deworming practices might include checking the color of mucous membranes or testing fecal samples.
Performance Over Pedigree
Jodey Fulcher often advises new goat owners to look past the pedigree of a herd. “A goat with a stellar pedigree might not be the best performing goat and won’t pass along the best traits [to its offspring],” he says.
At BF Farm, Fulcher provides data on pedigree and performance to those wanting to purchase his Kiko goats. He also encourages farmers to look beyond bloodline and choose goats that will make good additions to their herd.
Cull Underperformers
Even when raising livestock for meat, deciding which animals to cull can be a tough—but essential—choice.
“It’s hard to do in the beginning,” Fulcher says. “The goat that needs to be culled is probably the one you’re most attached to because you’ve handled it the most. But you have to make tough choices because that one goat could wipe out your whole herd.”
Maintaining strict standards for health and performance also helps build your reputation as a breeder, adds Bengston. You’d never sell underperforming stock, he explains. This makes culling important to the success of the herd and the farm.
Do not wait until an animal is sick to call the vet, advises Felicia Krock. Even though Large Black hogs are a hardier breed that rarely gets sick, Krock still schedules regular “well checks” with their large animal vet.
Knowing the personalities of the passel of hogs will help the vet make more accurate diagnoses when something goes wrong.
“If you’re selling breeding stock outside the state, you’ll need a vet to provide health certificates,” Darren Krock says. “It’s good to have a regular relationship with your vet to make those tasks easier.”
Emphasize Good Nutrition
Different livestock have different nutritional needs. Instead of taking a DIY approach, Darren Krock suggests developing a relationship with a feed supplier who can formulate a mix with balanced nutrition.
Bakery leftovers, distiller grains and fresh vegetables might be nice treats, but, Krock adds, “Without appropriate, balanced nutrition, your animals won’t thrive or give you the healthy litters you want.”
For livestock like goats, sheep and pigs, good nutrition includes the right balance of supplemental minerals. Fulcher offers free-choice minerals with a high copper content to his Kiko goats. Cronauer also offers minerals to her Idaho Pasture pigs, noting, “I’ve never seen [this breed of pigs] root unless there is a mineral deficiency.”
Be Patient
Many heritage breeds are slower growing than their commercial counterparts.
Kunekune pigs require up to 18 months on pasture to reach a butcher weight of 175 pounds or more. And Idaho Pasture pigs don’t reach their market weight of 230 pounds for at least 10 months.
Commercial pig breeds, however, can be butchered at five months. “If you want a fast-growing pig, heritage breeds might not be right for you,” Cronauer says.
But slower-growing breeds are often worth the wait. Lori Enright, founder of the American Kunekune Pig Registry, believes the slow-growing, docile breed produces delicious, marbleized meat that is much juicier than conventional pork breeds.
Moreover, she adds, “Consumers are contributing to the preservation of an historic breed.”
Many species of livestock, including cattle, goats, sheep, llamas and alpacas, are herd animals that eat, sleep and graze together.
Without a companion (of the same species) animals can get bored or depressed. And this could lead to undesirable behaviors such as crying or escaping the pasture.
To avoid accidental pregnancies, Macedo suggests putting two or more animals of the same sex in a pasture together. A female/castrated male pair would also work.
Deal With Dead Stock
No one likes to think about losing an animal, but it’s a fact of life on the farm. And when it happens, you don’t want to be unsure of what to do next.
“It’s important to have a system for dealing with animals that have perished in accordance with local laws and regulations,” Felicia Krock says. She suggests talking to the local extension office and your vet about properly disposing of deceased stock.
Make Time for Grooming
Farmers who want to raise fiber animals such as sheep and alpacas must be prepared to devote time to grooming.
Be prepared to maintain pastures to minimize exposure to foreign materials such as burrs and briars. You’ll need to set up feeders to minimize the amount of hay that ends up in the fiber. Also, you’ll invest in coats to keep the fiber pristine.
Shearing in clean conditions and minimizing second cuts also helps preserve the quality of the fiber.
“For new owners and breeders, understanding the value of the wool and how to maintain the sheep to maximize its quality is important,” Minnich says.
Schubert warns that experienced shearers can be hard to find. Be sure to check local availability—or prepare to take a class to learn the ropes—before purchasing fiber animals.
Consider Your Space
Putting too many animals on the pasture—called overstocking—leads to several problems from degraded pastures to increased parasite pressure. Before investing in livestock, research ideal stocking rates for animals you’re interested in raising.
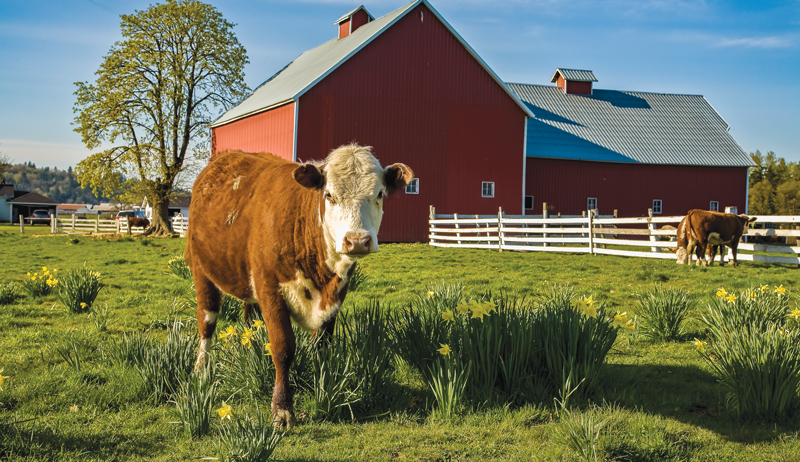
Mary Sue Measel ensures that each of the belted Galloway, Herefords, Lowline Angus and other miniature cattle breeds grazing in the pastures on Measel’s Mini Ranch in Greencastle, Indiana, have at least a half-acre of pasture each (for a stocking rate of 5 acres for every 10 cows).
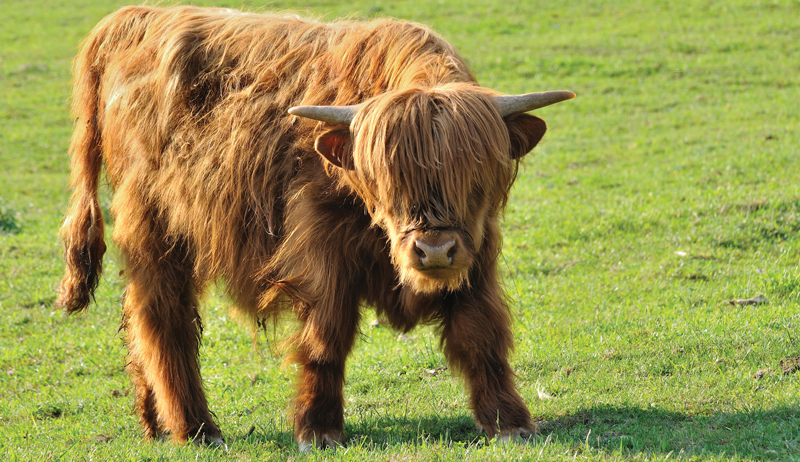
Asmussen follows a similar stocking rate for her Highland cattle. She runs 32 head on her 60-acre farm, Red Willow Ranch, in Springfield, Missouri.
The stocking rates for goats and sheep average two to four sheep per acre. Considering the amount of space you have in pasture will help you decide on the ideal number of animals for your farm.
Andrea J Smith/Shutterstock
Visit Multiple Breeders
Before purchasing stock, visit multiple breeders. You should get as much information as possible about the background of the animals. This includes their parents, health problems and bloodlines, according to Measel.
Gloria Asmussen, co-founder of the Heartland Highland Cattle Association, also advises using those visits to get a better idea of available colors and confirmations. In Highland cattle, for example, some breeders specialize in specific colors such as silver, brindle or dun, while others focus on confirmation.
Black Highland cattle tend to be smaller framed, while red Highland cattle have longer legs, she explains.
You should also evaluate their temperaments. The best breeders have animals that are beautiful, productive and well-socialized. “An animal that is fearful of humans is harder to deal with,” she says.
Mark Christenson of Red Circle Ranch in Cleveland, Texas, raised miniature Texas Longhorn cattle since 2008 and often sees prospective owners looking for bargains. It’s a mistake, he believes, to prioritize price over performance.
“The old saying that you get what you pay for is true with cattle,” he says.
Evaluating the animals available from multiple breeders will help you choose stock that is the right fit for your farm goals. Consider it an investment in the future of your farm.
Consider Threatened Breeds
Minnich reviewed the breed descriptions on The Livestock Conservancy website before purchasing her first Romeldale-CVM sheep.
“[The Conservancy’s] thorough descriptions of the various breeds led me to believe it was an ideal breed for someone with no livestock experience who wanted a breed with wool of various colors appropriate for hand-spinning,” she says.
Register Your Stock
The American Kunekune Pig Registry has almost 17,000 Kunekune pigs entered into its herd book. Enright believes that registration of heritage breeds is especially important for its conservation.
“It ensures that the breed and those characteristics that make it a breed remain intact and tracks the ‘health’ of the breed, allowing breeders to understand how many pigs are being produced and whether conservation efforts have been successful,” she says.
Thanks to breed registries like the Heartland Highland Cattle Association, The Livestock Conservancy was able to track the number of Highland cattle in the U.S. When annual registrations topped 1,000, the conservation nonprofit removed the heritage breed cattle from its Conservation Priority List last year.
“Most people don’t register their litters,” says Felicia Krock. “Large Black hogs are critically endangered. There are less than 50 breeders and only 28 are breeding animals. Following through with the paperwork is so important so we know the status of the animals.”
Develop New Markets
The limited number of markets for niche proteins is one of the downsides to raising heritage livestock breeds, Asmussen admits. “We’re not big enough as a group to form a co-op,” she says. “If you’re going to do any kind of beef [with Highland cattle], you need to develop your own niche market.”
Hosting cooking demonstrations and offering samples can help convince consumers to give heritage proteins a shot. Seeking out sales channels like farmers markets and food festivals that provide opportunities to talk to customers about the benefits of often under-appreciated breeds.
Tony Campbell/Shutterstock
Sidebar: Choose the Best Breed
Michelle Schubert researched multiple sheep breeds before choosing Southdown Babydoll sheep for her Bergamascos’ Babydoll Brigade farm in Stomping Ground, Kentucky. In addition to their diminutive size and overall adorableness, Schubert appreciated their versatility.
“They sell well in the companion, pet and 4-H/FFA markets; they are used in vineyards, sustainable agriculture and organic farming; and their wool is favored among spinners and fiber artists,” she says. “They also have select carcass value for the table … and some folks even milk them.”
Think about your goals for raising livestock—meat, milk, fiber, show, companions—and choose the breed that will best meet those needs.
Sidebar: Make time to socialize
Miniature cattle breeds are adorable—and Christenson warns that miniature Texas Longhorn are addictive—so interacting with them is a pleasure. It’s also essential
Spending time with your flock every day also alerts you to abnormal behavior, allowing you to diagnose a suspected illness before it’s too late.
“The Babydoll is small in stature and easy to handle,” says Schubert. “They also love treats—I use sheep pellets as treats—and they will come when I shake the bucket and call, ‘Here Babydolls.’ If you want your Babydolls to be friendly, you want to spend quality time with your flock and handle them on a daily basis.”
It’s not just socializing and regular health checks that take time. You’ll also have to establish a team to care for your livestock when needed.
“The No. 1 thing [new farmers] don’t consider … is the amount of time livestock requires,” says Jill Christopher of Six Wags Over Texas, a Van Alstyne, Texas, farm raising Harlequin sheep. “You can no longer go on vacation without a farm sitter to check the sheep twice a day, feed and water as needed and be alert to health changes.”
Strong biosecurity protocols help reduce the likelihood that your livestock will be exposed to infectious diseases. At Triangle K Ranch, no one is allowed in the barn or pastures but the vet (and the Krocks keep plastic booties ready so nothing is trekked in from other barns).
Make sure to wash your hands after dealing with livestock.
When bringing new animals on to the farm, keep them separate from the existing livestock for at least 30 days to ensure you’re not exposing them to disease.
Farm equipment can also be a source of infection. If it’s necessary to share equipment with other farms, it should be cleaned and disinfected thoroughly before it’s brought onto the property.
This article originally appeared in the July/August 2020 issue of Hobby Farms magazine.
This is the time of year when everything is reaching its zenith of production.
Big harvests are already starting, with massive ripening of peppers, tomatoes and melons. Picking crops like beans and harvesting potatoes and carrots are ongoing. Yet, soon the fall will be fully upon us, and storage crops will be lifted and put away for a winter supply.
Sweet potatoes and onions will need curing. And winter squash will need a timely harvest to ripen fully but not be left out for the frost.
The fall is also the time when all the spring crops come back into season. You can grow lettuces, radish and spinach of good quality in the cooler days of autumn.
One of the biggest fall jobs, though, is harvesting. So here are 9 tips for autumn harvest success.
1. Proper Maturity
Every crop has proper storage maturity. Under-mature squash won’t store, for example, while over-mature carrots are bitter.
Every crop variety has a “days to maturity” (DTM) marked on the seed packet. In some cases, this is the days to harvest from seed. Sometimes it is the days to harvest from transplanting into field, though, so make sure to read the seed packet.
Follow this closely as an indicator of when to harvest a crop, and mark approximate harvest dates on a calendar.
2. Indicators of Ripeness
Every crop has signs of its maturity and indicators that it is ripe for harvest. Eggplants, for example, will be a rich color and, although firm to the touch, will depress a little when squeezed slightly.
Watermelons have at least a dozen “indicators of ripeness.” We could write a short novel about whether or not a particular melon is ripe enough to suffer the harvest of outrageous fortune.
Some say it is the yellow spot on the bottom, or the distinct division between the dark green lines and light green skin. Or perhaps it is the sound it makes when you play drums on it. I usually go with the dried-up first leaf that is connected just past the where the stem meets the main vine.
Garlic is ripe when 40 to 50 percent of its green leafy material is dry or yellow.
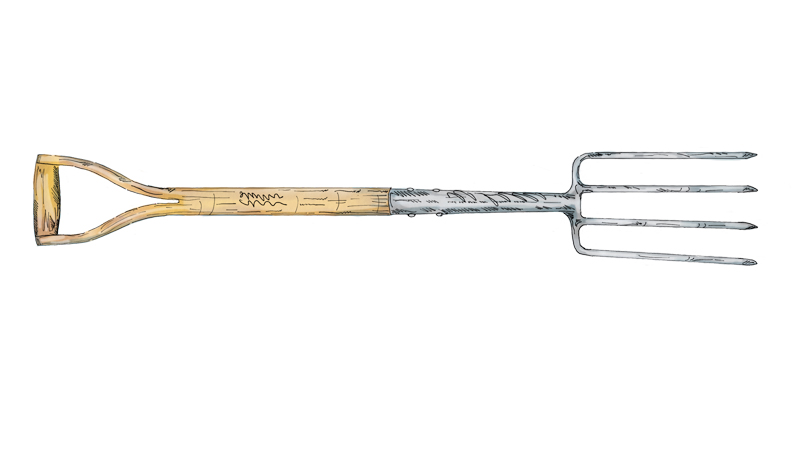
Always have the right tools to harvest properly. When it is time to harvest—and especially if you have a big harvest—you will want to have tools to help you. You also need containers to hold the fruits of your labor and the proper equipment to process your harvest.
Carrots and garlic need a good digging fork for an efficient harvest. Apple picking can benefit from a Joey Apron to prevent bruising while picking. And a quality wash gun can help clean off soil.
Zach Loeks
4. The Weather Outside Is Frightful
Timing your harvest to coincide with good weather conditions is important.
Crops that need to cure (garlic, onions, etc.) are better harvested in drier soil. Otherwise, they come out dirty and require more drying to meet ideal storage requirements.
Overall, you should avoid harvesting in the rain as much as possible. Unless you have very sandy soil, rainy harvest days produce dirty crops that need more aggressive cleaning for use or storage. Even if you store your carrots dirty, you don’t want them caked with mud.
Excessive cleaning and muck removal can damage your crop in post-harvest handling procedures. This results in shorter storage times and a lower crop quality.
It is easy to damage a crop while you harvest, before it is even out of the ground. The classic example is piercing your carrots, garlic or potatoes with your digging fork.
Proper tool use can help you avoid this problem. Put your garden fork tip into the ground 2 to 3 inches away from your row of crops and push it fully into the soil with your foot. Then, and only then, pull back on the handle and tilt the tines under your row of root crop to help lift them out of the soil.
courtesy of Zach Loeks
6. Helping Hands
A crop harvest can be a big activity. We often underestimate the amount of labor needed to get the crops out of the ground in good condition and in a timely manner.
Plan for adequate people power to get the crops out before fall rains come and ruin the onion wrappers or frost destroys the squash.
Jack Frost may represent a slowing of the garden season and a time for rest and planning the next season. But make sure you harvest before he comes and ruins your hard work.
Know your frost-sensitive and frost-tolerant crops. Hardy crops like kale and cabbage can be left in the garden for later harvest while you prioritize sensitive crops like tomatoes, peppers and cucumbers. You can bulk up on harvesting these crops slightly under-ripe to let them ripen indoors to maximize your fall harvest.
In other cases, you can avoid a mild frost by using row cover to protect a crop, gaining another 7 to 14 days of frost-free harvest. On the other hand, crops like pumpkins and carrots can handle mild frost.
In the case of squash, a little frost kills off the foliage and reveals the squash for easy harvest. For carrots, a mild frost results in a sweeter crop. But leave either too long and you can get damage and a loss in storability and quality.
Zach Loeks
8. Cure and Clean Your Crop
Some crops require curing, the process of subjecting them to proper humidity, temperature and air flow, and light conditions.
For onions and garlic, curing dries the wrappers. You cure crops like sweet potatoes and squash, though, to harden the outer skin.
All crops need a little cleaning to remove excess dirt, debris and bugs. Research the best cleaning and curing procedures for your crops to ensure they last as long as possible in storage.
9. Store it Properly
Proper storage—meaning both the right containers and conditions—is the last and critical step in fall harvest preparedness.
If you don’t have a storage plan for your harvest, you could end up losing your harvest to rot, mold and spoilage. You will no longer have the delicious fall veggies to enjoy over fall and winter.
You also will have lost your crop after the point of maximum investment. All the work of growing a storage crop—from seeding to weeding to harvesting—maxes out just before storage. So, whether you store it in a fridge, a root cellar or a dry cellar—or even if you process or freeze it— your crop is only safe when it has been stored properly.
You might be wondering why leafy greens are all the rage in cool-season gardens. They may not be gorgeous like bright-red tomatoes or have show-stopping flowers like okra, but leafy greens are nutritional powerhouses, versatile in the kitchen, and hardy even after a frost.
Collard greens—a No. 1 leafy green in my garden—are a crop celebrated in the South and central to African-American history.
You may hear about the seeds of collard greens being brought to the US by enslaved Africans. The truth is that collards originated in the Mediterranean and were probably brought here by Europeans.
Enslaved people in the Southern U.S. incorporated these greens into their diets, as collards were often made available to them and were similar to the wild and cultivated greens they knew in their home countries. (Let culinary historian Michael Twitty educate you.)
How to Grow Collard Greens
A member of Brassica oleracea, collard greens grow best in cool-season gardens, though summer harvest is not unheard of, as I managed in my garden this year. They slowed down a bit during peak heat but never quit producing.
For spring and summer gardens, start your seeds indoors in late winter, or direct seed in early spring. For fall gardens, direct seed in late summer. Here in Central Kentucky, we seeded our fall collards in early August. You want to give your fall collards at least two months to grow before frost hits them, if possible.
Fall collards will overwinter in many parts of the U.S. During Persephone Days—when there’s 10 or fewer hours of light per day—leaf growth will slow significantly, but it’ll pick up again after that, meaning you’ll be harvesting collards again in late winter and early spring.
Plant collard greens in full sun in deep soil. According to Texas A&M AgriLife Extension, the roots of a collard plant easily reach depths of 2 feet of more. This explains how collards can tolerate drought and stay productive for so long—they mine nutrients and moisture from that depth.
Give your plants 18 inches or more between them, and they’ll spread their leaves to match the space.
If you’re growing your collard plants for more than a few months, side-dress with fertilizer to give them a boost as seasons change.
Collards have little issue with disease, but they are a favorite of cabbage loopers, aphids and harlequin bugs. Keep them covered (more on that below), try a soap spray or use Bacillus thuringiensis when the pests are too much.
For spring/summer gardens, collards are likely to slow their production of greens as temps peak and dry spells set in. I know farmers who just leave their collard plants alone for a month or more, then come back to them for harvest when they start growing again.
For fall gardens, collard greens will survive frosts—and become sweeter, as the cold concentrates their sugars—and can go uncovered to 20 degrees or so.
Floating row cover is a smart move for growing collards in any season, as it’ll keep the cabbage loopers and other insects away from the plants, as well as extend the plants’ life into the colder months.
How to Harvest and Store Collard Greens
Harvest first thing in the morning so the leaves are as crisp and fresh as possible.
Wait until the leaves grow at least as big as your hand before snapping the stem at its base. Some collard varieties will get as big as your face—and bigger—so don’t be in too much of a rush to harvest.
Store collards in a plastic bag or wrapped in damp paper towels in your fridge. They’ll keep for a week or more.
Blanch, chop and freeze greens that you’re not eating right away.
I can’t pretend to be a collards expert, as I wasn’t introduced to collard greens until I started working on a farm in the South six years ago. But I know there are gloriously delicious ways to prepare collards by stewing them with fatback and smoked ham hocks—and typing that made my mouth water—and I encourage you to seek out recipes in that tradition!
I love collard greens the same as I do kale, mustard and chard, and sometimes I mix all of these for a sauté with onions, finished with vinegar. (I know I’m offending Southern sensibilities here!) Top that with a fried egg, and call it breakfast.
With a nod to fusion cooking, I love adding thinly sliced collards to miso soup. I love adding collards to most brothy soups, really, just at the end so they’re cooked but not mushy.
The sturdy leaves can stand in as the tortilla for your wrap, too.
Collard greens’ ability to produce when the weather turns too cold for many other veggies ensure their place in my fall and spring gardens. It doesn’t hurt that I love their large, vibrant, green leaves, and their taste is pretty good, too.
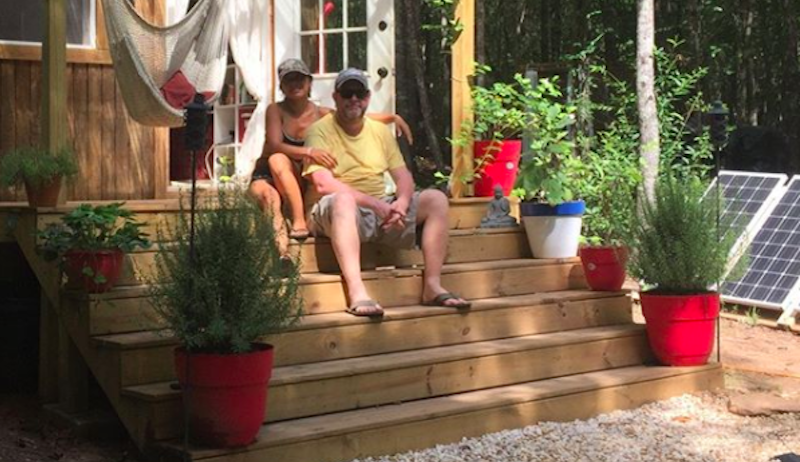
When John and Fin Kernohan decided to get married, they talked about where they’d like to live and what sort of fulfillment they wanted to get from their homestead. At the time, John was living in Miami in a 2,500 square foot house. But Fin told him plainly that she’d prefer a smaller and altogether cozier space.
After talking through some options, the Kernohans decided to settle on a tiny cabin in the woods in Georgia and take steps to live off-grid.
“For the past eight-and-a-half years we’ve been living in our DIY 304 square food foundation-based tiny cabin,” says John. They named the property the Beloved Cabin.
Since moving to a tiny house, the Kernohans have expanded their lot of land from three acres to 16 acres. They also added a smaller towable tiny home, which they dub the Tiny Firehouse: Station No. 9. They’ve also set up an advocacy and support group called the United Tiny House Association. John says this has “been able to donate over $675,000” from charitable festivals and events.
We spoke to John about the benefits of small-space living and the importance of sustainability. We also got the scoop on the couple’s greenhouse bathhouse.
Embracing sustainable practices has always been an important part of the Kernohans’ world view. “We began with small steps,” recalls John. “Solar to solve our energy requirements and water were our two main priorities when we got started.”
These days, the Beloved Cabin’s solar energy system generates all of the property’s power needs. Two creeks and natural springs on the land help provide water, along with a well that now pipes to the cabin and gardens.
The Beloved Cabin also utilizes a HomeBiogas system to create methane gas for cooking fuel. This in turn produces nutrient-rich liquid fertilizer as a by-product.
Crops And Compost
https://www.instagram.com/p/CCOYc_eHCa5/
“We started out with a small 8-by-12 garden box, which has now expanded to six different garden areas and multiple fruit trees,” explains John. “We grow an amazing amount of vegetables, peaches, apples, grapes and berries.
“And we also create most of our own soil though six different composting systems, which include two humanure composting systems.”
John says that watering the Beloved Cabin’s plants with “gray water” has also become a staple practice on their land.
“We ran the drainpipe from the clawfoot bathtub located in our greenhouse and bathhouse out to one of our garden boxes,” he says. “We use non-detergent castile-based soap and shampoo so that the gray water from our bathing is perfectly safe and beneficial for our berries and veggies.”
Behold the Greenhouse Bathhouse
https://www.instagram.com/p/CDwqaIuHcQ1/
One of the most distinctive and innovative features of the Beloved Cabin is the property’s greenhouse bathroom. “Fin has wanted a greenhouse and bathhouse for years,” explains John. “She has talked about and designed and redesigned it multiple times over the years.”
Building the facility out of repurposed windows, the Beloved Cabin’s greenhouse bathroom means that growing season can begin far earlier than usual.
“An added extra benefit of the greenhouse bathhouse is that through the process of passive solar heat, [during winter] it now heats the back of the cabin very nicely,” says John.
Following Your Tiny House Dreams
https://www.instagram.com/p/CBBBcBHnxqd/
“Without getting up on the proverbial soapbox, we believe we all have an obligation to do what we can in our own way to extend resources and help in healing our abused and over-used planet,” says John when asked about the most rewarding part of a tiny house lifestyle. “By living our off-grid, repurposing, tiny lifestyle, it’s just our way of doing what we believe we can to help in preserving our planet for future generations.
“It’s like we always say: Do something big in your world by simply doing something tiny!”
That smartphone in your pocket can connect you with more than just your favorite auntie’s gooseberry pie recipe. Whether you’re an Android or iPhone user, there are countless smartphone apps available to help you identify mystery weeds and insect pests, track your backyard hens’ productivity, and everything in between.
Here are a handful of mostly free smartphone apps to try. (Although some do include in-app purchases, even these afford perfectly serviceable, stripped-down versions you can use indefinitely at no cost.)
Seek
Created through a partnership between the National Geographic Society and the California Academy of Sciences, Seek is like having a nature interpreter on call. The free app uses image-recognition technology to identify fungi, plants, insects and other living things in real time.
That makes Seek well-suited for would-be naturalists, but it also has real potential for gardeners. See a new pest eating your beans? Or a weird weed that’s taking over? Simply point your smartphone’s camera at the subject in question. Seek scans and provides the species, photos and details—most of the time.
Occasionally, Seek only gets close. But even then it suggests related species to help you narrow your search. Aside from real-time scanning, Seek also accepts static images from your camera roll. (Admittedly, Seek seems to have a harder time identifying species from stored images than from real-time scans.)
Seek also offers fun nature-spotting challenges and badges. My only real caveat? Seek could potentially gobble up battery power in a hurry. If you have a tired, old phone like mine, you might want to keep an eye on that.
Pl@ntNet Plant Identification is part of a plant diversity citizen science project; however, it can also serve as a simple, free plant identification app.
Snap a photo of the plant you want to identify—or choose an image from your smartphone’s camera roll—and then select the category most relevant to your image: “leaf,” “fruit,” “flower,” “bark,” “habit” or “other.” Pl@ntNet will return photos and species names for suggested matches.
Just want to learn more about a particular plant in your region? Pl@ntNet also has a search function that returns botanical names, myriad reference images—again, many of which are crowdsourced—and outside links for more species detail.
Gardenize
The free version of the Gardenize app is a bare-bones garden journaling tool. You can use it to save photos of your plants, make notes about different garden areas, and record details about garden “events,” such as watering or seed starting.
The catch? If you stick with the free version, you’re unable to export your garden notes. (Paying customers can do so in the form of garden books, photo galleries or spreadsheets.)
Canning Timer and Checklist
Already an experienced canner? Then you’ll probably appreciate this free app by Oregon State University’s Extension Service. Canning Timer and Checklist offers a quick refresher on food preservation steps and protocols for more than 50 kinds of fruits, veggies, meats, jams, jellies and pickles.
Based on your elevation, canning jar size, canning method and whether you’re packing raw or hot ingredients, the app tailors a checklist and sets a timer to assist you during the canning process.
FlockStar
If you keep a small number of hens and want to better track their egg production, consider FlockStar. The free app enables users to upload photos and vital statistics for each of their hens as well as log daily egg laying, either for single hens or in bulk. It also charts monthly egg counts and even ranks hens via egg-laying leaderboard.
My only real gripes? Any weights—for eggs or hens—must be entered in grams. Also, there’s no obvious way to indicate whether a hen is broody. (But you can always mark a hen as “inactive” and enter details in the available “notes” field as needed.)
MiteCheck
Got bees? Then you’ve likely got a few mites, too. Developed by the Bee Informed Partnership, MiteCheck helps beekeepers of all skill levels to monitor their colonies’ Varroa mite levels. The free app includes details on the alcohol wash method as well as step-by-step instructions, a shake trainer and timer for the (better-for-the-bees!) powdered sugar roll.
After calculating Varroa mite loads, you can submit hive-related data to be included in interactive maps of Varroa hot-spots across the U.S. Visit the Bee Informed Partnership to learn more about MiteCheck data collection and the group’s multi-national Mite-A-Thon initiative.
Download a few of these apps, grab your smartphone, and head outside to enjoy nature in a fun, new way!
Recently, my husband found our Gold Laced Wyandotte rooster, Hercules Mulligan, lying near the feed bins without a mark on him. He was fine the day before, and now he was gone.
Why? We didn’t have an answer for this chicken death apart from the fact that he was walking oddly for several months.
We’ve kept chickens for almost 20 years now, and we’ve faced similar events before. But it’s always upsetting. As usual, we began to wonder what had happened. Could we have done something about it? Would more deaths follow or was this a one-off?
To get some answers, I turned to Yuko Sato, DVM, from Iowa State University.
Little or No Warning
It’s difficult to understand why a chicken looks healthy one day and experiences death the next. Sato says that this is because birds are prey animals, and so they have to be stoic about how sick they are until they are just about to die, which makes treating them difficult.
Some signs include:
hiding (when not laying)
not coming out to feed as usual
loss of conditioning
watery eyes
ruffled feathers
discharge from the beak
odd movements
An unexpected chicken death, such as our rooster’s, is an upsetting thing to experience. But it’s also something that chicken-keepers have to accept.
A-photographyy/Shutterstock
Getting Help
Can you call a vet when you have a sick chicken?
You certainly can, if you can find one. Poultry veterinarians or livestock veterinarians who know how to treat poultry are few and far between.
“I offer an elective on backyard poultry health for veterinary students,” Sato says. “But most students studying poultry are interested in working in the industrial side. So field visits to hobby farms aren’t very common.”
There is help available, however. The Association of Avian Pathologists has information for chicken owners like us. You can also contact your official state agent through the National Poultry Improvement Plan has a list of officials within your state.
NPIP is also useful for information on chicken health. It monitors diseases that affect chickens: Salmonella typhoid, Salmonella enteritidis, Mycoplasma gallisepticum, Mycoplasma synoviae, Mycoplasma meleagridis and avian influenza.
Most states have a healthy bird help line, too. You can also ask for help if you’re curious about why your chicken died, if you’re worried that it’s something that will spread to the other chickens or if you seek a way to prevent the same death in the future.
You’ll likely have to pay for a postmortem. Sato says to report chicken deaths to your state agent if you have had multiple deaths within a short span of time.
Sato participated in a study called Causes of Mortality in Backyard Poultry in Eight States in the United States (Kyran J. Cadmus, Ashe Mete, et al.). The study used autopsy results over three years from diagnostic labs in multiple states (Hawaii, Texas, Georgia, South Carolina, Pennsylvania, Iowa, Colorado and California) to understand how hobby-farm chickens die.
The findings demonstrated the importance of educating owners on disease prevention and biosecurity practices.
No. 1 Cause: Cancer
Researchers found that 42 percent of chicken fatalities were caused by cancers. Of that percentage, 63.4 percent was due to Marek’s disease or leucosis/sarcoma group.
Marek’s is a highly contagious fatal disease characterized by T-cell lymphomas and peripheral nerve enlargement, according to the Merck Veterinary Manual. Chickens are the natural hosts for the virus. As such, Marek’s is a worldwide problem, with every flock presumed infected.
Only strictly managed pathogen-free flocks are free from the virus.
“Marek’s is caused by a herpesvirus,” Sato says. “The virus gets shed in feather dander, and it’s impossible to clean that out of your coop. If it causes cancer is another story because there are three types of Marek’s and only one causes cancer.”
The other two types of Marek’s are used for the vaccine serotype 3 or HVT. The two types of Marek’s are the same virus, but because they are noncancerous, the vaccine is very safe. However, serotype 3 doesn’t stimulate the immune system as well as the serotype 1 vaccine, derived from the cancer-causing type.
Sato says that this type is weakened so it isn’t harmful. But because the vaccine is a living virus, it’s difficult to keep (it has to be stored in liquid nitrogen) and expensive. So it’s normally given to commercial birds, although some large hatcheries use it.
When you purchase your chicks, ask the hatchery if they offer a Marek’s vaccine and, if so, which one. Also inquire about vaccinations during chick days at your feed-supply or big-box store. Don’t assume it as a given.
If no one at the store knows the answer, assume the chicks are unvaccinated. If you decide to buy the birds regardless, understand that your new chicks will have no immunity to the disease.
Chicks have to be vaccinated before they are 1 day old because the vaccine will not work if the bird has already been exposed to Marek’s. The vaccination costs about 20 cents a bird, so it’s not worth skipping. In some of the bigger producers, the chicks are vaccinated in the egg.
Additionally, Sebrights and Barnevelders are more susceptible to the disease than other breed, such as Marans and Sumatras, which very rarely contract Marek’s.
Unfortunately, vaccinated chickens can sometimes contract Marek’s as the virus can overpower the vaccine or because the vaccine has been given improperly. Marek’s can strike a bird at any stage of life.
“A 2-month old chick can get lymphoma due to Marek’s,” Sato says.
Ovarian cancers make up 27.8 percent of this No. 1 category. “Cancer is any cell multiplying out of control,” Sato says. “A laying hen’s ovaries are always active. Inflammation can set in or a reaction can happen, and from there cancer can develop.”
Elena Masiutkina/Shutterstick
Infectious Disease
More than 36 percent of fatalities in backyard birds stem from infectious diseases (from bird to bird, not from bird to human).
Bacteria accounted for 34 percent of the total percentage. MG (Mycoplasma gallisepticum) and MS (Mycoplasma synoviae) accounted for 26.1 percent.
MG is also known as chronic respiratory disease. Birds with MG might not show symptoms at all, but some can. Signs can include sneezing, nasal and eye discharge, and rales (rattling sounds in the lungs).
MS affects the respiratory system, but it can also affect the joints. In addition to the same symptoms of MG, MS infected birds can demonstrate stiff movement, swollen joints and lethargy.
Infected chickens carry the diseases for their entire life. Contaminated equipment, wild birds and rodents can carry MG and MS, so biosecurity and cleanliness is important.
Viral infections (again, from bird to bird), accounted for 7.3 percent of the total number. IBV (infectious bronchitis virus) is a very contagious (for birds) coronavirus that causes tracheal lesions and upper respiratory disease. It affects the poultry industry widely and was the top virus found in the study. Symptoms include sneezing, coughing and rales. IBV is very difficult to control.
Generalized Noninfectious Diseases
More than 16 percent of the study was generalized noninfectious diseases. Of these, fatty liver hemorrhagic syndrome was the top culprit. This syndrome only affects hens and is thought to be caused by overfeeding.
It may also be caused by a calcium deficiency, stress or feed contaminated with the mycotoxin aflatoxin.
With fatty liver hemorrhagic syndrome, the liver becomes fat, and as a result damages easily. Fatality occurs when the liver ruptures and causes internal bleeding. This commonly occurs in caged laying hens.
You can help prevent this disease by offering calcium to the diet, changing feed and regulating food consumption.
The study found that 1.6 percent of birds died from zoonotic bacteria (bacteria that can transfer to humans): Paratyphoid salmonellae, Mycobacterium avium, Listeria monocytogenes and Campylobacter jejuni.
They also found evidence of lead and other heavy metals, which can transfer to eggs and meat, and one case of botulism.
People often worry about contracting influenza from their birds, but Sato cites a low rate of that happening in the U.S.
“We’ve heard about people in China and Hong King dying from bird flu,” she says. “But this is due to people living in their houses with their chickens.”
Sato says our rooster could have had a mass pressing on his nerves, which caused that odd, high stepping gait. I felt relieved to realize we couldn’t have prevented it.
In the end, we knew we had given our guy a place to live, with a flock of sweet hens that adored him. He was a very lucky rooster.
Diseases due to poor management and nutrition only amounted to 9.7 percent in the study. You can do your part to keep your chickens healthy by:
Providing good clean housing with adequate ventilation
Offering fresh food and water
Making sure baby chicks have enough heat and protection
Vaccinating your chicks, and learn your animals’ habits
These preventative measures will go a long way toward easing your mind when you’ve had a sudden, unexplained chicken death.
Galina Gutarin/Shutterstock
Sidebar: Learn More
If you don’t have a local vet that can help you diagnose a recent death, contact one of the following.
Like any pursuit, poultry farming is not without its questions, issues and challenges. You might come from a long line of chicken-keepers or may devote an entire bookshelf to reference guides (or both). But none of this necessarily means you’ll find the solutions you need.
A poultry association, however, can provide you with the kind of support unavailable in books. Your fellow members are happy to share their experiences and help you solve problems. They can offer advice, expand your horizons and even provide camaraderie.
The three basic types of poultry associations are described below. Joining one or more of these groups may be the answer you’ve been looking for.
National organizations serve the poultry-raising community as a whole. They seek to further the appeal of the hundreds of breeds and varieties of poultry throughout North America.
The two most prominent associations are the American Poultry Association (APA), the oldest livestock organization in the United States, and the American Bantam Association (ABA), which has represented bantam breeders and their special interests for more than 100 years.
Paid membership in these groups help fund:
Their youth programs
Their exhibition meets, held around the US and Canada
The association newsletters and yearbook
The development and improvement of the Standards of Poultry—the strict guidelines by which each breed and variety of poultry is measured
Being a member of the APA or the ABA is an excellent way to stay on top of the latest poultry developments. And you’ll gain a greater appreciation for the birds you are raising, too.
Membership also provides you with the opportunity to purchase member-only merchandise, such as leg bands, patches, club pins and books. Plus you also gain access to the associations’ Facebook pages, where you can connect with other chicken breeders and fanciers.
Breeders’ Clubs
Breeders’ clubs are the way to go if you’ve decided to focus on a specific type of chicken, such as a Polish, Silkie or Ameraucana.
These specialty associations typically maintain an in-depth website where you can find such information as:
The standards for that breed
Photos of the different color variations as seen in chick, hen and rooster
Historical information about the breed
A directory of members, including what varieties they raise should you wish to purchase hatching eggs, chicks or adults
Breeders clubs not only exist to improve their chicken of choice. They also actively exhibit their birds at shows around the country.
The club’s website will frequently feature a calendar of upcoming events as well as links to exhibitions for those interested in showing their birds. Breeders’ clubs often have a social-media presence, such as Facebook pages or groups that are available only to members.
Most breed associations charge monthly or yearly dues, which go to maintaining the web site, publishing club newsletters and other costs of operation. To find your breed’s club, search for the name of your breed plus the words “breed club” (for example, “Wyandotte breed club”).
Local associations often offer you the most personable experiences you’ll find in any poultry association. Whether it’s your town’s chicken-owners organization, your county’s poultry-swap group or your state’s fancier society, a grassroots group gives you the opportunity to feel as though you’re part of a family. And often there’s no membership fee.
These organizations frequently feature social media groups where you can chat with your fellow members, hold discussions, share photos of your flock and even buy and sell birds.
Some groups hold in-person meetings. Some organize social events such as picnics and potlucks where members can get to know each other better and forge friendships. Others offer annual coop tours, opening their chicken-raising areas to the public and offering prizes to the most beautiful coops.
If you’re interested or have plenty of ideas to share, you may consider running for club office, helping take your group into the future. To find your local grassroots poultry association, contact your town hall. You can also check with your local feed store or search the internet for “backyard chickens” and your zip code.
A few years back, making rain barrels out of re-purposed 50-gallon pickle barrels was all the rage. While there is nothing wrong with doing that, I was never tempted. I thought they were unattractive and, worse, held too little water.
By summer, a vegetable bed needs about 1 gallon of water per square foot every week. Watering a single 4-by-12-foot vegetable bed would drain a pickle barrel, and then you’re out of water until it rains again — unless you set up a whole series of pickle barrels.
And lining up more of them doesn’t make them less ugly, and it multiplies your cost of connections and the time to install them.
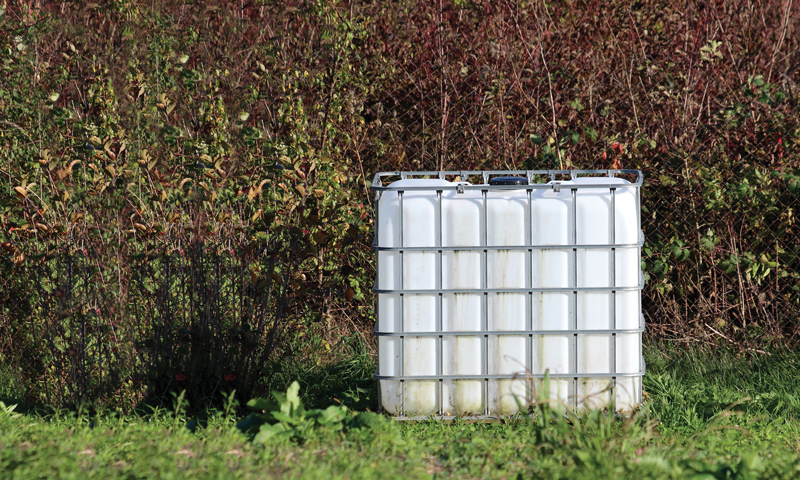
Asking around to see if anyone had a better option led me to IBCs: Intermediate Bulk Containers. You can find them advertised on Craigslist for $75 to $150 apiece (and they are well worth it). I figure that if it holds more gallons than it costs in dollars, you’re getting a good deal.
And an IBC holds 275 gallons—more than five pickle barrels’ worth, but with a smaller footprint and requiring less hardware.
An IBC is a 48-by-48-by-40-inch cube of food-grade plastic mounted on a pallet. It makes me think of the Grateful Dead song “Box of Rain.” An aluminum cage keeps the plastic cube from collapsing. At the top is an 8-inch-wide screw-on lid. Near the bottom is a 2-inch spigot.
The ones I’ve purchased still had the faint scent of the almond oil they originally contained.
To keep algae from growing inside, I slap on a couple coats of dark brown paint made for plastic. Then it looks like a cubic Hershey’s Kiss. Plus, I install them in a way that they can send water uphill to the garden without a pump.
There are two ways to get rainwater into your barrel: under an existing downspout and not under a downspout.
Under an existing downspout
Cut a hole in the top of the barrel, and drop in a downspout. Use a section of downspout to mark an outline on the top of the barrel. Drill a hole just inside the line. Insert the blade of your jigsaw into the hole.
Cut along the line, and your downspout should fit snugly through the hole. You’ll need to add the same kind of overflow hose near the top of the barrel that any pickle barrel or store-bought rain barrel would have to handle excess rainwater.
Not under a downspout
I recommend using the downspout diverter sold in the Gardener’s Supply catalog. It’s a metal box that fits into the downspout, diverting water into a hose that connects to your rain barrel. Install it correctly (meaning that, even if you’re a man, you read and follow the directions that come with it) and you won’t need to mess with an overflow hose.
When the barrel is full, the rainwater will back up in the hose and go down the downspout. Installing it correctly means that the inlet to the barrel is at the same height or lower than the diverter.
If you want to set up your barrel farther from the downspout than the Gardener’s Supply hose would allow, buy a 3⁄4-inch plastic hose used in Netafim drip irrigation systems. These are often sold at big-box stores.
Just be sure not to use clear plastic hose. Algae will grow in it, making it ugly and clogging it up.
Frank Hyman
Build a Base
Your IBC will come with one pallet. It works best stacked on several more pallets so you can set a bucket under the spigot and send water uphill (more on that later). Get free pallets from feed-and-seed stores, garden centers, HVAC contractors, big-box stores, etc.
If they have “HT” stamped on the side, they have been heat-treated and don’t have chemicals in them. Most pallets that have been treated with chemicals have bright paint slapped on the side and are expensive, so stores send those back for credit.
Unless it’s plastic or metal, remove the pallet from the bottom of the IBC. Add it to your pallet stack.
Once you have all the pallets you need, raise them off the ground by putting a cinder block under each corner. Bricks or scraps of pressure-treated lumber will work fine, too. The main thing is to get the pallet wood on a rot-proof foundation at least 5 inches above the ground so it won’t decompose.
Level up the foundation pieces, then start stacking pallets. Weight and friction will keep the pallets from moving around, so no need to screw them down. Check that the pallets are level or pretty close to it.
Then, wrap the pallets and foundation with some fence wire to keep critters from making a home under your IBC. Extend the fencing as an apron on the ground around the foundation to keep critters from digging their way under the pallets.
Last, use something waterproof and UV-proof as a flat roof to keep the pallets dry: scraps of pond liner, rolled roofing, scraps of metal roofing, etc. Most tarps won’t stand up to the sun’s UV radiation, so don’t go that route.
I had just enough scraps of pressure-treated lattice, so I used them to cover the sides of the pallet stack, to keep critters out and to make it look a little more like a garden feature, but that’s not necessary.
Once your pallet stack has a roof, foundation and critter-proofing, put the empty IBC on top. It should be light enough for one or two people to lift into place. No need to screw it down. Short of a tornado, its weight will keep it in place.
Some people unscrew the 2-inch spigot and use lots of PVC adapters to dial down the diameter so that a brass spigot can replace it. I tried that once and found that the adapters seriously constricted the rate of flow.
I also missed having a big spigot that could fill a 5-gallon bucket or a 2-gallon watering can in a matter of seconds. So I keep the 2-inch spigot in place and make a level area under it with bricks where I can set a bucket or watering can and fill it quickly.
To water my garden with a soaker hose, I attach a brass spigot near the bottom of the cube. To do this, I use a drill and a spade bit that cuts the same diameter as the inside diameter of the threads of the spigot. That way the outer edge of the threads will bite into the plastic as I screw it into place.
Just before it’s screwed all the way in, I apply a bead of exterior grade caulk around the threads and then screw it in the last bit. Leave the caulk to cure for 24 hours before moving anything or letting water into the cube.
Send Water Uphill
Here’s the fun part. I had a good site for my IBC, but the garden was uphill from there. Carrying water by hand was out. Installing a pump and routing electricity was expensive, and pumps like to break down anyway.
This was one of those moments where I feel like I learned everything I need to know in middle school science class. I remembered learning that water will run uphill through a hose if the inlet is raised up higher than the outlet. This is the same principle that gets water from a city water tower to your house.
That’s when I realized that if I stacked the pallets just a tiny bit higher than the high point of the garden, gravity would push the water uphill into the garden.
Follow these steps before building your pallet stack and you can do the same:
Drive a stake into the high point of the garden and wrap twine around its base at ground level.
Pull the twine to where the IBC would be stationed.
Hang a pen-sized line level on the twine.
With the twine pulled tight, adjust it until it reads level.
Measure the distance the twine is above ground level. (In my case, this was about 35 inches.)
If the spigot of your IBC is a couple inches above that height, the water in the hose will “think” it’s going downhill, even if the hose lying on the ground is actually running uphill.
Pallets are about 5-inches tall and I had some 6-by-6 scraps for a foundation. In this case, six pallets put the spigot of the box just above the hose outlet at the high point of the garden. The rainwater would flow uphill.
From the barrel to the high point, I would use a garden hose. From there, a soaker hose carried water downhill. (A soaker hose running uphill loses most of its water right away.)
Animaflora PicsStock/Shutterstock
Maintenance
Your super rain barrel should be maintenance-free mostly. Close the spigot when it’s empty so it will refill during rains. Come winter, open the spigot so water doesn’t freeze inside.
Depending on conditions, you may have to touch up the paint periodically to keep algae out of the water. Keep an eye out for critters setting up house in the pallet stack if your fencing isn’t tight enough.
Keep your rain gutters free of leaves in the fall and oak flowers in the spring. (Hopefully you’re doing that already.) And then enjoy tons of free water from your box of rain.
Sidebar: Materials List
Here is the stuff you’ll need to build your own super rain storage unit.
twine
line level
4-foot level
blocks of 6-by-6 pressure-treated wood or cinder blocks or bricks
pallets
rubber pond liner or metal roofing or rolled roofing
brass spigot
spade bit that matches inside diameter of threads of spigot
exterior grade caulk
downspout diverter and watertight connection
spade bit that matches inside diameter of watertight connection
overflow hose, watertight connection, matching spade bit