Categories
Crops & Gardening

Sugar Snap Pea Trellis Ideas

Sugar snap pea trellis ideas aren’t difficult to come by. In this article, I share five of my favorite trellis ideas. All are easy to set up. Plus, each provides ample support for the growing vines.

Sugar snap peas are among my favorite garden crops. Their sweet crunch is hard to resist. But, the vines of many sugar snap pea varieties can reach five to six feet in height, making a sturdy support structure an absolute necessity. Today I share five of my favorite trellis ideas. All are easy to set up, and each provides ample support for the growing vines.

Sugar Snap Pea Trellis Options

Nylon Netting Row Trellis

This simple structure is among the most inexpensive sugar snap pea trellis ideas. Nylon garden netting is often sold at local nurseries and found at various online garden supply companies. The netting’s openings are five- to six-inch squares, and it comes in lengths of 25 or more feet and is most commonly 5 feet tall. Hammer 1-by-1 hardwood stakes down the length of the row of your sugar snap peas, spacing the stakes about 8 to 10 feet apart. Then, stretch the nylon garden netting down the length of the row and use a staple gun or zip ties to attach the netting to the wooden stakes. You can plant a row of pea seeds down each side of this  trellis to maximize growing space.

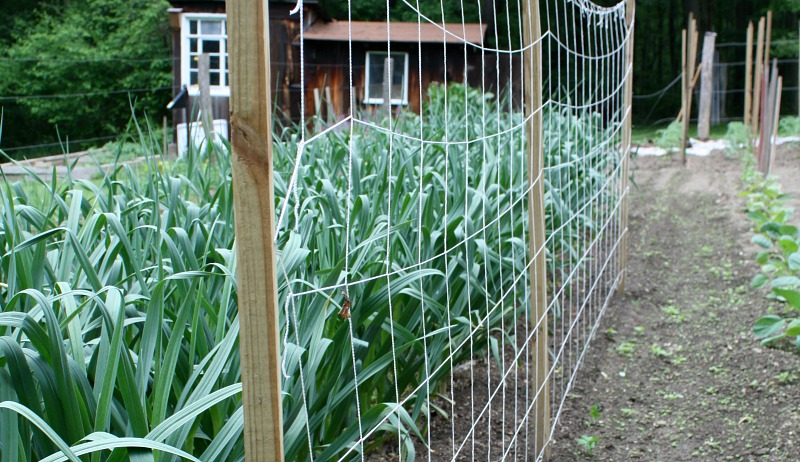
Box-Wire or Chicken-Wire Row Trellis

If you don’t want to purchase the nylon netting described above, use chicken wire or box wire to build your sugar snap pea trellis instead. Space the hardwood stakes as described above, but use the fencing instead of the nylon netting. It’s less flexible and slightly more visually obtrusive, but it works like a charm. The biggest downside to this sugar snap pea trellis technique? The small openings of the fencing make it impossible to reach through and harvest pods from the other side of the row. If you use this method, be sure that the trellis is fully accessible from both sides, or harvesting the pods will be challenging.

Natural Branch Trellis

Another fun (and visually attractive) way to trellis sugar snap peas is to use tree branches as support for the vines. Collect straight branches that are forked multiple times to give the vines plenty of places to cling to. Bury the base of a line of branches into the ground down the length of the garden row. Space them close enough so that their forked branches cross over each other. If you can’t bury the base in the ground, you can tie the base of the branches with twine or plastic zip ties to pieces of 3-foot rebar that are hammered into the ground for stability. Choose branches that are tall enough to support the growing vines to their mature height.

Gabion Stack Pea Trellis

Gabions are empty cubes or cylinders made from welded wire that are filled with rocks and earth. They were once used as military fortifications, but these days you often see gabions used for erosion control and to create unique fences, walls and other outdoor structures. Empty gabions also make great trellis structures. To make a trellis from gabions, stack several empty gabions on top of each other and fasten them together with zip ties. Place the stack in the garden and secure it to the ground with four wooden or metal stakes. Plant your sugar snap pea seeds around the stack, and you have yourself a distinct trellis. You can buy gabions from construction and landscape supply centers as well as various online sources.

Recycled Ideas

There are many different repurposed household items that work great as a sugar snap pea trellis, too. You can use a mattress spring, an old closet organizer or tireless bike rims—the possibilities are endless.

With a little bit of creativity, you’ll have a great sugar snap pea trellis for this growing season and many more.

This article about sugar snap pea trellis ideas was written for Hobby Farms magazine.Click here to subscribe.

Categories
Poultry

What Do Geese Eat? How To Feed These Popular Waterfowl

What do geese eat? It’s a question every potential geese-keeper needs to ask themselves before getting any gooslings. 

Hobby-farm and small-flock owners are increasingly recognizing the benefits that come with keeping geese. Beyond being dual-purpose birds, geese are fabulous poultry-flock guardians, facing off against weasels, skunks and smaller carnivores, and raising an ear-splitting alarm for other kinds of predators. Geese also make wonderful weeders, easily eradicating unwanted greenery growing in gardens, orchards and crop fields. Those interested in rearing geese quickly learn that these waterfowl are self-sufficient breeders, with both parents attentively raising their goslings.  

With so many positive reasons to raise geese, it’s only natural to wonder what these birds eat. This is especially true for flock owners who also keep chickens, ducks, turkeys or gamebirds. Can geese eat the same rations as the others? 


Read more: Geese make excellent guardian animals for the small flock!


What Do Geese Eat While Foraging?  

While formulated feed for geese does exist, it is very difficult to find at farm-supply stores. It can be specially ordered, but the cost would be prohibitive, especially if a hobby-farm flock features only one guardian goose.

Fortunately, most farmers already have plenty of what geese eat on hand: pasture! Primarily herbivores, geese are fabulous foragers. Their digestive systems are designed to efficiently process fiber and, as a result, they can survive on grasses and greens such as bluegrass, brome grass, chicory, white clover, dandelions, orchard grass and Timothy.

Just one acre of fresh pasture can support between 20 to 40 geese.

As with other domestic fowl, geese need grit to aid with digestion. A hopper of poultry grit should be offered near the goose house, but chances are that geese will take in all the grit they need naturally in the form of tiny pebbles as they forage. It’s essential that pasture-fed geese have access to a young, fresh pasture with tender grass and greens. Mature, dried-out pasture does not provide the quality of fodder necessary for goose nutrition.  

What do Goslings Eat?  

Baby geese—goslings—have different nutritional needs than their adult counterparts. So instead of asking what do geese eat, in this case, you need to ask: What do baby geese eat? They grow much faster than chicks or ducklings, and their diets will vary with their age.

Start newly hatched goslings out on unmedicated chick starter crumbles. At two to three weeks, switch them to unmedicated chick grower topped with sprinkles of chick grit and chopped-up white clover and fresh grass. Slowly increase the amount of greens and decrease the amount of grower so that, by five to six weeks, the goslings can be successfully switched to pasture (supplemental chick starter can be offered until the goslings are fully feathered).

Mother Goose 

Broody geese focus solely on one task: incubating their eggs. A goose setting eggs will rarely leave her nest. Given it can take anywhere from four to five weeks to hatch eggs, Mama Goose may starve since she cannot forage. So what do geese eat while brooding? 

It’s therefore vital to offer a broody supplemental food—and fresh water—in bowls she can reach without leaving her nest. Broody geese can eat crumbled layer rations sprinkled with chick grit. This food can be made more enticing by topping them with chopped white clover and grass.  

What Do Geese Eat During Winter?

Despite being cold hardy, geese cannot forage successfully if their pasture is covered by snow. During these chilly months, a diet of Timothy hay, shredded green cabbage and kale, and chopped beet and carrot greens will see them through the winter.

What do geese eat when it comes to special treats? Try cracked corn, wheat and oats from time to time—always in moderation. On snow-free days, allow your birds to forage whatever they can but continue to offer them their winter diet until the new spring pasture growth is well established once again.  

This article asking what do geese eat was written for Hobby Farms magazine. Click here to subscribe.

Categories
Equipment

Tractor Horsepower: How Much Do You Need?

Tractor horsepower is one of those myths when it comes to machinery; people tend to believe bigger is always better and more is best. I doubt there’s a hobby farmer anywhere who doesn’t appreciate the abilities of a powerful utility tractor with engine strength measured in tens or even hundreds of horsepower, and it’s not difficult to envision yourself behind the wheel of such a tractor, easily accomplishing all of your farming tasks.

Of course, the biggest tractors also come with the biggest price tags, and not everyone can afford a top-of-the-line tractor with features and accessories and tractor horsepower to spare. But not everyone needs that level of power. In fact, for hobby farmers, smaller tractors with less tractor horsepower can offer significantly greater versatility and return on investment than giant tractors aimed at commercial farmers.

This raises an interesting question: Just how much tractor horsepower do you need for common farming tasks? If you’re shopping for a tractor, here are some guidelines to help you identify how much power you need.

Tractor Horsepower & Working Acreage

The first question to ask is: “How much land do I intend to cultivate?” Do you have 10 acres that you’d like to prepare for planting? Do you have 20 acres of hay to cut for small square bales? Or are you mainly looking for a tractor with a front-end loader or a backhoe for more down-and-dirty farming tasks, with less emphasis on working in a field?

These are important to consider because there aren’t hard numbers to identify the amount of horsepower you need for any given task; it’s a variable equation driven by the size of the implements you want to use, the speed at which you intend to use them, the type of soil you’re working with and many other factors. It’s not as simple as: “Task Y requires X horsepower.”

Basically, it comes down to this: If saving time is a priority, or if you plan to use your tractor to cultivate large fields, a stronger tractor will let you use wider implements at a quicker pace. However, if you plan to minimize challenging field tasks have the patience to work your land at a slow speed, a tractor with less horsepower and smaller implements might be enough.

That said, let’s break down tractor horsepower ratings into a few categories and analyze the tasks that can be accomplished with each.

Tractor Horsepower Defined

If you’re curious about the origin of terms or phrases, you’ve probably wondered about the term “horsepower” and whether it has anything to do with the power of a horse. In short, the answer is yes, though the comparison between the power of horse and machine is fraught with caveats, exceptions and generalizations.

Consider first that tractor horsepower was meant to be a practical comparison of work accomplished over a long period of time, not a comparison of peak strength. You might wonder: “My little 17-horsepower lawn tractor is struggling to pull a heavy wagon up this incline. Does that mean I’d need 17 horses to do this same job?” The answer, of course, is no. A single horse at peak exertion is significantly stronger than a single-horsepower engine. But obviously, a horse can’t sustain its peak level of power for hours on end. In contrast, a lawn tractor can deliver that level of power for as long as you keep it supplied with gas.

In terms of modern standards, one horsepower is equal to about 746 watts of power, though there are also variations, such as the metric horsepower, which is about 10 watts less. It’s also worth noting that the horsepower rating of a given tractor usually refers to the “engine horsepower,” which is separate from the horsepower offered by the power take-off, a number that is smaller than the rating for the engine. If you need to know the PTO horsepower rating of a given tractor, you’ll have to dig into the specifications from the manufacturer, though for general comparisons of tractor strength, engine horsepower is a suitable measurement.

15 to 20 Horsepower

Horsepower in the 15 to 20 range (sometimes slightly more) is the amount offered by a basic lawn or garden tractor. This is more than sufficient for typical lawn tasks such as mowing your yard, pulling carts or small trailers full of debris or supplies, and even plowing light snow (with appropriate tires, tire chains and weights, of course). However, field cultivation tasks are out of reach.

25 to 35 Horsepower

Stepping up from lawn and garden tractors, 25 to 35 horsepower enters the range of subcompact tractors and low-end compact utility tractors. Their extra power provides options for using a front-end loader and a backhoe attachment. And—with the right implements—small-scale field cultivation is within reach. Unlike lawn and garden tractors, compact utility tractors typically have a power take-off, or PTO, for powering implements. This spinning drive shaft allows implements, such as a mower, loader or backhoe to pull energy from the engine to run. Most tractors come with a standard rear-mounted PTO, but midpoint PTOs are also available on some models.

40 to 50 Horsepower

The range of 40 to 50 horsepower begins to blur the line between compact utility tractors and regular utility tractors, significantly expanding the number of farming projects you can tackle.

Tasks such as plowing fields and baling small square hay bales are achievable with this level of horsepower, although you might find that challenging conditions, such as working in clay soil or pulling a wagon behind your hay baler, will push tractors of this strength to their limit. However, if you do these tasks in small amounts and are willing to work at a slow pace, tractors in this range can be an excellent choice for a hobby farmer; some even include removable mower decks, making them remarkably versatile.

60 to 90 Horsepower

A utility tractor in this horsepower range (especially the high end) will probably handle everything a hobby farmer can realistically ask it to do. The added strength makes the tractor more stable on challenging jobs such as baling hay—even round bales are feasible—and let you use larger and wider implements at a faster pace.

100 to 150 Horsepower

Talk about serious power! Tractors offering 100 to 150 horsepower can handle all but the most extreme farming tasks without hesitation and are suitable for farming at a commercial level, although this power and ability comes with a big price tag. The only question is whether you can put a tractor of this level to good use. The typical hobby farmer probably won’t have enough large-scale farming tasks to warrant the cost of a tractor in this range.

So for hobby farmers, where is the sweet spot of power versus price? For mowing your yard and doing some work with a front-end loader, a tractor with 25 to 35 horsepower might be all you need. If you envision doing a little of everything and want a versatile “jack of all trades” tractor, something in the 40- to 50-horsepower range will probably be sufficient while remaining maneuverable and relatively affordable. But if you need more tractor horsepower for serious field cultivation tasks, a large tractor with 75 horsepower or more could be worth the added expense.

In essence, you don’t necessarily need the biggest tractor in the lineup. Depending on your needs, you might be happier with something smaller.

This story about tractor horsepower originally appeared in  Hobby Farms magazine. Click here to subscribe.

Categories
Homesteading

Make Fence Posts

Make fence posts, instead of buying them. Use the trees from your lot to create your own wooden ones.

What are they exactly? That’s easy—it’s a post made out of metal or wood and installed in the ground to support the boards, wires, etc. that comprise a fence. Whether you’re marking a property line, keeping livestock in place, or blocking out wildlife, fences are common critical infrastructure on farms.

So that’s the broad definition. But let’s talk about the nitty-gritty definition—that “post made out of metal or wood” part. The livestock pastures on my farm are constructed with wooden fence posts purchased specifically for the project. The front side of the deer fence that surrounds my orchard is also built with wooden posts—4x4s, to be precise.


Also Read: Fencing out deer? It takes effort, but it’s worth it.


Make Fence Posts to Save Money

There’s nothing magical about wooden ones. Sure, some are treated so they resist rot and last longer. But at their heart they’re simply long sections of wood measuring several inches in diameter.

So the next time you’re working on a fencing project and shopping for a bunch of posts, and you’re questioning whether the cost is worthwhile … why not consider harvesting your own from the trees on your farm?

If you have the time and tools, you can create beautiful fence posts that will last for years. Maybe your farm is dotted with trees like Black locust or cedar that produce durable, rot-resistant wood. Maybe you’re a skilled lumberjack with the equipment to safely fell trees of all sizes.

And maybe your farm has a sawmill so you can produce uniform fence posts of specific sizes from all the black locust trees you felled yourself.


Also Read: Is a portable sawmill right for your farm?


Simpler Scenario

That’s the perfect-world example. But making your own posts doesn’t have to be so complicated or fancy. A couple winters ago, a massive storm blew down many trees and branches across my farm, including a few small pines trees and part of a cedar trunk that were just the right length and diameter to turn into fence posts.

As part of the cleanup, I trimmed off all the smaller branches with pruning loppers, then used an electric chainsaw to cut the logs to suitable fence post lengths. I left the bark in place and wound up using my simple posts to construct a grape trellis in my orchard.

I know untreated pine wood won’t last very long in the ground, but that’s okay. The post was free, it cleaned up a mess, and it will be easy enough to replace the post down the road.

So there you have it: two examples of making your own fence posts from the trees on your farm. Whether you’re cutting up logs on a sawmill to make tidy fence posts, using windblown pine trees to make rough-hewn posts, or taking an intermediate approach, you’ll be harvesting a valuable product from your farm and saving the cost of purchasing fence posts.

That sounds like a win-win situation.

Categories
Crops & Gardening

A DIY Wicking Tub For Container Gardening

Wicking tub? Many gardeners believe there is nothing new under the sun (literally) for gardening techniques, just new takes on old tricks. However, Leon Sloan from Kingston, Oklahoma, has a unique container gardening method debunking most gardening beliefs.

Sloan shares his 13-year-old concept of wicking water up through a pipe to get healthier plants that maintain moisture 24/7.

Waste Not, Want Not

Meeting Leon you quickly learn he conserves everything he can to make the most out of what he uses. He believes in protecting the oceans and environment through recycling and upcycling. And he always aims to save the most money possible.

At his greenhouse store, he sells fertilizers and plant supplements in ziplocks and recycled pop bottles. This responsible and intentional mentality is part of his wicking tub method. The concept of the tub is simple and reflects his way of living—waste not want not. 


Read more: Thinking about starting a medicinal herb container garden? Check out these 6 plants!


About the Wicking Tub

Wicking Tubs are made of recycled 25-gallon feed tubs, one PVC pipe and 8-gallon milk jugs. These are all simple supplies most people can access.

On larger scales the milk jugs can be supplemented for French Drain Pipes when making multiple wicking tubs without needing so many jugs. You can also substitute the feed tubs for 5-gallon buckets, your favorite decorated containers or raised garden beds.

Sloan’s universal rule is to cover 80 to 85 percent of the bottom surface of your container with the supply holding the oxygen (i.e. french drain pipes or empty gallon jugs). This, he refers to as a “false floor.”

Soil will take up the remaining 15 to 20 percent of the bottom of the container to wick the moisture up to the roots of the plant.

A Different Approach

Common Container Garden practices encourage using old soil or organic matter “fillers” in the bottom 25 to 50 percent of the containers, and to drill holes at the bottom of the container.

Sloan’s wicking tub method teaches that the oxygen at the bottom is pertinent to wick the water up. And holes only allow water to pass through and out of the container leading to dry soil. The wicking tubs make even drip irrigation seem wasteful.

“Without a way to hold water in and keep soil continuously and evenly moist, you are just running water through the soil and out the bottom,” Sloan explains. Sloan does drill a hole 4 inches from the bottom on the side and as an indicator of when you have watered the plant enough.

“Just pour your water down the PVC pipe until it comes out of the side hole,” he explains.


Read more: Collect rainwater to save money and water. Here’s how to start.


Wicking Tub Assembly

To assemble the 25-gallon tub with gallon jugs, follow these steps.

  1. Pre-drill 3/16-inch holes around the top and bottom of the gallon jugs.
  2. Drill one hole in the side of the tub 4 inches from the bottom. 
  3. Pack the jugs in as tight as you can, covering 80 to 85 percent of bottom.
  4. Open one of the jug lids and insert the PVC pipe. The pipe must be cut at an angle for the part going inside of the jug. And it must be long enough to stick out of the container.
  5. Add potting mix and supplements, ensuring 15 to 20 percent of the soil reaches the bottom of the container.
  6. Plant either seedlings or seeds.
  7. Water through the PVC pipe until it trickles out of the hole in the side of the tub.

Leon shares these wicking tub tips and more on his YouTube Channel, Gardening with Leon. In the video above, he demonstrates his method by assembling a fig tree using the French drain pipe.

This article about a wicking tub was written for Hobby Farms magazine. Click here to subscribe.

Categories
Crops & Gardening

Organic Fertilizer: Grow Your Own

Organic fertilizer, high in nitrogen, organic matter and any number of things soils love can be grown at home and then used in your garden.

When we hear the word “fertilizer,” we may picture animals, compost or maybe even just chemicals. What doesn’t always come to mind are plants. Most of these nutrient-rich plants can be grown at home on a small scale to provide a little extra kick to your garden, your compost or wherever you may need some added fertility.

Plants That Are Organic Fertilizer

Comfrey

Comfrey is a prolific and useful perennial plant that is also one of the top organic fertilizers. It grows fast, spreads fast and has leaves that are highly nitrogenous—not to mention it’s medicinal benefits for bone and muscle repair. Comfrey roots reach up to 10 feet down to mine minerals, so the plant can be used to enrich the soil or break up compaction. Many people, however, grow it strictly for the leaves, which are often applied to compost piles to activate them, brewed into a compost tea, or simply laid on the surface of beds for added nitrogen and organic matter.

Nettles

A favorite crop among many organic and biodynamic gardeners, nettle has highly desirable properties. Much like comfrey, it heats up fast as it decomposes, making it a great addition to kickstart a cold or below temperature compost pile. It can also be fermented along with comfrey leaves in water for a few days and applied to heavy feeding crops—this is called a compost tea. To make a compost tea, pack the nettles (greens only, no roots) into a small barrel or bucket, fill it with water, then stir once or twice a day for a few days. It will smell like manure. Before application, combine one part of the resulting liquid with 10 parts water to dilute it, and then apply directly to the base of plants. This high-nitrogen liquid will provide a nice snack to hungrier crops.

Leguminous Cover Crops That Are Great Organic Fertilizer

You hear the words “nitrogen fixing” thrown around a lot, but it’s a fairly unique and useful attribute for a crop to have. Nitrogen fixation is when a plant takes nitrogen from the atmosphere—where the vast majority of it resides—and turns it into something plants can use, like ammonia. This action is where legumes excel. By sowing leguminous cover crops, then working them into the soil prior to growing season, not only are you getting that nitrogen fixation but also biomass, which is good for creating humus and retaining nutrients.

Red, White and Crimson Clover

A highly productive biennial legume, red clover produces a lot of mass over time and excels at accumulating nitrogen and phosphorous. Sow it spring or fall, especially around perennials, like asparagus, as weed control and green manure.

Sown in the spring or late-summer, white cover crop makes for an excellent living mulch and can be planted into or sown around other crops. It’s a perennial, so expect it to come back year after year. Like red clover, it pairs nicely with other perennials.

Crimson clover is an excellent annual legume that creates nice ground cover and provides a dense rooting system to hold soil in place and help break up compaction. It produces a high amount of organic matter, and is generally sown in fall.

Vetch

A winter-hardy annual legume, vetch can be sowed in the fall as a cover crop and then turned into the soil in the spring. It excels at capturing nitrogen and provides added benefit when used in conjunction with rye.

Peas

Sown in the spring or fall in milder areas, peas collect nitrogen and produce a fair amount of biomass. In a crop rotation plan, it’s a great crop to proceed tomatoes, onions, cucurbits, celery and most anything that is not another legume.

Non-Leguminous Cover Crops That Make Great Organic Fertilizer

Fertility, of course, is not just about fixing nitrogen. A lot of times, it’s about blocking out weeds and keeping what nitrogen, soil and minerals you have in place. Plus, If you only used leguminous cover crops in your garden, you run the risk of incubating legume-loving pests and disease so it’s good to mix it up a little from time to time.

Oats

This cover crop establishes itself quickly, creating a nearly impenetrable mat for weeds. Many people will sow it in the fall over their garlic, so it will kill weeds and provide a mulch and feed for the garlic. Oats do not fix nitrogen, but they create biomass, which can then be turned into the soil.

Cereal Rye

Cereal rye is a fast-growing, winter-hardy cover crop that is proficient at holding soil and recycling nutrients. It has allelopathic effect on weeds and other grasses, so do not plant it where you will be growing corn. Cereal rye grows best in drier areas.

Sudangrass

Sudangrass is an excellent cover crop because it’s fast-growing and produces ample organic matter for the soil. For best results, sow it in combination with or before legumes.

11. Buckwheat

Buckwheat is extremely fast-growing and can outrun almost any summer weed, but it does not produce a lot of biomass. However, if left to flower, it will attract beneficial insects to pollinate your garden and increase its fertility.

Alfalfa and Grass Hay as Organic Fertilizer

Alfalfa is a legume typically thought of as a high-protein feed for livestock, but can also be a high-protein organic fertilizer for the garden. Mulching with alfalfa hay—or any good hay, for that matter—can be an excellent source of fertility. The grass can be cut and added to compost or dried and spread across the garden to be eaten by the soil microbes on their own time. To keep these fields productive, rotate animals through regularly—chickens can do a lot for keeping a hay or alfalfa field productive.

This article about organic fertilizer was written for Hobby Farms magazine. Click here to subscribe.

Categories
Poultry

Herbal Tea for Chickens

Herbal tea for chickens is a good way to help your hens recover from the long, cold winter and rebound to lay an abundance of healthy eggs in the spring. These five herbal teas are the perfect spring tonics for boosting health and vitality for backyard flocks. 

2 Reasons Why Herbal Tea for Chickens Can Be Better Than Fresh Plants

It may sound strange to brew a cup of tea for your chickens instead of throwing a handful of fresh or dried herbs in the coop or run, but brewing herbal tea for chickens is gaining popularity for two reasons.

 #1 Some herbs do not grow in all planting zones and are not available in the winter or spring when you need them most. Many backyard flock owners have solved this problem by purchasing dried beneficial weeds and herbs from online sources to make into herbal tea for chickens.

#2 Another plus to serving tea versus the plants is that all flock members should receive at least some of the benefits, versus the top hens in the flock eating up all the fresh chickweed you threw into the run while lower ranking flock members get nothing.

How to Brew Herbal Tea for Chickens

Herbal tea for chickens is easy to make, doesn’t require a ton of time to prepare and can be stored in the refrigerator for up to a week.

Start by boiling one and a half cups of water. Add one teaspoon dried herb or a handful of fresh herbs (unless directed otherwise). Steep for ten minutes. Strain the herbs from the water. Cool to room temperature before diluting into a gallon of water.

Replace tea water with clean drinking water after twelve hours.

Spring Tonic Tea

This spring tonic is one of my favorite go-to spring herbal teas. Unlike some of the other herbal teas for chickens featured in this article, this spring tonic is a tea blend that I put together for my flock and requires four ingredients.

This herbal tea blend also requires slightly different instructions than the previous ones for brewing tea. Here’s what you need.

1 teaspoon dried dandelion leaves

1/2 teaspoon dried dandelion root

1 teaspoon dried chickweed

1 teaspoon dried nettles

Boil two and a half cups of water before adding the herbal blend. Steep for fifteen minutes. Strain plants from water. Cool to room temperature and dilute in one gallon of water before serving.

What Does Herbal Tea for Chickens Do?

The spring tonic tea works as a cleanser to rid the chicken’s body of harmful toxins that may have built up over time. While at the same time replacing necessary vitamins and minerals the hen may have lost while being confined to the coop for most of the winter.

The herbs in this tea blend work as diuretics, optimizing kidney function and health by flushing toxins out of the body and increasing urine. Even though chickens do not produce urine, they do excrete a solid white substance called uric acid that mixes with their poop to flush the toxins out and keep their bodies healthy for the upcoming laying season.

The spring herbal tea for chickens is also high in vitamins A, B, C, and D and minerals, including zinc, iron and calcium. These beneficial plants are also great immune boosters.

speckled sussex chicken on roost bar in coop
Erin Snyder

Parsley Tea

Another beneficial herbal tea for chickens, parsley tea is one of the best springtime herbs to boost your flock’s health for the upcoming laying season.

Parsley is high in vitamin K and calcium that work together to keep bones strong. Since a hen’s body draws calcium from her bones to produce an egg shell, keeping her bones strength up is vital for her health and continued egg production.

Studies suggest that parsley contains anticancer properties and may inhibit the growth and spreading of cancer cells. This is especially critical for high-production breeds that are more prone to developing ovarian tumors and cancer.

Raspberry Leaf Tea

Raspberry leaf tea supports a healthy reproductive tract to keep a hen’s reproductive system healthy, and this tea has many other health benefits, too.

Raspberry leaves are a good source of calcium, magnesium, and potassium and are full of antioxidants. These antioxidants help to protect the hen’s body of free radical damage and help to guard against certain diseases, such as cancer.

Research suggests that these leaves also work to keep the immune system strong.

Raspberry Leaf Warning

Raspberry leaves can be challenging to dry and quickly become toxic if not dried properly. Always use fresh leaves from raspberry plants untreated with herbicides or pesticides.

Herbal Hint: While it is an extremely beneficial herbal tea for chickens, raspberry leaves are not my flock’s favorite tea. However, I have learned that my chickens will drink it when I brew a peppermint tea bag with the raspberry leaves.

Peppermint Tea

This herbal tea for chickens is usually thought of as a summer herb, but peppermint helps to increase egg production, create larger eggs with thicker shells, and help repel winter external pests such as lice and mites.

Peppermint aids in respiratory health, keeping your flock’s nasal passages and respiratory systems clean. Filled with antioxidants, this sweet-smelling herb also supports a healthy immune system and digestive tract.

Peppermint tea is a chicken favorite and pairs nicely with raspberry leaves to support a healthy reproductive system.

Herbal tea for chickens is beneficial for your flock’s overall health all year round. But it is especially critical in the spring when a chicken’s body is recovering from the winter and making the transition into the egg-laying season.

This article about herbal tea for chickens was written for Chickens and Hobby Farms magazines. Click here to subscribe.

Categories
Farm Management

Farming Oysters: Everything You Need To Know

Farming oysters is something that most farmers probably don’t consider. With oysters, you don’t need much land or have to feed your crop.

Out of Season?

Eating oysters on the half shell out with friends, I’ve noticed a few changes over the years. And not just in my friends. It seems that oyster shells have gotten deeper and the oysters, fatter and tastier.

Most curious is that oyster bars now offer oysters in summer. To me, oysters are out of season and not as tasty then. Most people know the rule that oysters are best in months that have an “r” in them, meaning that one avoids oysters in the spring and summer months of May, June, July and August. But that doesn’t seem to be the case these days. What’s going on?

Farming oysters—that’s what’s going on. Wild-caught oysters generally grow in clumps of long, thin, flat shells. They reproduce in summer, spitting out gametes (reproductive cells) that deplete their heft and tastiness. Wild oysters in summer often taste thin or muddy.

But the depletion of oyster beds from overharvesting and disease, as well as pollution from cities, industries and intensive livestock operations, has created an incentive for farming these sea creatures. The research and extension services of many states’ agricultural universities have risen to the challenge.


Watch Video: Foraging, Drying & Storing Oyster Mushrooms


Researchers have bred oysters that are sterile and resist disease. Because they don’t reproduce, oysters are still fat and tasty in the summer months, which extends the season for farmers. Without spending energy on producing the next generation—extension oyster hatcheries take care of that—these oysters come to maturity in two years rather than the three it takes wild oysters to reach harvest size of 3 inches long. That accelerates profitability for farmers.

If you have access to clean salt water that has historically supported Atlantic oysters (Crassostrea virginica) or West Coast oysters (Ostrea sp.), you can probably get a lease for harvest rights below the low tide line and a permit for farming oysters. Check with your local ag extension office or wildlife agency. Just an acre or less of shallow water is enough to start an oyster farm. Because oysters filter the water for their food, you’re helping the environment while spending nothing on feed. Contrast this with the 5 pounds of fish that it takes to raise 1 pound of farmed salmon.

Oyster Schools

Many coastal ag extension offices offer one-day workshops on farming oysters. Ag agents also visit sites for specific technical feedback on what you need to succeed. They can often help you with a business plan, too. In some states, you can’t sell directly to the public, so learn about local wholesalers and restaurants and ask them what they want in terms of quantity, quality, seasonality and price.

If you have access to a dock, you can start increasing your aquatic mollusk knowledge inexpensively by working with your local ag extension and doing what’s called oyster gardening. Many extension oyster hatcheries give away button-size baby oysters to people who commit to growing them for a year so they can repopulate depleted oyster beds with juvenile oysters. Some hatcheries want all their oysters back, so you might not get to eat them (darn!), but you do get a low-cost education in oyster management before taking the next step.

Another option: Look into a sustainable franchise model called GreenWave. It trains and assists farmers in implementing a mixed farming model that adds seaweed, sea vegetables, mussels and other marine crops to an oyster operation to better deal with fluctuations in the market and the weather.

Tools for Farming Oysters

A pickup truck, a small work boat and a dock will get your farm started. Oysters can eat only while they are under the water, but that’s also the time when their shells and containers can get fouled by algae, seaweed, mussels, barnacles and predators. A setup allowing the oysters to be above water so they can dry out kills these fouling organisms and makes for a cleaner and more profitable shell at harvest time.

Many oyster farmers grow their oysters with what’s called an off-bottom system. In it, oysters are suspended near the surface of the water in baskets, bags, trays or cages called oyster condos, racks, Taylor floats or adjustable long-line systems. These devices let the oyster be held above the water part of the time.

Some of these containers have floats allowing the racks to be flipped over, while others are suspended from piers like soggy sheets on a clothesline. When the tide goes out, the suspended bags of oysters can dry out. Floating cages can be flipped weekly so they can dry out and kill the fouling organisms. Flipping also makes for a deeper shell and a fatter oyster.

How Much to Get Started Farming Oysters?

The cost estimates of most extension websites are based on starting with an acre or more of oysters and a couple of thousand or more bags or cages. That could cost from $60,000 to $200,000 depending on a number of variables.

The University of Maine Cooperative Extension recommends starting small with just 25 oyster bags or cages. Counting equipment, baby oysters and permitting, you could get started for less than $5,000 if you already have a truck, boat and dock. Add another round of bags or cages and oysters each year, and you could be making a profit in three years. At that scale, you might manage without a helper, but generally oyster farm employees make $15 to $25 an hour depending on experience.

Beginner Bait

If you want more information, surf—er, fish—the web:

Oyster Taste

If you’re familiar with the notion of terroir, in which soils and climate determine the taste of vegetables and fruits, then you’ll understand the notion of merroir, in which the character of seas determines the flavors of oysters. Generally, the saltier the sea, the saltier the oyster. Oysters grown near large freshwater rivers are less salty.

The more time an oyster spends out of the water, the sweeter it tastes. The best tasting oysters—for sweetness and saltiness—are from my home region of the South Carolina Low Country. Tides there run 6 feet, so oysters spend a lot of time out of the water. The Sea Islands that were my youthful stomping grounds are far from the smallish rivers that feed the salt marshes there, so their salinity is high. In northern beds, oysters spend more time underwater. Being above water in winter they would die in the harsh cold weather.

Other things also modify their flavors while the oysters clean the water. As filter feeders, a single oyster processes about 50 gallons of water in a day. Oysters eat their preferred algae from the water but they also extract carbon to make the calcium carbonate for their shells and nitrogen to create the protein for their flesh.

Farming oysters can be a profitable farming opportunity, and it’s also a way to fight climate disruption and water pollution. Consider as well all the ice-cold dishes of shucked oysters to enjoy, regardless of how any month is spelled.

This article about farming oysters was written for Hobby Farms magazine. Click here to subscribe.

Categories
Equipment

3-Point Hitch Categories: From 0 to 4

The 3-point hitch is widely considered to be one of the greatest innovations in the history of tractors. This safe and simple means to attach implements to tractors forever changed the face of farming.

The design of the 3-point hitch is simple but effective. Three points of attachment, arranged in a triangular fashion, provide a rigid connection between the tractor and the implement. A pair of lower links at the ends of hydraulic arms (which you can raise or lower to adjust the attached equipment) complement a single upper link.

But three-point hitches are not all created equal. And they vary greatly in size, matched to the strength of the tractor on which they’re installed.

We divide three-point hitches into five categories, labeled 0 through 4. The key to distinguishing the categories is to measure the diameters of the link pins used to attach implements to the hitch.

Of course, pin diameters aren’t the only variable parts of the equation. The spacing between the two lift arms is another important consideration.

The latter measurement can vary slightly (we’ve included approximate measurements below). But the pin diameters are standardized and are the defining measurements separating the five categories.


Read more: Farmers should give thanks for the advantages offered by the three-point hitch.


When shopping for implements, you need at least a basic understanding of the categories in order to ensure you purchase the right equipment. You’re pretty much out of luck if you want to use a Category 2 implement on a Category 1 tractor, though with adapters, the reverse is often possible.

With these disclaimers in place, let’s explore the five categories of three-point hitches, outlining their pin diameters and other general specifications.

3-Point Hitch: Category 0

We define the smallest 3-point hitch category by upper and lower link pins measuring 5/8 inches in diameter. The spacing between the two lift arms is approximately 20 inches.

You find category 0 hitches on light-duty garden tractors with 20 horsepower or less.


Read more: Consider these 4 tractor types for farm use!


3-Point Hitch: Category 1

At one time or another, most hobby farmers have probably used a tractor with a Category 1 hitch. You’ll widely find these on tractors offering between 20 and 50 horsepower.

The top link pin measures 3/4 inch in diameter, while the two lift arm pins are slightly thicker at 7/8 inch. The spacing between the lift arms is approximately 26 inches.

You may also find references to “limited” Category 1 hitches. These hitches share the same dimensions as regular Category 1 hitches. However, they may be incapable of lifting all Category 1 implements as high as necessary for suitable performance.

3-Point Hitch: Category 2

Category 2 hitches are also common, albeit on slightly more high-powered tractors with horsepower ranging from 40 to 125. A Category 2 hitch increases the top link pin diameter to 1 inch and the lift arm pins to 1 1/8 inch. The spacing between the arms increases to approximately 32 inches.

3-Point Hitch: Category 3

The Category 3 hitch significantly increases the diameters of the link pins to 1 1/4 inch (top link pin) and 1 7/16 inch (lift arm pins). This provides the added strength necessary for heavy-duty implements powered by tractors in the 80 to 225 horsepower range.

The distance between the lift arms is variable. A straight Category 3 hitch features a spacing of approximately 38 inches, while the smaller Category 3N hitch shrinks the width to approximately 32 inches.

3-Point Hitch: Category 4

The most durable three-point hitch category adds another 1/2 inch or more to the link pin diameters. They come in at 1 3/4 inches (top link pin) and 2 inches (lift arm pins).

When installed on tractors offering between 180 and 400 horsepower, it’s hard to conceive of a task that a Category 4 hitch can’t handle.

As with Category 3 hitches, the spacing between the lift arms of a Category 4 hitch is variable. The spacing on a regular Category 4 hitch is approximately 46 inches, while a Category 4N hitch spans approximately 36 inches.

Now that we have all the dimensions in mind, I think it’s time to start shopping for new equipment!

This article about the 3-point hitch categories was written for Hobby Farms magazine. Click here to subscribe.

Categories
Large Animals

Can Pigs and Goats Live Together?

Can pigs and goats live together? Yes. But, generally speaking, most farming today is based on systems of monoculture. That is to say, the farmer focuses on one thing and grows a lot, whether it’s meat chickens or broccoli, dairy cows or apples.

Subsidies are set up to support large-scale operations that focus on just one thing at a time.

But monoculture farming is, by very definition, unnatural (nature is the ultimate polyculture). And it could be argued that these unnatural methods have fed the epidemic disconnection from food that leaves us unfazed by cage-raised hens and fields of corn that stretch for miles.

But that’s why we hobby farm, right? We’re not beholden to systems that reward overpacked cattle yards or maximized crop yields.

We like growing our own food, and we like farming whatever we want. So, maybe without even meaning to, small farms are often the antithesis of large-scale monoculture farms. That they often deliberately include a wide variety of animals and plants.

This is certainly the way things have gone on our farm, which we populated with gardens, chickens, pigs and cows within our first few months on site.

But while scrolling through Instagram recently, I saw a photo that left me wondering whether we’d missed an opportunity with our chicken yards, cattle fields and pig pastures. The poster had a sheep in the pig yard which is, like, next-level polyculture to me, considering that I farm according to the old Offspring lyric: “You gotta keep ‘em separated.”

And it got me wondering: can pigs and goats live together? As we consider bringing so

me goats onto our farm in the near future, what’s the rule for running pigs with other animals? Should we try co-pasturing animals?

Pigs With Chickens

Let’s start with the obvious. If you free-range chickens, they’ll get in with your pigs because they go wherever they want. You’ll be co-pasturing animals, and that’s a good thing.

When a pig roots the soil, it uses its snout as a dish, shoving it into the ground then flipping it over, soil side up. This allows them to access delicious roots, bugs and other subterranean goodies.

Chickens love bugs even more than pigs do. And they’re way better at getting to them.

When a pig flips a piece of dirt, chickens are all over it, breaking apart clods, pulling out bugs and spreading the soil around. They also go through feces when pigs drop them, too. This thins it out for quicker decomposition and exposes potential parasites to sunlight.

The downside, though, is that a hungry pig will, on occasion, make a meal out of a yard bird. I’ve seen it happen once, which puts pigs way behind all our predators. But it’s worth noting that it can happen.

Can Pigs and Goats Live Together With Sheep?

There are plenty of farmer stories about sheep, goats, pigs and even horses living together as one big, happy family. And it’s true that, on a large piece of land, you probably don’t have to worry about pigs being aggressive to the point of endangering other large livestock. (Baby animals are another thing, though, so don’t allow births around pigs.)

But it’s not a good idea to house everything together in pens, just based on the fact that pigs will destroy all the forage in a confined space. This will leave your other animals hungry.

Feedings present a challenge, too. Each animal has distinct dietary requirements, and one species getting into another’s feed can deprive the animal of necessary nutrients. It can also overexpose the animal to elements that can cause problems.

So, if you’re co-pasturing animals, create individual feeding stations and observe individual feeding times. On-demand feeders don’t work.

Finally, because these animals can carry a lot of common parasites, co-pastured animals need to be on a strict parasite program so that an infection in one species doesn’t spread to all animals sharing the space.

Pigs With Cows

A lot of the previous section applies to cows, but some farmers have found that cattle present a specific benefit to a porcine population—their manure.

Some farmers are in the practice of feeding their pigs cow manure, inspiring a study that found no significant effects, good or bad, save the production of a leaner carcass. Based on the teachings of Joel Salatin, it has become common to have pigs clean out cattle barns after moving cows to pasture.

I don’t plan to put my pigs on a cattle manure diet. But I am interested in the implications the practice presents for the whole co-pasturing thing.

While you’d need to be especially careful of pigs’ tendency to destroy pastures, wreck soil structure and starve your cows, the idea that pigs can benefit from cow waste is, at the very least, intriguing.

My Plans Are …

In the end, I don’t see myself intentionally co-pasturing animals of mixed species. Raising livestock presents enough challenges, and I suspect I don’t have the time or energy to co-pasture animals the right way.

But for a farmer who already pastures animals separately and is looking for a new challenge, well, there are plenty of people out there who run everything together, so it might be worth trying.

This article about can pigs and goats live together was written for Hobby Farms magazine. Click here to subscribe.