Birch trees bring a unique beauty to your property with their speckled white coloring and papery textured bark. Birch are also fast-growing, so they can be used to create shade where it’s needed. They’re even used for crafts. But amazingly, birch trees can also double as an alternative tree for sugar tapping!
Make no mistake—sugar maples are the king of tapping season. During late winter or early spring, countless farmers across New England and the upper Midwest trek out into the fading snow to tap maple trees. The collected sap (which is a liquid) has a mild, diluted sugary flavor when raw, but when the sap is boiled, the moisture content evaporates, leaving the condensed, sugary syrup that maple trees are so prized for.
Why Birch Trees Can Be Tapped for Syrup
The reason sugar maples work the best—and the reason for their name—is because the sugar content of their sap is quite high. You only need about 40 gallons of sugar maple sap to create a gallon of syrup, among the best of any tree out there. But if you’re willing to work a little harder—and don’t mind a slightly different taste—you can tap birch trees and make syrup in the same manner.
Birch tree sap has a lower sugar content, so you’ll need upwards of 100 gallons of sap to make a gallon of syrup. That’s twenty 5-gallon pails! It’s a lot of work to tap that much sap, but it may be worth the effort. Here are four reasons why.
1. You don’t have sugar maples on your land. If you don’t have maples, maybe you have mature birch trees, and you’d like to try tapping even though they aren’t the prime sugar species.
2. You live outside the range of sugar maples. Some far northern regions of the U.S. and Canada are too cold for sugar maples, but birch absolutely thrives there. Birch tapping is quite popular in Alaska.
3. You want to extend your tapping season. Birch trees often need warmer spring temperatures than sugar maples to prompt sap flow. As a result, birch trees may be just starting to run as the maple season ends—so you gain a few more weeks of harvesting.
4. You just want to experiment with something fun and different! Birch sap and syrup taste different—more savory—and it’s just a fun and cool experience to tap trees other than sugar maples.
How to Tap Birch Trees
It’s easy to start tapping your birch trees in the spring. Just select healthy mature trees at least 8” in diameter and drill a short hole with a 5/16” or 7/16” drill bit—the standard sizes for a tree tap. Drilling into the south-facing (sunny) side of the tree can help. Use standard sap collecting equipment (bags, etc…), and then keep your sap refrigerated until you’re ready to boil it down.
In short, birch trees offer you a different opportunity for tapping—not necessarily better than maple trees, but supplemental. Have fun!
Can you eat duck eggs? With the price of chicken eggs such a common topic because of bird flu outbreaks, the idea of eating duck eggs has become more popular. So, can you eat duck eggs? The answer is: absolutely!
Duck Egg Nutrition
Duck eggs are even more nutritious than chicken eggs. According to Lisa Steele of Fresh Eggs Daily, ounce for ounce, duck eggs have 500% more vitamin B12, 150% more niacin, 100% more omega-3’s, 60% more potassium, 40% more magnesium and 30% more vitamin E, than chicken eggs.
Chicken Eggs vs. Duck Eggs
We’ve eaten duck eggs in our household for nearly a decade. My husband can’t eat chicken egg whites for health reasons; however, he has no issue with consuming duck eggs. This is actually a more common issue for people than you’d realize – many people have problems with inflammation due to chicken eggs because of a protein in the egg whites. Fortunately, duck eggs don’t cause any inflammation issues for these particular people because they don’t contain the same protein as chicken egg whites.
Duck eggs are visually similar to chicken eggs; however, they are slightly larger (about 30%) and have a stronger shell. Duck eggs contain more fat and have a larger yolk than chicken eggs and because of that, are said to be preferred for baking over using chicken eggs. Duck eggs are richer in flavor and creamier in texture, but generally can be used in place of chicken eggs as desired – scrambled, fried, poached, hard-boiled or baked.
Where Are Duck Eggs Found?
We have had luck finding them for sale at our local co-op. For many years, we were fortunate to have a local farmer who sold chicken, duck, goose and turkey eggs. They were even more affordable to buy directly from the farmer, so it’s worth doing a little research in your area to see what options you have.
Duck Egg Recipe – Shirred Eggs with Tarragon
The richness of the duck eggs is enhanced by the fresh butter and heavy cream in this recipe for shirred eggs, or oeufs en cocotte, which is a traditional French way of preparing eggs. This is a wonderful way to cook eggs for a crowd, just by doubling or quadrupling the recipe. I keep it simple with just some fresh tarragon and buttered bread crumbs on top.
Makes 2 servings.
Ingredients
4 duck eggs
2 tablespoons of heavy cream
Fresh tarragon, coarsely chopped
Kosher salt
White pepper
2 tablespoons panko breadcrumbs
1/2 teaspoon butter, plus more to grease ramekins
Directions
Preheat the oven to 350°F. Lightly butter the inside of two ramekins. Divide the cream between the ramekins, then carefully crack two eggs into each. Sprinkle with the tarragon and season with salt and pepper.
Melt the butter and stir in the breadcrumbs with a fork. Top the eggs with the crumbs. Bake for 16 or 18 minutes or until the whites are just set, but the yolks are still runny. For a firmer yolk, bake for several more minutes. Serve warm.
*Recipe adapted from Duck Eggs Daily, by Lisa Steele (St. Lynn’s Press)
This article about can you eat duck eggs was written for Hobby Farms and Chickens magazines. Click here to subscribe.
Lard soap production at home has for many years seemed too intimidating. As it turns out, soapmaking is neither dangerous nor difficult.
Why Lard?
Our process keeps it simple. A good bar of soap requires only three ingredients: lard, lye and water.
Far too many experts try to make life more complicated by adding expensive vegetable- and nut-based fats and oils to their soap recipes. When we try to dilute the pure goodness of lard with shea, olive or castor oils, the lard soap gods are displeased and the bars become softer and take longer to cure.
If it’s good enough for 1800s settlers, it’s fine for a modern American home.
If your pig fat is not rendered, you will have to do that first. Rendering involves slowly melting small chunks of animal fat over the stove until it reaches liquid form, then filtering out the brown cracklins and impurities.
Water content of the ultimate product matters. Our meat processor renders our lard for us, and he cooks the liquid fat until enough water has evaporated that it is technically shelf stable. This lack of water ultimately makes a better bar of soap, but is hard to replicate at home without commercial equipment and a water activity meter.
Your best bet is to start with “melted” and increase the temperature of home-rendered lard until satisfied with the bars.
Next, find a good, reliable scale and a good soap calculator to proportion your three ingredients. Our go-to is the Sage Lye Calculator, which has never let us down. Simply type in the amount of lard in grams and it will walk you through the rest of the soap-making process. We always soap at 5 percent excess fat.
Lyndsey Teter
A customary warning when mixing the water and the lye: Always add your lye to the liquid. If you pour water into a container of lye, a caustic lye volcano could erupt in your kitchen. That’s not fun.
The lye and water mixture will be very hot, so use a sturdy container and stay upwind if you can. We use half-gallon Mason jars to mix lye and water.
Melt the fats in a large stock pot on the stove at the same time, and let both cool to about 90-100 degrees before slowly pouring the lye water into the melted fat. Simply apply a stick blender until the mixture looks like pudding. We use the smallest recommended amount of water in each recipe to reduce the time spent immersion blending.
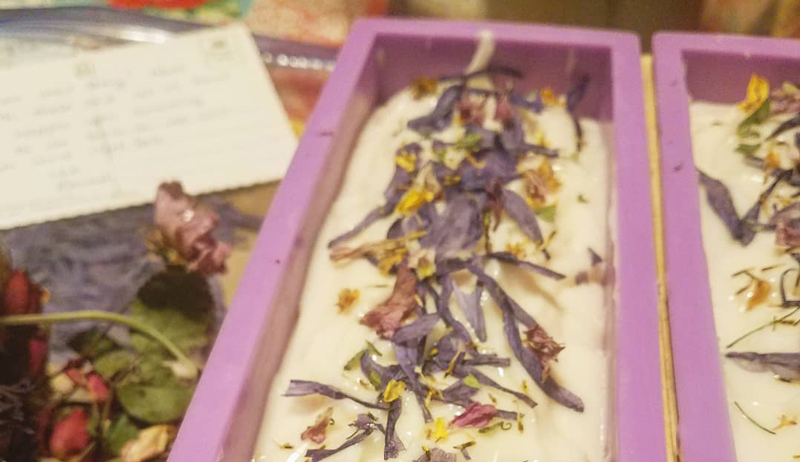
At pudding stage (called “trace”), you can add any scents, exfoliants or colorants if you’re feeling fancy, then pour soap batter into your molds. We prefer these silicone molds from Amazon.
As a quick reference, about 850 grams, or a little less than two pounds of lard, will fill two of these molds, which will make 20 bars of lard. Soap loaves will be ready to cut in one to two days.
Now We Wait
Modern soap blogs suggest that cold process soap needs to sit on the shelf for six to eight weeks to cure.
But we’ve discovered old lard soap recipes that suggest that the majority of the saponification occurs in the first 24 hours. And 10 days are more than enough to cure or harden a bar of lard soap.
We’ve yet to burn ourselves with a bar of 10-day-old lard soap.
It is important to note that lard soap does not lather like other soaps. That is the one downfall for those used to soaping with other oils. Some folks need bubbles to feel like things have truly been cleaned. It takes some adjustment of expectation.
However, lard soap is a very mild cleanser and our customers’ feedback confirms it is great for kids. It’s also good for those with sensitive skin and eczema.
Pig cells and human cells are very compatible. Similarities in lipid and collagen makeup in fat and skin make moisture more easily absorbed when we use lard soap. That’s why lard soap never dries out the skin. It’s also the best thing we’ve found, ironically, to scrub piggy smells from the skin.
Lyndsey Teter
Does Lard Soap Smell Like a Farm?
Pure lard soap smells clean. Few odors survive the drastic heat and pH changes that occur during the saponification process. This is great for those who do not want their soap bars to smell like pork or bacon.
This is bad, however, when you are trying to add natural scents to a bar of soap. If you want your bars to smell like flowers or lemons or patchouli, plan to buy oils in bulk (Piping Rock and Bulk Apothecary are good resources) and to use the equivalent of several bottles for a batch of soap.
Cheaper fragrance oils are also an option, but we prefer to keep our body products scented naturally—with the fire of a thousand lemons, for example. Bars can also be mildly scented with a handful of coffee grounds or cocoa powder.
Once you start, soap-making can become quite addictive. Luckily, bars of soap are well-received as gifts and you can fit up to 10 in a Christmas stocking. Enjoy experimenting!
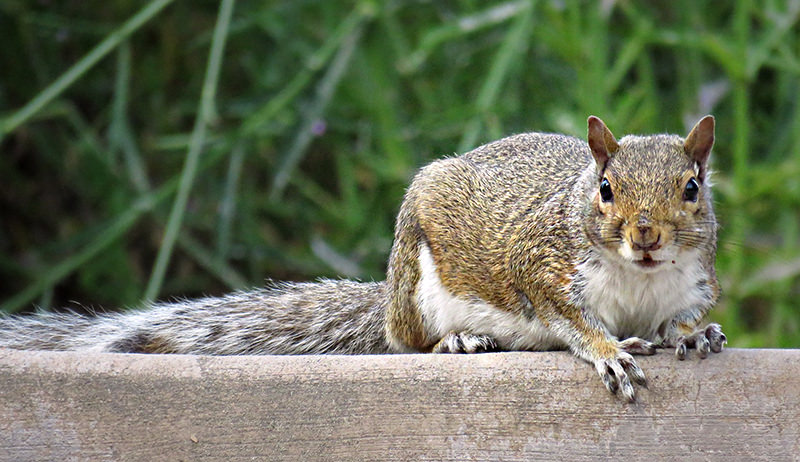
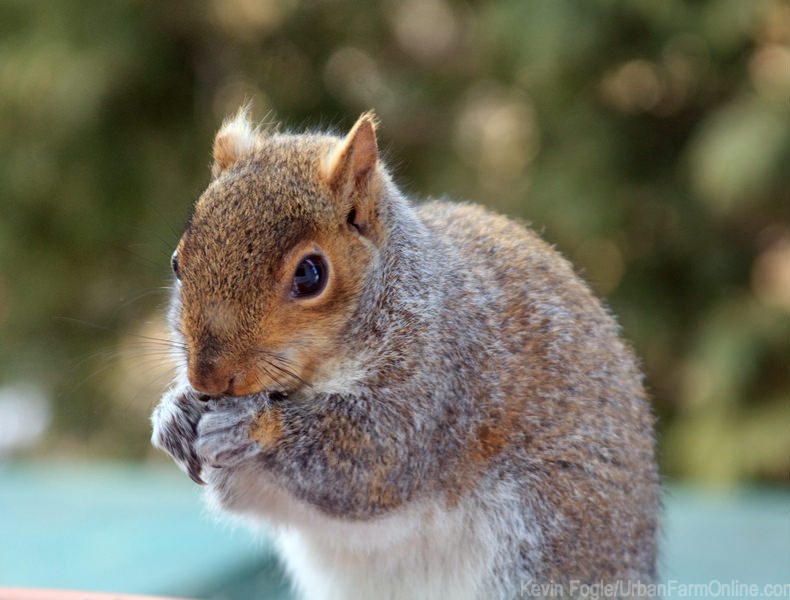
Squirrel deterrents are necessary for your garden. Keeping them out of the garden is something every urban farmer faces. In our house, they’re almost a curse word–I’ve begun referring to them as the “s-word” to keep my blood pressure in check. These furry little devils constantly threaten my front-yard garden and are readily finding new ways to be a general nuisance from stealing fruits and vegetables to digging up containers and damaging my taller plantings with their attempted acrobatics.
Gardeners just as readily devise new ways to deter squirrels: live trapping, getting a family dog, motion-activated sprinkler systems, hot pepper sprays. The only successful solution I’ve found is using flexible plastic mesh as perimeter fencing around my in-ground crops.
The best type of mesh for squirrel deterrents is made of thin-plastic rather than a rigid plastic (only slightly heavier than traditional garden netting) with 1-inch openings. I found mine at a big-box hardware store and bought two 4-by-50-foot rolls. To create my fence, support the mesh by hooking it to a series of simple step-in plastic fence posts placed every 4 to 5 feet. Spade in the bottom of the mesh about 4 inches deep and then recover with earth.
For whatever reason, the squirrels in my neighborhood don’t like to climb this type of fencing. These are great squirrel deterrents, and I’ve had relatively few incursions since I installed it. Only two or three squirrels in the last three or four growing seasons have found their way in, usually by digging under the fence rather than climbing. I stopped these bright digging squirrels by filling their excavations and placing a brick above their entrance on the outside of the fence.
So if your garden crops are being molested by squirrels, think about investing in cheap and easy squirrel deterrents. As an added bonus, the mesh is so thin that it is largely invisible and you can train vining plants to use the fence as a long, low trellis. I planted several Armenian cucumbers along the inside of my fence this summer, and the mesh was able to successfully support a whole crop of these monstrous cucumber-like melons.
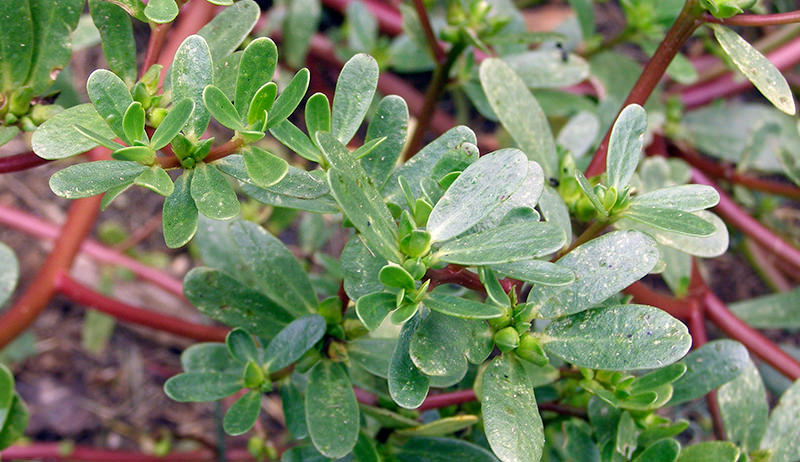
Purslane is often thought of as a weed, but this edible succulent is enjoying the attention of farmers and foodies alike. Unlike lettuce, spinach and other tender greens that readily bolt in pounding heat of summer, purslane thrives. It is also extremely nutritious, high in vitamin A, omega-3 fatty acids, calcium and other minerals. Or perhaps you just want to add another tasty addition to your microgreen production. Purslane can do that, too. This edible succulent is simply too good to overlook when it comes to planning the summer garden. And as you may have noticed when it has volunteered in your paths or around your yard, it practically grows itself.
Selecting Seed
The two types of purslane seed most common in seed catalogs are Gruner Red and Goldberg—though according to Wikipedia, there are over 40 different varieties in cultivation (do with that what you will). If looking for heirlooms or alternatives, you may also find seed under the verdolaga, it’s Spanish name.
Cultivated purslanes generally have larger leaves than wild purslane and grow upright, making harvesting easier. If you want to propagate your own variety, seed can be harvested from wild purslane once the plant has senesced, but the production may be more variable, yields lower and stems shorter. However, what you lack in convenience you may make up for in flavor.
1. Grow Purslane As Microgreens
Microgreens can be a nutritious treat, as well as an excellent market item—especially for chefs. To grow purslane as microgreens, use a perforated seedling tray. Cover the bottom with organic potting mix to at least 1/2-inch deep. Sprinkle seeds evenly but thickly overtop, and cover with a thin layer of soil mix. Place in sunny area at about 75 degrees F, and keep moist until germinated. Once germinated, a slightly cooler temperature between 60 and 70 degrees F, is optimal. Keep the soil moist, irrigate the sprouts from underneath to avoid splashing the plants. Cut the microgreens when the reach 2 to 4 inches.
2. Keep Soil Dry
Although soil fertility for purslane doesn’t have to be particularly high, as a succulent, purslane does enjoy a drier, well-drained soil. It is a fast grower, so it can often outcompete many other weeds, but a good preemptive flame-weeding or stale seed bedding is always recommended before direct seeding it into the ground.
As a member of the same family, purslane will share diseases with other succulents. It is also somewhat susceptible in my own experience to fungi if the season is too wet and planting too dense, as it actually prefers a dry climate.
–Tico–/Flickr
3. Grow Purslane In A Warm Spot
Purslane cannot tolerate cold and prefers germination temperatures of 70 degrees F or more. Wait to place in field until days are long and average temperatures are above 70 during the day and 50 at night, preferably warmer.
Purlsane can be started in seed containers or sown directly into beds. Seeds should be sown every 3/4 inch in rows 8 inches apart. Thin to roughly two or three per foot in row. If transplanting, sow in flats and transplant once first true leaves appear at roughly 8 inches apart.
4. Harvest Purslane In The Morning For Tartness
When harvesting purslane, take into consideration the malic acid content of the plant, which is higher in the morning than at night thus making it more tart. Some will prefer this while others may find they enjoy purslane harvested in the evening, when the flavor is milder.
5. Cool Immediately After Picking
Purslane is a delicate crop and should be cooled immediately after harvest. Warm temperatures after harvest will bring out the mucilaginous texture of the crop. Gardeners can either pick off stems continuously over several weeks or cut the whole plant. It will regrow if 2 inches or more of the plant is left on the stem, though it should get no more than three weeks of harvest if the flavor begins to decline and the plant shows signs of bolting. Store purslane in the crisper drawer of your refrigerator, and use within a week.
6. Seek Out Chefs
If looking to grow a lot of purslane, contact chefs beforehand. It will sell a bit at market, but it is a specialty crop and may need some other outlets to move it. Ask chefs at what size they would prefer it and how many pounds. And since it is a rarer green, consider selling at herb prices.
This article about growing purslane was written for Hobby Farms magazine. Click here to subscribe.
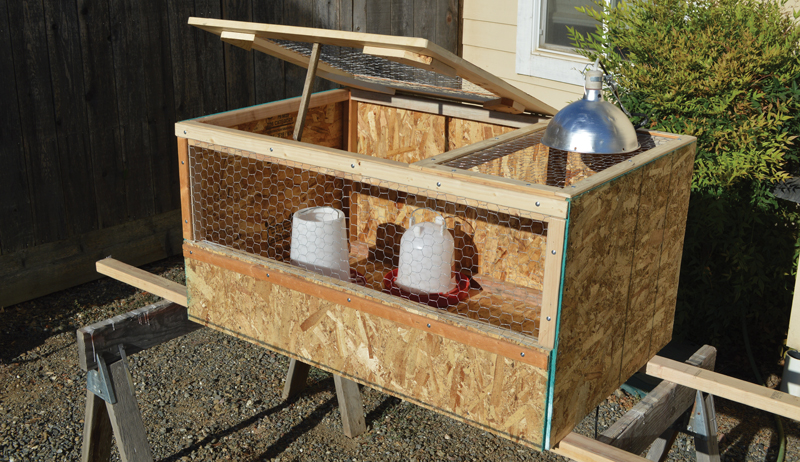
A DIY chick brooder for your new chicks is easy to build. A brooder box must perform the duties that the mother hen would perform for her babies. The chicks are literally under her wings of protection for six to eight weeks. They come out to eat and drink but periodically return for her warmth and quickly return when threatened.
At about 2 months of age, though, the new hatchlings are ready to join the flock. This homemade chick brooder box will do exactly that.
The task is to create an enclosure that is capable of keeping baby chicks secure and warm until they are feathered out to the point that they are independent. It’s still up to the chicken keeper to monitor feed, water and the heat source.
This particular homemade chick brooder, designed for about 10 chicks, will make the task that much easier.
The box isn’t weather-tight, so keep it in your garage. When the chicks become young pullets, move the box into the coop and let the older hens meet the new gals for about a week or 10 days before opening it up to let the groups commingle.
What Materials Are Needed for a DIY Chick Brooder
Building a DIY chick brooder isn’t particularly difficult, but it does require a few tools, some skill and patience, and a bit of time. Here are most of the materials you will need to get started:
one 4-by-8-foot sheet of oriented strand board (OSB) or plywood. (I like it to be about 3/8 or 7⁄16 inches thick to keep the weight down.)
five 8-foot-long 2-by-2s (pine or fir, which will be less expensive)
two 2-by-3-by-8-foot pieces of fir or pine lumber
~100 3⁄4-inch deck screws with a Phillips head
~25 3⁄4-inch pan-head screws
a few long screws (2 1/2 or 3 inches)
~10-by-2-feet of small-opening poultry netting or 1⁄2-inch wire mesh
a handful of Sheetrock nails (not more than 13⁄8 inches long)
wood glue
one small pair of hinges
one 8-foot and one 6-foot piece of 1-by-4 (to create the hinged top)
very thin strips of wood to screw down over the edges of the poultry netting. Use whatever is available in your area. This brooder was made with wood strips that measured 1 ½-inches wide and ¼-inch thick, cut to the length of the netting edge.
Here are most of the tools that you’ll likely need to build this brooder box.
a drill motor and bit set
a circular saw with a wood-cutting blade
a Philips screwdriver or bit for a power drill
a tape measure
a 4-foot straight edge and pencil
some kind of wire cutters
some sawhorses or other work surface
three or more 4-inch C-clamps
safety glasses
an awl or other pointed instrument
a medium-sized claw hammer
You should understand that if you have more efficient power tools or pneumatic staplers, your job will be that much easier. At certain stages, it’s also helpful to have an extra set of hands
Cutting the Board
The diagram below represents a single sheet of Oriented Strand Board (OSB, plywood) measuring 4-by-8 feet. The heavy lines represent the location of saw cuts.
Use OSB that measures about 7⁄16-inch thick to keep the weight to a minimum. You could make the bottom and sides wider, but it makes reaching in and across to catch chicks pretty difficult. As drawn, this will create a brooder that is 10 square feet, which is more than ample for 10 chicks—even more when they only a few days old.
Amonphan Comphanyo;BushAle/Shutterstock
Dispose of the narrow strip that is left over, or use it to create a low front below a strip of poultry netting. All corners will be reinforced with 2-by-2 lumber to provide a surface so screws can be used to make sheets meet securely. Use litter on the bottom of your brooder to a depth that covers these corner pieces.
Once you have your boards cut, use the captioned photos to walk you through the process. Take your time and enjoy this fun little homemade chick brooder plan.
Step-by-Step DIY Chick Brooder Instructions
Step 1: Tools & Materials
Start by laying out what you’re going to need. I like to use the smoother side of the oriented strand board (OSB) sheet for the inside of my brooder.
Use a wet/dry vacuum to clean the finished DIY brooder. If chicks soil or spill water, use a wide putty knife or small dustpan. Remember to keep the smooth side to the inside.
Step 2: Which Side of the Line
Make a mark 24 inches from one end of the OSB (or plywood) and then make a similar mark on the opposite edge. Using a straight edge, make a line completely across the 4-foot width. Using your circular saw, make the cut on the line.
Notice that I am cutting right along the edge of the line, leaving a full 24 inches. Perform this exact same task on the other end of the OSB, but make this cut at a 30-inch line. The piece that is 24-by-48 inches is the back of the brooder, and the 30-inch piece is the bottom.
The DIY brooder will still work if you’re off a little. You just might need to make some simple adjustments.
Bill Graves
Step 3: Add 7/16
After cutting and removing the 24-inch back and 30-inch bottom, cut a 48-inch piece of 2-by-2 lumber and place it along the back edge of the bottom, as shown here. Use about five 3⁄4-inch deck screws along the bottom and five more along the back.
For added strength, add a little wood glue to the joints. Once you have cut a 2-foot section and a second 2 1⁄2-foot section from the 8-foot piece of OSB, you should have a piece a little less than 42-by-48 inches.
(Note: 2-by-2 lumber actually measures 1 1⁄2-by-1 1⁄2. Don’t let that throw you off; suppliers just call it 2-by-2.)
Cut 30 7⁄16 out of the 42-inch piece, and then cut that piece in half down the middle. The idea is to create two pieces that measure 24-by-30 7⁄16. These two pieces will be the side ends of your DIY brooder box.
The sidebar (below) should make this more clear.
You should also notice in this photo that I have already added a piece of 2-by-2 that is about 28 1⁄2 inches directly behind the tape measure. All the corners will have this 2-by-2 or 2-by-3 screw backing.
In the image below, it’s easy to see the process. All inside seams are joined with screws and glue. It may be helpful to use C-clamps when tightening the screws, but once the screws are in place, you can loosen the clamps and move on to the next piece.
The corners aren’t put on in any particular order, so simply measure and cut each on as you go. Notice that I put a 2-by-3 across the top of the front span for a bit more support for the top.
Bill Graves
Step 5. Predrilling Close-Up
A small drill bit is used to drill the OSB and 2-by-2 backer. OSB is a rather hard material, but you can use a sharp awl and hammer to start the hole.
Just be careful to apply some pressure from the back if you’re going to hammer on the structure.
Step 6: Apply a Screw
A 3⁄4-inch deck screw is applied to the hole.
Step 7: Ready for Front
At this point, your DIY brooder box is nearly ready for the top and front. The narrow area at the bottom in front can be filled in (see step No. 8), or you can use poultry netting for the entire space.
All eight inside seams now have a 2-by-2 or a 2-by-3 screw backer. At this point, you’ll begin to see how truly rigid the box has become.
In this slightly elevated view, the narrow remaining strip of OSB has been used to fill in the front bottom. Because my poultry netting is only 24 inches wide, this is a much better option than trying to fill the entire space with wire.
Also, this image shows one spot where two very long screws are needed near the top. The top 2-by-3 on its side is installed to leave about a 12-inch gap.
That will make sense as you finish.
Bill Graves
Step 9: Sheet Rock Nails
I like to pull the wire tight with an awl or Sheetrock nail and/or use a screw. If using a screw, cut one side of the wire and wrap the wire around the screw head before using the screw bit to drive the screw in.
Once you’re happy with how tight the wire is, you can just drive in the nail. Make sure it doesn’t come out the back.
Step 10: Lid Corner
The lid corners were made, braced and hinged. I cut the 1-by-4 on a 45-degree angle and used metal braces with additional wood on the inside. You could also butt-splice the 1-by-4 and then create added strength with the thin strips that cover the wire.
Caution: If you use lid material that is less than 1-by-4, your 24-inch poultry netting will not be wide enough for the top.
Step 11. Finished
The front and top are complete! The lid can be opened without removing the heat lamp, which is wired in place so it won’t move and become a fire hazard.
The main image for this story also illustrates the thin strips that were used to cover the edges of the poultry netting. I would likely use feeders and watering devices that are slightly smaller to give the chicks a bit more room.
Now your DIY brooder box is ready for some floor litter and baby chicks!
At about two months or even less, you can place the DIY brooder inside your henhouse to introduce the young chicks to the rest of your flock. Chicks won’t need a lamp at that age.
During introductions, put a layer of cardboard on top of the brooder so adult hens can’t hop up and poop through the top. Older hens should accept the new arrivals in a week or 10 days.
This article about building a DIY chick brooder box was written for Hobby Farms and Chickens magazines. Click here to subscribe.
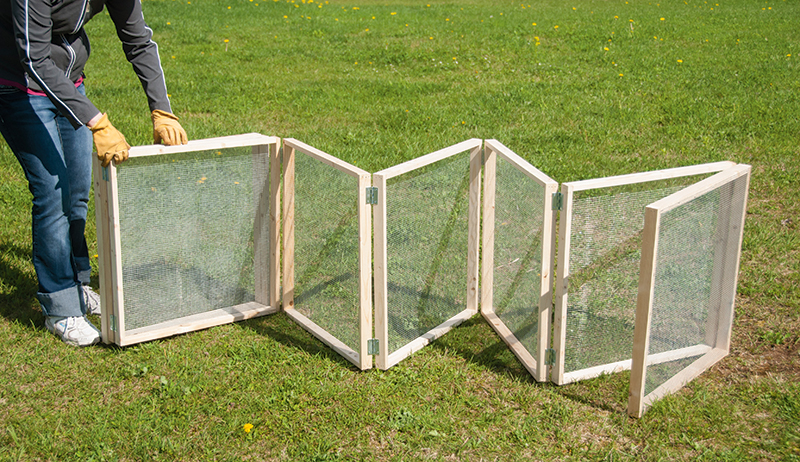
With this DIY chicken run, you can allow your birds to free-range for part of the day while being safe from predators.
Many chicken keepers like to have the ability to allow their birds to free-range for part of the day so that they can utilize new areas. But you might still want to contain your chickens in a specific area so that you can protect them from predators and control where they range. There are a number of ways to create a portable chicken run, including the popular chicken tractor, but you can also make an easy-to-build, 4-by-4-foot chicken run that collapses into a small, lightweight package whenever you want to move it or store it.
In the instructions that follow, we’ll show you one way to create a simple collapsible homemade chicken run, but you can certainly make variations to this design to fit your flock, no matter the size; for instance, you could opt for a larger 8-by-8-foot design by essentially “doubling the recipe.”
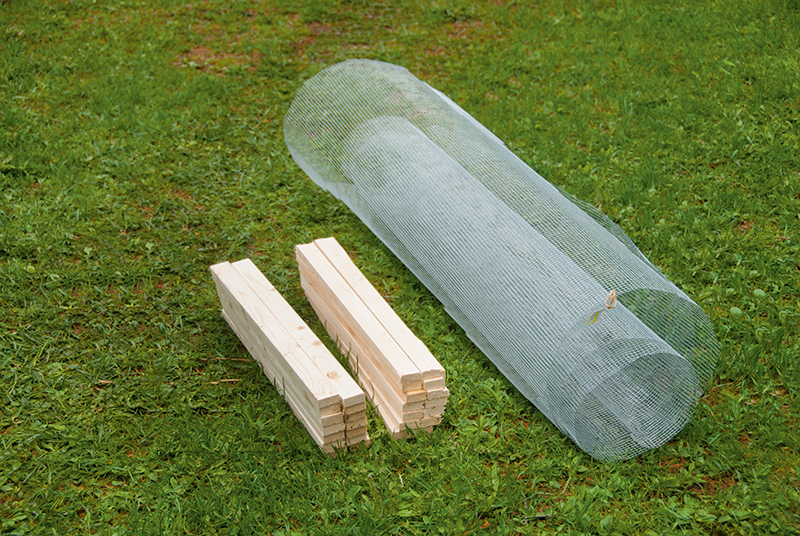
Materials For a DIY Chicken Run
All photos by Daniel Johnson
Wood & Cut List
• (16) 24½-inch 1-by-2s
• (16) 23-inch 1-by-2s
Hardware
• (8) 24-by-24-inch sections of ¼- or ½-inch hardware cloth
• (2) hook and eye latches
• (14) 2-inch hinges
• Box of 1½-inch nails
• Box of staples
Tools
• Circular saw or miter saw
• Staple gun or hammer
• Electric drill or screwdriver
• Framing square
• Metal snippers
• Wood glue
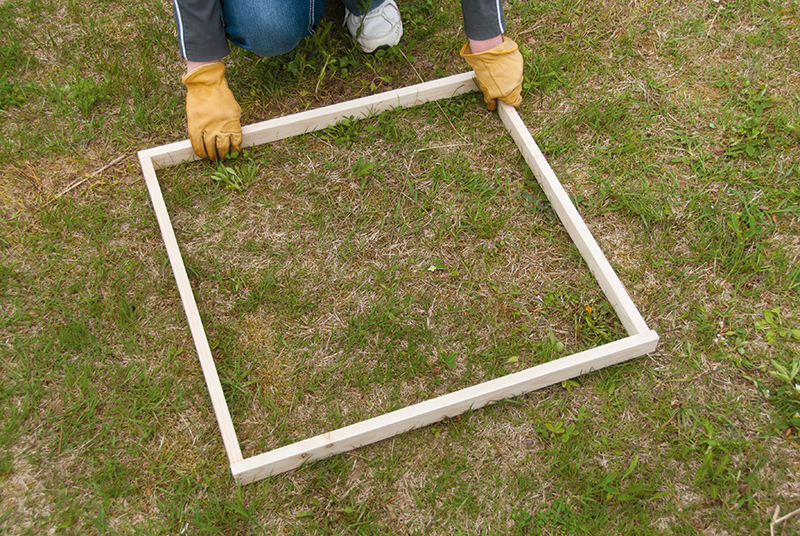
Step 1: Assemble Panel Frames
To begin, we’ll assemble the frames that will form the skeleton of the collapsible chicken run. We’ll need eight complete frames.
To build the first, take two of the 241⁄2-inch 1-by-2s and two of the 23-inch 1-by-2s and use them to create a square, with the shorter 23-inch 1-by-2 on the “inside,” and the longer 241⁄2-inch 1-by-2 on the “outside,” as shown in the photos. Use a framing square for precise corners.
Predrill nail holes with a small drill bit and then fasten with 11⁄2-inch nails. Use wood glue on each joint for a firmer bond. Repeat this seven more times to create a total of eight wooden squares. Set these aside.
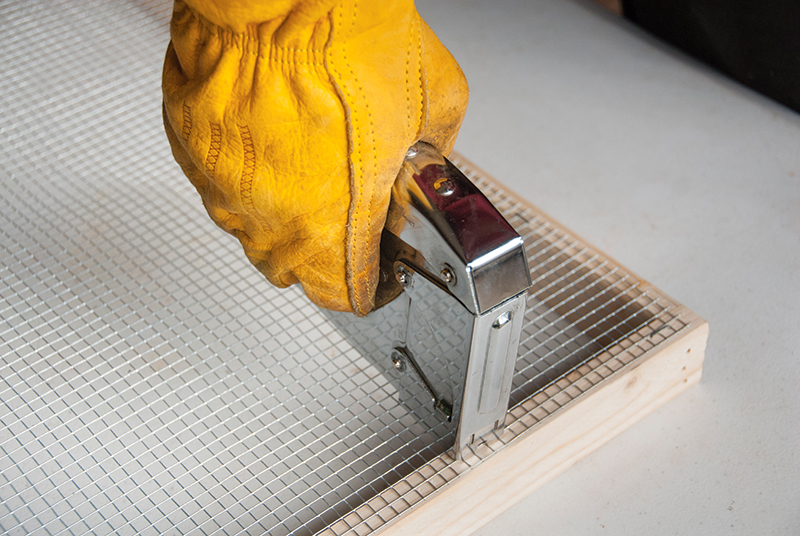
Step 2: Cut Hardware Cloth
Now we’ll need to add the hardware cloth to each panel of the chicken run. Using your choice of 1⁄4- or 1⁄2-inch hardware cloth, carefully cut a total of eight 24-by-24-inch squares with wire snips.
Our supplier provides hardware cloth on rolls 4 feet wide, so it was a simple matter to purchase a 4-by-8-foot section to use for this project.
Step 3: Fasten Hardware Cloth
It’s time to attach the 24-by-24-inch sections of hardware cloth to each of the eight wooden panel frames of the chicken run. We used a manual staple gun for the job, but you could also use roofing nails to pin down the hardware cloth.
It’s important to keep the edges straight and properly aligned with the wooden frame. It’s also critical that you exercise extreme care when handling the wire. Safety glasses and gloves are a must!
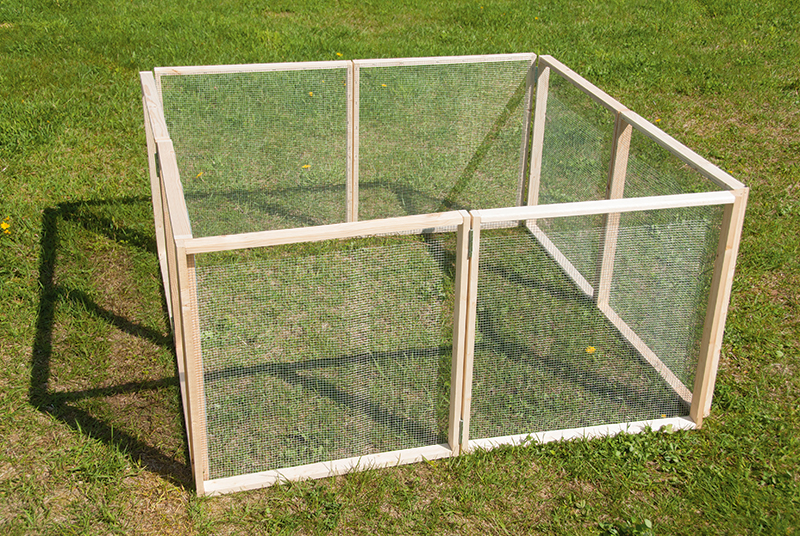
Step 4: Attach Hinges
At this point, we can begin to fasten the finished panels together to create the chicken run. This can be a tricky step to do properly, as the hinges and the frames must be assembled the correct way to allow the pen to expand and collapse properly. Use two 2-inch hinges on each joint, and screw them in with the electric drill or screwdriver. It can help to predrill the screw holes here as well. Here’s an easy way to make sure that the panels will assemble in the correct manner:
• Create four pairs of panels, each with the hardware cloth facing “out.”
• Place all four pairs (a total of eight panels) side by side
• Attach hinges to each of the four pairs (shown in the photo at left).
• Go around to the other side
• Now attach hinges to the six inner panels, leaving off the two panels on each end (shown in the photo below).
Step 5: Enjoy Your DIY Chicken Run!
When assembled correctly, the pen should easily collapse into a lightweight and portable package that can then be quickly unfolded into a 4-by-4-foot movable run for your chickens.
Use two hook-and-eye latches at the top and bottom to secure the opening and you’re all set to go.
Predator-Proofing Pointers for a Homemade Chicken Run
Keep your birds safe while free-ranging in your new pen with these proofing tips.
• Half-inch hardware cloth may be available in a stronger gauge than 1/2-inch, which can help keep out predators. Don’t use chicken wire for this project, as predators can easily get past chicken wire. Hardware cloth is essential.
• If you’d like to create a roof for the collapsible run, you’ll need to make one large 4-by-4-foot frame and cover this with hardware cloth. The corners should then be temporarily screwed down during the day when the chickens are using the pen and removed at night.
• You can also use 2-by-2s (or larger lumber) instead of 1-by-2s for the basic frame; this will be make the run stronger, although using wood of a larger size like this will make the run heavier and more cumbersome to move and handle.
• Because this homemade chicken run is lightweight and portable, it’s not a safe defense against digging or large predators. Your chickens should be kept in a digproof coop at night, and this pen should only be used during the day in a place where you can keep an eye on the chickens.
• Moving this pen around inside a larger area protected by an electric fence may help keep predators away.
This article about building a DIY chicken run was written for Chickens magazine. Click here to subscribe.
Ice melt products certainly work, but they’re not always ideal for farm use. Still, you can’t have slippery walkways and doorways causing unnecessary winter trouble for you and your livestock. Let’s briefly explore some safe and effective ice melt alternatives and solutions for farm safety.
The Problem
Ice buildup on the ground is often an issue around your farm property towards late winter. It’s easy for deep snow to pack down as people and animals traverse it, and this packed snow slowly turns to ice after a time. Also, the warming winter sun melts snow during the day, but then cold nights re-freeze the moisture back into ice. Before you know it, you have a recipe for slippery walkways, gates, doorways, driveways, trails and paths around the barnyard.
Prevention: Clear Snow Right Away
First off, try to put as much in your favor with some smart elbow grease. When it snows overnight, get out there and clear your farm paths, driveways, and walkways right away. If you can, try to remove the snow before other people or your animals have had a chance to walk around much. Every footstep and every tire tread that falls on fresh snow compacts that snow and forms a compressed layer that is just waiting to become ice. It’s not always possible, but the faster you can remove snow with snowblowers, plows, and good old hand shoveling, the less ice you’ll have later.
Try Sand as an Ice Melt Alternative
Despite your best efforts, ice still has a way of forming in later winter. Warm days and cold nights might be great for maple syrup production, but they make ice in the farmyard. Late winter can also bring ice storms, where rain freezes as it falls. When these conditions occur, you might consider a variety of commercially available ice melt products like rock salt, calcium chloride and potassium chloride
However, these products can be damaging to concrete surfaces, and they’re quite harsh on grass, creating dead spaces. They’re also not always safe around pets or livestock, who might try to consume large amounts because of the taste. Dogs and cats can get their feet irritated by the ice-melt products, and long-term exposure isn’t great for hooves, either.
Ice melt alternatives for farm use can be as simple as keeping sand on hand. While sand doesn’t melt ice in quite the same manner, on a warm day it will collect heat and melt into the ice. And in the meantime, sand gives you and your animals excellent traction to move around safely. Sand is easy to source, inexpensive, and simple enough to apply, so it makes a decent ice melt alternative. Then in the spring, you can simply sweep the sand harmlessly away.
Keep Some Hand Tools Around
You’ll also need some ice-scraping tools to help you clear the way.
· Rounded shovel for digging out deep sections of packed snow
· Spade (square shovel), for scraping
· Dedicated ice scraper, with a flat blade
· Snow shovel for removing the initial snowfall.
Prioritizing farm safety with the right ice melt alternatives will keep you and your animals protected. Be careful out there during late winter! Spring is just around the corner, so keep yourself and your animals safe from ice in the meantime.
This article about ice melt alternatives on the farm was written for Hobby Farms magazine. Click here to subscribe.
German and Roman chamomile differences are subtle but distinct. I have grown both at one time or another, and I like aspects of each. Right now I have a lot of the German and not much of the Roman and that’s just because of a harsh winter a couple years ago. The two plants are in the same family, but after that, they have very little in common despite containing similar chemicals and appearing to have similar flowers.
ethnobot/Flickr
German chamomile (Matricaria recutita) is a self-seeding annual in the Midwest. It grows from 6 inches to 2 feet tall. The leaves are ferny and delicate, and it has a typical aster flower, with a yellow disc in the middle surrounded by evenly spaced white florets. The flower smells like apples, and the essential oil derived from the yellow and white flowers of this plant is blue due to high levels of azulene.
Traditionally German chamomile has been used to calm, feed and soothe the nervous system and to support good digestion. You can use all parts of the plant in salads, though you might want to watch out for its bitter quality. They say that the longer you use chamomile on a daily basis, the more benefit it will give you. As a tonic, there are few reasons to avoid it, unless you happen to have an allergy to ragweed. Even then, there is only a very slight chance that someone might have a reaction, and it is most always a topical rash. I grow this type to harvest and dry for our medicinal preparations. It simply blooms more prolifically and makes my time picking worthwhile.
Melanie Shaw/Flickr
Roman chamomile (Chamaemelum nobile) is typically grown as a perennial, though it likes a warmer climate than I can give it here in Ohio. I’ve had it stay around for some winters—but not the really bitter ones. It is hardy to zone 5 and is a creeper, only growing to about 3 to 4 inches high. The leaves tend to be thicker and more substantial than those of German chamomile, and in my experience, so are the flowers.
This is the flower you want if you are putting together a chamomile “lawn” or wanting to plant in between your patio pavers. Most people that grow Roman chamomile in this way keep it cut short. Sadly, they miss out on all the companion planting benefits of this plant, as it attracts some great pollinators and beneficial insects. The flowers and the leaves of it also smell of apples, but while the essential oil of this plant is useful, it doesn’t contain high levels of azulene, so it’s a clear oil.
Roman chamomile has also been traditionally used for its calming and relaxing properties. It doesn’t bloom as much or as often as the German variety. It’s worth picking for a cup of tea for sure but I’m not sure I’d want to count on it to fill my herb jar.
This article about German and Roman Chamomile Differences was written for Hobby Farms magazine. Click here to subscribe.
Bales of hay may seem like a faded memory by late winter, but properly stored hay is crucial for ensuring a steady supply for your livestock. Summer’s hard work baling hay is long past, and with the finished hay safely under cover, it’s easy to put it out of your mind, other than the slow process of feeding. But maybe you shouldn’t get too lax—late winter is an excellent time to check on the safety of your hay stock and ensure your hay storage remains intact.
Storing Hay Can Invite Pests
During a recent cold snap, I didn’t access my main hay storage barn (half a mile away) for about ten days, instead feeding my animals on hay reserves that I stashed closer to home. When the weather finally warmed back up, I returned to the hay barn for a restock.
Surprise, surprise, during my absence an opportunistic rabbit had discovered a small crack in the barn wall and had apparently spent the entire cold snap enjoying my supply of square bales of hay. Not only did the rabbit leave many, many calling cards all over the barn floor, but he had also even climbed well up the stack of hay, depositing droppings as high as ten feet.
Luckily I caught this problem before it could become too bad. A brief repair sealed off the entrance, and I cleaned up the mess. But this rather humorous episode could’ve been more damaging if I hadn’t caught the problem quickly. If left unchecked, messes like this can easily ruin valuable bales of hay, making them unsuitable for animal feed. Making hay is far too much effort to be wrecked by wild critters!
What Animals Are Attracted to Bales of Hay?
Many different animals will try to move into a cozy hay storage barn. Squirrels, rabbits, mice, voles, and raccoons—all of them will try burrowing into bales of hay, while troublesome pigeons might roost above. The amount of damage caused by these critters can range from a minor nuisance to quite damaging. As already mentioned, rabbits can cause a costly mess, as can pigeons—sometimes ruining many bales of hay. Keeping an eye on any signs of occupancy gives you the chance to stop the issue before it gets out of hand—and it’s easy to miss in late winter if you aren’t paying attention.
Hay Storage Challenges in Late Winter
There are other things to keep an eye on in your hay storage barn. In regions with heavy snowfalls, it’s not uncommon for tiny leaks in the building—or even ventilation points—to become access points for wind-blown snow. A wintry blizzard with high winds can drive small amounts of snow into your barn and onto your bales of hay, where it will melt later in the season, possibly creating a mold issue. High winds can peel away roofing or siding, allowing snow to pile in. Checking on your barn after a snowfall ensures your bales of hay remain dry and mold-free before any melting snow seeps in and causes damage. The same goes for any round bales of hay stored outdoors—check plastic covers and other protection to make sure they’re still functioning properly deep into winter. Remember, the first few inches of a round bale—the most vulnerable to moisture—contain the most amount of hay.
Frost buildup is another reason to check your hay storage during late winter. If your hay storage shares a wall with livestock housing, or if there is any kind of heat source in an adjacent portion of the barn, frost can begin to form on the wall during very cold weather. Frost like this can soak precious amounts of hay.
Conclusion
The bottom line? Late winter is a good time to check on your valuable bales of hay and remedy issues before they become bigger problems. By maintaining proper hay storage and staying vigilant, you can ensure your livestock has access to high-quality feed throughout the season.
This article about checking bales of hay in late winter was written for Hobby Farms magazine. Click here to subscribe.


")