How to tell if a pig is pregnant is something that many farmers wonder about. Knowing the answer can be difficult, but here are five tips to help.
Is My Pig Pregnant?
Three months, three weeks, three days. The short gestation and prolific nature of the swine means that, relatively, we don’t have to wait too long to find out if hog-farrowing is an enterprise on your farm. The maximum amount of torture you will endure is 114 days.
The trickiest part is establishing a starting point for the 21-day count, or the estrus cycle of your lady.
Pigs cycle every 18 to 21 days. The span of symptoms is wide, ranging from none at all, to fully aggressive, restless, swollen mamas, mounting pen mates with visible discharge, ears popping up and down, vocalizing and locking their back legs to brace for the boar’s heavy frame.
My favorite sow used to walk to the edge of her paddock closest to our house and stare, unmoving, for hours. She was a great no-brainer sow for a beginning farmer. Some are less obvious, but most gals show at least a few of these signs.
The most reliable indicator is the attention of the boar. However, keep in mind, that you do not have to witness a boar mount a sow or gilt for her to get pregnant.
We’ve had seemingly discrete boars that prefer to breed when no one is watching, and we’ve had boars with less scruples, willing to mate only on full agriculture educational display, as a bus full of school children drives by.
But sneaky or not, the boar always leaves evidence of mating. He’ll leave sticky evidence all over the sow’s body, particularly her rear end, all over the pasture, maybe even all over a bale of hay, it’s just … you’ll see it.
# 2 A Little Bit Pregnant
Once you can establish mating has occurred, it’s time to start the 21-day clock looking for another heat cycle. Prepare to endure all sorts of “what ifs” and self-doubt.
No is the only definitive answer. If she cycles again, she is not in the family way. If there’s no evidence of heat, you’re partially on your way to answering yes, my pig is pregnant.
Unless she’s only a little bit pregnant.
There are many roadblocks to certainty on the farm. Disease pressure, stress, weather changes, transportation stress, age and condition of the sow—a number of things can cause a gilt or sow to absorb an early pregnancy. It’s rare, but it happens.
To complicate matters further, aggressive boars will mount a sow who is already pregnant. It’s a good sign if she refuses to put up with his tomfoolery, but it depends on the temperament of both the boar and the sow.
I have seen very pregnant sows put up with this behavior.
When we first started out, we were tempted by expensive cheats like pig pregnancy test strips (yes, they exist) and portable ultrasound instruments, which emit a series of tones that indicate pregnancy between 30-80 days after mating.
Ultimately, collecting pig urine or convincing sows to hold still for the Doppler—as well as learning proper technique for these devices—were not practical at our scale. I could definitely see myself diagnosing a full bladder as a false positive.
We put off buying equipment until, one day, we found we had trained our eyes to recognize a pregnant pig.
#4 Monitoring Mammary Development
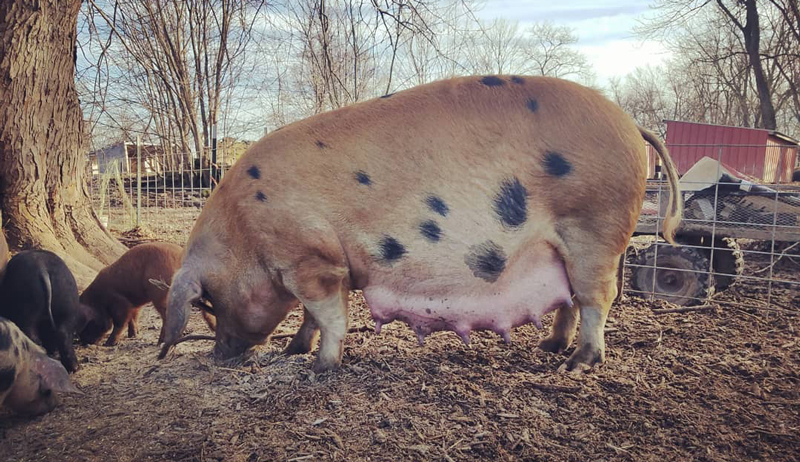
Milkline, underline, rail, milk rail—there are many terms for it, but mammary development is the most reliable and consistent indicator of swine pregnancy.
Udders along the belly will fill out slowly from the rear like a balloon animal prior to being twisted. Teats will expand or cone out toward the ground.
It takes several hours of pig boob observation to make the call, but as a general rule, gilts show change earlier than our sows. The professional eye can detect change about 30 days out.
In an older sow, our warning window is shortened to about 2-3 weeks. Eventually, the udders will become so engorged that you’ll be able to squeeze the teat and express milk, a sure indicator of Go Time. Pack your hospital bag, as you’ll likely have piglets within 24-48 hours.
Fair warning, we have had high production sows express milk for a full week before farrowing. Just to keep us from getting too confident.
The key is in the mammary. This gilt is three weeks from farrowing. (Lyndsey Teter)
#5 Watching Lady Pig Parts
As the mother pig’s belly swells and is weighed down with the pregnancy, in some pigs, the vulva will actually begin to point up toward the sky. The key here is knowing what the sow’s vulva looks like when not bred, and observing any change.
This appears to be a genetic trait, as this method has proven less reliable on our farm. But many have found success in observing change of direction in lady pig parts, if that’s your thing.
Can Results for How to Tell if a Pig is Pregnant Be Clear?
Waiting for babies is a major cause of anxiety for new farmers.
Farmers want to be prepared for a new litter of piglets. At the same time, they also seek assurance they are not carrying costs for livestock with reproductive issues.
Luckily with pigs, there’s usually only a month or two (at most) of wondering in despair if your pig is pregnant. Just hang on a few more weeks.
This article about how to tell if a pig is pregnant was written for Hobby Farms magazine. Click here to subscribe.
The Idaho Pasture Pig was developed by Shelly Farris of Rigby, Idaho, when she saw a need for a good grazing pig. She wanted a good-natured animal that would graze the grass instead of rooting. The animals would also need to mature out at a smaller size than traditionally grown pigs, but able to reach a butcher weight in a reasonable amount of time. She began offering breeding stock to the public in 2012.
Down with IPP
The Idaho Pasture Pig—also called an IPP—is comprised of Old Berkshire, Duroc and Kunekune breeds. Many years of dedicated work went into creating a pig that is great for small family farms, as well as anyone interested in raising quality pork.
The meat from grass-fed pigs is higher in omega-3 fatty acids. It’s also more marbleized than traditional grown pork, with a deep red color and a sweeter flavor.
Idaho Pasture Pig boars mature to about 350 to 450 pounds. Sows top out about 250 to 350 pounds. With a diet consisting primarily of grass, the pigs will mature to a butcher weight of about 230 to 250 pounds in approximately 10 months.
All pigs require lysine that is found in grains, so IPPs are unable to be 100 percent grass-fed. But they can be primarily grass-fed. Only 10 to 20 percent of their diet needs to consist of grains and minerals.
It’s essential for the minerals to be mixed properly into the feed. Due to their toxicity to salt, Idaho Pasture Pigs are unable to be fed free-choice minerals or mineral blocks. A mineral deficiency will result in the pigs digging in the ground to locate additional minerals instead of grazing the ground properly.
Its uniform head leads to a shorter, upturned snout. This allows the Idaho Pasture Pig to graze grass. Other breed-standard attributes include:
a long back
well-developed shoulders
rounded hams that extend all the way down to the hocks
a good personality
The Idaho Pasture Pig has more hair on its body than other breeds, making it very cold-hardy. Sows make excellent mothers, and they don’t require heat lamps to farrow outside in A-frame shelters.
The keys to a happy, healthy grazing pig include minerals; water; grass, hay and fodder; shelter; and, of course, a nice wallow!
This article about the Idaho Pasture Pig was written for Hobby Farms magazine. Click here to subscribe.
A heated chicken coop is something that people in regions of the United States where the temperatures drop dramatically from October to April often consider to keep their birds from freezing. Here’s how to keep your flock safely warm throughout the winter by providing heat via one of these three secure options.
Heated Chicken Coop Dangers
My husband Jae recently shared some sad news with me. A couple of his colleagues had lost their entire chicken coop over the weekend to a fire. All but one of their hens had perished; the lone survivor had to be euthanized, her injuries too extensive to treat. Scorch marks on the outer bricks of their residence showed how tragic this incident could have been.
I looked at Jae and said two words: heat lamp. And of course, it had been.
Search the internet and you are bound to find dozens of examples of coop fires caused by heat lamps. As with this local blaze, the poultry owners tend to be unaware of the inherent risks that come with using a searing-hot bulb over such combustible materials as straw and pine shavings.
3 Ways to Safely Keep Your Chicken Coop Warm
1. Heating Panels
Infrared heating panels are popular in home improvement because they can transfer heat quietly, without the use of fossil fuels and with no bulbs or filters to maintain. Most commonly found in bathrooms and yoga studios, these panels are easy to use: Mount them on a wall or ceiling, plug them in and wipe them down every so often. These traits make them ideal to use in a chicken coop. Simply position them beside or above your perch, and your birds will keep warm all winter.
Added bonus: The dust in your coop won’t get kicked up because these panels do not blow air in order to heat.
Drawback: The initial layout can be costly. Infrared heating panels can cost from about $100 to more than $300, which can be a little pricey for the debutante flock owner.
2. Deep Litter
A tried-and-true method, deep litter relies on in-situ decomposition to heat the henhouse. As the pine shavings become soiled with droppings, fresh litter is added on top. As more fresh litter is added, the soiled litter is compressed and begins to decompose in place. The decomposition process releases natural heat, which warms the coop and its inhabitants.
Added bonus: When it’s time to clean out the coop come spring, you’ll have plenty of fresh compost as a byproduct.
Drawback: Your coop must have proper ventilation to prevent an accumulation of gases that could be harmful—or fatal—to your flock.
3. Caged Heat Lamps
When used properly, a heat lamp provides an effective source of heat for your chickens. If you use a heat lamp, do some research rather than plunking the first one you see into your shopping cart.
Make sure the bulbs are infrared heat-lamp bulbs that are shatter-resistant.
Check the wattage: If you buy a 250-watt bulb, for example, you must use a 250-watt lamp.
Never exceed your lamp’s allotted wattage, which easily and unknowingly can be done by adding a timer.
Suspend your heat lamp from a permanent fixture such as a rafter or stud.
Use appropriate hardware to securely install your light.
Reinforce the chains with hardware wire so that they do not unlink.
Hang your heat lamp a minimum of 18 inches above head level to allow your chickens room to safely jump
Do not position your heat lamp above the perch, which will raise the birds to a level too close to the heat source to be safe.
Most importantly, use a cage over the face of the heat lamp. This way, should your heat lamp fall, the hot bulb will not contact anything incendiary.
Added bonus: Heat lamps, for the most part, are inexpensive.
Drawback: Heat lamps are also laughably easy to install incorrectly—which is a risk to your flock.
Jae shared our condolences with his colleagues and gently reminded them that I am just a phone call or text message away when they’re ready to outfit their new coop. I only wish they’d called me back in October, when they first hung their uncaged lamp from a cast-iron planter hook. They thought they would provide heat for their hens. Unfortunately, they didn’t realize how much.
This story about a heated chicken coop was written for Chickens magazine. Click here to subscribe.
Rain gardens and bioswales are gardening options that provide native habitats and manage excess rainwater simultaneously.
What Happens When We Get Too Much Rain Too Fast?
When our gardens get buckets of rainfall dumped on them in a more compressed amount of time, we’re at greater risk for flooding—and greater risk of losing precious topsoil in the process. Rather than slowly penetrating and subsequently filtering through layers of soil to recharge the local groundwater, extreme rainfall becomes fast-moving runoff.
If your soil is really compacted or, like most of us, you’re surrounded by asphalt roads, concrete driveways and similarly impervious surfaces, all that extra rainwater has a chance to spread out and flow even more quickly across these areas. As a result, the runoff remains above ground, making its way into nearby streams and rivers and taking the topsoil and its nutrients along with it.
Fortunately, we can prepare for these extreme weather events and preserve the rich topsoil we work so hard to build. By building bioswales and rain gardens into our landscapes, we can channel and slow that runoff.
Changing Environmental Conditions
No matter where you live and where you garden, odds are you’ve noticed at least some changes in your local weather patterns over the last several years. Throughout much of the United States, for instance, we’ve seen new extremes—more intense rains punctuated by prolonged periods of drought.
A 2019 research brief released by the policy-neutral nonprofit group Climate Central notes that for every degree Fahrenheit rise in temperature, our atmosphere can hang onto about 4 percent more water vapor. That means as temperatures go up, the stage is set for even heavier deluges when it does rain. Climate Central researchers analyzed the rainiest days of the year for 244 U.S. cities and determined that, “Since 1950, the wettest day of the year has gotten wetter in 79 percent of the cities analyzed.
“In addition to getting stronger, extreme downpours are happening more frequently than in the past. In 80 percent of the cities analyzed, the top 1 percent of rain events have been recorded disproportionately recently.” Just how recently? More than 1⁄3 of the cities Climate Central studied set their rainfall records since 1990.
Studiomiracle/Adobe Stock
What is a Bioswale?
You may already be familiar with swales. They’re long, narrow ditches or shallow basins typically positioned around homes and along roads to redirect storm water. These may be planted with grass, filled with stone, or even made from concrete. But what makes a swale a bioswale?
Modeled after Mother Nature, a bioswale incorporates natural elements that work together to filter and direct the runoff. These may include native perennial grasses and flowers as well as certain soil amendments. In part, the natural elements to be included depend on factors such as soil texture and how quickly water drains through a particular area. The land’s degree of slope matters, too. (Land that is nearly flat or, conversely, land that is very steeply sloped is ill-suited for a bioswale.)
What is a Rain Garden?
You can use bioswales to slow and direct stormwater runoff from your roof, driveway and other impervious surfaces, but where exactly should this runoff go? Bioswales work especially well when paired with rain gardens. Rain gardens are usually located in low-lying areas and include deeply rooted native plant species that, once established, can tolerate “wet feet” and drought conditions.
While native plants do some of the runoff-filtering work, the physical structure and layout of the rain garden are also important parts of the equation. Imagine the rain garden as a kind of basin complete with berms—built-up ridges of land—on all sides except for the side that receives stormwater runoff.
Water from the gutters on your home and water being directed along any nearby bioswales flows into the rain garden site. The rain garden’s high berms help to hold the runoff in place long enough for it to be taken up by the deeply rooted plants. The stormwater runoff also gradually penetrates and drains through the rain garden’s layers of mulch and amended soil.
auntspray/Adobe Stock
How Do I Choose Between a Bioswales and Rain Gardens?
Should you choose to install your own bioswale and rain garden, their location, size and shape depend on several factors. Some of these include your current stormwater runoff drainage patterns, the texture of your soil, the rate at which water drains through it, and your growing conditions.
Stormwater Runoff
If you aren’t sure about the path your stormwater runoff currently takes, you might have to wait until the next heavy rain to carefully observe this. Take note of any areas in the yard with standing water as well as any spots that feel extra squishy. Snap some photos or draw a map to help you remember where excess water is going and which areas of your land may be eroding.
Soil Makeup & Infiltration
As for the makeup of your soil, if it is badly compacted or especially poor-draining—think heavy clay—you’ll need to remove and amend more of it than if it is already very light and sandy. Ideally, a combination of well-rotted compost, sand and topsoil is best.
Sometimes called the “soil infiltration rate,” the rate at which water drains through your soil is another critical piece of information to consider. A simple way to estimate this for your soil is to dig a hole that’s about 6 inches across and 8 to 12 inches deep. Fill the hole with water and wait until it has drained before moving on to the next step.
Once the hole is empty again, put a yardstick inside it and refill the hole with water. Make a note of the water level now and then again in an hour’s time. If at least 1⁄2 inch of water has drained, then this might be a suitable spot for your rain garden.
Sunlight
How much sunlight the area gets also matters. After all, this will influence the plants you’re able to choose for any bioswales and your rain garden.
Site Requirements
Finding the Slope
The spot you’re considering for your rain garden should be located at least 10 feet away from the foundation of your home. It should also have a slope of less than 12 percent. You can find an area’s percent of slope by placing two stakes at its highest and lowest points. Run a string from the base of the uphill stake to the downhill stake, making sure that the string is level where it attaches to the downhill stake. Measure the distance from the base of the downhill stake to the top of the now-level string. This is the change in the “rise.” Next, measure the distance between the two stakes. This is the “run.”
Make sure your rise and run are both expressed in the same units of measure. Divide the rise by the run and multiply the answer by 100. This is your percent of slope.
Finding the Depth
Knowing the slope of a potential rain garden location will help you determine how deep the final product needs to be. As a rule, rain gardens built on a slope of less than 4 percent should be just 3 to 5 inches deep at their deepest points. For slopes of 5 to 7 percent, you’ll need to dig down 6 or 7 inches. Rain gardens built on slopes between 8 and 12 percent should be about 8 inches deep at their deepest points.
Ultimately, the depth of your rain garden, along with the square footage of impermeable surface you have, will influence your rain garden’s finished size. For example, say you have 800 square feet of impermeable surface and your rain garden is going to be 6 inches at its deepest point. In this case, the rain garden should take up about 40 square feet. But, if your rain garden is just 3 inches deep, you’d need to double its footprint, making it 80 square feet instead.
Set Up Timing
Depending on your rain garden’s size and depth, its excavation and shaping could take several days. So could amending heavy soil with sand and compost. Plan to cover the area with a large tarp between work sessions. (Oh, and don’t forget to ask your local utilities to mark any underground lines before you begin your big dig!)
What Plants Grow in Bioswales and Rain Gardens?
Plants that perform best in bioswales and rain gardens are clumping, native grasses and sturdy, native perennial flowers with very deep roots.
Some common warm-season grasses that work well throughout much of the United States include:
sedges,
big bluestem, and
northern sea oats
river oats
Perennial flower options that can pull their weight in most rain gardens include:
swamp milkweed
bee balm
columbine
black-eyed Susan
joe-pye weed
queen of the prairie
cardinal flower
For best results, ask your county extension office or native plant society for rain garden plant recommendations to fit your specific microclimate. Also, it’s worth noting that some city and county governments do offer stormwater project grants for area residents looking to install their own bioswales and rain gardens. If one of your local agencies offers grants, you might be able to use one to help cover labor or plant costs.
This article about using rain gardens and bioswales to control rainwater originally appeared Hobby Farms magazine. Click here to subscribe.
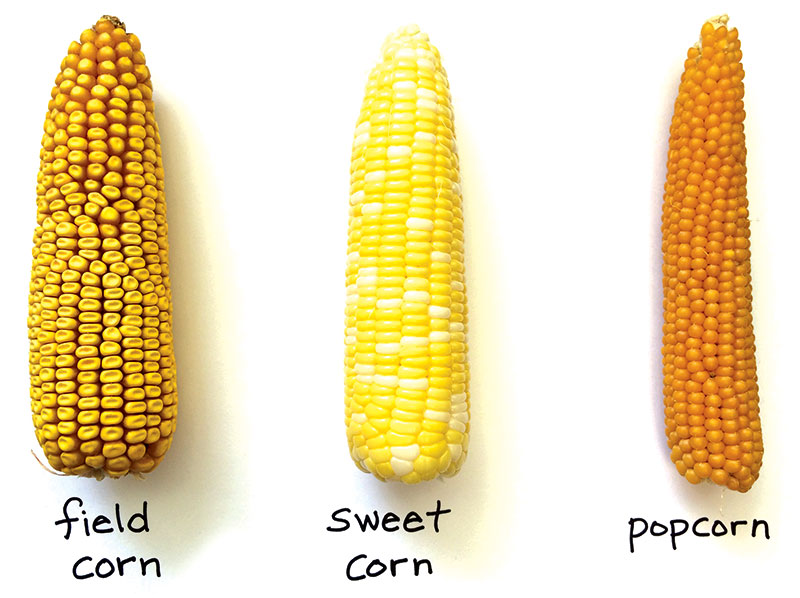
Popcorn is as American as apple pie. The bursting sound and wafting smell of salty, buttery, goodness can be found at stadiums, carnivals, homesteads, and most notably, movie theaters.
Archaeological and genetic evidence of the origin of popcorn throughout Central and South America, particularly Guatemala, Mexico and Peru, is extensive. On a recent excursion to Peru, I learned that the country has more than 55 varieties of corn. When I sampled the popcorn, each large flake’s sweet flavor and shape surprised me.
There are two main structures of popcorn: mushroom and butterfly. The 2-inch pieces I sampled are known as mushrooms for their consistent puffball form. Confectioners prefer this variety for its shelf life. In movie theaters, however, butterfly, aka snowflake, is the mainstay for its texture and mouthfeel.
Pop History
To learn more about the history of what might be the oldest snack food, I contacted Dolores Piperno, senior scientist emerita of the Smithsonian Tropical Research Institute and Smithsonian National Museum of Natural History.
“The wild ancestor of corn is a wild grass called teosinte [Zea mays ssp. parviglumis],” she says. “The earliest maize discovered so far was like a popcorn, and it turns out that teosinte grains can be popped.”
Because both grains have similar types of endosperm, both react to heat the same way.
“Scientists wondered for a long time how teosinte was used as a food by the earliest cultivators of corn, since its kernels were enclosed in the fruit case,” she says.
It appears teosinte was popped in order to be eaten. It wasn’t until later in its evolution that other types of maize, such as field, flint and sweet corn, were bred.
“Geneticists compare the DNA sequences of modern varieties of corn with related wild species that can still be found growing today and that could potentially be ancestral, and the proof is hard and firm,” Piperno says. “Also, importantly, within the past decade or so, geneticists are carrying out ancient DNA studies directly on remains of crops excavated from archaeological sites. These analyses have moved forward our understanding of how corn evolved through thousands of years of agriculture from teosinte.”
Pop Stars
Ethan and Natalie Pratt, ages 12 and 10, respectively, own Bubba-Bug Popcorn. Five years ago, they asked their mom if they could open a lemonade stand. She told them that lemonade stands don’t work on an empty country road. So these two inspiring entrepreneurs came up with the idea of selling popcorn. They chose and planted varieties, hand-picked each ear at harvest time, shelled the corn with an old hand-cranked sheller, and packaged it up and delivered it to customers. They’ve been growing their business ever since. Here is some planting advice from these young, but seasoned farmers.
Wait to plant until the soil temperature is above 50 degrees and there is no threat of frost. Be sure to plant into a seedbed of fine soil. This might require a couple of passes with the roto-tiller. Keep your rows narrow, and plant at a high population to encourage pollination.
We planted by hand for three years, tried to use our grandpa’s corn planter one year and finally purchased a vegetable seeder. We used that this year. Planting was so easy. It ensured even seed depth, spacing and soil coverage.
For harvest, wait until the popcorn is dry before picking. Picking too early can result in mold growing on your kernels. It should have a moisture content of 13 to 15 percent. We pick by hand and shuck the ears right in the field.
Find out more about the popcorning Pratt siblings at Illinois Farm Girl.
Popcorn Popularity
The popularity is like the act of popping itself: slow at first, with a few booms, followed by a firestorm of kernels exploding into delightful puffs of air and starch.
By the mid 1800s, it was a prevalent snack food because of the entertainment value of its popping process. In 1885, Charles Cretor invented the first steam-powered popcorn maker. This allowed vendors to sell the snack at outdoor sporting events, circuses and fairs, a large advantage over the potato chip, which needed to be made in small batches inside a kitchen. Street vendors took advantage of popcorn’s appealing aroma to boost sales. The only place popcorn wasn’t available? Inside movie theaters. Imagine an audience full of popcorn eaters, chomping away while watching a silent movie!
Baker Creek Heirloom Seeds
Most popcorn sold during this time was white because yellow corn wasn’t commercially grown and cost twice as much. However, popcorn vendors preferred yellow corn, which popped more, causing more volume for less seed. The yellow tint also gave the impression of a butter coating. The public started refusing the white variety at markets, requesting “movie popcorn.”
By 1930, nearly 90 million people every week went to the movies. Movie theater owners’ eyes glazed over with dollar signs, as patrons came to the theater with street popcorn in hand. The release of talkies and sound movies also persuaded owners to allow the crunchy snack into theaters.
At first, owners leased space to vendors in the foyer or on the street in front of the theater. By 1945, newer theaters contained dedicated areas for popcorn to be made and sold. At this time, more than half of the popcorn consumed in America was eaten at movie theaters.
Rhodora Collins/DeKalb County Farm Bureau
In 1946, engineer Percy Spencer conducted experiments at Raytheon Corp. with a magnetron. After discovering that a chocolate bar melted nearby, he experimented with other foods. When corn kernels were close, they popped, and the creation of microwave popcorn led to the invention of the microwave. The first commercial microwave measured 6 feet tall, weighed 750 pounds and cost $5,000 at the time (nearly $70,000 in 2017 currency). In the 1970s and ’80s, counter-sized microwaves became widely available.
Today, Americans consume 14 billion quarts of popped popcorn annually, or about 43 quarts per person. Seventy percent is eaten in homes, while 30 percent is eaten in places such as theaters, stadiums and schools.
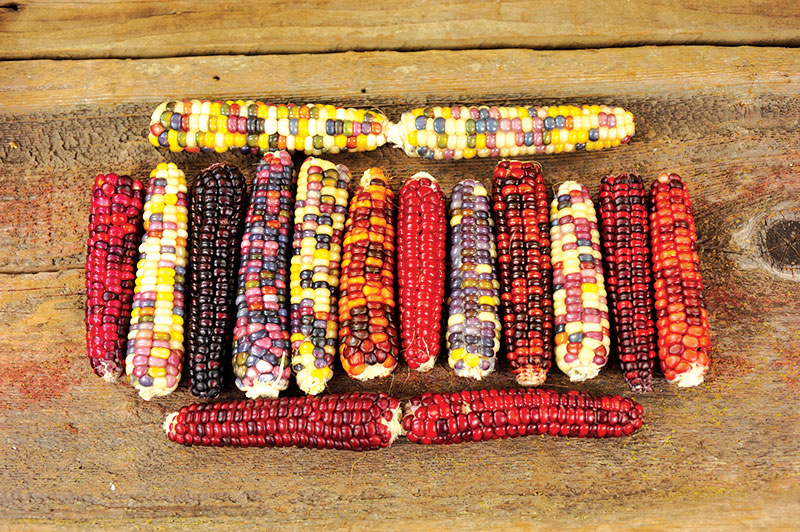
9 Varieties to Grow
Today, white popcorn accounts for 10 percent of commercially grown popcorn, with yellow being the most popular. Try these varieties to add a pop of color to your homestead.
1. Burro Mountain
This ancient white popcorn produces two to three, 4- to 6-inch-long ears per stalk. It was first found in a pottery container dated to be 600 to 1,000 years old in the Burro Mountains of Grant County, New Mexico.
2. Chapalote
This flint/popcorn may be the oldest corn variety grown in North America. Carbon dating shows that it could be 4,000 years old. Long, slim ears are filled with shining-amber to dark-brown kernels. It also has great drought and heat tolerance.
3. Cherokee Long Ear
This variety produces a beautiful blend of brightly colored long ears, 5 to 7 inches long; they are wonderful as fall decorations as well as popping.
4. Dakota Black
Dark reddish-black ears of corn are quite attractive for fall decorations or popping into delicious popcorn. This variety is easy to grow and does well in almost all growing climates.
5. Glass Gem
This variety of popcorn produces translucent multicolored kernels that shine like glass. The 3- to 8-inch ears are decorative but also edible and tasty. Sturdy plants reach 9 feet tall and throw numerous side-shoots where the season is long enough.
6. Indian Berries
Baker Creek Heirloom Seeds
These 4- to 5-foot plants yield as many as four multicolored ears each. The ears are as long as 5 inches and include shiny kernels in red, blue, purple, yellow and white. Ears are produced curiously low on the plants.
7. Mini Pink/Blue
These cute, 2- to 5-inch ears are independently indigo or mauve to rose pink. Plants can reach 6 to 7 feet and yield as many as four ears per stalk. When popped, the kernels have a nutty flavor.
8. Strawberry
This is a popular, cute variety whose little ears of corn look just like big strawberries. The 4-foot plants produce two to four ears each.
9. Smoke Signal Indian
This traditional Native American corn makes a stunning ornamental display and can be dried and popped for a tasty snack. Tall, sturdy plants create a natural trellis for climbing beans.
Other Seeds That Pop & Puff
While popcorn is certainly king, there’s a whole world of popped grains out there. Other grains you can try popping include:
Amaranth
Barley
Millet
Quinoa
Sorghum
Wheat Berries
Growing Advice
Ginger Grubb and her husband Bill began growing popcorn soon after they got married in 1972. They live on a heritage farm in south-central Iowa that has been in his family since 1874. “My father asked if he bought some good tasty seed he had found, would Bill plant it for him,” Ginger says. “We planted a couple of rows alongside the field corn, and we picked it by hand in the fall. The neighbors liked it so well that we planted a few more rows and then a couple of acres. In 2010, a friend of mine and I went into business selling popcorn to a few grocery stores. We were planting eight to 10 acres of popcorn.”
Today, Grubb’s Premium Popping Corn (www.grubbpopcorn.com) plants more than 40 acres.
Once you have selected a variety that is suited to your area, sow the seeds directly into the ground. Several short rows, similar to growing sweet corn, will ensure good pollination. Don’t plant sweet corn in the same area as popcorn as they will hybridize. Water, fertilize and weed regularly.
Angela N/Flickr
Harvest
“The key to having popcorn pop is the amount of water in the hull,” says Wendy Boersema Rappel, a spokesperson for the Popcorn Board. “Processors dry popcorn to about 131⁄2 percent moisture.”
Allow the cobs to dry in the field as long as possible. When picked, the kernels should be hard and the husks completely dry. Place the ears in mesh bags, and hang in a warm, dry, well-ventilated area. Once a week, try popping a few kernels. If the test kernels pop well and taste good, harvest the rest of the kernels. If the popcorn is tough or the popped kernels are jagged, they are too wet and need to dry longer.
“To get a good crop, we check the moisture levels in the fall before harvesting and pick when it is 141⁄2 percent or close to that,” Grubb says. “If it is too dry or too wet, then it doesn’t pop at all well.”
Jim the Photographer/Flickr
Storage
“Storage is important to keeping that moisture in, so keep popcorn in a sealed container, away from extreme heat sources,” Rappel says.
When stored properly, popcorn will retain its popping quality for several years. Make sure the area is rodent-proof. If stored popcorn doesn’t pop, it might be too dry. Add 1 tablespoon of water to a quart of popcorn. Shake until the popcorn has absorbed the water, and attempt a few trial runs.
People have always loved the taste and smell of popcorn,” Rappel says. “Today’s consumer also understands and appreciates the farm-to-table simplicity of popcorn, that it’s a healthy snack fitting current concerns [non-GMO, gluten-free, whole grain, naturally low in fat and calories].” It’s also inexpensive.
While Rappel doesn’t have a favorite variety, she likes to keep it simple using a stovetop with oil and a touch of superfine popcorn salt.
“When I make a treat, my popcorn usually contains melted peanut butter and chocolate,” she says. “Popcorn has been around for thousands of years. Its staying power has a lot to do with its great taste, but also the fact that it’s a bit magical.”
Advice for how to grow begonias from seed is simple: get started early. While prime seed-starting time is still weeks away for most parts of North America, there’s one plant that requires a bit more time to grow. Begonias are beautiful annuals that are both shade-loving and deer-resistant and they make a beautiful addition to almost any landscape. If you want to grow some of your own, you might be surprised to learn that, unlike most other annual flowers, mid to late January is the perfect time to start begonias from seed.
Why Start Begonias From Seed
Annual flowers are definitely not the most expensive plants at your local greenhouse, but if you grow (or sell) a lot of them, starting your own from seed can save you a ton of money. While starting marigolds, cosmos and salvias from seed is as simple as can be, when you start begonias from seed, it requires a bit more time and effort.
As with many other plants, starting begonias from seed, rather than buying transplants from a grower, means you’ll have a better varietal selection to choose from and you’ll get a lot more bang for your buck. Most commercial growers focus on growing just three or four popular types of begonias, but there are dozens of selections you can choose from when growing begonias from seed.
How to Grow Begonias From Seed: Four Steps
Begonia seeds are extremely tiny. In fact, each seed isn’t much bigger than a speck of dust. Handling these miniscule seeds can be difficult, though you can purchase pelleted seeds to make the job a bit easier. Add that to the fact that begonias take a very long time to germinate, and that’s probably why most folks shy away from starting them from seed. However, once you get the hang of starting begonias from seed, you’ll discover your efforts are well worth it.
1. Keep Things Sterile
Use new seedling trays or flats to plant begonias from seed. The plants are prone to developing fungal diseases, including damping off and botrytis, so new or disinfected seed trays are a must. You’ll also need new sterile potting soil that’s formulated specifically for seed starting.
2. Planting the Begonia Seeds
Once your seed trays are filled with sterile potting mix, it’s time to plant your begonia seeds. Begonias need light to germinate, so simply broadcast the seeds across the surface of the potting mix and press them against the surface of the soil with your fingertips or a flat piece of cardboard. Do not cover the seeds. Try to distribute them evenly across the soil, but it’s okay to have them spaced fairly closely. Begonias always need to be transplanted when they’re young, so if the seedlings end up too close, it’s no big deal; you’ll be separating them later anyway.
3. Watering the Newly Planted Seeds
When I start begonias from seed, I water the newly planted seeds in with a mister, rather than a hose nozzle, to make sure they stay in place and don’t float away.
4. Germination & Growth
Cover the seeding tray with a sheet of clear plastic or a humidity dome, and place the tray under grow lights that run for about 14-18 hours per day and stand about 2-3″ above the tops of the trays. Put heat mats under the trays to improve and speed germination. Some varieties of begonias can take weeks, if not months, to germinate, so don’t give up on them even if it seems to be taking forever. Make sure the seed flats don’t dry out; water them with a mister or spray bottle whenever necessary. Remove the plastic or humidity dome as soon as the seeds start to germinate. Raise the lights as the plants grow.
When Is the Best Time to Transplant Begonias Started From Seed?
As soon as your begonia seedlings develop their first true leaves, it’s time to transplant them. Use a spoon or spatula to lift a section of young plants up out of the tray and then use your fingers to gently tease them apart. Once separated, replant the begonia seedlings into nursery 4 packs or small plastic pots of new sterile potting soil.
Keep the pots or nursery packs well watered and continue to keep them under the grow lights for 14-18 hours per day. Once the danger of frost has passed, it’s time to begin to move your begonias outdoors for a few hours per day. Gradually increase the amount of time they spend outdoors over the course of two to three weeks until they are outdoors full time. This process of hardening off means a reduced chance of transplant shock and sunburn once your begonias are planted outdoors permanently.
Which Begonias Should You Start From Seed?
There are many types of begonias you can start from seed. Some types, like rex begonias, are easier to grow from root or leaf cuttings, but the experience of starting other types from seed is lots of fun. When trying to start begonias from seed for the first time, I recommend beginning with wax begonias, Dragon wing begonias, Angel wing begonias, cascading begonias or tuberous begonias.
This article about how to grow begonias from seed was written for Hobby Farms magazine. Click here to subscribe.
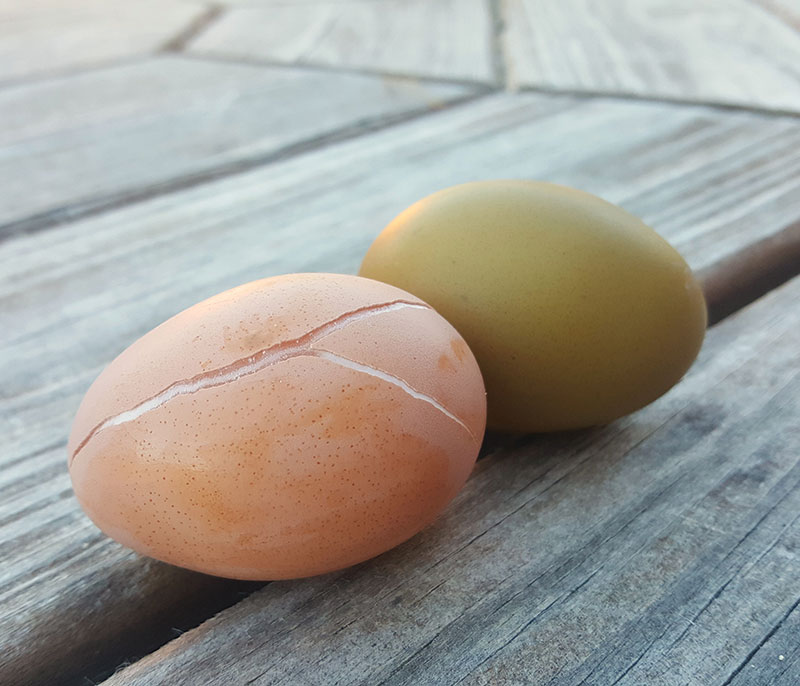
Frozen chicken eggs in winter can be tough on a chicken keeper and ultimately crack if left out. Chickens usually do just fine when the mercury falls and the cold weather sets in. Many breeds are cold-hardy and can live in an unheated coop all winter in temperatures below freezing.
Eggs, on the other hand, don’t fare as well. As the egg temperature drops, the yolk and white expand, pressing against the shell. Eventually, visible cracks appear in the shell or tiny hairline cracks occur that aren’t visible to the naked eye.
Can You Eat Frozen Chicken Eggs?
Although frozen chicken eggs are usually still fine to eat as long as the inner membrane hasn’t broken (just allow them to slowly defrost in the refrigerator), the texture can change a bit and you might find them a bit grainy. Put any frozen eggs you collect in a bowl to defrost (not in an egg carton), because if there are any hairline cracks you didn’t detect, as the egg defrosts, the egg white can seep out and make a mess.
However, if the eggshell has visibly cracked and the membrane is broken, it’s best to discard the egg. There’s too much chance that bacteria or other germs have touched the oozing whites and therefore contaminated the entire egg.
Even though bacteria grow more slowly at cold temperatures, freezing won’t kill all bacteria, so there is still a chance of contamination. A slightly cracked egg with an intact membrane is probably still safe to eat, but to err on the side of caution, I recommend cooking it well, and then feeding it to your chickens instead. There is no use taking any chances, and the birds will appreciate the treat.
Lamerie/Flickr
How Do I Store Chicken Eggs in the Winter?
Normally, farm-fresh eggs can be left out at room temperature for a few weeks on the kitchen counter and still be fine to eat because the bloom or natural coating on the eggshell keeps out air and bacteria. However, if you collect eggs that are cold to the touch, condensation will probably form on the shells once they start to warm up, which can make the properties of the bloom ineffective, so it’s good practice to refrigerate your eggs in the winter.
You don’t need to wash them until you’re ready to use them. One nice thing about winter: All the mud and chicken manure is usually frozen, so eggs generally stay cleaner.
Five Ways to Prevent Frozen Chicken Eggs
Preventing frozen chicken eggs can be a challenge in the winter if you live in a cold climate. Unless you stay home and can check your nesting boxes many times throughout the day, you’ll find frozen eggs. Although some chicken keepers add artificial light in coops to nudge their chickens to continue laying through the winter, I prefer not to for several reasons—partly because I believe chickens need that natural break that their bodies signal them to take at the onset of shorter days. That way, egg production naturally slows considerably, and my chances of having eggs being laid, much less frozen, is greatly reduced.
However, new layers will continue to lay through their first winter without added light, and even older hens will lay the occasional egg, so it’s best to be prepared in case you have hens laying through the cold winter months. These are simple things you can do to mitigate the problem of frozen eggs.
1. Check the Coop Often
Collect your eggs from the coop as often as possible during the day. Depending on the temperature where you live, that might mean every couple of hours. If you work outside the house all day, enlist a neighbor who might be home to check for eggs several times a day. Egg collecting is an easy job for kids, so if your children leave for school after you leave for work or get home from school before you arrive home, be sure they check the boxes and collect any eggs they find.
Lisa Steele
2. Consider the Nesting Box Location
If you live in a cold climate and are building or buying a new coop, think about the location of your coop. Position your coop in full sun with the nesting boxes facing east. This way, the boxes are warmed from the rays of the rising sun early each morning. Interior boxes, meaning those enclosed within the coop, will stay warmer than those attached to the outside of the coop.
3. Insulate the Nesting Boxes
An egg is almost 100 degrees when it emerges from the hen, so it will take several hours to cool sufficiently to freeze. The warmer you keep the nesting boxes, the longer it will take to cool.
Adding insulation to your boxes is a great idea, but be sure the insulation is protected so your chickens can’t peck at it and eat it. If that’s not an option, line the sides of the boxes with a few layers of cardboard cut to size and fill each box with a nice thick layer of straw.
If you normally use shavings in your nesting boxes, consider switching to straw for the winter. Straw is hollow, and those hollow shafts will retain the warmth from the hen’s body after she leaves the nest, keeping the boxes warmer longer. If your nesting boxes are the type that jut out from the outside wall of the coop, consider wrapping them in dark plastic tarps and stacking hay or straw bales around them to further insulate them.
4. Add Curtains
Hanging curtains across the front of the nesting boxes can also help keep the boxes warmer longer and prevent frozen chicken eggs. Use an old wool blanket or sweater, a piece of burlap or even empty feedbags for maximum heat retention. It doesn’t have to be fancy; you can simply staple a length of fabric to the top of each box, leaving a small space open for your chickens to enter and exit.
5. Don’t Discourage a Broody Hen
Chickens don’t often go broody in the winter, but if you find yourself with a broody hen, consider letting her sit. She’ll keep the eggs warm for you until you can collect them.
Lisa Steele
5 Frozen Chicken Egg Handling Tips
1. If an egg is cold to the touch, refrigerate it and then rinse it in warm water before using.
2. If an egg is frozen but has not cracked, go ahead and refrigerate it. It should be perfectly fine to eat after it defrosts. Again, remember to rinse it before cooking with it.
3. If the egg is cracked but the membrane seems intact and the egg isn’t visibly dirty, you can still use it, but cook it right away. Be sure to scramble and cook it well – no soft-boiled or eggs sunny-side up please!
4. If the egg is cracked, the membrane broken and the white oozing out, toss the egg or cook it right away and feed it to your chickens or dog. Their stomachs and digestive tracts are better able to handle bacteria than we as humans are.
5. If the egg is cracked, oozing and dirty, then discard it. There is no sense in taking unnecessary chances.
Is Supplemental Heat a Good Idea?
Heating your chicken coop to prevent frozen chicken eggs might seem like the most logical way to keep your chickens warm and prevent eggs from freezing. However, think twice before installing a heat lamp in the coop. Each winter, chicken coops, barns and even homes burn down because heat lamps start fires in coops. Lamps can accidentally fall or be knocked down, and bulbs can shatter. The combination of electricity, a hot bulb, dry coop litter and chickens is a volatile mix that too often leads to property damage and death. Even a regular light bulb hung over nesting boxes will usually generate enough heat to prevent eggs from freezing, but that can also be a fire hazard and a risk I’m not sure is worth taking.
A safer way to heat your coop is to use a radiant panel heater, but I don’t recommend that either. The basic danger of heating your coop? If you lose power, your chickens haven’t been allowed to slowly become accustomed to the falling temperatures, so they will face extreme cold and be unprepared for it. Like most animals that live outside, they handle cold temperatures by being exposed to them gradually.
Think About Adding Ducks to Your Flock
I do have one last suggestion if frozen chicken eggs are a problem: Think about adding some ducks to your flock. Ducks lay eggs during the hour or so before dawn. The beauty of this is that you can then normally collect the eggs when you open up the coop and feed your flock before heading off to work, thereby not having to worry about eggs being left outside all day.
Ducks lay eggs on the coop floor in the corner and like to cover them with straw to hide them. Of course, this helps keep their eggs warmer longer. Duck eggs are also about 30 percent larger than chicken eggs, so it takes them longer to cool down. In all my years raising chickens and ducks, I have found a few frozen chicken eggs each winter but never a frozen duck egg.
Ducks and chickens can coexist peacefully in the coop, eat the same feed and share the same run. Ducks also tend to continue laying through the winter without added light in the coop. So think about expanding your flock to include a few ducks.
Even if ducks aren’t in the cards for you, instead of heating your coop, consider trying a few of the other methods mentioned in this article to keep your eggs from freezing. Eggs do become a precious commodity in the winter for most of us chicken keepers who don’t use artificial lighting. As production drops off considerably, no one wants any eggs to go to waste, so it’s important to prevent the few eggs your chickens lay in the cold months from freezing.
This article about preventing frozen chicken eggs was written for Chickens magazine. Click here to subscribe.
Can chickens eat wild bird food? In the past decade, there have been a handful of times that I’ve looked out my kitchen window, expecting to see nuthatches and chickadees at the wild-bird feeders hanging on my deck, only to find one of my hens precariously perched on the deck rail, happily gobbling up bird seed. I was amused at first. But the hilarity curtailed quickly when I realized how much birdseed my Orpington oinkers cost me.
I eventually switched to squirrel-proof—and poultry-proof—feeders, which solved that situation. Still, whenever I haul out the sacks of feed to refill the wild-bird feeders, my chickens suddenly dash toward the deck, hoping to get some seeds scattered their way.
I shared this story with an old friend not too long ago. Karen doesn’t keep chickens, but all colors, shapes and sizes of wild bird feeders literally bedazzle her deck. She smiled as she visualized my Buff Orpington hens gorging themselves at my tube feeder. She then asked me, “Well, why not?”
Can Chickens Be Fed Wild Bird Food Exclusively?
Why not? I schooled my expression and changed the subject. But once I was home I practically ranted at my husband, Jae, about this exchange.
Feeding chickens bird seed, I remarked. Can you imagine? Jae just looked at me and replied, “Well, why not? They’re already eating it.”
When he saw my bewildered expression, he continued that surely it would be easier to just buy more sunflower and safflower seeds than to also buy starter, grower and layer rations.
Two thoughts sprang to my mind.
One, my husband obviously was not reading all of my articles. Two, if Jae thought feeding our chickens a diet of bird seed was acceptable, then there surely must be other flock owners who might harbor the same mistaken notion.
Can Chickens Eat Wild Bird Food Bottom Line:
Can chickens eat wild bird food? In addition to not having the right nutrients, wild bird feed is also high in fat and calories, neither of which are good for domestic chickens. A handful of sunflower seeds tossed to a flock every now and then as a treat is fine. Feeding chickens nothing but wild bird feed can start them down a dangerous path of bad health … or worse.
3 Reasons Chickens Should Not Eat Wild Bird Food Exclusively
1. Cost Effectiveness
Depending on the manufacturer and the type of feed — starter, grower, or layer rations — a 50-pound sack of chicken feed costs approximately $17 (at least it does here in Michigan). A 40-pound bag of black-oil sunflower seed, however, costs $27. That may not seem like a huge difference, but it adds up. A 200-pound poultry feed purchase comes out to $68, while a 200-pound sunflower seed purchase totals $135. The wild-bird feed prices out at twice the cost of the poultry feed.
2. Biosecurity Issues
Migratory birds can carry and transmit such infectious bird diseases as Highly Pathogenic Avian Influenza (HPAI) and exotic Newcastle disease (END) to backyard flocks. Research conducted by a team including Sonia Hernandez (professor of wildlife disease at the University of Georgia’s College of Veterinary Medicine) detected 14 wild bird species—all considered at high risk for pathogen transmission—regularly entering backyard chicken coops to share the food and water meant for the flocks and a total of 72 species intermingling with chickens.
One can only assume that the contamination rate would only increase if backyard flocks were fed a diet intended for wild birds.
Poultry feed is scientifically formulated to provide chickens with the nutrition they need for proper growth and development at each stage of their life. If you’re wondering can chickens eat wild bird food, without the right balance of vitamins, minerals and nutrients, poultry can fail to thrive, suffer from deficiency-related conditions, and become incapacitated if affected severely enough.
It is crucial to provide chickens with the right diet to keep them healthy. It is for this same reason that our flocks cannot be fed scratch grains or any other supplement as their main nutritional source.
This story about can chickens eat wild bird food was written for Chickens magazine and is regularly updated for accuracy. Click here to subscribe.
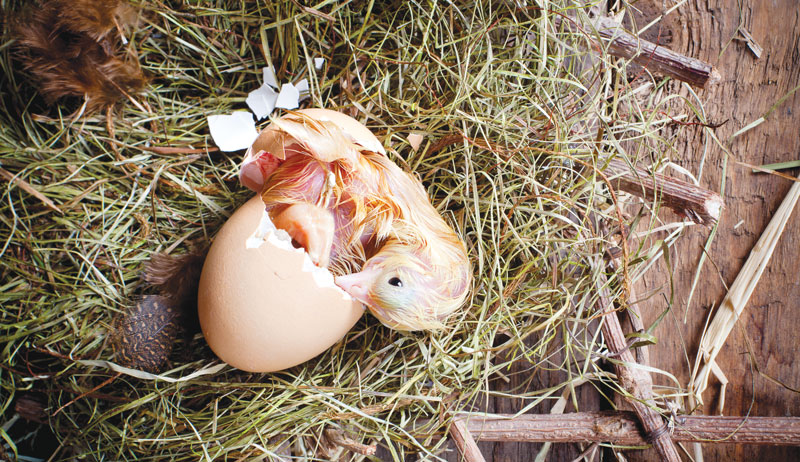
Do chickens have belly buttons? It’s a common beginner question. Even though a chick hatches from an egg instead of being born from its mother’s womb, it still has a “belly button.” However, the navel on a chick is more difficult to find, especially on a healthy newborn.
A poorly closed navel is a clear sign there’s something wrong with the chick. And it may indicate a problem with your incubator or incubation techniques.
A chick’s navel is one of the most vulnerable places for bacterial and fungal infections. So it’s important to understand what a chick’s belly button tells you.
How Is a Chicken Belly Button Formed?
Do chickens have belly buttons? A belly button is basically a scar left behind from the umbilical cord. In unborn human babies, the umbilical cord connects the baby’s belly to the mother’s placenta to provide the blood supply the baby needs to survive.
Because a chick develops inside an egg instead, do chickens have belly buttons? Yes, the umbilical cord is attached to the yolk sac where it gets much-needed nutrition. A few days before hatching, the chick absorbs the small intestine and the remaining yolk sac inside its body. This leaves behind a navel at the entrance.
“From day 16 to day 19, the small intestine, or umbilical loop, retracts into the growing body wall,” says Eric Gingerich, doctor of veterinary medicine and technical poultry specialist with Diamond V, a global animal nutrition and health company.
“Then, the yolk sac is drawn into the body cavity, which is directly connected to the small intestines through the yolk stalk. By day 20, the yolk sac should be completely inside the body and the navel should be fully closed by hatching. A ringlike muscle called the umbilicus becomes the future navel.”
Maurice Pitesky, doctor of veterinary medicine with the UC Davis School of Veterinary Medicine and Chickens Poultry Science columnist, adds that chicks “get their calories and nutrients from the yolk sac, which continues to serve as their main source of nutrition for the first two or three days of life.”
Anneka/Shutterstock
Do Chickens Have Belly Buttons? Finding the Navel
Do chickens have belly buttons? Yes. A well-closed belly button is a good sign of health in a newborn chick. And it’s usually well hidden beneath its soft down. Even if you hold the chick and run your finger over it, you could still miss the navel.
But it’s there.
“In a healthy chick, it’s very hard to find, because it’s smooth and dry, but it’s just below the tail. In a poorly hatched chick, it shows and can be an issue,” says Shelley McBride Lynch, who raises laying hens and Cornish cross chickens, among other things, as the owner of 3F’s Feathers-n-Fur Farm. She’s also the owner of Oklahoma’s first and only state-inspected poultry slaughter and processing establishment, 3F’s Poultry and Rabbit Processing.
Gingerich further explains that a normal navel appears as a dry, sealed hole in the body wall. It’s located just below the anus of the chick under the feathers. Blowing on the underside of the chick will reveal its navel.
“Hold the chick where you’re looking at its ‘business end’ and the belly button is about two fingers south of the cloaca,” Pitesky says. “You’ll see a little nubbin that should be clean and closed. If it’s red or hot, it implies there’s an infection of the navel.”
Hatching your own eggs requires ideal incubation conditions to ensure healthy chicks. When conditions are less than satisfactory, your chicks may suffer. One of the signs that something went wrong is a poorly formed belly button.
Depending on the navel problem, external issues affecting your chick could be a factor. However, different incubation issues are often the cause.
“When the naval doesn’t close properly, it’s usually a sign that something went wrong during incubation, especially if there’s an infection,” Pitesky says. “You must maintain as sterile an environment as possible and have really clean incubators. Poor hygiene in the incubator and in the brooding area cause most navel abnormalities.”
Incubation Issues
Gingerich points out that various problems during incubation can also cause navel issues in a chick. He stresses that proper temperature and humidity conditions throughout incubation are needed, so the synchronization of the retraction of the yolk sac and intestines by day 20 can take place.
“Abnormal navels can result if the temperature during incubation is too high after day 16,” he says. “Or if the temperature and humidity conditions resulted in too little or too much moisture loss, which may be caused by low or excessively high ventilation rates. Also, trying to hatch eggs you’ve stored longer than seven days or from breeder birds older than 50 weeks may result in more issues with bad navels.”
High temps can make a chick hatch too fast, leaving part of the yolk sac out when the hole closes.
“Low temps can make a chick small and weak and unable to suck the yolk residues up,” Lynch says. “If ventilation keeps too much humidity inside, it could make the birds full of water, leaving no room for the final taking up of the yolk. A long or short hatching period can also affect the absorption rate and naval closure problems could occur. Trying to hatch different ages of eggs at the same time can also lead to problems with belly button closure.”
Signs of a Bad Belly
According to Pitesky, a well-formed belly button should be clean and fully closed and never be red, hot to the touch, or smelly or have anything coming out of it. If you notice wet, sticky down, it’s likely a sign of a leaky, unhealed navel.
Discolored navels and unabsorbed yolk sacs may also be a sign of omphalitis, also known as yolk sac infection.
A chick with minor navel problems may survive. But they may grow more slowly or have lower weight if bred for slaughter. More severe naval issues could lead to death, often occurring shortly after hatching.
“Wet, unhealed navels can lead to infections. They serve as an entry point for bacteria,” Gingerich says. “Also, abnormal navel closures mean the incubation conditions weren’t correct and poorer performance of the chick can be expected.”
4 Signs to Watch For with a Chicken Belly Button
1. Black buttons or bruised navels from too low or too high temperatures in the hatcher after transfer
2. String navels from excessive cooling caused by low temperatures after transfer or spraying hatch eggs after transfer
3. Open or unhealed navels due to incubation temperatures outside the normal range
4. Infected navels from poor sanitation of the hatch trays or use of floor or dirty nest eggs for hatching
TEA OOR/Shutterstock
Care for Common Chicken Belly Button Issues
For some navel issues, it’s generally advised that you don’t do anything and let nature take its course. A common issue that’s generally okay to ignore is a dry navel. Even rough, dark navels are less risky than wet navels.
In these cases, the navel may simply have dried remains of the umbilical cord on it. It shouldn’t cause health issues if it remains dry.
“As long as the navel is closed and not wet, you shouldn’t do anything,” Gingerich says. “Even if the chick has an ‘outie’ belly button, as long as the navel isn’t bleeding or wet, do nothing.”
Pitesky agrees that you shouldn’t be as concerned with a dry navel. Clean and dry is what you want—not hot, not red, not inflamed, not wet. “A scab should form,” he says. “Scabs do better in dry conditions, instead of moist, as far as preventing infections.”
On the flip side, if a chick has a wet, leaking belly button, it’s probably not properly closed and is basically an open wound. This wound can allow bacteria to enter a very sensitive part of the chick’s body cavity, where internal organs and the rest of the yolk sac sits.
This area provides an ideal place for bacteria to breed. Infection could cause the chick to die within the first week.
“Treat it just like a wound and keep it from becoming infected,” Lynch says. “Use creams for fungal and bacterial infections and keep it clean.”
“Be sure to provide a clean, dry brooding environment,” Gingerich says. “And sanitize the navel with alcohol and iodine disinfectant solution.”
Should I Leave or Remove Pieces of the Umbilical Cord?
There is some debate on what to do if a piece of the umbilical cord is still attached to your chick. Generally, this isn’t a sign there’s something wrong with the chick. Many experts advise leaving it alone.
However, it’s possible your chick will be at a higher risk of developing an infection. Lynch sides with those who advise leaving it alone. He says it should harmlessly fall off on its own in time.
Pitesky adds that not only should you leave it alone and wait for it to fall off, but you should never pull it. “If you pull on the umbilical cord, you could pull the intestines out, causing a hernia,” he says. “If you try to push the intestines back in, you could cause strangulation of the intestinal loop and kill the chick.”
“This is called a string navel and you can remove it safely by clipping it with scissors,” Gingerich says. “Do not pull it out! Pulling out the remnant tissue may open the navel allowing an entry for bacteria.
“String navels are caused by low temperatures during the hatch process leading to a slowing of the retraction of the yolk sac. This means that the naval was open longer than normal during hatch and exposed to a relatively higher bacteria level than a normal hatching chick. Chicks with string navels should be considered at risk for omphalitis.”
Poorly closed belly buttons affect chick quality and may cause higher mortality rates. If you’ve noticed an escalating number of naval problems, thoroughly analyze your incubation techniques and the cleanliness of your incubator to pinpoint potential problems in your incubation program that could put your future chicks at risk.
12 Ideal Incubation Tips
Even chicks hatched from eggs incubated under the best conditions may still have poor navels. But it’s less likely. Poorly healed navels can be a definite sign that conditions in your incubation program aren’t ideal.
Try these 12 tips to improve your program to promote better navel quality and healthier chicks.
1. Use only fresh, fertile eggs laid at approximately the same time by breeder birds younger than 50 weeks old.
2. Select eggs that are normal in color, size, shape and shell texture.
3. Ensure the incubator is placed in an area free from drafts, that’s not too close to heaters or heating ducts or in direct sunlight.
4. Always thoroughly clean your incubator between every hatch and ensure it’s appropriately calibrated for temperature and humidity control before setting any eggs.
5. Operate your incubator for several hours before placing eggs inside to ensure temperature and humidity are stabilized.
6. Maximize yolk sac utilization by avoiding temperatures that are too low or too high in the setter, where eggs are turned every hour for the first 18 days of incubation.
7. Optimize hatcher ventilation regarding relative humidity and carbon dioxide.
8. Avoid high temperatures in the hatcher, which can make the navel close too fast before full absorption of the yolk sac.
9. Adjust the rate of weight loss during incubation if you notice poorly closed navels combined with full bellies.
10. Shoot for a narrow hatching window by promoting appropriate preheating and uniform incubation conditions.
11. Avoid exposing hatching eggs to fluctuating temperatures or rapid temperature changes.
12. Immediately remove any moldy, cracked or leaking eggs to prevent losing your entire hatch.
This article about do chickens have belly buttons originally appeared in Chickens magazine. Click here to subscribe.
Garden ideas can be like weeds; they keep popping up! Try these tips using the farmers market as a guide to help focus your attention as you plan your garden.
What is cheap and easy to find at the farmers market?
Zucchini, canning tomatoes, slicing cucumbers, peppers, radishes, the ubiquitous yellow summer squash and even melons are all a dime a dozen in peak season. Make friends with your farmer and show up at the end of the market—you’ll probably get a deal. Ask your farmer if they have “seconds,” which are lower quality but perfectly good for eating and preserving in bulk. You may want to skip past growing these vegetables or only plant a small amount since they will likely be abundant throughout the season.
What is more economical for you to grow yourself?
Think long-term growing versus short-term growing garden ideas. Broccoli, cauliflower, celery and leeks will take a very long time to grow and will use up space in your small garden for little harvest yield. On the other hand, fresh herbs, lettuce or other micro-greens, peas, and cherry tomatoes all do well in small-scale gardens. They produce several harvests per crop and you can harvest the amount you want whenever you need. Zucchini flowers are another pricey purchase that you can grow yourself and are best when harvested fresh.
What can’t you find at market?
A gardener’s secret treat is a freshly picked okra pod eaten raw. It’s delicious, and best when the pod is much smaller than the typical size sold at the farmers market. Try planting a few stalks for this special (and very gut-healthy) treat. Ground cherries, stinging nettle and tulsi basil are on my personal list of hard-to-find items to grow.
What is beneficial for your garden?
While the farmers market is for groceries, your garden isn’t just about growing food. You may want to grow plants that attract beneficial insects and encourage biodiversity and beauty in your garden, such as alyssum, fennel, hairy vetch and others.
So be strategic in the coming growing season. You might not have a lot of land to grow on and lots of garden ideas, but you can surely maximize what you have while accentuating your diet at the same time.
This article about garden ideas from the farmers market was written for Hobby Farms magazine. Click here to subscribe.