How to make deviled eggs is popular at Easter to use up dyed eggs and year-round. Here’s how to make this yummy, classic recipe.
Ingredients
6 large eggs, hard-boiled
3 T. mayonnaise
1 tsp. sugar
1/2 tsp. salt
1 tsp. Dijon-style mustard
1 tsp. wine vinegar
dash pepper
1 to 3 T. chopped chives, to taste
paprika
Preparation
Place eggs in enough cold water to cover completely. Bring to a rolling boil over high heat, then reduce heat to medium-low and cook for 12 minutes. Drain and cover with cold water, replacing with more cold water after five minutes. When completely cool, carefully remove shells from eggs. Halve eggs lengthwise with a sharp, lightly oiled knife. Leaving whites intact, remove yolks and place in a medium bowl.
Mash the yolks with a fork and add mayonnaise, sugar, salt, mustard, vinegar and pepper. Mix together well. Add chives (optional) or set the chives aside for garnish.
The prettiest deviled eggs are made with the filling piped into the egg-white halves, but you can also spoon it in. Carefully pipe or spoon the mixture into the egg whites, mounding it slightly. Sprinkle the top with paprika and garnish with chives. Chill before serving.
Makes 12 servings.
Variations are the perfect way to personalize deviled eggs for any occasion and taste. You can replace the mayo with any flavor of creamy salad dressing, sour cream or even horseradish sauce. You can add different herbs, shredded cheeses or meats, particularly seafood, such as crabmeat or minced shrimp. Finely diced veggies also make a fun variation on the standard deviled egg. For extra spice, use finely diced hot peppers with a bit of chili powder, and garnish with a sliced olive or cilantro. The possibilities are endless.
This story about how to make deviled eggs was written for Hobby Farms magazine online. Click here to subscribe.
Dyeing Easter eggs with natural dye sources from the pantry and root cellar results in eggs that are beautiful in their earthiness and charm and peace of mind that the eggs are safe to eat.
The patterns for dyeing Easter eggs presented here were created with natural dyes and using a resist print using herb leaves, rubber bands and wax.
Dyeing Easter Eggs Materials For Different Colors
Red cabbage: blue
Onion skins: orange or deep rust
Beets: pink
Coffee: beige
Turmeric: yellow
Paprika: muddy rose
Other Materials
1 teaspoon white vinegar per dye bath to help set the color
soy wax
various-sized craft brushes
small tin for melting wax
rubber bands (various widths)
fresh herbs
tulle
string
Step 1: Cook the Eggs
Place the eggs in a single layer in a large pot. Cover with cool water by 1 inch, and bring to a rolling boil.
Turn off the heat and leave covered for 12 minutes.
Drain the water and fill the pot with cold water to cool the eggs as quickly as possible. When cool, refrigerate until ready to dye.
Step 2: Make the Dye Baths
Cabbage, Onion Skins & Beets
Thinly slice red cabbage, crush onion skins and grate beets.
Place one cup of your chosen ingredient with one cup of water in a medium saucepan. Do this with each ingredient separately to make three separate natural dyes.
Bring to a boil, cover, lower the heat, and simmer for 30 minutes. Allow to cool in the pot.
Strain into a glass, pressing on the material to extract as much dye as possible. Add one teaspoon of white vinegar to each of your natural dyes. Cover and refrigerate.
Coffee
Make a very strong cup of coffee. Cool. Add one teaspoon of white vinegar. Cover and refrigerate.
Turmeric & Paprika
Mix one tablespoon of ground turmeric or paprika with one cup of boiling water. Stir to saturate the powder. Let steep for 30 minutes and strain through a fine mesh strainer. Add one teaspoon of white vinegar to each dye bath. Cover and refrigerate.
Step 3: Gather Resist Materials
Wax
Soy wax is available at the craft store. Beeswax is also a good option because it melts at a lower temperature and is easier to remove from the egg.
Melt in a small tin. Aluminum mini pie tins and washed-out tunas are perfect. Set the tin in a skillet of simmering water, creating a double boiler to melt the wax into liquid form. Stay close, as you don’t want to overheat it.
Use small craft brushes to make lines, circles and dots on both white eggs and eggs that have already been dyed. Applying wax will preserve the color you cover.
You can repeat the waxing and coloring to produce several colors on an egg, going from light to dark to make a checkered egg using first white natural egg, then turmeric, then cabbage, then onion skin. (Be careful because the turmeric yellow can get a bit lost in the process.)
When the wax is cool, lower the egg into the dye bath. Cover and refrigerate for two to 24 hours. The longer the soak, the darker the color.
When the egg has achieved the color you desire, chip off as much wax as you can with a fingernail, then rinse under hot tap water, rubbing with your hands to remove the remaining wax.
Rubber Bands
Stretch the rubber bands around the eggs in various positions. Lower them into the dye bath and let them soak, covered and refrigerated, long enough to achieve the desired color. Pat dry on paper towels, then remove the bands to reveal the pattern.
Herbs
Cut fresh sprigs of herb leaves (parsley, thyme and rosemary were used here) and lay them on an 8-inch square of tulle. Lay the egg on top and gather up the sides so the herbs are in close contact with the egg. Twist until tight, and tie with a string.
Lower into the dye bath and let sit in the refrigerator for several hours to get a rich color. Remove the netting and herbs, pat dry on paper towels and admire.
Step 4: Eat Your Eggs
To eat the resulting eggs, be sure to refrigerate them at all stages and not keep them out for more than a few minutes while making the patterns.
If you are not patterning your eggs, you can cook them directly in the dye bath.
Display your dyed Easter eggs in a basket or wooden bowl on the breakfast table and enjoy with your meal, or use them to make recipes such as deviled eggs.
PREMIER SPONSOR: Home Fresh® Poultry Feeds (Kent Nutrition Group)
Hear about Hillarie’s upbringing visiting her family members’ original homesteads in South Dakota and how her life came full circle, back to the land herself on Whidbey Island, in Washington. She talks about how she and her husband are balancing their differing interests in landscaping versus gardening on their property, ultimately arriving at a food forest approach.
Learn about Heavy Nettle Collective, a diverse group of farmers, creatives and healers who are growing food, producing local events and building community together. This group has formed organically and changes in response to the needs of the people coming together — having grown from 5 to 20 — and they are slowly bringing the group into a more formal structure.
While everyone contributes their own strengths to the collective, some of Hillarie’s gifts are facilitating community and wellness. Since launching her wellness experiences through an REI business incubator program, Hillarie has been offering nature immersion, movement and breathwork to reconnect people to themselves and the world around them.
Hillarie offers a thoughtful definition of the concept of community and illustrates how that looks in her own life. Get her best advice for how to actually build the community that so many people talk about wanting.
Easter dessert recipes can be filled with all the cuteness of live animals without all the fuss and long-term care. Here are four options that are sure to please.
1. Chocolate Easter Chicks and Bunnies
Sure you can buy chocolate Easter chicks and bunnies, but it’s more fun and can be more healthy to make them yourself. All you need is a silicone or plastic mold shaped like chicks or bunnies and some melted chocolate. Pour the melted chocolate into the mold and let it harden in the fridge. If you use this recipe, the candy will start to soften at room temperature because of the coconut oil, but it is a much healthier option.
2. Marshmallow Easter Chicks
Making your own marshmallows is one of the easiest sweet hacks ever, better even if you make strawberry marshmallows. To make marshmallow chicks, use a chick-shaped cookie cutter to cut out shapes once your marshmallows have been set. Homemade marshmallows can be stickier than commercial types, so dust your cookie cutter with coconut flour, homemade powdered sugar or Fair Trade cocoa before you plunge it into your marshmallow canvas. Be sure to use a sharp, stainless-steel cutter, as well. If you can only find plastic, depress the cutter firmly before you pull it away. After they’re cut, roll your marshmallow chicks in coconut flour or flakes, cocoa, powdered sugar or cinnamon. Let this yummy Easter dessert recipe air-dry overnight.
Okay, there’s probably no way to make these cake pops healthy, but they are cute. If you’re torn between the adorableness of a live baby bunny and these, I say make these. You can get the live bunny when you have all the equipment you need and your child is prepared to care for it. A good book on raising rabbits would be the perfect gift to go along with these cake pops.
4. Soaked-Flour Easter Biscuits
Despite all the sugary Easter dessert recipes, one of my favorite treats is a humble sweet biscuit. Presoaking the flour makes the grains easier to digest. We cut the biscuits into chicks and drizzled with a raw honey and cinnamon glaze. Sometimes our chicks end up looking more like squashed turkeys, but they help us celebrate this special time of year.
This recipe is prepared over the course of two days, but don’t be intimidated. It’s very simple and will make your finished product so much easier on your gut.
Ingredients
Group 1
3½ cups flour
1 tsp. sea salt
1½ cups whole milk
2 T. apple cider vinegar
Group 2
3 cups flour
1¼ cups of water
2 T. apple cider vinegar or whey
1/4 tsp. yeast
Group 3
1/4 cup sugar or sucanat
1 tsp. sea salt
2 T. butter
2 tsp. yeast
2 cups raisins, sultanas, currants or cacao nibs (optional)
Preparation
Mix all ingredients in Group 1 together until well combined. Cover and let sit on your counter overnight.
Mix all ingredients in Group 2 in a mixer for 5 minutes. Let it rest to soak up some of the moisture, then mix for 1 more minute. Cover and let sit on your counter overnight.
The next day, mix the ingredients in Group 3. The optional ingredients listed will make your biscuit taste more like a Hot Cross Bun, a traditional treat this time of year. You can also increase the sugar by 1/4 cup if you want a sweeter biscuit.
Combine all three groups of batter in a mixer, and knead for 8 to 10 minutes. The dough will be wet, but it should clear the sides of your bowl. Add a bit more flour if the dough is too wet, but don’t add too much or you’ll end up with bricks instead of biscuits. Roll dough into a ball, cover, and and let it rise for 1½ hours or until doubled in size.
The dough will still be sticky after rising, so wet your hands to begin shaping the dough. Experiment with different ways to form chicks, but remember that this dough will rise a bit more as it bakes and your chick will double in size.
After you’ve formed your shapes, add raisins for eyes and cacao nibs or slivered almonds for beaks. Bake at 350 degrees F for 35 minutes or until golden brown.
While the biscuits are baking, make the cinnamon-honey glaze. Heat 1 cup of raw honey to just below 110 degrees. Mix with 1 to 3 tablespoons cinnamon. Immediately after you remove the biscuits from the oven, drizzle the glaze overtop. Another option is to top the biscuits with homemade frosting, such as our vanilla honey spread.
What special treats will you be serving up this Easter?
This article about Easter dessert recipes was written for Hobby Farms magazine online. Click here to subscribe.
Easter kulich or Pascha bread is a rich egg bread reminiscent of challah and panettone. Kulich is made by Russian, Ukrainian and other Slavic families every spring to celebrate Easter. As a young missionary in Russia, I was fortunate enough to have my Ukrainian missionary companion, Aelita Zaetz, make me kulich for breakfast. Alas, as a mom, now I’m in charge of making it.
It’s been a fun kitchen project every spring for the kids and me to pop into the kitchen and begin the process of making our sweet bread for the Easter celebration. This recipe is more involved than any other yeast bread I’ve made because it has three—yes, three!—rise cycles. The texture and flavor are worth it, and we usually do other fun spring and Easter activities while we wait for the bread’s next step. If you’ve ever loaded a slow cooker or bathed a toddler, you can probably handle making this bread.
Easter Kulich Ingredients
Bread
2 sticks butter (You can also substitute coconut oil.)
1-2 T. fresh lemon juice (Use Meyer lemons, if you can get them.)
Easter Kulich Preparation
In a saucepan over medium heat, melt butter. Add milk and heat until just warm. Remove from heat and whisk in eggs, yeast, sugar and vanilla.
In the bowl of your mixer (or any large bowl), whisk together salt and 4 cups flour. Add butter mixture to flour mixture. Switch to the dough hook of your mixer or a sturdy spoon. Add in sour cream. This mixture will be wet and thick. Cover it and allow it to soak and rise about two hours in a warm place. You can use your dehydrator set at about 90 degrees F or your oven with the light. Your dough will probably double in size the first rise, so give it space.
Put the dough back into your mixer bowl if you removed it, and mix in the remaining flour 1 cup at a time. The dough should still be soft, but it should clear the sides of the bowl. If you stick your finger into the dough, it will be squishy but won’t cling to you the way it did before. If you add too much flour, the final product will be a little dry, but it will still be edible. After you’ve made it a few times, you’ll know exactly how wet you like it. Mix in the remaining ingredients, or any other preferred add-ins. Cover and let rise another two hours in a warm place. It will double in size or more.
Divide dough evenly and place into paper molds (see “Using Tin Cans As Molds” below). Be gentle and don’t bang your dough around, but make sure you don’t have any air bubbles trapped inside. Let rise in a warm place for another two hours but don’t cover it this time—a cover might interfere with the lovely top that will form on your kulich.
Bake at 350°F for 30 to 35, or until golden brown on top. Using a cake tester or a thin knife, check the center for doneness, especially if your kulich ends up particularly tall.
Once cooled, remove from molds and mix up the glaze. Pour the glaze over the top and let it drip down the sides. To make it look traditional, add some colored sprinkles. The glaze is a lovely combination of sweet and tart.
We don’t usually add the glaze if we’ve put in chocolate chips (not a traditional ingredient at all!) just because that ends up a little too sweet for us. You can fashion an “XB” on the top, if you’d like to be completely authentic. “XB” stands for “Christ is Risen in Russian (pronounced Chreestose voskres).
Using Tin Cans As Molds
You can bake up your Easter kulich in the paper molds used for panettone, which can be found on Amazon and in specialty markets. They’re easy to use and, when the bread is baked and cooled, you can simply rip them off and discard them. This recipe will bake up three paper-molded, medium-sized kulich.
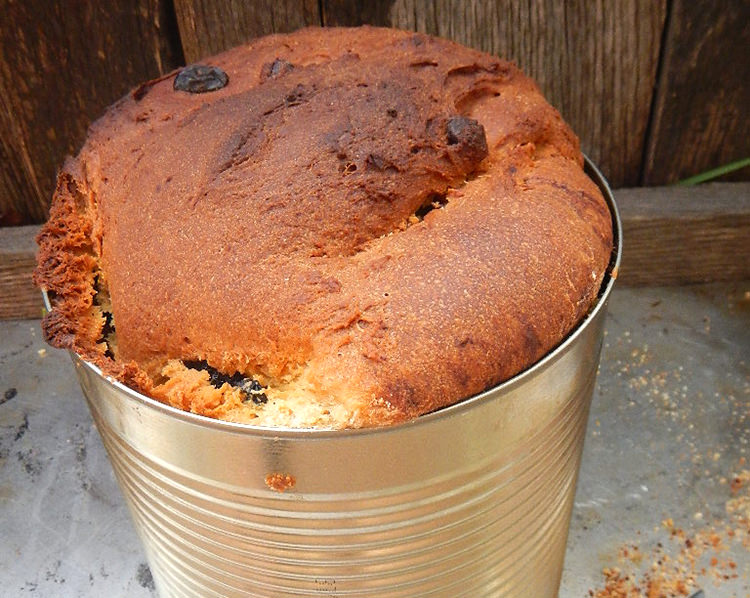
As poor missionaries, we couldn’t get quite as fancy as paper molds, but Aelita showed me how to use tin cans to achieve the same result. Take any size tin can you’ve saved and wash it thoroughly. If you have rogue sharp edges, flatten them by rolling over them in one direction with your can opener. You can also gently bang them flat with a hammer.
Remove any paper labeling. Dry and generously butter the inside of the can, all up the sides. Fill each can only halfway with dough and let it rise. We always use a #10 can size (a 2-pound coffee can) because we like the novelty of having such a tall bread, but I invariably end up overfilling that size and it poofs out the top, lopping over in a very undignified manner. Aelita’s never did that. I fare much better with a more medium-sized tin can, about 4 inches diameter and 6 inches high. However, we’ve even baked them in the small tomato-paste cans, but they do cook a bit faster to so you have to check on them.
A tin can bakes about like a regular bread pan but a little slower than a paper mold, so be sure to watch all your kulich as it bakes. A general rule of thumb is that once you can smell the kulich throughout your house, you have about another 5 minutes until it’s done.
To remove your bread from the can, allow it to cool completely and then use a knife to clear the bread from the sides. Turn it over and gently tap the bottom of the can until the bread slides out. Needless to say, don’t use a can with a lip because it will mess up the shape of your bread. Use caution as you’re going around the sides of the can that you don’t accidentally cut through into the side of the bread. This is more often a problem with the taller cans than the smaller ones; just make sure you use the longest knife possible to remove your bread for #10 cans.
This story about Easter kulich was written for Hobby Farms magazine online. Click here to subscribe.
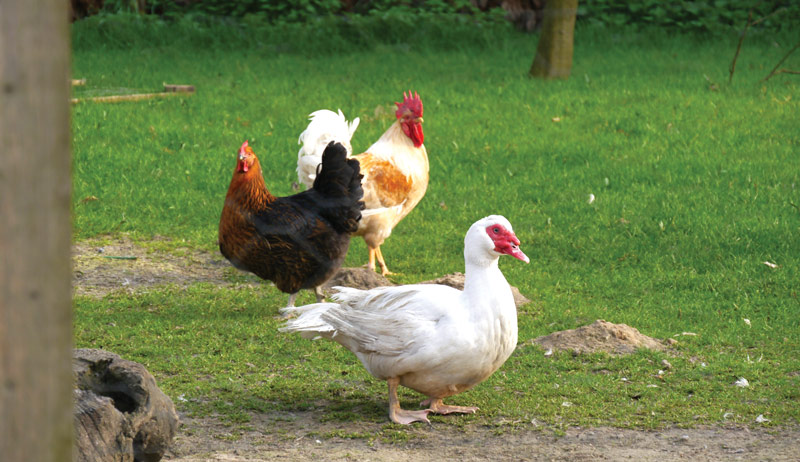
Ducks vs. chickens? It’s a common question and debate when you’re thinking about backyard birds. The obvious choice for many is chickens. But maybe you’re also considering ducks. Both birds can be fun, beneficial and productive backyard companions.
Which one is right for you will depend on several factors, though you might also consider keeping both.
For the Garden
If you want working birds for your gardens, both types can be beneficial in similar but different ways. Ducks are excellent eaters of slugs and grasshoppers, while chickens will keep the tick population down and snatch up Japanese beetles with a vengeance.
Ducks create ready-to-use fertilizer for your garden. Their manure can be instantly applied to the garden safely, as its waterlike consistency quickly breaks down and is absorbed by the soil. Chicken excrement is also fantastic for your plants, but it needs to be kept composting for about 6 months to a year before it can safely be added to a vegetable bed or flower pot.
In these ways, both ducks vs. chickens can be beneficial in flower and veggie beds. But chickens may do more damage than they’re worth, depending on what you are growing. While ducks’ flat feet and tendency to sit on everything can be a danger to small seedlings in spring, they’re relatively harmless to mature plants.
Chickens, however, will scratch everything, dust bathe everywhere and can often be caught jumping and flapping to reach the very best tomatoes on the vine. Where chickens excel is in the aeration of compost piles and garden cleanup at the end of the season, when they can clear unwanted seeds and scraps from the soil.
petra urbath/EyeEm/Adobe Stock
Eggs
If eggs are what you’re after, with ducks vs. chickens, both can be excellent providers. When I say egg, you think chicken. But ducks are great, reliable egg producers as well. Some breeds even outlay their chicken counterparts.
Duck eggs are highly nutritious and better for baking than chicken eggs. They also keep longer and, because of their unique protein makeup, can be eaten by many who otherwise have egg allergies. Duck eggs are also bigger, richer and creamier than those of a chicken. And if you intend to sell them, duck eggs will go for a higher price. If you really love eggs, keep both to take full advantage of what each has to offer.
Or maybe you simply want to keep birds because you love the birds. In which case, both ducks and chickens can be fabulous companions with their own weird little personalities and behavioral characteristics. Both can be extremely friendly pets when handled often and are always fun to watch.
Whatever your reason for wanting birds there are a few things you should know about ducks vs. chickens and their specific needs, before choosing one, the other or both.
One of the main differences between ducks vs. chickens that you need to consider is their space and how they occupy it. Chickens (some breeds more so than others and especially bantam breeds) tend to acclimate well to being penned in smaller spaces. Ducks, for the most part, enjoy a degree of freedom.
While I always recommend free-ranging any type of farm bird you keep, if space is an issue and free-ranging isn’t a viable option, chickens are probably the better choice. If you have even a small yard for your birds to forage in, ducks may be back on the table.
Ducks love green grass and dandelion leaves and will appreciate any natural space you allow them to wander. Chickens, on the other hand, can happily occupy themselves scratching in the dirt for days.
That said, if you’re able to free-range, it’s worth noting that while most chickens will stick relatively close to home, even when let free, many duck breeds tend to travel farther to forage. If you’re surrounded by woodland or open fields, your ducks will enjoy little adventures. If you have close neighbors who don’t appreciate feathered pets as much as you do, you may want to reconsider or consider fencing.
Regardless, in the ducks vs. chickens debate, both can be easily trained to return home at the end of the day so that they can be safely locked away for the night. Both types of birds will also enjoy and appreciate small structures or brushy areas under which to hide and relax in relative safety as well as to escape extreme heat, snow or wind.
Health & Behavior
By and large, ducks tend to be healthier than chickens, more resistant to disease, hardier and less fragile. Chickens are susceptible to a wide range of issues from mites to internal parasites to crop issues. They are also much more likely to become egg-bound or fall victim to the aggression of their own flock.
While ducks aren’t immune to these ailments, they tend to fare better than their chicken friends. Though with both species, if you keep males in your flock, it’s essential to maintain healthy ratios to avoid mating injuries.
Both ducks and chickens have a pecking order, but you’ll notice infighting much more in chickens than in ducks, and the injuries can be worse. Roosters have spurs, sharp beaks and long toenails. Duck squabbles look much more like an innocent round of neck wrestling.
And while I have known a few chickens to eat their own, I have never seen such behavior in ducks.
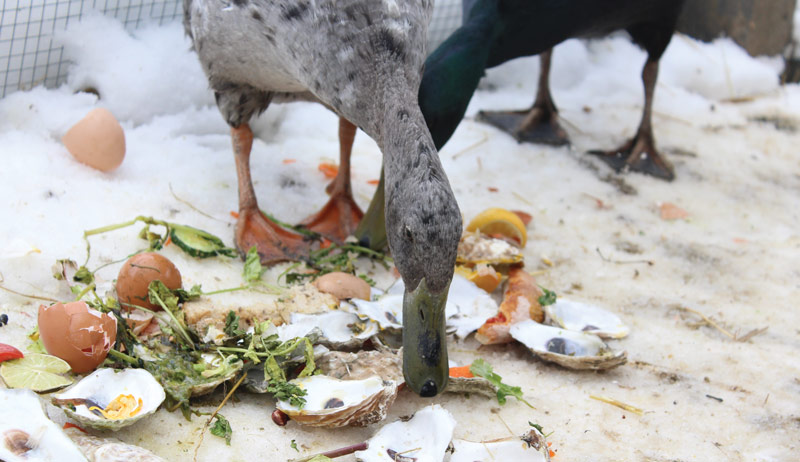
The feeding situation for ducks vs. chickens isn’t much different as adults, but what to feed baby ducks is important to know. Each can be fed with generic pelleted feed along with fresh veggies, dried bug treats and various kitchen scraps. While each has their own, slightly differing, specific nutritional needs, proper formulated food for ducks and chickens is easily found at any feed-supply store.
If you choose to house them together, many feed pellet blends will meet the needs of both and can be fed communally.
The biggest difference in the feeding of ducks and chickens is in the water. While chickens simply require available fresh water, ducks will need it deep enough to fully submerge their beaks, as this is how they clean their nostrils and keep their nasal passages clear. Ducks will also muddy water much quicker than chickens, thus increasing the frequency with which you must change out their waterers.
Housing
While ducks and chickens can be housed together, there are some specific needs for each. Chickens roost at night and require perches in a well-ventilated, but draft-free coop, shed or barn. Ducks, on the other hand (except for the Muscovy), will sleep on the ground wherever they are, with little regard for weather, cover or bedding. That said, they should still be provided, at minimum, a three-sided shelter with a roof where they can hide from the elements, should they choose to.
Chickens require nesting boxes where they should reliably lay their eggs throughout the day. Ducks will lay, mostly in the morning, and wherever they happen to be, or in a communal nest if someone starts it. They’re also known to hide their eggs, so if you provide them with straw bedding, it doesn’t hurt to dig around a bit.
Ducks also require more frequent tidying. Chickens will scratch and move bedding around, rifle through their straw or wood shavings and otherwise aerate their space. Ducks have very wet poop, fling water everywhere and then sit in it, creating a stinky, mushy situation that needs to be scooped up relatively frequently.
Keeping the two together can reduce this somewhat, especially if your chicken count is higher than your duck count. But any time ducks are involved, there will be more mess and you’ll have to retain dry areas for the chickens, who greatly dislike having wet toes.
Housing the two together is relatively easy. A small coop that has perches for chickens and sufficient floor space for ducks will happily be shared. A secure attached run with 24/7 access gives the ducks the option of sleeping outdoors, too. Water should be kept in runs and not in the coop itself. This will cut down on the mess that ducks make and the humidity in the coop which can have negative effects on chickens, particularly in winter.
Anika Wilson
Noise
Neither ducks or chickens are particularly noisy creatures. However, where noise level is concerned, it’s the males that are quieter amongst ducks, while the opposite is true in chickens. If eggs aren’t a consideration for you, male ducks are the quietest of all the backyard birds. Their soft little rasps don’t reach great volumes and you can keep a flock of entirely male ducks, so long as there is no female present, as adorable lawn ornaments and outdoor companions.
When considering noise in chickens you really want to limit the number of roosters in your flock. One will crow occasionally. Add another, and he’ll want to match the other. Add a third, and you’ll hear conversations all day.
Both ducks and chickens will “chat” amongst themselves almost constantly, with the female ducks being slightly louder than all the others. This is somewhat dependent on breed, however. Muscovies, for instance, tend to be very quiet birds, while bantam ducks such as call ducks (which can also fly) tend to be louder and chattier creatures. Ducks will also occasionally chat throughout the night, especially when startled, while chickens are all but comatose once perched for the evening.
Whatever your reason for getting chickens or ducks, whichever type you choose, it’s worth looking into individual breeds to ascertain what is right for your situation. Some chickens are hardier in cold temperatures than others. Some duck breeds lay eggs more frequently. Some birds are homebodies, while others may travel a little farther.
There are also different sizes amongst breeds from bantam varieties to extra-large breeds. Some make better mothers or lay various colored eggs. Some breeds of chickens are known to be friendlier if you’re looking for pets, where others are better free-rangers because of their skittishness and heightened awareness.
At the end of the day, chickens and ducks are equally joyful creatures to have around, easy to source and relatively easy to keep. They aren’t expensive to feed, house or care for and can be a great source of delicious eggs.
More Information
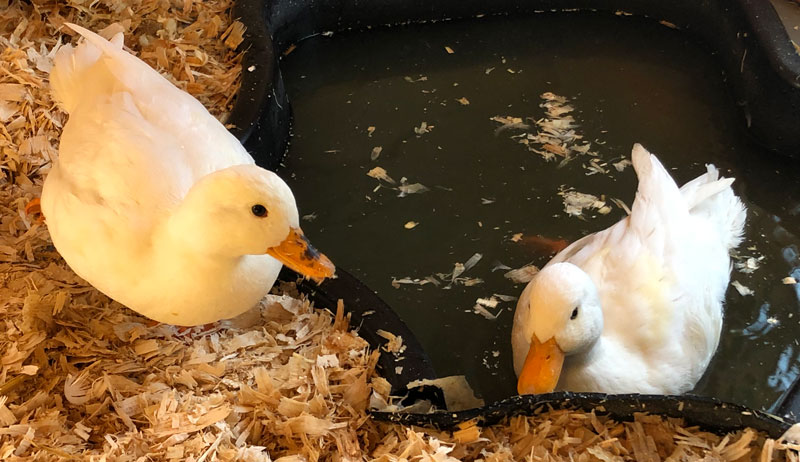
Water Needs
In terms of their natural habitat, ducks do love water. That doesn’t, however, mean you need a pond to keep them. They’ll be happy with a kiddie pool filled fresh daily, a small meandering creek in your backyard or even just a big puddle to play in.
While they can live without water, I recommend providing water deep enough for them to float. There is nothing more joyful than a duck in a fresh pool.
Though water for swimming is good exercise, it isn’t essential for growing ducks. “Pools or small ponds can become soiled quickly, and if not flushed often, the rank water can be detrimental,” writes David R. Laatsch, an interim University of Wisconsin Extension agricultural educator, in Care of Ducks. “Ducks will stay clean and healthy with adequately adjusted drip-type watering systems and wire floors. Fresh drinking water is essential for top performance.”
This article about ducks vs. chickens originally appeared in the March/April 2023 issue of Chickens magazine. Click here to subscribe.
Bantam ducks are a great option if you’ve decided to start your own or expand your duck flock. Consider one of these three breeds of bantam ducks when raising waterfowl.
Silkie Ducks
These delightful little bantam ducks will catch your eye and capture your heart. Their soft, fluffy feathers lack barbicels (as do the feathers of Silkie chickens), adding exponentially to this breed’s plush-toy appearance.
Ana Hotaling
Reaching an adult weight of approximately two pounds, Silkie ducks are gentle, friendly and inquisitive birds that make affectionate pets. They forage ably and make short work of the slugs, grubs, beetles and other insects they come across during their explorations.
Available in an array of colors, including black, snowy, grey and white, you probably won’t want Silkie ducks for their egg production. But they more than make up for that with their charm.
Our Silkie ducks were quite content being toted around the yard, happily nestled in our sons’ arms.
Call Ducks
Enormously popular with waterfowl breeders, Call ducks are the crowned cuties of duckdom.
Fully grown at just over 1 pound, you can easily recognize Call ducks by their large eyes, tennis ball-shaped head, teensy beak and round, compact body.
Their tiny size results from the reason for their domestication. They were the original decoy duck, used by Dutch hunters centuries ago to lure wild Mallards.
These days, Call ducks are raised primarily as exhibition birds, although their ultra-friendly nature makes them perfect pets. While there are multiple varieties of Call ducks, the colors recognized by the American Poultry Association include white, snowy, grey, buff, blur and pastel.
One important note: although the name “Call” is believed to originate with the Dutch kool, or trap, a reference to their role as hunting decoys, Call ducks are also known for their calls. According to duck expert David Holderread, author of Storey’s Guide to Raising Ducks, the Call is one of the noisiest of all duck breeds … something to bear in mind if you have nearby neighbors.
Australian Spotted Ducks
Despite their name, these bantam birds were developed in Pennsylvania. They are the result of cross-breeding Mallard, Call and Northern Pintail stock with an unidentified wild Australian duck.
Australian Spotteds inherited the best features from their progenitors. They have the Call duck’s friendly, lovable nature, the Pintail’s teardrop-shaped body and the Mallard’s hardiness and excellent foraging skill. Topping out at about two pounds, the Australian Spotted is also the best layer amongst the bantam ducks. The breed produces between 50 to 125 cream, blue or green eggs per year.
Three varieties are available: greenhead, bluehead and silverhead. All feature the distinctive flecks that give the breed its name.
Australian Spotteds are the perfect choice if you have standing water anywhere on your property. They love gobbling up the larvae mosquitoes lay on the surface of still water. Although they are capable flyers, Australian Spotteds are homebodies, preferring to stay near their coop.
What to feed baby ducks should be top of mind for anyone raising ducks. Can chickens and ducks share feed is often the first question asked when people raise both. Though sometimes considered to have the same nutritional needs as chicks, ducklings require more vitamins than chicks do during the growing stage and throughout their adult lives. Young ducks grow faster than chicks and this requires different dietary needs. Failing to meet these nutritional requirements may result in deformities and poor egg production.
While their nutritional needs may vary from those of their chicken cousins when given the proper nourishment, baby ducks are easy to raise. There are many duck breeds to choose including bantam ducks for small backyards and duck breeds for eggs.
What to Feed Baby Ducks: Choosing a Feed
Many feed brands do not offer duckling starter and grower feed, so many duck owners feed their baby ducks a starter and grower formulated for chicks. What to feed baby ducks begins with a starter feed for the first two weeks of life. When choosing a feed for ducklings, look for a non-medicated feed with twenty-two percent protein. (If a twenty-two percent protein starter is unavailable in feedstores near you, feeding ducklings a nonmedicated twenty percent starter for the first four weeks of life will work in a pinch.)
Because ducklings consume more feed than chicks, feeding a medicated starter may result in accidental poisoning from consuming too much medication.
Since chick feed does not contain all the vitamins that baby ducks need to thrive, supplementing their feed with essential vitamins will help ducklings stay healthy. (More on that later.)
After the first two weeks of life, what to feed baby ducks switches to a lower-protein grower feed. Due to their rapid growth rate, ducklings require switching to a grower feed sooner than chicks to prevent growth deformities. Just as when feeding starter, never feed a medicated grower. Feed ducklings a seventeen to nineteen percent protein grower feed from two weeks of age until the point of lay.
Bring on the Supplements
Most feeds formulated for growing chicks do not contain the niacin and riboflavin baby ducks need to thrive into healthy adults. A deficiency in both vitamins could result in ducklings developing weak or bowed legs, and some individuals may also be stunted in growth and development.
Growing ducklings require fifty-five mg/kg of niacin (B-3) and 4 mg/kg of riboflavin (B-12). Since chick starter and grower feeds do not meet ducklings’ niacin and riboflavin needs, supplementing their diet with Brewer’s yeast is the best way to ensure both baby ducks and adults get these essential B vitamins. Mix three cups of Brewer’s yeast into ten pounds of feed to avoid joint and leg deformities.
Probiotics and prebiotics work together to keep a duckling’s immune system in tip-top condition. Prebiotics are found in high-fiber plants and feed the healthy bacteria in a duckling’s gut. Sea kelp is one of the best prebiotic foods to feed ducklings, as it promotes growth and works best when fed with Brewer’s yeast.
Healthy bacteria found in the gut, also known as probiotics, work to control E. Coli, salmonella, and other harmful bacteria found in the digestive tract. Adding probiotics daily to a duckling’s diet may also help prevent other health concerns, such as bumblefoot.
What to Feed Baby Ducks: Healthy Treats
Raw, uncooked oatmeal is an essential part of what to feed baby ducks. It contains antioxidants, thiamine, riboflavin, niacin, choline, magnesium, calcium, and zinc, and helps develop strong legs and wings. Oats should be added to a duckling’s diet soon after hatching and gradually added until twenty-five percent of a growing duckling’s diet is oats at three weeks old. Consuming this beneficial grain helps to decrease the chance of angel wing, a condition caused by too much protein.
The best way to help ducklings reach their potential weight is to give them daily access to pasture. When temperatures are 75° F or above, allowing baby ducks outside in a predator-proofed run will help supplement their diet with essential vitamins and minerals, reduce feed consumption, and lessen the chance of cannibalistic tendencies.
Healthy treats such as herbs (including basil, mint, oregano, parsley, and yarrow), dandelions, leaf lettuce, kale, peas, and black soldier fly larvae should be included in a what to feed baby ducks routine to help them develop a healthy immune system. These nutritious snacks are also packed full of beneficial vitamins and minerals.
When feeding ducklings fresh greens, feed only tender young grasses and herbs and avoid picking greens treated with pesticides or herbicides.
Ducklings are a joy to raise. And with proper nutrients and protection from predators, ducklings will soon grow into healthy adults and fill your egg basket with those deliciously beautiful eggs.
Seed starting soil temperatures can be overlooked as gardeners focus on air temperature. This causes many gardeners to miss out on a few days, or maybe even a month, of growing time.
Seed-starting basics include what seeds need to break their dormancy including temperature, moisture, light and oxygen. Once these basics are met, watching this process happen will always be a miracle to me! Being a part of bringing seeds from dead-looking inanimate objects to living, photosynthesizing, food and pollen-producing plants is a source of joy and sustenance for more than our bellies as most gardeners know.
Seed Starting Soil Temperature vs. Air Temperature
Seed starting soil temperatures tend to warm slowly but consistently and can depend heavily on microclimates within your growing area. While air temperatures fluctuate much more, they’ll also catch up in the weeks it takes the seeds to germinate and get high enough above ground to be more affected by air than soil temperatures.
Some of the easiest seeds to get growing early in your garden require a lower seed starting soil temperature than you might think to germinate. As gardeners, we know that the health of our soil is key. Remember walking on and working in waterlogged or still frozen soil can leave you with compacted soil and damage the existing soil life, so make sure the garden space and soil you’re working in has completely thawed out and dried out a little from snow melt.
When pushing the seasons as early as possible remember you’re playing with Mother Nature. If you decide to plant at the minimum temperatures required for germination, and there’s an unexpected cold swing for a few days that brings soil temperatures back down, you may lose some seeds to rot, but if things go as planned, you’ll be eating from your garden weeks earlier than if you’d waited. If you choose to wait until the soil is even 5°F warmer than the lows listed below, you’ll end up with a higher percentage of seeds that germinate.
Having a soil thermometer or two on hand to be able to leave in place and get an accurate reading of soil temperatures both in the morning and afternoon.
Crops to Start as Early as Possible
(35-70°F) Spinach – from 40-50 days to maturity – low temp threshold 30°F
(35-75°F) Lettuces – from 45-70 days to maturity – low temp threshold 26°F
(40-70°F) Peas – 50-60 days to maturity – low temp threshold 28°F
(40- 80°F) Beets – from 50-70 days to maturity – low temp threshold 28°F
(45-70°F) Onions – 100 days + to maturity – low temp threshold 28°F
(45- 70°F) Arugula – 40-50 days to maturity – low temp threshold 28°F
(45- 70°F) Kale – 45-70 days to maturity – low temp threshold 24°F
(45-80°F) Radish – 30-40 days to maturity – low temp threshold 30°F
(45- 80°F) Carrots – 60-85 days to maturity – low temp threshold 28°F
Eggs baked in avocado is a unique way to cook eggs and a delicious recipe that’s hard to resist; especially when your hens are laying on a regular basis during the season. With lots of backyard chicken eggs in the refrigerator, this is a way to use those delicious eggs in meal planning.
Eggs Baked in Avocado
This recipe makes a quick, easy and healthy breakfast or brunch dish.
Serves: 2
Ingredients
1 avocado, seed removed
2 eggs
A pinch of salt, a dash of pepper and any additional seasonings you’d like to add.
Oil, as needed to grease a baking dish
Directions
Preheat the oven to 425°F.
Wash the outside of the avocado, dry it well and slice it in half lengthwise. Remove the seed. Leave the avocado flesh in the shell.
If the avocado has a small seed pit, use a spoon to carefully scoop some of the avocado flesh out to make room for the egg.
Lightly grease a small baking dish. I prefer a small baking dish with sides, just large enough to fit my two avocado halves. That way, the dish helps support the avocado and keep it from tipping over. Place the avocado halves in the greased baking dish.
Crack eggs into each avocado half. Season with salt, pepper, and any other seasonings you’d like. We prefer a Cajun seasoning blend.
Bake uncovered for 15-20 minutes. Bake 15 minutes for a creamier yolk and closer to 20 minutes for a harder yolk.
Serve straight from the shell or scoop out the flesh, the choice is yours. Or, spread the warmed avocado over toast as it’s effortlessly spreadable once baked.
This recipe is easily adaptable to many tastes by adding toppings such as bacon, feta, tomatoes and parsley.


")