The other day, I was happily digging holes to plant apple and cherry trees in my orchard. My plan was perfect, or so I thought: I would shovel the sod and soil into a small single-axle trailer towed by a lawn tractor, rather than spread it messily through the grass. This strategy would also eliminate the risk of killing grass if I got delayed in actually planting the trees.
But those best-laid plans got more complicated as I went along. I had originally intended to dig one hole, plant one tree, dig another hole, plant another tree, and so on. But I was into such a nice rhythm digging the holes, and the weather was so perfect for digging (nice and cool, not hot and muggy), that I wound up digging three holes without stopping to plant.
Watch Your Weight
Hmm. By that time, there was a lot of soil and sod in my trailer—more than I had expected. And for the sake of convenience I had piled more dirt behind the axle than in front of the axle, which would make it easy to shovel dirt back out of the trailer … but harder for my lawn tractor to tow.
You see, when loading a single-axle trailer, the recommendation is to load 60 percent of the weight in front of the axle. This ensures that there’s weight pressing down on the hitch, which in turn helps the towing vehicle gain traction with its rear wheels. If you put more weight behind the axle than in front, the trailer exerts an upward pull on the hitch. This can reduce traction for the towing vehicle and even lead to dangerous “fishtailing.”
So when I fired up my lawn tractor to drive back to my front yard and pick up a couple of trees, I could tell my tractor was struggling just a little. The tractor was strong enough to tow the load, but it’s a lightweight machine, and it wasn’t getting as much traction as ideal.
At that point, I should have fired up my heftier garden tractor and switched towing vehicles, but I didn’t. I loaded a couple of trees into the wagon (alongside the dirt) and set off back to my orchard.
No Traction Action
All was fine until I tried to drive up a very mild slope to one of the planting holes. Evidently there was just enough of a hump in the slope to catch the mowing deck, and the lawn tractor—already fighting for traction—gave up and started spinning its wheels. It would go forward, and it wouldn’t go backward. It didn’t help that my farm had received 1 1/2 inches of rain the night before, rendering the grass and topsoil too slippery for the tires to firmly grip.
Even once I shifted some weight from the back of the trailer to the front, I couldn’t get enough traction.
So there I was, stuck on basically nothing in the middle of my orchard. I had to shift the dirt again (to the rear of the trailer) so I could lift the front of the trailer off the hitch and free the lawn tractor. Without a heavy load to tow, it had no trouble getting unstuck.
Then I brought out the garden tractor and hitched it up, expecting it to pull the trailer without issue. It turns out, though, that lawn tractor spinning its wheels had muddied the grass enough that I had to engage the differential lock on my garden tractor and back it down the mild slope before it could get enough traction to regroup and continue forward.
There are several ways I could have avoided these difficulties, which wasted quite a bit of time and energy. First and foremost, I should have made sure to distribute the load in my trailer properly, with 60 percent of the weight in front of the tires. Maybe the load was just too heavy for the little lawn tractor to pull, but I didn’t give it the best chance with my casual approach to weight distribution.
That’s an important thing to keep in mind when hauling heavy materials (dirt, compost, hay, etc.) in two-wheeled trailers around your farm.
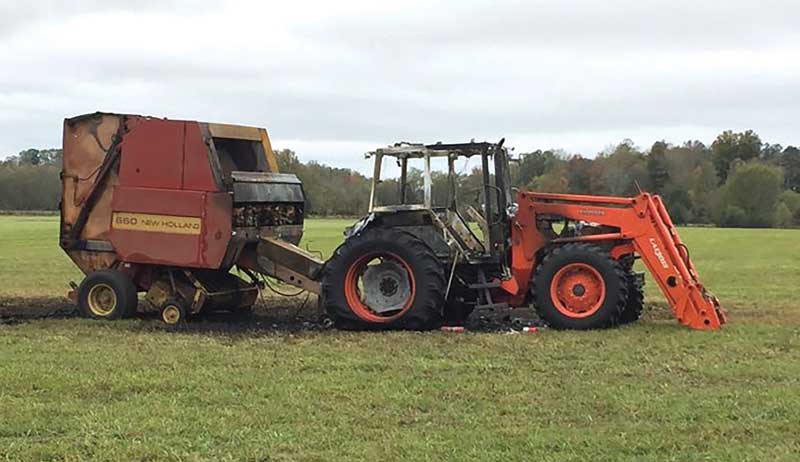
About three years ago, the day before the predicted first frost of the season, Bledsoe County farmer and retired agriculture teacher Bobby Loyd was balinglate-fall hay with plans to wrap it for silage. On this day, he mowed until around dinner when he shut the tractor off for a short meal break. As he settled back into his seat to pick up where he had left off, the tractor wouldn’t start. “I thought that was odd,” he says. But, looking to get back to work, he jumped it off with his pickup truck, hooked it to the baler and started baling.
The oddity still in the back of his mind, he decided to check and see if the tractor would start if he turned it back off. “I baled maybe 15 bales and shut it off,” he says. “This time, when I jumped it off the battery was so low that I couldn’t even get the power takeoff to engage,” he says.
Thinking it was an issue with the battery, he went into town and purchased a new one. Then, after replacing the battery, he was able to operate another 30 minutes after which he pulled up, stopped and got on another tractor so that he could begin bunching hay, readying it for wrapping at daylight the next morning.
By this time, it was dark, and Loyd was at the opposite end of the field finishing up for the day. He looked up and saw the other tractor that he’d parked in the middle of the field with a light under it that clearly shouldn’t be there. Reaching for the fire extinguisher on the tractor he was stacking with and driving across the field at the maximum speed that he could still stay on, Loyd raced across the field.
As he drew near, he saw that the flames were already blazing up under the windshield at the very end of the motor of his parked tractor. “I sprayed the fire extinguisher empty up under the tractor,” he says. At one point, Loyd believed that he had succeeded in saving the tractor. “But then it puffed back up,” he says. Grabbing the fire extinguisher out of the tractor that was on fire, Loyd tried again.
He was unable to make any headway this time.
A passerby arrived on the scene, asking how he might help. Loyd sent him to retrieve another fire extinguisher that he kept stored in his pickup truck which was also parked in the field. While he was away, Loyd attempted to unhook the baler. Unfortunately, his would-be helper, having been unable to locate the extinguisher, returned empty-handed. So instead, Loyd asked for his help in unhooking the baler. He hoped to take a chain and drag the two apart. Sadly, the tractor and baler were connected with a homemade pin and the tractor was parked in a bit of a bind. “I had the jack down and the pressure up,” he says. “I couldn’t get them apart.”
The tractor fire progressed quickly. Even though Loyd had also called 911, by the time fire responders arrived only a short time later, the equipment was lost. “The fenders were melting and were dropping on two big tires full of fluid,” he says. “I told [the passerby] that it wasn’t worth getting killed over. Let’s just back up and let it burn.” The tractor and baler were total losses.
Though he’ll never know for sure, looking back at the events as they occurred, Loyd believes that the tractor fire was caused by a short in the battery cable. In the brand of tractor he was driving, the main battery cable comes on the right side of the motor and crosses over the top of it going to the starter. “The only thing that makes sense to me is that I somehow got a short [in the cable] and that was what was draining the battery,” he says.
Loyd considers himself fortunate. “I never park a baler in the field,” he says. “But because I was looking for those other bales, I hadn’t pulled this tractor back in the shed yet.”
Had it not been for this slight change to his routine, there very likely would have been a barn fire as well. Loyd also considers himself blessed that, as is sometimes the case with tractor and equipment fires, little of his crop was lost to the fire as it was confined to the area around his tractor and baler.
Bobby Lloyd
Causes of Equipment Fires
While not necessarily foreseeable, Loyd’s story illustrates the importance of fire safety and prevention. Mike Mathews, field service manager with TriGreen Equipment, says that while he doesn’t see a lot of tractor and equipment fires, those that he does see are memorable. TriGreen, a John Deere dealership with stores in McMinnville, Winchester, Manchester, Mt. Juliet and Cookeville, Tennessee, as well as in Alabama, serves many farmers in the Sequatchie Valley area and beyond.
In Mathews’s experience, while fires can also be caused by electrical fires such as the tractor fire experienced by Loyd, lightning strikes and static electricity, most of those fires that he sees are thermal events.
“We have some seasonal farmers, like your hay and cattle farmers, that put certain equipment in the shed and it sits for months at a time waiting for the next hay crop to be ready to harvest,” Mathews says.
In some of these instances, birds will build a nest on top of the engine and as the exhaust heats up when the tractor goes to the field, the nest ignites. Other times, he says, bearings can go down and the customer doesn’t catch it in time. “It will heat to create a thermal event from crop dust or chafe,” Mathews says.
As for balers, whether round or square, to prevent mold producers bale their hay when it has a low moisture content. “Typically, a bearing will run probably around the 130- to 150-degree range,” Mathews says. “Under normal conditions, when it [the bearing] gets a lot of wear or starts to fail, you can see that get up into the 250-plus-degree range.”
At that temperature, the dry crop residue, not the hay itself, will get into certain areas against those bearings and heat up and ignite.
Fire Prevention
To prevent these types of fires, Mathews recommends pre- and/or post-season inspections performed by a dealership. “We have a winter service special,” he says. “We encourage our customers to do an end-of-season or preseason inspection. We do it at a discounted rate. Typically, we do these in our slow season where we can offer a better value for the customer.”
As part of the inspection process, belts and chains are removed, shafts are turned, bearings are checked, and they listen with experienced ears for noise to determine how rough bearings are in play with the intention to catch them before they go bad. As well, bearings are packed and other types of preventative maintenance are performed. While these types of inspections can seem expensive, they’re well worth the investment in terms of fire prevention and downtime during the harvest season.
Mathews uses the example of the dealership’s hay customers. “They don’t get to schedule when they harvest,” he says. “It depends so much on the weather and their work schedule. A lot of times, our hay producers and smaller cattle farmers are in a position where they have to do it when they get off work during the week or on the weekends. They’ve got a tight window because of the weather and other factors they have no control over.”
It’s not just the danger of fire that the dealership promotes inspections. “It’s the advantage of having the machine ready to go to the field when you need it,” Mathews says. However, thermal events are a problem. “If you don’t maintain your machine and the bearing fails and it catches the baler on fire, then that’s going to carry over to your crop,” he says.
The Operator’s Role
Inspections and maintenance aside, operators with open station tractors can also play a role in fire prevention by listening and watching for signs of equipment failure. However, because of their amenities and the very fact that they are enclosed within a cab, operators of cab tractors can be at a slight disadvantage. These operators may not hear the machine run so they don’t catch that slight squeal or feel that little bit of vibration that could indicate some type of equipment failure.
To this end, TriGreen encourages owners that may be new to equipment or owners or operators who may be stepping up from older to newer equipment to attend the many customer events and clinics the dealership offers. During these events, customers are encouraged to take proactive measures like taking a leaf blower to blow crop residue off the machines every time they finish using them.
“There have been times where a bearing might be in the process of failing, they [the producer] finish for the afternoon and get into their truck and drive away. Then two hours later they get a call that their equipment is on fire,” Mathews says.
Performing this type of precautionary measure could help prevent this from happening.
The Manufacturer’s Role
Mathews explained that as a preventative measure, most manufacturers do a good job before they release a product to market to check for premature failures or any defects in material or workmanship. They also closely monitor any fire events to make certain that it had nothing to do with the manufacturing process of the equipment.
As well, balers and some other types of equipment often come with water fire extinguishers that can be refilled and repressurized by the owner. It is less common for tractors to come equipped with these, so it is always a good idea to get one of your own.
A Costly Occurrence
While a high percentage of equipment fires are not a total loss, thanks to diligent operators, they can prove costly. “The cleaner you keep the machine, the less chance you have of an event,” Mathews says. “Typically, of those that we see that are a total loss, I hear comments indicating, for example, a hydraulic leak that the operator was aware of and didn’t take the time to fix. The leak allowed the crop residue to become saturated with hydraulic oil and ,if they get a hotspot from a bearing, it lights up.”
Thankfully, most producers have insurance, and Mathews advises that if you don’t currently have it, invest in some. But, while insurance may cover most of your loss in terms of equipment, it doesn’t cover the resulting downtime. Mathews’ biggest piece of advice in terms of fire prevention and safety is to keep your equipment clean and be meticulous about maintenance. And, in the end, saving yourself should always be your top priority.
Though Loyd did have insurance coverage on his equipment valued at what he thought it was worth, he did have trouble replacing it. For example, his tractor, though used, was only a few years old and in good working order. He struggled to find something comparable to replace both it and his baler with the available insurance funds.
He continues to practice fire safety and prevention measures learned from his experiences as an educator and a farmer and hopes never again to experience another equipment fire.
This article originally appeared in the July/August 2023 issue of Hobby Farms magazine.
Do you see hydrangeas in bloom right now and realize you want more of them? Even though summer is dwindling, there is still time to propagate these beautiful perennial flowers showing off this month. In the video we show you two quick and easy ways to multiply some of that fresh green growth into future shrubs for your garden.
1. Propagation Pots
In this method, pots are placed next to the mother plant to bend a limb down to root while the limb is still getting nutrition from the mother. To do this, simply bend a fresh limb down to the pot and remove leaves. Place something heavy to hold the limb in the pot.
Continue to water as normal, and roots will start to grow from the area of the limb where the leaves were removed. Wait a few weeks for the roots to develop. If you plan to transplant the new plant, wait several weeks for a strong root system. If the plant will stay next to the mother plant, you can clip the bent limb once roots are developed.
Supplies needed:
propagation pots
something to weigh down the limbs
soil
2. Cuttings
Another easy way to propagate hydrangeas is to take cuttings and use a rooting medium to grow new roots in soil. In this method, timing is crucial. It is best to cut the fresh new limbsfrom this year’s growth. The woody stems are more difficult to generate roots.
Make sure to pack your seed-starting tray or cups with potting soil to have ready for the cutting you take. To get a good specimen, cut a fresh branch 4 to 6 inches long right above the node where leaves attach to the stem. These nodes are where new roots will form.
Remove all the leaves except one set at the top of each cutting. Dip the cutting in water followed by rooting hormone, making sure it adheres to the nodes. Insert the cutting so the potting mix covers at least two bare nodes. Then gently firm the potting mix around the cutting.
This method will take two to four weeks for roots to develop. Plant, pot up or give away as the roots develop and grow into a beautiful new hydrangea.
It’s inevitable: Once you start keeping chickens, you become an encyclopedia of all things poultry. If you’re like me, you get your hands on every publication available in pursuit of new chicken facts. I have five bookshelves dedicated to chicken books. I have acrylic magazine holders stuffed with issues of Chickens and Hobby Farms. My browser features a folder full of bookmarks for reputable chicken web sites.
My phone’s Contacts app has entries for professors of poultry science, avian veterinarians and chicken breeders. You’d think that I probably know everything there is to know about chickens … but I don’t. I learn new facts about chickens with pretty much every article I research and write.
When I discover new facts, I get excited all over again and eagerly wait for my family to get home from work and school so that I can share my new knowledge about our chickens with them. Naturally they’re not as enthusiastic as I’d hope—perhaps because they’ve been at computers all day. But, luckily for me, I can share these nuggets with all of you.
Here are four sets of chicken factoids I recently learned for you to enjoy and perhaps share with your own poultry people.
Those 730 million birds brought in approximately $77 billion dollars in revenue in 2022. As enormous as this seems, the U.S. actually only produces 17 percent of the world’s poultry, with China and Brazil following close behind.
Chicken Chow Down
America not only produces the majority of the world’s poultry; it also consumes most of the world’s chicken. About 15,000 metric tons of chicken is eaten each year in the U.S., and it’s easy to understand why: chicken wings, fried chicken, chicken soup, roast chicken … Americas just adore chicken.
Not only is it a tasty protein, it’s also an inexpensive one, much less costly than beef, veal or seafood. Chicken’s affordability definitely helps put a chicken in every American pot.
But it’s not just the U.S. that loves chicken. Global consumption of poultry is estimated to be 136,000 metric tons in 2023, more than nine times what the U.S. consumes.The country that eats the most chicken after the U.S.? China.
The Real Eggsperts
The United States is also a global leader when it comes to egg production, with more than 109 billion eggs produced annually. According to United Egg Producers, more than 55 percent of America’s annual egg production is consumed right here in the U.S. Less than 1 percent of the US’s annual egg production—about 0.15 percent, or 160.8 million eggs—are exported to other countries, mainly to Mexico, Canada and Japan.
Does that mean the United States is the world’s top egg producer? Nope! That title goes to China, which produces more than 586 billion eggs per year, more than five times the amount produced by America.
The U.S. is actually No. 4, after India (122 billion) and Indonesia (114 billion). As far as eggsporting, the world’s top spot goes to The Netherlands, which exports almost 21 percent of the world’s eggs.
Iowa takes top marks as America’s top chicken-keeping state, followed by Ohio and Indiana. Who are America’s backyard flock owners? Most of the micro flocks—15 percent—are owned by millennials (born between 1981 and 1996), followed by the 10 percent owned by Gen Z (born between 1997 and 2012) and the 6 percent kept by Gen X (born between 1965 and 1980).
In addition, three quarters of America’s backyard-flock owners view their chickens as pets, making chickens the fourth most common pet in the U.S. after dogs, cats, and fish.
Fermented salsas like this nectarine salsa are some of the easiest ferments to make. They come together easily, don’t require a long fermentation duration and are always delicious.
I personally prefer fresh fermented salsa over cooked (canned) any day of the week. After a quick 24-to-48-hour ferment, the flavors will have a chance to meld together. You’ll notice a slight effervescence that is unique to fermentedfoods.
Yield: 1 pint jar (2 cups)
Ingredients
1.5 cups fresh nectarine, diced
2 tbsp. finely diced red onion
1/2 cup chopped cilantro, loosely packed
2 tsp. fresh garlic, finely chopped
1 jalapeno pepper, finely diced
2 tsp. fresh lime juice
1 tsp. coarse kosher salt
Dash of black pepper (optional)
Directions
In a medium-sized, non-reactive bowl (such as stainless steel or glass), prep ingredients and mix them together. Stir well to distribute the salt.
Once mixed well, transfer the ingredients to a clean wide-mouth, pint-sized canning jar. Use a spatula to scrape any remaining liquid (brine) or salt from the bowl. Use a jar weight (or other food-safe weight option—see below) to push down the ingredients under the brine. Make sure that there is no food on the sides of the jar that is above the brine.
Wipe the rim of the jar clean and place the canning lid (or airlock lid if using one), and tightly screw on the metal ring.
Fermentation
This is a one-to-two-day ferment. Ferment at room temperature, ideally between 60 to 75 degreesF (15 to 23 degrees C) and keep out of direct sunlight. Though the salsa is delicious immediately after mixing together (give it a taste!),the flavors will change over 24 to 48 hours.
Once the fermented nectarine salsa reaches an ideal flavor, transfer the jar to the refrigerator.
Because fermentation does not stop completely once cooled, the taste and texture will continue to change. Therefore, this ferment is best enjoyed within two weeks.
Notes
Add a quarter cup of freshly diced tomatoes if you so desire.
If you do not have a glass jar weight, you can improvise by using an easily removable small food-grade glass dish that fits inside the jar. Or, if you have a smaller glass canning jar that can fit into the mouth of the jar you are fermenting with, you can use that to keep the produce pushed under the brine.
You may substitute fine sea salt instead of coarse kosher salt if you prefer. The measurement will remain the same for this recipe.
This recipe has been adapted from Thurow’s book WECK Home Preserving(2018) with permission from Skyhorse Publishing, Inc.
“Having a hobby farm is truly a blessing,” says Jess Nestor, who runs the Our Wren’s Nest Farm in Ohio with her family. Having always found herself drawn to a “simple way of living and everything old school,” Nestor was able to fulfill her self-sustainable dreams after “a chance meeting with someone who is now our very dear friend and the best farming mentor.”
That person wound up helping the Nestors the chance to secure their own land. “Now we could grow a garden on a larger scale, raise our own chickens, build a small cabin and truly live out our hobby farming dreams,” says Nestor. “So we jumped in with both feet, even quitting my day job for a new career that allowed me to farm full time!”
Taking a break from tending to the hobby farm, Nestor spoke to us about the benefits of totally revamping the garden and the annoyance of cucumber beetles. We also got the scoop on ghost squash.
“This year we made a goal to completely revamp how we garden,” says Nestor when asked about how this year’s produce haul turned out. “[We] spent most of the winter researching and planning. In the spring we built completely new grow beds, added irrigation and only planted plants we knew we would eat—no experimenting.”
Nestor adds that embracing the square foot gardening method also allowed them to “grow produce more efficiently in an area that is easy to manage.”
Nestor calls this year’s garden “the best we have ever grown” and is thrilled by how “the produce keeps piling up!” But unfortunately the cucumbers did not go quite according to plan.
“We experienced cucumber beetles for the first time!” says Nestor. “We now know how to deal with them and, even though they didn’t work out, we gained a ton of knowledge for next year!”
If you enjoy the Our Wren’s Nest Farm Instagram account, you’ll come across a little something tagged ghost squash.
But what exactly are ghost squash?
“I am a huge fan of everything summer and winter squash, one of my favorite foods, and I grow a good amount of it every year,” explains Nestor. “From zucchini to spaghetti squash, it is all so good! I like to have different types of squash, and the White Scallop squash added a fun touch to the garden.”
It turns out that the distinctive White Scallop plants are quite prolific. “I think if I was going to use it in a Halloween recipe, I would carefully carve out some eyes and a mouth at the top and then steam the squash,” says Nestor, getting into early Halloween mode. “You would definitely get a spooky, fun addition to your meal that way.”
Having dallied with attempting to grow potatoes for a number of years, Nestor reveals that they finally came good this time around.
“Oh, potatoes! What a learning experience those have been,” she says. “I feel like every farmer has that one plant that tests them every year, and potatoes have been that for us. This year, though, was the first year we had a sizable harvest. Even though it wasn’t as much as we wanted, we learned so much!”
When it comes to potato-growing tips, Nestor says to always make sure you have enough space, use a good quality seed and be patient. “Don’t pull the plants too early—which I’ve been guilty of in the past!”
When it comes to the benefits of running a hobby farm, Nestor points to “the feeling of accomplishment and the rewards of your hard work.”
“You raised those chickens and ducks, and know where the eggs are coming from,” she continues. “A pantry full of canned goods is a feast to the eyes and the stomach that are free of preservatives. It is just such a sense of pride for us. The best feeling is just sitting back with my husband, watching the flock roam the yard and seeing how far we have come.”
Being able to save seeds from the food you’re growing—and then turn around and grow even more food from those seeds—is so empowering! As vegetable gardeners we know what seeds look like when we plant them, so the seed-saving process is quite intuitive.
We want to start by saving seeds from the healthiest, largest fruits and vegetables. Starting with heirloom and open-pollinated vegetables is best. Whether you started from seed or potted seedling, you should be able to check if it is open pollinated or hybrid. Hybrid plants won’t always grow back true to type. Next year’s fruits or veggies can end up being a little (or a lot) different from the parent plant. But, crossing plants is how we come up with all kinds of delicious new varieties, so also keep that in mind.
Here are the easiest vegetables to start your seed-saving journey.
Beans & Peas
These are simply left on the vine or bush to dry and harvested afterwards. Try to mark out some of the earliest beans or peas to form so you can reserve those for seed saving.
Trying to save a few seeds from the final peas or beans to mature will be frustrating and leave behind sad foliage. Wait until fully dry on the plant/vine before harvesting.
*Legume seeds stay viable for around three years.
Lettuce
While these seeds take a long time to mature, they’re beautiful and easy to harvest. The lettuce will bolt, sending up a center stalk which will flower. Eventually those flowers become seeds.
I usually wrap some netting around the flowers once they start to dry out to capture seeds as they mature over a few weeks. Then I bring the seeds inside in a paper bag to fully dry. Shake seeds into a bag, then blow off the fluff. One lettuce plant will give you years of seed.
*Lettuce seeds are viable for three to four years.
Tomatoes
Harvest tomatoes when the fruit is fully ripe, then scoop out seeds. These seeds have a gel coating on them that prevents from germinating too soon. This coating is easily broken down by submerging the fresh tomato seeds in a jar of water, covering with a paper towel and letting ferment two to four days.
Be warned, this ferment will get stinky! Seeds that float to the top are not viable, so scoop those off, then rinse the rest of the seeds and set to dry.
*Tomato seeds stay viable for four to six years.
Bell Peppers
Harvest from the fully ripe fruits, being careful not to damage the seeds as you separate them from the pepper’s ribbing. Set to dry. All seeds should be fully dried before storing. Seeds can be stored in a cool, dry, dark location in paper bags or in airtight containers..
Try to harvest seeds from different times of the season, like the first large tomato, if you’re trying to grow earlier-maturing crops.
*Bell pepper seeds stay viable for two to five years.
It is so powerful to be able to grow food from seeds you’ve saved yourself. Saving vegetable seeds can take your homesteading and gardening to another level. Having something homegrown to share other than jams and pickles is pretty neat, too.
There are few things worse than spending a small fortune on a garden just to grow a tomato or two. Gardening can be expensive. Gardens are a huge time commitment and, honestly, a lot of work. So, it’s important to select the right varieties of garden vegetables to make all of that worth it!
We know that you want to have mountains and mountains of produce from your garden to justify all that investment of time and money. So here are five of the most productive high-yielding vegetables every gardener should grow!
Tomatoes
Tomatoes are one of the most productive and highest-yielding vegetables of the summer garden. One packet of tomato seeds can produce a dozen tomato plants, each of which can yield pounds and pounds of tomatoes.
Tomatoes are typically categorized by indeterminate or determinate varieties. Indeterminate tomato varieties will continue to grow and produce tomatoes all season long. These varieties produce huge quantities of delicious tomatoes over the course of the season.
Determinate tomato varieties do not produce tomatoes as long into the season. Instead, the fruit of determinant tomato varieties ripen simultaneously, making this an ideal crop for canning and saucing!
Whether you choose determinate, indeterminate, or a mixture of both, tomatoes—when properly cared for—can produce very large crops of delicious summertime fruit.
Salad Greens
Every good garden has a few greens planted here and there! Greens are potentially one of the most productive and high-yield crops per square foot in the garden. Lettuces, spinaches, kales—they can all be very prolific.
Just one packet of seeds can keep you eating more greens than you ever thought possible!
The most wonderful thing about growing greens is that they can be planted in small spaces and almost anyone can find the garden space to grow some greens! They also thrive in cooler weather, which can extend your growing season and therefore extend your overall season’s productivity.
Squash
Everyone who has grown summer squash knows just how much squash one plant can produce. One day your baby zucchini is tiny, and the next it could feed 10 people—with some to spare!
Summer squash (as well as winter squash) can be very prolific in the garden and produce pounds and pounds of squash. Summer squash varieties, such as yellow squash or zucchini, are among the most productive, producing bumper crops of squash.
Planting a mixture of winter squash and summer squash can produce a longer stand of food as well. Winter squash, such as butternut squash, can be stored for months, while summer squash should be eaten or preserved promptly after harvest. Overall though, few vegetables are as high yielding as the squash family!
Beans
Beans are super producers in the garden! I remember vividly spending long, hot summer days harvesting green beans in the garden every single day, and snapping them and canning them almost every single evening. It always seemed like the beans would grow faster than I could ever possibly harvest.
Pole beans, when grown vertically, are incredibly high yielding per square foot of garden space. While bush bean varieties are less productive per square foot, they still produce countless pounds of beans that you can enjoy!
Cucumber
Cucumbers are fast growing and produce countless cucumbers per plant. Pickling cucumbers produce huge amounts, and as pickling varieties, are ideal for pickling, storing and enjoying for a longer term.
One packet of seed can supply you with plenty of cucumbers. By employing vertical growing techniques, the space requirements are pretty small and therefore produce a large volume of produce per square foot.
Overall, gardening is worth it no matter what you’re growing. But it doesn’t hurt to make the most of your garden with these high-yielding and productive plants for maximum vegetables!
Kentucky farmer Jann Knappage talks with Hobby Farms Presents: Growing Good podcast host Lisa Munniksma about part-time farming, farmers markets, working behind the scenes in Extension, and food preservation.
Get to know Cooperative Extension’s Nutrition Education Program and the behind-the-scenes work that goes into bringing Extension programming to us as farmers and citizens. Jann explains the University of Kentucky’s Recovery Garden Toolkit, bringing gardening programs into substance-use recovery centers; Growing Your Own publications for homesteaders and home gardeners; the Farmers Market Toolkit for farmers markets wanting to reach customers purchasing food with SNAP; and the Cook Wild Kentucky program, promoting the heritage of hunting, fishing and foraging in the state. (You need to hear why Jann had a meeting in a Lowes parking lot in Eastern Kentucky!)
Learn about how the Red River Gorge Farmers Market was born from Jann and her partner’s own dreams of building community and bolstering local farmers’ income. Now in their third season, the market runs two days a week with as many as 40 vendors and features various community programs. Jann gets honest about what it’s like to start and run a farmers market as a volunteer—the good and the less good.
Jann also talks about her and her partner’s Fox and Hen Farm and the journey they took through a series of rental properties—including one that involved growing in 5-gallon buckets and another that flooded—for 3 1/2 years until they found a place to call their own. And she shares her hack for getting through food preservation while managing a full-time job, young baby, farmers market and regular life.
Listen to the end for Jann to convince you that you need to be eating beet greens—and to get a creative recipe for using them.
Oviduct prolapse is scary and stressful for backyard flock owners. The thought of your beloved hen’s oviduct sticking out of her cloaca is enough to send shivers up and down your back. While most hens will never experience an oviduct prolapse, it does happen occasionally. Learning to treat this condition could be the difference between life and death for your hen.
There are several things you should know before dealing with a prolapsed oviduct:
Always isolate the prolapsed hen to avoid cannibalism.
Only treat a prolapsed oviduct at home in emergencies.
Always take your hen to see a licensed veterinarian, even if you have successfully pushed the oviduct back in, to ensure she isn’t injured internally.
Emergency Prolapse
Emergency treatment occurs when you realize your hen has prolapsed, and the veterinarian who usually treats your chickens is closed for the night. Every animal hospital you call has no appointments or doesn’t treat chickens, and there is no other way to treat her.
That is what happened when Millicent, my Speckled Sussex hen, laid an egg on the fourth of July and prolapsed. Every vet I called in the area was closed, and all the emergency veterinarian hospitals I called in my home state didn’t have a veterinarian who treated chickens. So, with help from my sister, I gathered everything we needed to treat a prolapsed oviduct at home.
When dealing with a prolapse, you must respond quickly to increase your hen’s survival rate. The longer the oviduct is exposed, the harder it will be for your hen to recover, and increase the chances of contracting an infection and fly strike. Chickens can’t poop when they have a prolapsed oviduct, so a hen suffering from this condition may also have an impacted crop.
Treatment
Treating an oviduct prolapse requires only a few things that should be in your flock emergency kit:
disposable gloves
petroleum jelly or coconut oil
granulated sugar
Wearing disposable gloves and holding the hen securely on your lap, clean the exposed oviduct gently with warm water, being careful that no water enters your hen’s cloaca.
Generously sprinkle sugar over the exposed oviduct and let the sugar sit for 15 minutes. The sugar helps to absorb liquid in the prolapse, causing the oviduct to shrink.
Next, wear a clean pair of disposable gloves, coat the gloves and the hen’s cloaca with Vaseline or coconut oil. Carefully gather the exposed oviduct between your fingers and thumb, and gently push the oviduct up the hen’s cloaca until the oviduct has disappeared from view.
In some cases, the oviduct will pop right back out. If this happens, repeat the steps until the prolapse disappears into the hen.
Calling a Vet
Whenever possible, having a vet treat the prolapsed oviduct is the best way to treat your hen and increase her chances of survival. Oviduct prolapses are an emergency life-threatening condition, so when scheduling an appointment for your hen, tell the receptionist that you are dealing with an emergency.
Once your hen has arrived, the veterinarian will diagnose her condition. In some severe cases, the oviduct may have pushed some organs out with it. If this happens, your vet may recommend humanely euthanizing the hen to prevent further suffering.
When only the oviduct is exposed, many veterinarians will apply topical dextrose to the oviduct to decrease the swelling before pushing the oviduct back through the cloaca. Often, a vet will secure the oviduct in place with a few sutures so it doesn’t pop back out.
During this process, your hen will be under anesthesia to ensure she feels no discomfort. Anesthesia can have side effects, so discuss these with your vet before the procedure.
Recovery
Once the procedure has taken place and your hen’s oviduct is no longer exposed, some vets will hospitalize a prolapsed hen for 24 to 48 hours to ensure no complications, while others will send her right home. If your hen comes home shortly after the procedure, withhold water and food for several hours (even if she is alert) until all effects of the anesthesia have worn off.
Whether your vet hospitalizes your hen or not, there are several things every hen recovering from a prolapse needs.
complete isolation from the flock for 14 days
antibiotics administered by a vet to fight infections
anti-inflammatories administered by your vet to decrease any swelling in the reproductive tract
Check your hen several times daily throughout recovery to make sure the prolapse hasn’t recurred. And be sure to follow any additional instructions your veterinarian may give you.
Feeding Restrictions
Calcium is one of the chief nutrients your hen’s body will need to recover from a prolapse. Feeding a diet of layer feed and no treats for the first 14 days after the prolapse is crucial to help your hen recover. As always, supplement the hen’s diet with free-choice oyster shell.
If the hen is on medication, temporarily withhold herbs or herbal supplements, probiotics or any additional vitamins and minerals unless directed otherwise by your veterinarian.
With the proper care and a trip to the vet, many hens fully recover from an oviduct prolapse and go on to live a happy chicken life.