Do opossums kill chickens? While the opossum will indeed kill a chick or chicken if it is hungry and the opportunity presents itself, this marsupial is actually much maligned.
Having an opossum in the area can actually be beneficial, especially if you live in a rural or agricultural zone.
Why Opossums Can Be Helpful Around Your Yard
Opossums help control the mouse and rat population since these are a staple of the opossum diet. They also consume ticks and are reported to reduce tick populations by 90 percent. They also eat slugs and snails, which is a huge benefit to gardeners.
Opossums are also fastidiously clean, they are resistant to snake venom, and they are rarely rabid (although they can carry the disease). If you notice an opossum trundling around your property, it may be best to just let it be … especially if your flock, coop and run are secured.
Do Opossums Kill Chickens? Understanding Opossum Behavior and Habits
Native to South America, the opossum (Didelphis virginiana) established its presence in the United States and Canada during the 1920s. While it’s uncertain how the opossum arrived in North America, records indicate that this cat-sized omnivore was once farmed for both its grey-and-white pelt and its meat.
Although its natural habitat consists of forests and fields, the opossum easily adapts to inhabit agricultural and suburban zones. It is the only marsupial in North America: the females will carry their young in pouches just like kangaroo mothers.
Nocturnal by nature, the opossum emerges at nightfall for nine or so hours of activity before returning to its shelter just before dawn. Its keen eyesight—more than twice as sharp as human vision—allows it to see easily in the dark.
What Opossums Eat and How They Hunt
Opossums are opportunistic animals, which is why you’ll sometimes find them with your chickens. They have adapted to eat anything: fish, frogs, insects, rodents, and reptiles. A skilled scavenger, opossums can survive on carrion and on the biowaste in our garbage bins and compost piles.
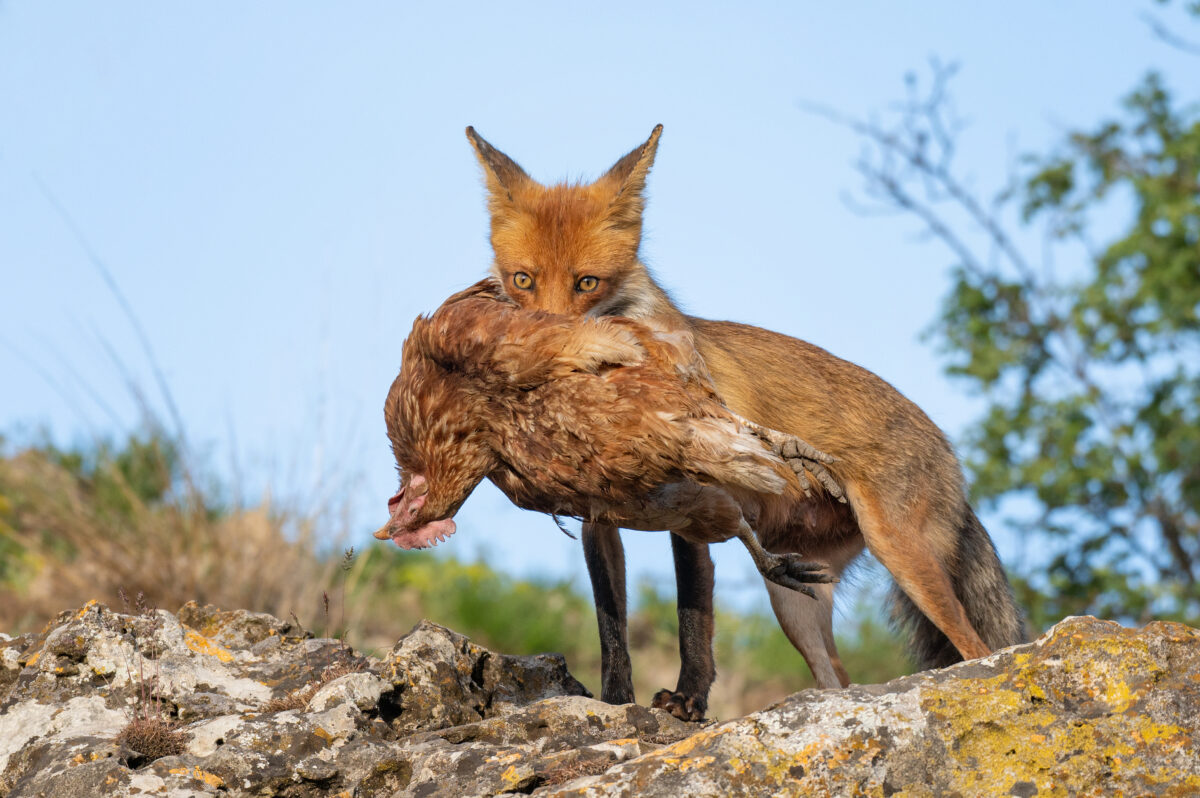
Orchards and vegetable gardens provide plenty of food for opossums … as do chickens and their coops. Despite its fearsome appearance—beady eyes, scaly pink tail and a mouth bearing close to 50 razor-sharp teeth—the opossum is a non-confrontational hunter. Opossums prefer to help themselves to eggs, chicks and nesting hens versus chickens that fight back or attack.
Do Opossums Kill Chickens? Signs Your Coop Was Raided
Invasive opossums may be long gone by the time you release your chickens in the morning. Still, look for telltale signs that an opossum raided your henhouse overnight. Empty, discarded eggshells show that an opossum collected your chickens’ eggs for you and ate them on-site.
While missing chicks can be attributed not just to an opossum but also to a variety of predators, a dead chicken with its underbelly or chest torn open and its insides missing or scattered clearly indicates one or more opossums stopped by for dinner.
How Opossums Access Chicken Coops
There’s always a possibility that you may encounter an opossum on your property. If you leave your garage door open, if you keep your trash bin outside, if you have an outdoor pet shelter with a food bowl, chances are an opossum will eventually come by.
Opossums can also find a way into the coop with your chickens simply by climbing your run’s fence.
Opossums are designed to climb. Each of their feet has five toes, including opposable thumbs, giving this animal the ability and agility to grip fence wiring quite securely (its tail is also prehensile). Once an opossum climbs down the other side of your run fence, it can just stroll right on into your coop.
What to Do If You Encounter One
Should you encounter an opossum, be ready for quite a show. Two shows, in fact. A cornered opossum may hiss, growl, bare its teeth and even snap its jaws at you.
A more likely reaction, however, is that it will “play possum.” The animal freezes and lies so still that it appears dead. If left alone, the opossum will recover from this catatonic state in one to four hours.
Just because the animal is playing possum does not mean he’s more easily handled in this state. Contact your local animal control officer or an animal-removal service.
Do Opossums Kill Chickens? How to Protect Your Flock
Unfortunately, there is no fence tall enough to keep an opossum out. This talented climber will nimbly scale the tallest enclosure if it thinks there are easy pickings or there’s a safe shelter inside. To protect your chickens against opossums accessing your coop via your run, you’ll need to put a cover over it.
Some sort of permanent roof or a section of wire fencing that securely attaches to your existing fence should do the trick.
Do not use chicken wire, as this is not meant to keep intruders out but rather keep your flock in. Predators can easily tear through flimsy chicken wire, so avoid using this material at all. An added bonus to covering your run is that you will also deter aerial predators such as hawks and owls.
Other preventative measures include installing a motion-sensor light over your coop’s entrance, adding a rooster to your flock, and setting up live traps baited with fruit and kitchen scraps.
Coexisting With Opossums on Your Property
My husband Jae and I first noticed opossums on our acreage about five years ago, at about the same time we started having to live-trap rats. (Our silly hens—and some unfortunate songbirds—kept setting off the kill traps.) My first thought was “Great! Another pest to deal with!” My second was, do opossums kill chickens?
By the end of the summer, our rodent problem was over. I haven’t seen a single rat or mouse since, although our neighbor regularly informs me that she keeps finding rodent remains in her yard.
I also know for a fact that our birds refuse to eat ticks. Even our guineas, when we had them, refused to eat ticks. But our property has been tick-free ever since the opossums arrived.
So, do opossums kill chickens? Yes, they can be poultry predators, but their good outweighs the bad. We may not be all hugs and kisses, especially after we spent a very frustrating time trying to coax a juvenile opossum out of our Orpington coop. (The little thing kept playing dead on us and the Orpingtons were fussily clucking in the run, wanting to roost for the night.)
We finally scooped the little marsupial up with a garden hoe and sent him on his way, hopefully, to keep eating rodents and insects in a careful coexistence with our poultry … and with us.
This article about do opossums kill chickens was written for Chickens and Hobby Farms magazines. Click here to subscribe.