A chicken dust bath is a necessity for chickens to keep their feathers and skin, and ultimately their health, in tip-top shape. Plus, nothing makes a chicken happier than fluffing her feathers and wriggling in sun-warmed dirt. Before you set up your chicken dust bath, check out this list of dos and don’ts to provide a fun and safe time.
Life or Death in the Chicken Dust Bath? – A Personal Story
I decided to construct an indoor dust bath for chickens to use during the winter when the frozen ground prohibited them from frequent dust baths.
I constructed the DIY chicken dust bath by filling a flexible plastic mixing tub with dirt and wood ash. Their new accommodations delighted the hens, and they happily scratched through the soil, looking for tasty morsels.
All was well until one day when a strange sound came from my chickens in the barn. I hurried inside to find one of my Speckled Sussex hens, Kristi, wheezing. I rushed her to the vet, where they put her on oxygen and did emergency radiographs to discover the cause. The vet diagnosed her with dust particles in her lungs (probably due to improper ventilation while dust-bathing) and gave her less than a 50% recovery rate.
My vet treated Kristi with a steroid injection and nebulizer treatment and sent her home with additional medications. After receiving around-the-clock care, Kristi returned to the vet for a follow-up the next day, where she was given a clean bill of health.
After Kristi’s near-death incident, I examined my chicken dust bath setup to ensure the safest experience possible.
Erin Synder
Why Do Chickens Need to Dust Bathe?
A chicken wriggling around in the dirt may appear dirty, but this behavior is how chickens keep themselves clean and free of external parasites. As a chicken fluffs its feathers while dust bathing, a protective dust coating settles on the skin, creating a dust barrier to prevent insect bites.
Allowing chickens to dust bathe in a natural setting decreases bullying and cannibalistic behaviors amongst flock members in chicks and adults. Chicken dust bathing is a social event that helps build a strong bond between flock members. This natural behavior also reduces stress, allowing your flock to coexist more harmoniously.
Chicken Dust Bath Dos
How to make a chicken dust bath is easy, but before you begin, here are several things all dust-bathing spaces must have to create a safe and fun enrichment for your flock.
Natural is Best: When given the option, chickens always prefer creating their own dust-bathing area. Nothing makes a hen happier than scratching through new grass to the dirt below. So, providing an artificial dust bath during the summer months where hens can access this natural behavior isn’t recommended. However, in winter, when the frozen ground is covered in snow, chickens will happily utilize any dirt you can offer.
Adding Dried Herbs: Many herbs work as natural insect repellents, so it seems only natural to sprinkle some dried herbs in the dirt where your chickens dust bathe. Catnip, dill, fennel, lavender, mint, rosemary, thyme and yarrow are excellent insect repellents and help deter other vermin such as mice and snakes.
Outdoors Only: Only allowing chickens to dustbathe outdoors versus inside the coop is essential for proper airflow to keep chickens’ airways clean from dust particles.
Refresh the Dirt: When using a kiddie pool, flexible mixing tub,or a child’s sandbox, the dirt should be replaced with new, clean dirt. How often the dirt should be replaced will vary depending on the number of chickens in the flock and how frequently chickens are allowed access to the area.
Erin Synder
Chicken Dust Bath Don’ts
Just like every dust-bathing space has specific needs, there is a list of things to stay clear of when setting up the perfect area for your chickens. Following the suggestions below should ensure the safest experience for your flock.
Indoor Dust Bath: Even in the most ventilated coops, airflow is still more restricted than out in the run. Never put a chicken dust bath in the coop to prevent the risk of dust or dirt entering the airways.
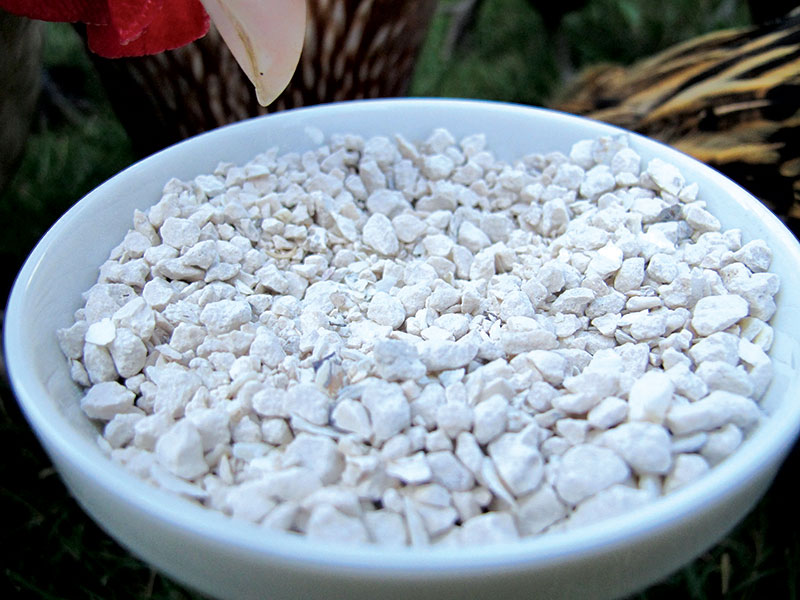
Forget the Wood Ash: Wood ash is often used in chicken dust bath areas. This natural ash has many health benefits but can irritate a chicken’s sensitive airways. To keep hens’ airways clean while providing the health benefits of wood ash and charcoal, feed charcoal free-choice like you would grit or oyster shell.
Stay Clear of Fertilizer: When choosing dirt for a dust bathing area for your flock, avoid soil with fertilizer since many contain harmful substances that can cause illness or death if ingested. (This rule also applies to gardens and lawns.)
Following safe chicken dust bath practices allows your chickens to experience the instinct of dust bathing, stay free of parasites and help to strengthen flock bonds.
This article about chicken dust baths was written for Chickens magazine online. Click here to subscribe.
What to feed laying hens should be top priority as egg-laying hens must be fed correctly to achieve their potential. When their dietary needs are met, laying chickens supply homegrown eggs that are far tastier and more nutritious than typical store eggs.
What to Feed Laying Hens When They Start To Lay Eggs
As female chicks approach laying age at five to six months of age, depending on the breed, their nutrition and dietary needs change because their bodies focus on laying eggs rather than growing. Proper nutrition is also helpful to make sure hens that are laying don’t stop egg laying They don’t require as much protein, but they need much higher levels of calcium, which is necessary for hens to produce eggshells, along with phosphorus and vitamin D.
Commercially available layer rations are designed to provide optimal nutrition for laying hens, and all feeds sold in the U.S. must have a nutrition label. So when purchasing feed, read the label to make sure it’s specifically a layer ration and that it provides protein levels of 16 to 18 percent. Additionally, the percentage of calcium should be in the 3.5 to 4.5 percent range while the level of phosphorus should be 0.4 percent or higher. Young hens may be started on layer rations at about 18 weeks of age, or when the first egg arrives, whichever comes first.
A basic layer ration that contains appropriate amounts of protein, calcium and phosphorus should provide adequate nutrition for egg-producing hens and be the most economical option. Suppliers also offer more expensive feeds that contain additional vitamins and minerals or are specialized in some way. There are feeds with vitamin or omega-3 enhancing supplements, as well as natural, soy-free, non-GMO, organic and others. Choosing among these higher-priced rations is a personal choice based on your chicken-keeping goals.
Food Budget
Feed costs vary widely depending upon the type of layer feed—basic, organic, and so on—and the region you live in. Pelleted feeds are considered more economical than crumbles (aka broken pellets) because adult birds waste fewer pellets. Where I live in Northeastern Ohio, a 50-pound bag of natural layer pellets is about $15. It’s recommended that laying hens have free-choice access to feed, and on average, you can expect them to consume about 1/4 pound per day.
Given the parameters listed previously, a pound of feed costs 30 cents ($15/50 = .30) and 1/4 pound costs 7.5 cents (.30 x .25 = .075). That means it would cost about 53 cents (.075 x 7 = .525) to feed a hen for a week. If that hen laid six eggs per week, then it would cost $1.06 (.53 x 2 = $1.06) in feed for a dozen eggs. This demonstrates how economical home-produced eggs can be and one reason laying hens have become so popular.
Supplement Selections
In addition to free-choice rations, egg-layers should have constant access to clean water, oyster shells and grit, if they are eating anything other than commercial rations. Eggs are primarily made up of water, so water is critical to a laying hen. Just a few hours without water can result in reduced egg production.
Although layer rations contain extra calcium, it’s a good idea to offer oyster shell or calcium grit. Top-producing hens may need more calcium than what is in the feed and will self-regulate the amount of additional calcium they consume. If you are feeding supplemental foods or hens are foraging, then they need grit, too. The only mechanism chickens have for grinding food into pieces small enough to digest is grit.
It takes just a few basic elements to ensure that laying hens receive an optimal diet. The reward for meeting their nutritional requirements are happy hens that provide homegrown, wholesome and delicious eggs.
This story about what to feed laying hens originally appeared in the July/August issue of Chickens. Click here to subscribe.
Feeding chickens is simple, right? You just put up some fencing and let them do the rest, right? Well, not exactly. Many of our domesticated chicken breeds need a bit more in the way of nutrition than their progenitor, the red jungle fowl. This is because humans have bred farm birds to be high producers of eggs and meat. Abundant, healthy output requires feeding chickens abundant, healthy input.
Chickens do have simple digestive systems, “with few to no microorganisms living in the digestive system to help digest food like in ruminants such as cattle,” writes Phillip Clauer, poultry extension specialist at Penn State University in “Biology of the Fowl.” “Chickens depend on enzymes to aid in breaking down food so it can be absorbed, much like humans.”
Here are a few things to consider as you look at the feeding system for your chickens.
1. Always Offer Age-Appropriate Feed
A rapidly growing day-old chick needs higher protein than an actively laying hen or a bird in molt, for example. Each age and stage of a bird’s development—throughout its life and throughout the calendar year—commands a different ration.
When feeding young chickens, offer starter feed or broiler feed, depending on their purpose, free-choice, meaning, make it available at all times.
Laying hens should be offered a layer feed, designed with the proper amount of protein for hens actively laying eggs. Birds in molt need higher protein in general; feathers consist of more than 85 percent protein, and it takes a lot of energy to grow new feathers. This can often be supplemented in other ways.
2. Feeding Chickens: Keep Treats Seasonal
If you live and tend to a flock in a region with fluctuating seasons, keep the months in mind when providing treats.
High-protein treats, such as mealworms, are great in the fall, when many birds are molting.
Scratch, as a fatty snack, encourages a bird to bulk up. Reserve for winter.
When laying resumes in the spring, support your hens with fresh abundance of their calcium-rich layer feed (preferably organic).
In summer, follow the season and offer green treats, particularly allowing ample time to forage.
3. Free-Range Often
A happy chicken is a foraging one. Every bird should know the freedom of ranging, the warmth of the sun and the satisfaction of hunting its own feed. The emotions of your chickens aside, an active bird is a healthier bird, and feeding time plays into this. Adding variety to the diet and keeping the fat stores around its reproductive system to a minimum increases egg laying and fertility.
4. Feeding Chickens: Remember Supplements
For laying hens, calcium supplements are critical. Many chicken keepers offer them in the form of oyster shells, produced and sold for this very purpose.
“Laying hens use the calcium from their bodies to form eggs,” writes Pam Freeman in Backyard Chickens: Beyond the Basics (2017). “Almost half the calcium a hen needs to form an eggshell comes from her bones.” If they aren’t getting enough calcium to replenish their stores, their bones can become weak.
For birds that are lucky enough get kitchen treats and compost access, provide the right-size grit free-choice in a separate feeder in the coop. Grit assists in digestion, as a chicken doesn’t have teeth, but rather a gizzard, an oval organ composed of two pairs of thick red muscles.
“These muscles are extremely strong and are used to grind or crush the food particles,” Clauer writes. “This process is aided by the presence of grit and gravel picked up by the bird.”
Offer oyster shells and grit in their own containers, separate from the feed and full at all times. Flock members will take what they need when they need it.
5. Water Is Essential
Summer or winter, hot or cold, access to fresh clean water is an absolute must. Consider water the most critical “feed” element—even before feed. Laying hens that go without water for just 24 hours might experience decreased laying abilities for a month or more. Hens that go without water for a longer period might sustain irreparable damage and never fully recover their egg-laying frequency.
“Water helps to remove waste products produced by food and exercise,” writes chicken-keeper Virginia Shirt in The Right Way to Keep Chickens (2007). “As food is eaten, water softens the corn or pellets and aids the extraction of vitamins and minerals from the food. Chickens, being small animals, do not ingest great amounts of water at a time; however, they do make many visits to the water supply throughout the day.” Also, many supplements are administered by being added to water.
It’s true that chickens are easy and don’t ask for much. Anticipating their needs and meeting those needs before anything goes awry keeps them happy and healthy in the long run. Good food, plenty of water, a few extras and access to the outdoors will keep your flock in tiptop shape.
This article about feeding chickens was written for Chickens magazine online and is regularly updated for accuracy. Click here to subscribe.
Chicken feed one hundred years ago looked very different than what we feed chickens today. Feeding chickens with nutritionally balanced, bagged livestock and poultry feed is a fairly recent and welcome development. One hundred years ago, poultry keepers grew their own produce for feeding chickens or fashioned it from bulk ingredients.
Consider chick starter. In 1909, Arthur Johnson wrote Chickens and How to Raise Them. In it he stressed the importance of chicks’ first meals to a healthy start.
“For the first meal, there is nothing like the old-fashioned hardboiled egg and stale bread crumbs, the former being well minced and mixed up with the latter,” he wrote. “A little of this should be sprinkled upon a sack, and the chickens will in most cases immediately begin to eat.”
In a couple of hours or so, Johnson said, the chicken keeper may offer another meal. The next day, the chicken keeper could add some coarse oatmeal to the mixture.
“Unfertile eggs are just as good as fresh ones,” he wrote, “but this food should not be used exclusively or excessively, and not after the third day, unless the chickens are very weak and the weather against them. Having discontinued it gradually, some scalded biscuit-meal may be given with the oatmeal, and green food added to the bill of fare.”
Chicken Feed: Going Green
Green food enjoyed high regard in the day. It still impacts the fare of our chickens, whether chicks, layers or slow-growing heritage meat birds. Johnson couldn’t stress enough the importance of a good supply of fresh, juicy vegetables, particularly in late winter, when green is hard to find.
“Lettuce, cabbage and onions can always be obtained, and the last-named is an excellent vegetable for chickens if minced up,” he wrote. “They are cheap, always obtainable, wholesome and prevent many diseases.”
Myrtle Wilcoxon wrote Common Sense on Poultry Raising in 1906 and heartily agreed. Her favorite chicken feed from the garden was the mangel-wurzel, also known as the mangel or fodder beet, an astoundingly productive, easy-to-grow, old-time vegetable still right for today’s poultry garden. A single root weighs as much as 20 pounds, and mangels keep well in winter storage.
“Where fowls are kept in pens and yards throughout the year, it is always best to supply some green food,” she wrote. “During the winter and early spring months, mangel-wurzels, if properly kept, may be fed to good advantage. The fowls relish them, and they are easily prepared. As it is not difficult to grow from 10 to 20 tons of these roots per acre, their cost is not excessive.”
Chicken Feed: Beets
When feeding chickens beets, Wilcoxon advised splitting the root lengthwise with a large knife. The chickens can then pick out the crisp, fresh food from the exposed cut surface. Large pieces have the advantage over smaller pieces in this respect: The smaller pieces when fed from troughs or dishes fall into the litter and soil more or less before consumption. Large pieces can’t be thrown about as easily and remain clean and fresh until wholly consumed.
Fanny Field, author of The Excelsior Poultry Book (1891), preferred cabbage and clover. “If we would keep our fowls in the best of health and have them lay regularly in cold weather, we must supply them with some kind of green food that will, as nearly as possible, fill the place of the green grass that they get while at large in warm weather,” she wrote. “Some poultry raisers claim that raw cabbage is ‘the best’ green food, while others declare that clover is better than cabbage. I think the better way is to feed both if you can get them.”
Field advised to hang the head of cabbage to the side of the coop. There, the birds could reach it and let them help themselves. Don’t worry about their eating too much good food, she wrote. “When it is where they can get at it all the time, they won’t eat enough to hurt them.”
Recycled Food
In addition to green food, turn-of-the-century chickens ate rations comprising grains, protein from milk or meat, and scraps from the family’s table.
“Bits of bread, cheese, meat, cake, pie, doughnuts, all kinds of vegetables are served up to the hens,” Field wrote. “Nothing in the way of food comes amiss. Of course, where a large number of fowls are kept,
the table scraps will not be sufficient to make the fowls’ breakfast every morning, but if all the scraps are carefully saved in something kept for the purpose, there will be enough to give an occasional breakfast that will be liked by the fowls.”
Field’s preparation included scalding or boiling the table scraps enough to soften them. She then mixed in enough wheat bran to make a stiff, crumbly mass.
“For some of the other breakfasts, boil up the small potatoes, apples, turnips, carrots, beets, parsnips, beans, peas, squashes, pumpkins, celery tops, sometimes one thing, sometimes another. Mash them, and then mix up with bran and shorts [wheat middlings] and sometimes a little cornmeal,” she wrote.
Chicken Feed: The Ideal Plan
In The Home Poultry Book (1913), author Edward Farrington described an ideal feeding plan for a small flock of chickens.
“Good sound grain in variety, with a mixture of ground grains served as a mash, a certain amount of meat in some form and green food in abundance will fill all the requirements,” he wrote. “The grains to use are corn, oats, wheat, barley and Kaffir corn [sorghum]. Corn, oats and wheat are the grains to be depended upon month in and month out. The others are fed to give variety but really are not necessary.”
Farrington especially adored corn. “Corn is the best poultry food there is, and the danger that it will make the fowls too fat to lay is a bugaboo to which little attention need be paid. Cracked corn is better than whole corn simply because it makes the hen work harder to fill her crop, and exercise is important.”
The Spice of Life
Fanny Field, Biodiversity Heritage Library
The Excelsior Poultry Book author Field earned a reputation as an outspoken lady. And she really loved chickens. Her nutrition advice included feeding chickens a variety. This was not just for health reasons but because the chickens needed it for their mental well-being.
“Don’t give the same kind of cooked food every morning right through the winter,” she wrote. “Give as much variety as possible. I don’t like the same kind of breakfast 50 or 60 mornings in succession. And I don’t believe hens do either.”
Wet Their Whistles
Our authors stressed that supplements and plenty of water are important, too.
“Only the veriest tyro [beginner] needs to be told that oyster shells and grit must be kept in hoppers where the hens can have access to them at all times,” Farrington wrote.
He also noted that without water, hens will not lay eggs. During summer, he advised providing fresh water at least twice a day.
“It is an advantage to have the water dish in a shaded place outside the house and an iron or earthenware dish will help to keep the water palatable,” he wrote.
Field addressed winter water for hens in the same way she addresses feeding chickens. She was direct, with her chickens’ welfare in mind.
“Many farmers who would not think of depriving their fowls of drink in warm weather, make no effort to supply them with water in cold weather,” she wrote. “They seem to think that the biddies can get along somehow without drink, but the fowls that ‘get along somehow’ are not the ones that pay dividends.”
During cold weather, Field suggested keeping a supply of pure, fresh water available to your flock during the greater part of the day. And be sure it’s a bit warm.
“Warm drink and warm food makes the fowls feel comfortable,” she wrote.
Vintage poultry books contain a lot of interesting, often adaptable old-time advice for chicken feed. Download a few from the Heritage Biodiversity Library or buy reprints from today’s booksellers. They are fun to read and informative, too.
Free Library
All the vintage poultry books we discuss in this column are available from the Biodiversity Heritage Library, a consortium of libraries dedicated to making digital a huge array of old-time natural history and agricultural books and journals so they’re available as free downloads to anyone who wants to read them.
More than 200,000 titles are available, including more than 50 general-interest poultry books. And a plethora of books just about chickens including breeds and bantams, geese, ducks, turkeys and guinea fowl. It’s a resource every poultry keeper should have.
This article about chicken feed was originally written for Chickens magazine online and is regularly updated for accuracy. Click here to subscribe.
Oyster shells for chickens can help them to lay eggs with stronger eggshells. While we don’t often think about the purpose, composition or strength of eggshells, there are serious implications associated with the structural integrity of an eggshell, including hen health, the viability of a developing chick and even human health.
Calcium Conundrum
Eggshells consist primarily of calcium. For a hen to make an egg, she needs calcium from somewhere. However, most of us stop thinking about it after we purchase a bag of oyster shells and a commercial layer feed that contains calcium.
Why should we offer oyster shells for chickens along with this layer feed? A second source of calcium should be available to support the health of the hen in addition to helping her create strong eggshells.
Many people feed the cleaned, dried eggshells back to their laying flock instead of oyster shells, believing this will accomplish the same objective. However, that is not the case, and the reason relates primarily to size.
Let’s take a deeper look at why laying hens need oyster shells in their diet and why offering eggshells back to them does not offer the same benefits to hen health and shell strength.
Oyster Shells for Chickens: Food and Health
Chickens and humans are different in a lot of ways, but we’re similar in that what we eat affects our health as well as how our bodies perform various functions. As any woman who has struggled with fertility issues knows, diet affects egg production and egg quality; similarly, a hen’s egg production and quality are affected by her diet.
A hen, however, is much more sensitive to getting her daily nutritional needs met than a woman, for a variety of factors including a hen’s distinct anatomy, her high metabolism and because she produces many eggs each month rather than just one. In order for a hen to be healthy and make strong eggshells, she must have access to precise amounts of specific nutrients—most notably, calcium—in specific forms, at particular times throughout each roughly 24-hour period.
Eggshells are approximately 95 percent calcium carbonate. To produce an eggshell, the calcium must come from a hen’s diet. In fact, a laying hen must consume approximately 4 grams of calcium per day to get the 2 grams of calcium needed to make one eggshell, which is three times more dietary calcium than required by nonlaying hens.
The most common sources of calcium carbonate fed to laying hens are crushed limestone and oyster shell. Commercially prepared layer feeds ordinarily contain crushed limestone, while oyster shells for chickens are usually offered as a supplement in a dispenser or hopper alongside the feed. I offer oyster shells to my hens free-choice to allow each hen to regulate the intake to meet her specific calcium needs.
Calcium carbonate must be broken down into its calcium and carbonate components in the hen’s intestine before being absorbed into the bloodstream, where it’s delivered directly to the shell gland (the uterus); any extra is then stored in the hen’s bones.
Laying hens store calcium in specialized bones called medullary bones. Think of a medullary bone like a sponge filled with calcium that is encased inside a hard, hollow bone. The hard bone is the cortical bone, which is responsible for strength and stability.
If a laying hen doesn’t have calcium trickling into her bloodstream while making an eggshell, she will steal it from the calcium stash inside her cortical bones. This calcium theft can cause brittle bones that fracture easily (osteoporosis), and in the most severe cases, the inability to stand, which is known as caged-layer fatigue.
Shell to Shell
It pains me to break some of my hens’ colorful masterworks, intentionally or unintentionally, but when I do, it’s a consolation to know that I can feed the clean, dry, crushed shells back to the ladies for use in making new shells. However, feeding eggshells back to a hen is not sufficient to supply her with the resources she needs to create new, strong eggshells and to remain healthy.
Mixing clean, air-dried eggshells into oyster shells for chickens is fine, but eggshells, much like crushed limestone in the feed, are a fast-release source of calcium, which isn’t available to a hen during the most calcium-demanding portion of eggshell production: at night while she’s sleeping. The take-home message: Eggshells offered with oyster shell are fine but aren’t a sufficient source of supplemental calcium by themselves.
Oyster Shells for Chickens: Size & Timing Matters
The time it takes for most food particles to pass through a chicken’s digestive tract is approximately 90 minutes. When a hen is awake and eating layer feed, crushed limestone is dissolving into her bloodstream quickly, getting where it needs to go. However, it takes approximately 25 hours for a hen to construct an egg. Eighteen to 20 of these hours are dedicated to shell formation, the bulk of which occurs at night while she is sleeping. Do you see where we’re going with this? When a hen is asleep, she is not eating and therefore doesn’t have access to the calcium in her feed to use for building the shell. That is a major problem because while building an eggshell, a hen can use and replace the calcium she carries in her bloodstream as many as 100 times.
So, what’s a girl to do in the middle of the night when she craves calcium on the graveyard shift? While she won’t stop making the eggshell without crushed limestone in her bloodstream, she will continue building the eggshell to the detriment of her own health with calcium she pillages from her bones to finish the job. That is unless—cue the dramatic music—she has a second source of slow-release calcium to tap into late at night.
The large particles of oyster shells serve as a slow-release source of calcium for a hen. They sit in her gizzard, where they are ground up gradually throughout the night for use as the hen needs them. If you pay attention to your laying hens just prior to roosting time each night, you will notice that they pick up pieces of oyster shell, readying themselves for their night job.
Strength Equals Health
A hen cares about eggshell strength, and so should we. Let’s remember that the purpose of eggs is to make more chickens, not breakfast food. If fertilized by a rooster, the contents of an egg can contribute to the perpetuation of the species. For a fertilized egg to have a chance at developing into a healthy chick, it must be protected from harm, including bacteria sneaking in through an eggshell’s approximately 7,000 to 17,000 pores. A strong eggshell is a critical defense against threats to the survival of a developing embryo. That’s a lot of pressure on a hen to make a quality product.
Most eggs laid in today’s world are destined for human consumption. Why should we care about eggshell strength? Two words: food safety.
When we think about eggs and food safety, we often concern ourselves with issues such as whether an egg is clean or dirty when collected, washed or unwashed, and stored in the refrigerator or on the countertop. Defending an egg’s contents against bacterial invasion is an eggshell’s primary function, and a strong eggshell is an important defense against bacteria getting into our food.
Here’s a quick test for eggshell strength you can try at home with the kids. Crack an eggshell on a bowl, and take a look at the resulting break. Did the shell break in a straight, clean line or was it jagged and haphazard? A clean break signals a strong eggshell while a jagged or messy break suggests the need to reassess the hen’s diet with a close look at the sources and forms of her calcium intake.
This story about oyster shells for chickens originally appeared in the May/June 2018 issue of Chickens magazine and is updated for accuracy. Click here to subscribe.
Vegetable gardening with kids can be a lot of fun. Here’s a list of fruits and vegetables perfectly suited to a children’s garden to help get you started. But don’t let the fun stop here—let your kids’ imaginations run wild and don’t be afraid to try something new in the gardening realm.
1. Parisian Carrots
Pinetree Garden Seeds
Carrots tend to be a favorite when vegetable gardening with children, but we love this small, round, heirloom for small hands to harvest. Parisian carrots have a consistently sweet flavor, and are ready to harvest in a shorter amount of time than full-length carrots. They grow well in difficult clay or rocky soil but are also perfectly sized for container gardening. Be sure to provide this variety plenty of water, and they’ll be sure not to disappoint your little ones.
2. Easter Egg Blend Radishes
Johnny’s Selected Seeds
What could be more fun than an Easter egg hunt? Digging up colorful radishes in pink, purple, red and white, of course. While radishes might not be at the top of your little eaters’ favorite-foods list, kids will want to pop one of these pretty, mild-flavored globes into their mouths after having pulled them from the ground. Easter egg radishes have a crisp, mild flavor and can be harvested in just a few weeks after direct-sowing into the garden.
If your kids are hesitant to eat the radishes raw, consider baking them with a little salt and butter to bring out their sweetness. Or mix them raw in a food processor with a stick of butter to spread on bread as a snack—the butter mellows out the radishes’ bite.
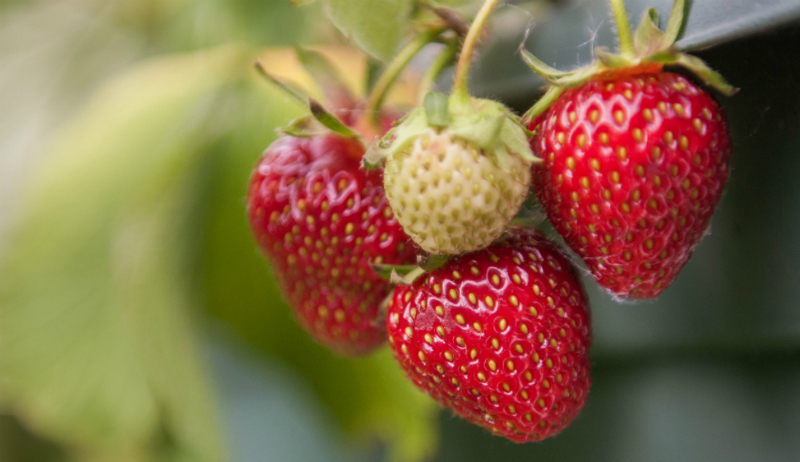
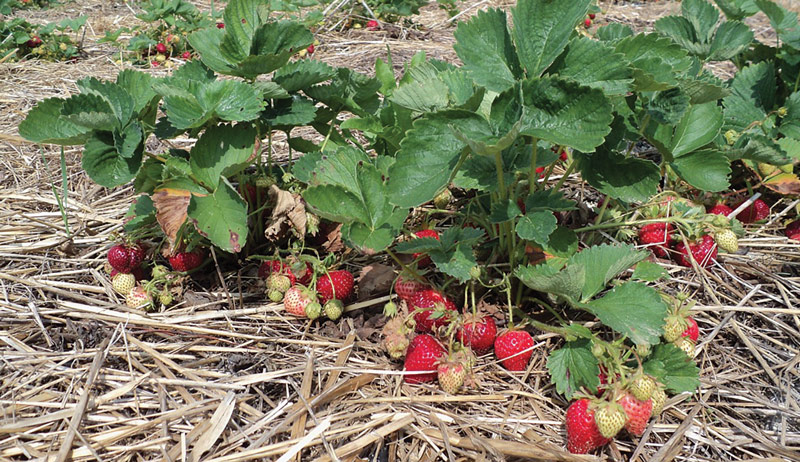
3. Strawberries
Ajith/Flickr
Strawberries are a no-brainer for children’s vegetable gardening because kids love them, they come back year after year, and they will spread on their own to fill the container you plant them in. When choosing strawberry plants, look for everbearing varieties, which produce fruit all season long. For something a little different, try pineberry strawberries, a white variety that tastes like pineapple.
4. Cherry Tomatoes
Bonnie Plants
Tomatoes are a must for adults and children in vegetable gardening because the flavor of a garden-grown tomato beats a store-bought variety every time. Cherry tomatoes in particular capture the imaginations of children, perhaps because they are so plentiful and easy to pick. A child just can’t help but pop a few in his or her mouth while wandering through the garden. Try sweet, disease-resistant varieties such as Sun Sugar (a yellow cherry tomato) or Super Sweet 100 ( a red tomato)—but be aware that they might do better in raised beds than in pots and will need to be staked or caged to keep their indeterminate vines off the ground.
5. Purple Potatoes
Seacoast Eat Local/Flickr
Growing potatoes is like growing your own buried treasure. While any type of potato can be fun for youngsters in a vegetable gardening project, kids will be especially delighted by purple varieties—and it can be an excuse for you to introduce more color into their diets.
To plant, cut seed potatoes so there’s at least one eye per piece. Space the potato pieces at least 3 feet apart in the garden and about 5 inches deep. As the plants begin to sprout, hill up the soil around the stalks until the plants begin to blossom. (For containers, choose a deep container, and add soil to it as the plant begins to grow.) Then continue watering them. Once the plants begin to die back, you can dig up the potatoes. Feel free to dig them up all at once, or leave potatoes in the ground to preserve them until you’re ready to use them.
6. Sugar Snap Peas
Johnny’s Selected Seeds
A cross between flat snow peas and garden peas whose pods are inedible, sugar snap peas are a fun addition to a children’s garden because they can be eaten fresh or cooked, whole pod or not. Look for stringless varieties so that small children don’t choke on the strings. The peas can be planted straight into the garden in early spring and will need to be trellised. Incorporate something fun into the garden as a trellis, such as the side of the children’s swing set or a teepee trellis that the kids can climb inside.
7. Baby Greens Mix
Johnny’s Selected Seeds
This is another small plant for small hands and one that will work well in containers as well as raised beds. By incorporating a mix of greens—spinach, kale, chard, arugula and others—your children will get to explore a variety of colors, textures and flavors while getting their daily dose of roughage. Start planting baby greens when the weather is still cool, and continue to sow until warm weather causes plants to bolt and turn bitter. Have children harvest with scissors daily or as leaves are big enough for a tender salad mix. If they don’t get to the harvest in time, don’t sweat it—the full-grown versions of the greens are just as tasty.
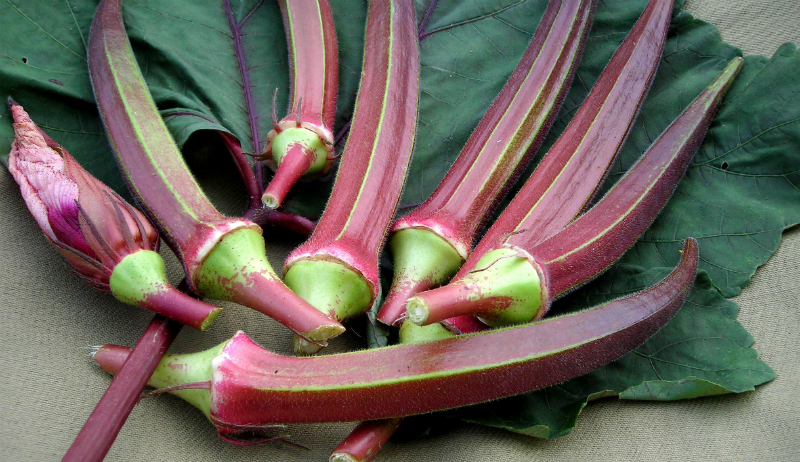
8. Okra
Southern Exposure Seed Exchange
Okra is a fun plant for kids because it’s a flower as well as a vegetable. During the day, okra plants boast big beautiful flowers (which can be eaten, too, if you want to try a fun experiment). The okra grows very quickly once it comes onto the plant. Your children will be amazed at how its size changes from day to day, and there will always be something for them to harvest. To add an extra splash of color to the garden, look for a red variety, or plant a mix of green and red okra.
This article about vegetable gardening with children was written for Hobby Farms magazine online and is regularly updated. Click here to subscribe.
Gardening tools always include the classics like the digging shovel, the hand trowel, the hoe, the hand cultivator and more. In fact, we’ve compiled a list of these must-have items (see below). But your collection of gardening tools isn’t complete when you’ve covered the basics. Some might argue it’s impossible to truly “complete” a collection because there are so many niche and custom tools you can employ to make gardening better and easier. Like my favorite bamboo pole planter, for example.
That’s why we’ve compiled a list of five less obvious items you’ll want to have on hand when spring rolls around and you’re ready to prepare and plant your garden. Are they absolutely critical? Not necessarily. But they can certainly make life easier.
Tending to a garden requires many hours spent in the sunshine. To avoid sunburns, add sunscreen to your gardening tools. This is especially helpful if you’ve spent a long northern Wisconsin winter indoors or bundled up in winter coats so the sun never reaches your skin. (I speak from experience.)
2. Cardboard Boxes
Cardboard boxes of all sizes are highly useful in a garden. You can set one by a garden bed and toss in plant matter as you weed. You can fill them with worn-out plant materials (frost-bitten tomato plants, sunflower stalks, etc.) at the end of the growing season.
They’re handy for transporting dirt, compost, dried leaves and other materials around the garden. They can even serve as emergency cloches on cold nights. Just don’t leave the boxes out in the rain or they’ll fall apart, which can make quite a mess if the box was stuffed full of weeds and dirt.
Decorative signs labeling your garden plantings are both picturesque and effective, but sometimes you don’t have a sign for every type of plant you’re growing. Or maybe you need more information than a sign that says “Tomatoes” can provide. (Maybe you’re growing 15 varieties of tomatoes and need to remember where each individual type is planted.)
That’s why you need an outdoor marker on your list of gardening tools. I grow plants in wooden raised garden beds, and it’s simple and easy to write the types and varieties of plants in ink on each bed. If you’re not using raised beds (or if you’d rather not write on them), just cut a few slats of wood and stick them in the ground as homemade markers.
A quick DIY approach with scrap wood and an outdoor marker is better than forgetting which plants are which.
4. Rolls of Twine
If you’re not sure where and how you would put twine to use in your garden, don’t overthink it. Just buy a roll and have it ready with your gardening tools. The needs will become apparent soon enough.
Obviously twine is useful when building trellises for plants like peas to climb, but it can also be used to help large and gangly plants that need extra support. Think of giant sunflowers trying to blow over in the wind or a tomato plant that is trying to fall over under the weight of its crop.
5. Scissors
You could cut twine with a knife, but scissors are easier and you’ll put them to use in countless other ways. Whether you’re deadheading flowers or opening a bag of organic fertilizer, you need to have a pair of scissors (perhaps even several pairs) in your garden.
Congratulations! With these extra items, you’re elevating your gardening game to the next level.
This article about gardening tools was written for Hobby Farms magazine online and is regularly updated. Click here to subscribe.
Perennial plants and plantings (by definition, those living for more than two years) can be worth the time and investment for future gardening efforts. Yes, there are some additional planning steps to take, but the best gardens emerge when you know your soil’s texture, fertility and drainage and what each of your plants prefers.
Perennial Profits
There are many advantages to perennial crops, whether fruits, flowers, vegetables or herbs. Because of their multiseasonal, established nature, they greatly contribute to the organic matter, porosity and water-holding capacity of the soil, meaning that over time, they’ll be able to produce increasingly better crop outcomes.
Root systems, having years in which to grow, will reach to lower-level soil minerals and moisture and establish beneficial relationships with mycorrhizal fungi. This will also enhance their ability to reach these resources. The result is increased drought resistance as well as a measure of disease and pest resistance and a more mineral-rich foodstuff in the case of edibles.
Perennials kept in good shape will pay for themselves and more, not requiring the repeated outlay of money annuals do. Consistent mulching will help with this maintenance by suppressing weeds as well as conserving moisture, which also helps to diminish the need for intensive watering routines required with annuals.
Perennials remove the pressure for speedy yet well-timed soil bed preparation in the changeable spring weather as well. The planting of crops can often be delayed until conditions are more ideal.
Perennials will extend your fresh food eating throughout the year. Many of the herbs and vegetables are harvested in spring in advance of the annuals found in a typical outdoor garden. Others offer foodstuffs throughout the season and into the autumn months as the annual garden is ending. This includes some leaf and shoot crops but also many roots and nuts.
And if you raise enough variety of fruits, you can establish a constant supply of food for the entire growing season. Additionally, many perennial crops offer rather high yields, especially when considered in terms of “per footage of plants.”
Many perennials are such beautiful plants that they will ornament your homestead in addition to their other benefits. Plus, they’re advantageous in sales and marketing terms. Many are rare and pricey when sold, yet the higher cost, space and specialized skills growing them requires often makes them less attractive for growing to potential customers of yours who may be dabbling with an annual garden.
garden perennials perennial plants
Perennial Problems
Before you plant all your garden space to perennials, let’s acknowledge their drawbacks. To begin with, many perennial edibles are simply foreign to the American diet. This could be a great opportunity to try something new, but not everyone likes the unfamiliar.
Some have strong or unique flavors.
Though (as perennials) their plants are always present and growing. They aren’t always at the edible stage and do have to be managed/cut back to encourage the proper growth. Some perennials are slow to establish (certainly all are slower than annuals). It may be several years before it’s time to harvest from them.
If they do develop pest or disease issues, you won’t be able to move them away from it as crop rotation can achieve in the annual garden.
Perennial areas can foster the growth of perennial weeds, which are tenacious by nature and, given the lack of tilling, doubly difficult to be rid of. Some perennials (especially flowers and herbaceous and caning fruits) will grow so thickly that they must thinned to be kept in productive shape. Lastly, there are perennials which are so hardy, adaptable and prolific that they can become “weeds” and expand into areas not intended for them.
Perennial plants need to be carefully placed on your homestead as they’ll be more or less permanent. You must take their light level, moisture and soil preferences into account and consider their future size and shape (particularly with bushes and trees). If tillage is part of your annual garden maintenance, you’ll need to keep your perennials somewhat removed from annual areas so that damage isn’t done to their roots.
Permaculture designs are an increasingly popular way to build perennials into your landscape and garden. This is done by layering plants to construct a plant guild in which above and below ground spaces are all occupied with different plants at each level.
This allows for the addition of many different species in a relatively small space, and by imitating natural ecosystems (as permaculture is meant to), it fosters greatly beneficial relationships between plants, soil/soil organisms and insects. Typically, fruit or nut trees form the anchors of the plantings, with herbaceous and vining plants, fruiting canes and shrubs filling in their understories.
Plant guilds are based on more than sharing space effectively. Nitrogen-fixing plants will benefit their closest neighbors, as will those that produce quantities of aboveground biomass and/or mobilize soil minerals. Taller members of the guild can act as trellises for vining plants and/or offer shade to those which thrive with some protection from the sun. Managed herbaceous plants in the understory will function as weed barriers. Also, any plants especially attractive to beneficial insects will be to the betterment of the whole guild.
Perennial Participants
A plant will only be a perennial in your area if it’s hardy enough (and your winter is mild enough) for it to survive. I live in hardiness zone 5, where perennial herbs are numerous and include garlic and onion chives, oregano, thyme, lemon balm, winter savory and many mints, to name a few.
Flowering perennials with marketing value (and general beauty) include daffodil, delphinium, dianthus, foxglove, hydrangea, lavender, lupine, narcissus, peony and pussy willow.
Most fruits come from perennial plants, whether they’re herbaceous (e.g., rhubarb and strawberries), caning (raspberries and blackberries), bushing (currants and blueberries), or trees (pears and apples). There are so many fruits that’ll grow in the temperate areas (not to mention varieties of the same); it would take too much space to name them all.
But given the variety of forms, it’s clear they’ll fill many niches in a perennial area.
Perennial vegetables are particularly interesting to the homesteader for various reasons. Asparagus is probably of chief commercial interest and an excellent crop for selling your excess to make good money. Sea kale and sorrel are apt examples of crops that “travel” poorly and so will be missing from your plate if you don’t grow them yourself.
If you have never made your own horseradish, then you have never had good horseradish. The homemade quality is incredible.
And bunching onions define convenience. They lack the rigid scheduling of annual scallions for planting and harvest but offer a phenomenal end result of which you can pick as much or little as you want at your leisure.
Here are more details of some of the most common perennial vegetables.
Leah Smith
Asparagus
The popular spring favorite is one of the best-known perennial vegetables. Fully mature beds, kept fertile, can produce an almost daily harvest for more than a month.
Bunching or Egyptian Walking Onion
This allium is planted in late summer and can be harvested and used as a scallion later that year or the following spring. Their seed stalks produce small bulbils which can serve as tiny onions and/or be allowed to “walk” down to the ground to plant themselves again!
Common Sorrel
The tangy, almost lemony taste of these leaves is usually used to add flavor to soups, stews, salads and sauces. Common sorrel (Rumex acetosa) grows up in the spring. It will eventually go to seed, but cutting mature leaves down to just above ground level will cause the plant to send up new, young leaves once more.
Note: It’s usually used in moderate quantities and/or cooked to avoid an excess of the oxalic acids present in the leaves.
Horseradish
Horseradish root makes an incomparable condiment and fermentation ingredient. It is best to harvest the roots when the plants are dormant. Having done their most substantial sizing up in late summer and early autumn, the two ideal harvest times are autumn after a killing frost or early spring as green shoots are just beginning to show.
Lovage
Often used as a celery substitute, it is the lovage leaves that are harvested. Its more assertive flavor (than celery) means fewer leaves are required to impart their terrific taste. Young leaves should be harvested. Growing plants can be cut back two or even three times during the summer (prior to flowering) to encourage regrow and another crop!
Leah Smith
Sea Kale or Crambe
Crambe maritima has edible shoots, roots, leaves, florets, flowers and seed pods (which look like green peas). It also has a bushy growth habit and, yes, tastes like kale. Exceptional for its tolerance of salty soils, it can be grown almost anywhere with decent drainage and loose soil (to at least a 12-inch depth). Once established (after three years), it can be managed around harvests, though it tends to peak in spring and early summer.
Jerusalem Artichoke or Sunchokes
Helianthus tuberosus—the underground tubers of this plant can be eaten raw or cooked. Allow plants to die back and begin harvesting after the first frost. Tubers don’t store well, so dig as needed before the soil freezes (and the residual tubers will produce next year’s harvest).
Watercress should be continuously cut back to encourage the leafy, young, tender growth that is best for eating. Not surprisingly, it must be grown in soil that is continuously damp-to-wet. But when kept happy, it will be back year after year.
Bonus
Though garlic, shallot, radicchio, kale, kai-lan/gailan (Chinese broccoli/kale), early purple sprouting broccoli, scarlet runner bean and even Irish potato are commonly grown as annuals, they can be managed as perennials—particularly if you’re only interested in household-scale production.
Depending on the crop, the use of hard cutting back, harvesting/leaving residuals, preserved growth/regrowth, self-seeding and, in all cases, heavy protective winter mulching can be used to produce perennial beds of these crops—with a little bit of practice!
More Information
The Truly Unique
In addition to the more commonplace perennial edibles, many plants which aren’t yet widely embraced in the Western diet are well worth a look!
Bronze Fennel (Foeniculum vulgare ‘purpureum’ and F. vulgare ‘rubrum’), also called smokey fennel. Possessing the same licorice flavor, its feathery leaves can be used as a culinary herb interchangeably with the fennel found in annual gardens (but don’t harvest the bulb, as this will kill the plant).
Cornelian Cherry (Cornus mas), a member of the dogwood family with fruits that resemble coffee berries in appearance and a cranberry/sour cherry hybrid in taste.
Daylily (Hemerocallis spp.), commonly grown here as yard ornamentation and not for their edible flower buds which are used as green bean substitutes or battered and fried in other parts of the world.
Good King Henry (Chenopodium bonus-henricus), a spinach relative whose shoots, leaves and flower buds are much valued in Europe.
Groundnut (Apios americana), a vining, nitrogen-fixing plant with protein-rich, potatolike tubers for autumn eating.
Honeyberry (Lonicera caerulea), also called haskap, is ready to harvest in June. Its sweetly tart or tartly sweet taste defies definition, having been likened to grapefruit, grapes, kiwi and tart cherries, or as an amalgamation of blueberry and raspberry with either strawberry, rhubarb or black currant and elderberry undertones.
Ostrich Fern (Matteuccia struthiopteris), again grown as ornamentals when you should be eating their fiddleheads.
Salad Burnet (Sanguisorba minor), an uncommon herb whose leaves have a decorative appearance and cucumber-
like flavor.
Environmental Advantages
Perennial plants have more to offer than simply dependable crops. They perform a variety of functions which will benefit the environment at large as well as your homestead, including:
atmospheric carbon sequestering
building topsoil
reducing water dependency
fostering a healthy (tillage-free) soil food web
erosion control (as ground covers or hedges)
providing habitat and food sources for beneficial insects and pollinators
providing habitat and food sources for wildlife
This article about perennial plants originally appeared in the March/April 2023 issue of Hobby Farms magazine. Click here to subscribe.
Herbs can be a great addition to your cut flower farming. Odds are your mind goes to zinnias, sunflowers and dahlias. These are classics among the cut flower world. But while focal flowers are great, every cut flower garden needs a bit of greenery! Greenery adds texture and intrigue to cut flower bouquets and arrangements, and is an absolute must for your cut flower garden.
Thankfully, growing greenery can be simple. You might already be growing some wonderful cut flower foliage in your garden without even realizing it. My trick for amazing bouquets? Herbs! That’s right, herbs can make excellent cut flowers and are a wonderful addition to flower bouquets. Not only are they easy to grow, but they add a wonderful fragrance to your cut flower bouquets.
Fragrant Mint
Mint is perhaps the easiest herb to grow on this list, but you’ve got to be careful planting this one. Plant mint in pots, raised beds or in an area in which it cannot spread, as mint can quickly take over if left unattended for too long.
This herb comes in countless varieties such as orange mint, chocolate mint and pineapple mint, each with a unique look and delicious fragrance. A well-established stand of mint can easily produce towering stems that will last and last in a cut flower arrangement.
Herbal Blooms: Dill
Nothing says cut flowers quite like the classic scent of pickles! Okay, I know it sounds odd, but this wonderful herb brings a fresh airiness to any flower bouquet.
Dill, as we all know, is tasty in the kitchen. But when you let it bloom, the umbrella-like blooms are perfect in a cut flower bouquet. Bouquet dill specifically makes an excellent choice.
And don’t worry about that pickle smell. The interest and unique freshness often is a good selling point. It’s something different, and people love a little bit of intrigue!
Fragrant Herbs: Lavender
No herbs-as-cut-flowers list would be complete without lavender. Lavender is a beautiful and fragrant cut flower that can be utilized fresh or dry. This is a major benefit to growing lavender as you can extend your sales window and there is less pressure to move the fresh product.
Pollinators love lavender, and so do people! It’s edible and can be used in baked goods, beverages and in cosmetics.
Blooms & Scent: Basil
Basil is my personal favorite on this list. The annual is easy to grow from seed and perfect in both the kitchen and in cut flower arrangements.
When you’re not harvesting every single leaf to make delicious pesto, you can easily cut these stems and add a fragrant note to any bouquet. You can also let the basil bloom to add yet another texture to your bouquets.
Furthermore, basil’s vase life is incredible, and the herb will even begin to root in the water. You can replant it from the vase to begin the cycle all over again.
Herbal Greenery: Rosemary
Rosemary might not be as readily known for use as cut flower foliage. But the delicious scent and long-lasting vase life make it a wonderful addition.
These shrubby bushes can get very large and put off decent-sized stems that can easily tuck into your arrangements. The unique foliage adds a lovely texture and is a wonderful complement to wreaths and garlands as well as market bouquets.
This story about herbs that make great cut flowers was written for Hobby Farms magazine online and is regularly updated for accuracy. Click here to subscribe.
Vegetable gardening in the colder regions of the United States means you might not have the luxury of a 100-plus-day growing season. You’re working in a shorter time frame, and if you want your short-season vegetable garden to produce abundantly in the available days, you have to choose the right varieties.
But we know you want more out of your short-season vegetable gardening than 30-day radishes and arugula. Luckily, you have plenty of short-season vegetable options, and here are 10 all-stars that are sure to shine in your garden.
Miniature White Cucumbers
A brief description of these will suffice because their name says it all: They’re small (3 inches) and white. But moving beyond their physical description, Miniature White cucumbers are nicely prolific with good flavor, plus they produce quickly, putting cucumbers on the table in 50 to 55 days.
And while they are admittedly smaller than your typical slicing-type cucumber, thanks to the volume that Miniature White produces, your harvests will be impressive. Miniature White cucumbers have a crisp texture that’s delicious in salads or sliced for snacking.
Here’s an added bonus: Miniature White thrives happily even if you’re vegetable gardening in containers, which is a nice option if you’re limited on garden space or want to be able to bring the plants indoors on cold autumn nights.
I used to try growing beautiful large tomato varieties such as German Pink, but even though my garden did its best, the growing season here is just a little too short to reliably produce large tomatoes in abundance.
I can grow the early-season varieties and cherry tomatoes all day long. But I sometimes just want the fun of growing a big tomato.
Last year, I tried Emmylou and was pleased with my vegetable gardening results. Emmylou produces gorgeous red tomatoes that are surprisingly large for the speed with which they mature (75 days from transplant). I liked that they were resistant to cracking, and they also exhibited disease resistance, which is another plus for this extra-special tomato.
Neon Pumpkins
Just because we live in colder climates doesn’t mean that we don’t want to grow pumpkins. Now of course we can plant miniature pumpkins, like the charming Casperita, which is adorable and matures in about 75 days. But sometimes you just feel like growing a jack-o-lantern-sized pumpkin, right?
But large pumpkins are slow to mature, and that’s why you need Neon. It’s a very pretty, 8-pound pumpkin that has a reputation of being perfectly ideal for carving up at Halloween. With its brilliant orange color, useful size, great productivity and lightning-fast maturity (ready in approximately 80 days), Neon has more than earned its place in my garden.
Bonus features: It’s prolific and stores well. What are you waiting for? Your search for the perfect pumpkin starts and stops with Neon.
(P.S. In your quest for larger pumpkins, don’t overlook the fun of the miniature pumpkins, like the aforementioned Casperita. They’re a lot of fun to grow, and they make delightful decorations, too.)
Yaya Carrots
I don’t have the greatest track record with vegetable gardening and growing carrots. I can recite all the reasons it’s difficult to grow them: They’re slow to germinate, the soil has to be just so, you have to thin at the proper time, and if you don’t follow the magic steps correctly, the carrot fairies revolt.
Carrots
For a while, I tried growing carrot varieties such as Thumbelina, thinking that—like cherry tomatoes—the smaller types would be better suited to the north, maturing more quickly. But the joke was on me!
The diminutive Thumbelina, while lovely, still requires up to 70 days to mature. And I wanted to grow full-sized carrots. Enter Yaya!
Yaya is a gorgeous, 5- to 6-inch, Nantes-type carrot that’s everything you could want in a carrot. Early maturing? You got it (60 days). Deliciously sweet? It’s among the best. Easy to grow? I’ve never grown carrots that did as well as Yaya.
Just think: You could be harvesting beautiful, super-sweet carrots in just 60 days!
Vegetable gardening with snap beans in colder climates is no problem. Plenty of early-maturing varieties are productive, tasty and colorful. But I like growing dry bean varieties, and that can be tricky.
Take Mayflower, that gorgeous dry bean variety that has a legendary connection to the ship. It’s beautiful, and I’d love to grow it, but it’s a 100-day variety. The good news is that there are other dry beans that require fewer days to grow, such as Orca.
Now Orca has several aliases, including Yin Yang and Calypso. But all refer to a stunning black-and-white bean that’s as eye-catching as it is delicious. Another bonus: Unlike most dry bean varieties, which are pole habit, Orca beans are bush habit, which eliminate the need for trellising.
A dry bean that’s user-friendly and matures in just 75 days sounds like a winner to me.
Sweetness Corn
I probably don’t need to tell you much more than that Sweetness is the most accurately named vegetable ever. An impartial panel of seven family members unanimously agreed it was the best corn they’d ever tasted! (And they’ve tried some not-so-great corn over the years.)
It’s difficult to know where to start when describing just how excellent Sweetness is. It matures really quickly, in less than 70 days, produces a nice quantity of ears, and is quite beautiful with its bicolor kernels.
But the flavor! It’s beyond delicious. The plants reach approximately 6 feet tall and produce 8-inch ears of corn.
Little Snow Pea White
I know there’s nothing extraordinary about growing peas when working with short-season vegetable gardening. It’s easy to grow peas, right? They don’t mind cold weather, and they don’t take long to mature.
Daniel Johnson
But Little Snow Pea White takes everything you knew about growing peas and says, “Hey, I can do it even faster.”
Little Snow Pea White grows at a lightning fast rate, with peas ready to harvest in as little as 30 days. In my zone 4a garden, it took closer to 40 days, but we had a cold spring, which may have been a factor.
Once it started producing, Little Snow Pea White kept at it for weeks, filling our harvest baskets with abundant quantities of tasty snow peas. They’re quite elegantly pretty, too. So if you’re looking for a great way to kick off your gardening season and an addition to those early garden harvests of radishes and arugula, give these peas a chance.
Candy Onions
Following on the heels of Sweetness corn: How about Candy onions? An ideal choice for short-season gardeners, Candy hybrid onions are an amazingly large, simply delicious, day-neutral variety. They’re always reliable, beautiful and ready in approximately 90 days from transplant.
(Yes, this is on the longer end of the range, but you can set out onion plants earlier than tomato seedlings. So there’s never an issue with onions having time to reach maturity.)
To add to the fun, Candy onions come in red and white, both equally beautiful and absolutely yummy. Candy onions aren’t a superior storage variety, but they’re so tasty that you’ll probably eat them all before long-term storage is an issue.
All Blue Potatoes
These may not be the largest or the most productive potatoes in the whole world, but I can say this: These potatoes are simply the most fun to grow. I mean, they’re blue potatoes! What’s not to like?
Daniel Johnson
All Blue is an heirloom variety that has somehow been eclipsed by the more popular potatoes such as Yukon Gold, but if you’re willing to think outside the box, you won’t be disappointed by these gorgeous potatoes.
They appear brilliant with an unexpected shade of blue-purple inside and out, and they hold their color when baked. They’re truly a delight when short-season vegetable gardening, in the kitchen and in your tummy.
Lunchbox Peppers
For me, growing peppers can be like growing carrots: occasionally unpredictable. Here in the north, the sun just isn’t sunny enough sometimes to satisfy the requirements of sweet peppers, and I’ve tried a lot of varieties over the years in a quest to find peppers that produce reliably and in a short time.
Then I met Lunchbox peppers. Before I knew it, I was picking more pecks of peppers than Peter Piper himself.
These charming little peppers are “snack-sized” (3 inch) and packed with sweet flavor. They’re colorful (red, yellow, orange) and delicious either fresh or cooked. Lunchbox peppers are productive and quick to mature (about 80 days at the most), a truly excellent choice for short-season gardeners and anyone who wants a little fun in the garden.
Short-season vegetable gardening might sound limiting, but with so many wonderful heirloom and hybrid varieties available from seed catalogs and garden centers, it’s easier than you might think to harvest a diverse and delicious assortment of garden veggies all season long.
This article vegetable gardening originally appeared in the May/June 2022 issue of Hobby Farms magazine. Click here to subscribe.