Categories
News Urban Farming

Prizes Available for Green Education

Education

Courtesy Comstock Images/Comstock/Thinkstock

Public schools that have implemented school-greening programs can apply for the Green Prize in Public Education from the National Environmental Education Foundation.

Public schools across the U.S. that have successfully implemented innovative and sustainable school-greening programs have an opportunity to be recognized for their efforts.

The National Environmental Education Foundation, with major support from the National Education Association Foundation and in partnership with EarthEcho, Inc., will award a $10,000 Green Prize in Public Education to an outstanding public school that demonstrates success in engaging students, faculty and the local community in school greening efforts.

Greening efforts can take a variety of forms, including a creative and innovative classroom curriculum that integrates the environment, changes in daily operations that lead to greater efficiency, and resource conservation or physical improvements to school grounds and facilities.

Through the leadership and involvement of educators, staff, parents, students, community partners and others, green schools provide rich opportunities for collaborative learning and problem solving. Green schools also reduce costs, minimize waste, increase efficiency and contribute to a healthy environment.

“Schools green themselves in many different ways, but they all have things in common—they inspire,” says Diane Wood, NEEF president. “They are a teaching tool, not just for the students, but for the entire community. The Green Prize recognizes outstanding schools along with their dedicated teachers and students who advance environmental education and allows them to serve as a model for the entire country.”

The foundation will also award two additional schools $5,000 merit awards to supplement their school-greening efforts.

This is the second year for the Green Prize, conceived by the NEA Foundation and now managed by NEEF. In 2010, the NEA Foundation awarded the prize to Mike Town, an environmental science teacher at Redmond High School in Redmond, Wash. Town was recognized for his Cool School Challenge, a program that engaged students and teachers at 150 schools in reducing carbon and greenhouse gas emissions by more than 1.5 million pounds.

Visit the NEEF website to learn more or to apply for the Green Prize in Public Education. Applications are due Feb. 15, 2011.


Categories
Urban Farming

Italian Agriculture

Small-farm magazine

Photo by Rick Gush

This magazine, Vita in Campagna, is one of my favorite resources to Italy’s small-scale agriculture.

Most people might think all those Roman ruins and medieval castles and paintings are the most notable historical artifacts in Italy. Personally, I think the thriving small-farmer culture that still dominates Italy is the most important gift from the past. 

Sure, there is a whole lot of commercial agribusiness in Italy, but Italy’s core farming interest is still in the hands of small cultivators. Almost every town features a local vegetable market, where small cultivators sell their products directly to consumers. Small farmers in Italy can boast of an official registry of thousands of handmade and homegrown agricultural products not available through the big-business markets. And every day, Italian TV shows extol the values of small-farm products.

My wife and my garden is rather small, and we produce just for our own use. But we have been repeatedly offered the opportunity to sell extra production. The little market a few hundred yards from our home is always asking if we have something we want to sell. Last year, I was in the market when a customer asked the owner if she had any fresh parsley and marjoram. The owner didn’t, but I went up into our garden and harvested a nice bunch of parsley and a handful of marjoram to give to the customer. She offered to pay me, but I was happy just to be able to gift something from our garden. If I wanted to, I could easily sell figs, grapes, wild asparagus, fave beans, wild plums, mushrooms, fresh herbs, tomatoes, peppers, broccoli and squash from our garden.

I personally know a dozen small farmers here in Rapallo who make their entire living cultivating their farms and gardens, several dozen people who sell something from their gardens, and two hundred people who sell some portion of their olive-oil production. I enjoy the fact that while olive oil in the supermarket is priced around 5 euros per liter, the price for homemade oil is about 10 euros per liter. People appreciate the quality of small lot oil production and are happy to pay twice the price when they can.  
 
My favorite magazine these days (aside from Urban Farm and Hobby Farms, obviously) is Vita in Campagna or Life in the Country.  All the small farmers in Italy read this magazine. It’s focused on articles of interest to people who are growing and producing food as a personal business— mostly hard-nosed discussions about topics related to financial success for small farmers. 

I think Italy is the most fervently organic food producer in the world, not because they don’t have the money to buy expensive fertilizers and pesticides, but because sustainable culture makes more economic sense than the agribusiness methods.

Read more of Digging Italy »

Categories
Crops & Gardening

Favorite Seed Catalogs

Planting new seeds and returning to old favorites can be a rewarding process
I’m excited to start growing seeds, both old favorites and new varieties.

The seed catalogs have really started rolling in, now, and it’s so exciting. I was talking with some fellow gardeners yesterday about their favorite catalogs and about some of the new varieties they are looking forward to trying this year. It was interesting to hear what everyone had to say and I was very surprised that almost everyone had a different favorite catalog.  Here are some of the interesting things I learned:

  • The Cook’s Garden catalog, which I had heard about but never seen, has a really cool new tomato called Green Envy. It’s a large, slightly elongated cherry tomato that’s bright green even when it’s ripe. I’ve grown Green Zebra before and really enjoyed it but never had a green cherry before. I don’t think I’m going to plant any myself, but I’ll have to convince my friend to share.
  • Territorial Seed apparently is the first company to offer grafted tomato plants to the general public. I guess commercial growers have been using them for quite a while but home gardeners have not had the opportunity before now—unless of course, they were willing to graft their own. My friend Doug said that the rootstock comes from very disease resistant and vigorous varieties and then they graft regular tomatoes, like Early Girl and Big Boy or whatever, on top. Apparently in side-by-side comparisons, the grafted varieties continued to produce later into the season, showed more vigorous growth, and were more disease resistant and productive. I’m thinking about buying one or two (the seedlings aren’t too terribly expensive) just to see for myself.
  • Herronswood Nursery, which has been a longtime favorite of mine along with Plant Delights for unusual perennials, has some really terrific stuff. The ”covergirl” on this spring’s catalog is a gorgeous new Echinacea (purple coneflower) called Pomegranate. It looks kind of like a bright-pink, cactus-style dahlia or zinnia but obviously it isn’t. A bit too expensive for me, but in a few years, I might be able to convince my friend to pass along a division!
  • Seed Savers Exchange is my own personal favorite catalog for this year. (In previous year’s it was High Mowing Seeds, which still maintains a very close second place!) I think the cover photo is utterly breathtaking. It’s an image of a bunch of different purple veggies like eggplants, beans, “greens” and the like, with some bright-yellow cherry tomatoes tumbled over them.  And, of course, what’s inside is breathtaking, too. They have so many unusual heirloom seed varieties, and I’m looking forward to trying many for myself this season.

Can’t wait to get growing!

Categories
Urban Farming

Soup Swap

Corn chowder

Photo by Judith Hausman

This corn chowder, last year’s dinner soup, will be my (much-requested) contribution to this year’s soup swap.

What has become my annual, all-girl Soup Swap event will take place this Sunday. (I confess I didn’t make up the idea; I stole it from a women’s magazine I rifled in a doctor’s waiting room.) The Soup Swap updates the cookie-swap format — who needs to eat more cookies anyway? — and sends my busy, working women friends home with three homemade dinners to eat or freeze. The huge snow piles we’ve got to contend with this year spell soup to me anyway, especially with garden goodies in the freezer.

Here’s the idea: I invite about six women and ask each to bring three quarts of soup along, preferably packaged in freezer bags, and copies of the recipe for it. One big pot of soup yields three quarts easily. I dish out another soup for dinner for us all and then each guest “shops” for three quarts to take home with her. Given individual tastes, it works out to pick three from among the seven kinds available. (One friend doesn’t like beans and another friend won’t eat shellfish, for example.)

We aren’t rigid; last year Connie couldn’t cook so she bought three quarts of lobster bisque to contribute to the swap. Renee brought red lentil soup, Barbara brought turkey-vegetable and Sandy brought carrot. The corn chowder I served for our dinner was such a hit that I‘m making it (with local corn that I froze) for the take-home portions this year.

This year, the dinner soup I’m making will be the three-mushroom soup I love, garnished with a few exotic mushrooms from a vendor at my nearby winter farmers’ market. (The recipe below will probably need to be doubled for the dinner).

With some interesting Northeast artisanal cheeses, a couple of  breads, such as homemade corn bread or biscuits, a farmers’ market whole-grain country loaf, and a few bottles of buttery white and rustic red wine, we’ll be all set.

We’ll finish with a pile of fresh fruit or a refreshing dessert, like orange slices poached in wine, unless someone wants to make some cookies. Low-key parties are my favorite and with less stress on the host, the guests eat better. Of course, there’s no reason men can’t come along, too.

Recipe: Three Mushroom Soup

Ingredients


  • 2 cups or more chopped portabella, cremini or baby bella cultivated mushrooms
  • 1/4 to 1/3 cup dried porcini mushrooms (or substitute shiitake or a mix of dried wild mushrooms)
  • 1 T. olive oil
  • 1 T. butter
  • 2 large porcini bouillon cubes (Knorr cubes are often available at Italian delis or specialty stores), or substitute 4 cups vegetable broth
  • 4 cups or more water (if using bouillon cubes)
  • 1/2 to 1 tsp. dried thyme leaves
  • splash of cognac, port or dry sherry
  • salt and pepper to taste
  • 1/2 cup whole milk, evaporated milk or light cream, optional
  • diced fresh wild mushrooms (shiitake, oyster, coral and so on), if available, for garnish

Preparation

Cover the dried mushrooms with warm water, and let them sit for 1 hour or more. Strain the juice and save. Chop the re-hydrated mushrooms and set aside.

Sauté the cultivated mushrooms in a soup pot, and when soft and slightly browned, add the broth or bouillon cubes and 4 cups water, and the reserved soaking water. Cook 30 to 45 minutes, until the mushrooms are very soft. Add seasonings and  cognac. Purée roughly with an immersion blender. There should be chunks of mushroom still visible. Thin with more water or milk, as desired.

Read more of The Hungry Locavore »

Categories
Equipment

Tighten Up Loose Chair Rungs

Fixing chair rung
Photo by Jim Ruen
Fixing chair rungs is easy and reliable with the help of Woodmate’s Mr. Grip.

If you live in a northern climate, you probably share one of my winter frustrations. It seems like a chair rung or two come loose each winter. A combination of age and the drier winter air is likely to blame.

Fixing chair rungs used to be an exercise in frustration. Glue alone was a wasted effort, at times not lasting even through another winter. Placing toothpicks in the hole with the glue helped, but it also wasn’t a long term fix. Then my wife saw Woodmate’s Mr. Grip in a catalog.

The furniture-repair kit consists of four, 1-inch long, 1/4-inch wide metal strips with holes punched through from either side. The result is rough areas on each side of the metal strip. When placed over the end of the chair rung before it is pushed into the hole, the strip anchors itself in the wood fiber of both the hole and the rung tip.

Using Mr. Grip is almost too easy. The thin metal is easily cut with a regular scissors. I trim off a piece that fits both sides and the end of the chair rung. Holding Mr. Grip over the end, I slide the rung back into the hole on the leg. That’s it! The metal grabs hold and simply doesn’t let go.

In the nearly 10 years I’ve been using these handy grips, I am only now beginning to see potential repeat offenders. Even these have the potential to be “fixed” with the use of a second strip across the first.

The company makes multiple sizes or different situations. In my case, one pack has lasted for years. If you have loose chair rungs or other wood-to-wood connections that have come loose, check out Mr. Grip at your local hardware store.

<< More Shop Talk >>

Categories
News

Taking Control of Witchweed

Witchweed
Courtesy USDA APHIS PPQ Archive, USDA APHIS PPQ, Bugwood.org
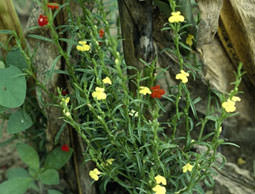
Witchweed is an invasive species that has been devestating farmland in North and South Carolina.

For the past 50 years, areas near the border between North and South Carolina have been ground zero for a fierce battle in the war against a devastating weed. Federal and state officials and local farmers have been fighting the only known U.S. infestations of witchweed (Striga asiatica), an invasive plant that has crippled key segments of the agricultural industry in countries around the globe.

The parasitic weed is a danger to some of our nation’s most important crops, including corn, sorghum, sugar cane, rice and other plants belonging to the grass family. It taps directly into a plant’s root system to rob it of nutrients and moisture—dramatically reducing yields.

Unfortunately, witchweed also is very prolific. A single plant can produce as many as 50,000 dust-like seeds that can live in the soil for a decade or more, making eradication a tough and time-consuming process.

But for farmers battling the weed in North and South Carolina, the end seems tantalizingly close.

“We’re 99 percent of the way there,” says Alan Tasker, national noxious weed program manager with the USDA’s Animal and Plant Health Inspection Service. “Not only have we halted the spread of witchweed over the past five decades, but we’ve dramatically reduced the number of infested acres, as well—down from 450,000 in the 1950s to about 2,000 today. Our goal is to eradicate it once and for all.”

Witchweed is native to Africa, India, the Middle East and China. No one is sure how it made its way to the Carolinas. A graduate student from India first spotted the slender, red-blossomed pest in 1955. He knew it well because of its devastating impact on his own country’s sorghum crops.

To avert a similar disaster for U.S. growers, Congress created an eradication program in 1957 led by a USDA program that later became APHIS. The agency established a research station and farm where it developed the science-based control methods that have produced outstanding results. The successful program is built around three critical phases, each involving close collaboration among federal and state officials and farmers in the Carolinas:

1. Locate and map all witchweed infestations.
Because witchweed is so prolific, finding each and every specimen of the foot-tall plant is vital. In addition to farmers checking their own land, scouts are sent out to locate infested sites, traveling on foot and on horseback early in the program and later in all-terrain vehicles. There are penalties for failing to report the weed and bounties paid for sightings by eligible parties.

 “We typically have great cooperation from local farmers, who know the danger witchweed poses to their crops,” Tasker says.

2. Quarantine areas with witchweed.
Although tiny witchweed seeds can be spread by wind or by water, human activity is often the culprit. For that reason, the areas where witchweed is found are quickly quarantined. Machinery used at the site and any crops harvested with soil attached must be cleaned thoroughly to remove witchweed seeds. Growing the grass crops favored by witchweed is strictly prohibited until the pest is totally eradicated in the quarantined segment of a field. Instead, farmers must leave the land fallow or convert to crops that are harvested well above the soil line.

3. Control witchweed.
Officials remove witchweed plants when they’re found and use both foliar-applied and soil-applied herbicides for deterrence. Destroying the tens of thousands of microscopic seeds that may already be in the soil, though, is tougher and more time-consuming. Some seeds sprout right away and are killed by the herbicide. But others can lurk for years.

“Allowing grassy weeds to grow in the area or planting a crop that is susceptible to witchweed can actually trigger dormant sends to germinate, even if they are deep underground,” Tasker says. “We have examples of parasitic weed seeds remaining dormant in a fallow field for 50 years and then sprouting as soon as the preferred host crop is planted.”

One effective technique for controlling dormant seed is “suicide germination.” Ethylene gas—a natural ripening agent produced by fruits, vegetables and flowers—is injected into the soil and causes the seeds to sprout. Without a host plant to attach to, the new seedlings wither and die. Another approach is to fumigate the soil with chemicals to destroy any seeds that remain. 

“Regardless of the technique used, we spot-check the fields for years afterwards to make certain the weed is truly eradicated,” Tasker says.

Tasker and Jim Westwood of Virginia Tech have organized a special day-long symposium on the witchweed program and other parasitic weeds will take place during the 51st annual meeting of the Weed Science Society of America. The event is scheduled for Feb. 7 to 10, 2011, in Portland, Ore.

Categories
Homesteading

How to Create a Farm-Property Scrapbook

Scrapbook supplies
Photo by Stephanie Staton
Select photo for your scrapbook with an eye for consistency and unity.

Take a cue from the enormously popular scrapbooking hobby, and create your own keepsake album that describes your farm and land. Using readily available materials and basic techniques, you can have fun documenting your property while including important information about forests, wetlands and wildlife.

Preserving Your Property
Scrapbooking is all about capturing and preserving memories while channeling your creativity. It’s also an ideal way to leave a legacy for your family and to record the one your ancestors left for you. Including your farm’s life and land in your memory-keeping will help you keep track of the changes in you, your family and your farm. Melissa Sherman, a marketing coordinator with a background in graphic design who creates ready-to-go scrapbook pages for other busy moms, sees the hobby as ideal for catching moments that might otherwise get away.

“Changes in nature happen all the time, sometimes slowly and sometimes overnight,” she says. “It’s nice to look back at your pages and embrace the changes and cherish how the Earth and our families grow in our short lifetimes.”

Having a record of your property’s history can be of value for renovation and preservation as well as for documenting the building process. Jenny Cheifetz, aka The Sugar Mommy—purveyor of custom candy and cookies as well as an avid scrapbooker—documented the construction of her home through move-in day and continues to capture special moments there. She believes it’s important because, “A home is a special place, and documenting where you live makes it special for your family. You may not always live there so it gives you a concrete memory.”

Cheifetz notes that having a record of who lived on the property and what features were there (i.e., stone walls, outbuildings, important or rare trees and wildlife) at a particular time in history could be helpful if there is ever a land dispute.

Erika Bullard, a blogger at Scrapbook Obsession and a MemoryWorks consultant, stresses that original documents such as legal and historical records should not be included in your album.

“Instead, make good-quality copies onto white, archival cardstock, and include those in your scrapbook,” she advises. “Keep the original documents in a home fire safe, security deposit box or other place [where] they will be protected from the elements, flooding and fire.”

Mapping Your Property Journal

Scrapbook page
Photo by Stephanie Staton
For a quick page accent, add a favorite quote, printed or handwritten, to your page.

Most scrapbook pages or layouts start with photographs; if you’ve been snapping shots of your farm life, you probably already have quite a few photos to work with. Take Sherman’s advice to begin organizing them.

“Having tons of photos that you would like to archive and scrapbook can be overwhelming,” she admits. “If you feel inspired by a certain photo, start there. Forcing yourself to design in a certain order can backfire and lead you to quit before you get started.”

Think of photographing and mapping your property as a treasure hunt for the unexpected and hidden things that make your land and farm special. It’s not necessary, but a map, such as a copy of a survey, is a good place to start. From there, you can add information about unique features and objects as you find them.

As you take pictures of the people and places you love, keep two elements in mind to ensure better photographs:

  1. Natural light, especially in the early morning or late afternoon, is usually better. (The “golden hour” is two hours after sunrise and two hours before sunset.)
  2. Photographing people, especially children, and animals usually means taking lots of pictures. It’s much easier to find a great shot out of 30 or 40 than to make do with only two mediocre photographs. Sherman advises, “Make sure you capture the details up-close. Fill your viewfinder, with the subject as close as possible.”

Depending on the focus of your album, you may want to include other documents, as well. You could include easements and right-of-way agreements, mineral and water rights, conservation easements, and prior sales documents, especially if a previous owner was noteworthy. If you’re lucky enough to have records from previous generations, consider including them as well. Your own operating and domestic records, such as crop yields or livestock records, add character to your album.

Sort your pictures in the order that makes sense to you. For Cheifetz, organizing her photos chronologically made the most sense, starting with the empty wooded lot and ending with the finished house. You might find another order that works, such as a theme album with one section devoted to your prized chickens and another to your child’s garden. If your property has diverse ecosystems, a geographic organization may be better, with pages for the stream and the woodlot. Using page protectors allows you to move the pages around after they’re complete if you find another order that works better for your journal.

Page 1 | 2

Categories
Urban Farming

Green Movement Still Has Skeptics

Grocery shopping

Courtesy Digital Vision/Digital Vision/Thinkstock

Men and women are divided on whether buying eco-friendly products really makes a difference.

For Michael and Vanessa Martin, shopping for paper towels, dish detergent and tile cleaner often leads to a discussion in the supermarket aisles about the environment. Michael would prefer to spend less on conventional products while Vanessa believes it’s important to choose products that are eco-friendly.

“I go for the more expensive, green products, and he looks at the prices and rolls his eyes,” says Vanessa. “I’m standing there saying to him, ‘Do you know how many chemicals are in those products?’ but he feels like if it’s on the shelf, it’s safe.”

Michael admits that price is a factor when it comes to shopping for green products—but it’s not the only reason that he often fills his cart with products that aren’t touted as eco-friendly.

“With some of the labels, I’m skeptical,” he says.

When it comes to making eco-friendly purchasing decisions, the Martins are a typical couple, according to a new survey released by Crowd Science’s Just Ask!

The online survey, which tallied responses from 1,299 respondents in October 2010, found that compared with women, men are almost twice as likely to believe that shopping green makes no difference. In fact, 16 percent of men felt that shopping green doesn’t make a difference and 13 percent think the green movement is nothing more than a marketing ploy.

“The green movement is a very important element of our current shopping environment,” notes
Sandra Marshall, vice president of research for Crowd Science, the California-based research firm behind the survey. “We’re bombarded with information about companies that claim to offer green products, and consumers respond to those claims in different ways.”

Compared to men, women are more likely to choose products with eco-friendly packaging, are willing to pay substantially more for green products and believe it makes a difference for companies to follow environmentally friendly practices.

“Women seem to be more eco-centric in their shopping practices,” Marshall says.

One quarter of respondents over 55 (both men and women) were also more likely to doubt green marketing claims.

Marshall believes that some of the skepticism is warranted.

“There is a lot of green-washing,” she says. “People see all of those labels—green, natural, sustainable, organic—and wonder which ones they can trust.”

In addition to green purchasing decisions, the Crowd Science survey also looked at ethical shopping behaviors. They found that 43 percent of respondents have boycotted products for political or ethical reasons and 34 percent always buy local when given the choice.

“This was such a positive finding,” says Marshall. “It’s great to see people taking an active role in their purchasing patterns so they can have an impact.”

There is more good news for the environment: Research shows that women make 80 percent of purchasing decisions, which means that if women believe shopping for green products is important and they’re willing to seek out items with eco-friendly packaging and pay more for green goods, those products will sell.

Just ask the Martins.

“If she wants to buy the green product, we do,” says Michael. “It’s an argument I’ll never win.”

The survey is part of a larger series of surveys Crowd Science is conducting about shopping attitudes. At this time, the company has no formal plans to apply the research, though Marshall hopes that their findings might be useful to companies who are examining how they market green products.

Categories
Homesteading

How to Assemble a Scrapbook

Scrapbooks
Photo by Stephanie Staton
Create a scrapbook as a creative outlet and a way to tell your farm’s history.

If you’re ready to tell the story of your farm or family, get creative and put together a scrapbook that you can look at for years to come. Here are some tips to help get you started:

Step 1: Gather your scrapbooking materials.
Spread out photos and other documents you plan to include. Select items from this pile with an eye for consistency and unity. Select your papers, stickers and other materials to complement the theme of your album and to coordinate with your pictures.

Step 2: Organize your scrapbook memorabilia.
Sort through the photos and documents and order them in the way that makes the most sense.

Step 3: Group your photos.
Place the photos in groups of two to four pictures, and add the related memorabilia to the groups. This is the beginning of your individual pages.

Step 4: Crop your photos.
Crop (scrapbook talk for cut) your photos to remove distracting or plain backgrounds. Use scissors or craft paper trimmers, and don’t be afraid; cropping can dramatically improve photos and helps you fit more on a page. Have precious and vintage photos duplicated, and safely store the originals.

Step 5: Design scrapbook pages.
Arrange your photos on the page and move them around to find the best arrangement. Overlap and group them for interesting alternatives. You can also cut colored mats (a slightly larger piece of cardstock that shows as a border around the photo) to enhance the pictures.

There are many ways to design the pages in your album, from plain to fancy. First, choose one photograph or item as a focal point, and use the other elements to support it. Imagine a triangle or tic-tac-toe grid on the page and place your focal point at one of the tips or crosses. Place your supporting items at the other locations, but don’t let them compete with the center of interest.

Step 6: Commit to your scrapbook pages.
Once you’re happy with the way the photos and mats are arranged, adhere them to the paper.

Step 7: Tell your story.
Add titles and photo captions to support and coordinate with the theme. Titles are sometimes added to identify the activity or time depicted on the page. They serve as both decoration and reminder, because as time passes, it’s easy to forget what was happening. That’s where journaling (another scrapbooking term that means writing on the page) comes into play. Journaling is used to add photo captions that narrate the action or tell a more detailed story for the future. Use archival pens for journaling and include, at minimum, the date, names of the people shown and the location.

Step 8: Add scrapbook-page embellishments.
If the page still needs something more, add accents and embellishments, such as stickers, in groups of three or five. Stickers and other embellishments add dimension and interest to your page.

Step 9: Finish your album.
Put your finished page into a page protector, and place it in your album.

Implementing Design Alternatives
Ready-made layouts with accessories and instructions instantly add unity and coordination to your whole album as well as speed up the scrapbooking process. They’re a great learning tool for the novice, too.

As an alternative method, Erika Bullard, a blogger at Scrapbook Obsession and a MemoryWorks consultant, recommends using an 8 1⁄2- by 11-inch album with divided page protectors that have six vertical or horizontal slots per page and following these easy instructions:

“On each page, you can slip five photos into the pockets and use the remaining pocket for describing what’s in the photos,” she explains. “You can also use the photo slots to hold receipts, small documents or other ephemera related to your project. Add papers and embellishments, such as ribbon and stickers, to journaling sections or right on the photos themselves.”

This approach removes the pressure of designing a layout and allows the flexibility to move the pages around. And, as your scrapbooking skills progress, “You can even include occasional full-page layouts in the mix,” she says.

About the Author: Monette Satterfield is an artist and author with boundless curiosity. She lives and gardens in Central Florida and makes her web home at ShinyDesigns.com.

Categories
Animals

Fiber Animals

Sheep
Photo by Sue Weaver
Sheep are a classic fiber-producing farm animal.

Yesterday morning it was 4 degrees F when Mom fed us our breakfast. She paused to scratch Mr. Tumnus’ back and hair came out! She looked closer and sure enough, the Boers are starting to shed their cashmere undercoats. Boers have cashmere? That’s right! Special Cashmere goats grow a lot of ultra-soft fiber (Mom wrote an article about them in the July/August 2010 issue of Hobby Farms), but all us goats grow cashmere underwear to keep us warm. You can comb it out and use it if you learn to spin yarn.

Lots of other farm animals grow fiber you can make into clothing, blankets or rugs. If you don’t spin, knit, crochet or weave, you can also learn to make it into felt or pay other craftspeople to do it for you.

Dogs like Samoyeds, Siberian HuskiesGreat Pyrenees and other double-coated breeds have soft, fine undercoats that can be blended with wool to make into garments. Go to Google (my favorite search engine) and type in “spin dog hair” to find artisans who do it for a fee. Or, type in “spin cat hair” or “spin horse hair” if that’s what you want made into hats or gloves.

Curly horses are extra-special in the horse-fiber department. Hair from their winter coats is twisted and curved like the fiber from Suri alpacas, so it’s easy to felt or blend with other fibers and spin into yarn.

Got Highland cattle? Their soft, winter undercoat is a spinner’s dream! You don’t have to shear them to harvest their fiber, just wait until they shed and comb it out.

That’s true of some llamas, too. It’s easy to gently groom the shedding undercoat from classic (also called short-wool or ccara) llamas using a dog-style pin brush, but most medium-wool and all long-wool llamas have to be shorn. Some llama fiber is as soft and workable as alpaca.

If you like to spin but think alpacas are too expensive to buy for their fiber, think again! Alpaca fiber geldings get cheaper all the time. Many breeders sell them for nominal prices or donate them to rescue organizations. If you want alpacas for fiber, think boys!

And if you’re really adventurous, get a yak. A yak’s winter, cashmere-quality undercoat is ultra-soft and cushy, and all you have to do is groom it out.

Or, stick to the old favorites like Angora and Pygora goats, Angora rabbits, or beautiful sheep. There are oodles of fiber-bearing animals you can keep on a farm!

« More Mondays with Martok »