
I love how winter sowing works with Mother Nature to give us a jump start on our early spring seed starting!
Benefits to this system of seed starting include:
- earlier seedlings
- re-use of existing plastic containers
- no expensive equipment
- no hardening off
- stronger plant growth
This method has been around for over 50 years and reuses plastic jugs and containers to create mini-greenhouses. This allows gardeners to harness the sun’s growing energy early in spring and add a little extra heat to the soil. This results in the seeds germinating faster, but not so fast that they can’t handle air temperatures once they break dormancy.
This practice was originally used as a way to have a little more control over direct seeding native plants that needed that cold stratification period (a certain amount of time in freezing temperatures and the need for the freeze thaw process to break down seed husks).
But I have been using winter sowing to jump start some early season vegetable crops for years.
Read more: You can use these 4 items as emergency cloches.
Make a Winter Sowing Container
First, save food grade plastic containers like milk jugs, takeout boxes, rotisserie chicken containers, salad clam shells, water jugs or anything that has a clear-to-opaque top half.
Drill, puncture or melt drainage holes in the bottom of your containers. Add holes to the tops of anything that doesn’t have a cap you can remove. Cut open (with a box knife) if needed to allow access. (Leave a hinge in jugs, or just open takeout containers.)

Add seed starting soil. Plant seeds at suggested depth and water them in well. (Go ahead and overseed, as you’ll be transplanting anyway.)
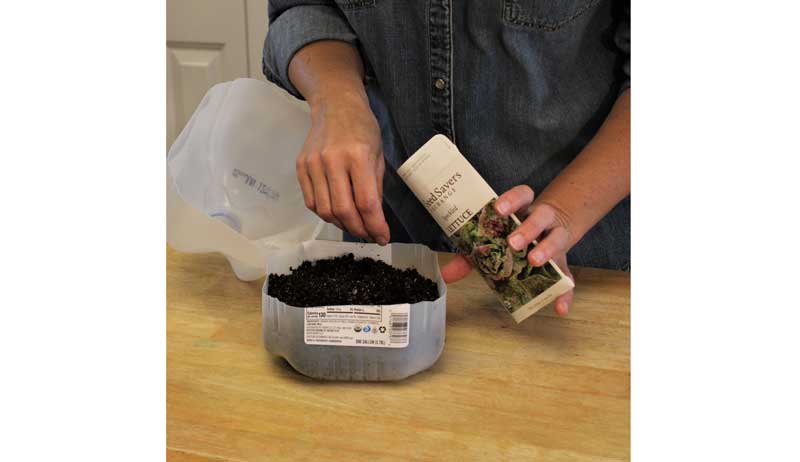
Double label your plants with both a plant stake label in the soil and identification on the outside of the jug written with a waterproof and sunproof garden marker.
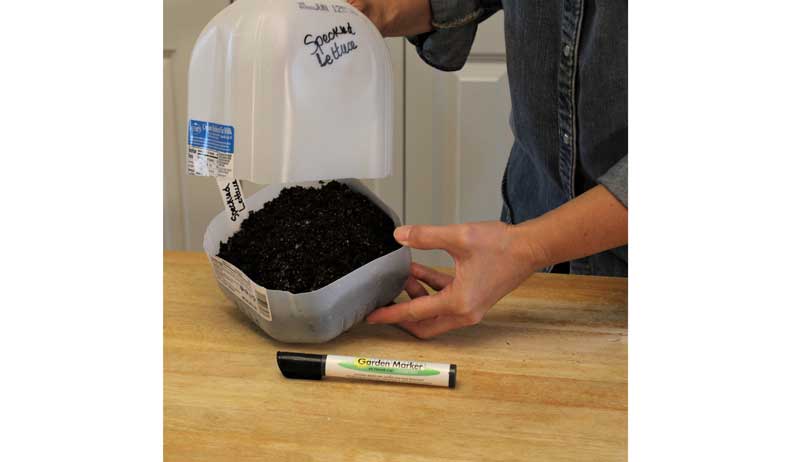
Seal the cut opening with high-quality, waterproof tape. (I use silver duct tape.) Move the winter sowing containers outside to an area that gets good sunshine and has access to rain. Then, just wait for Mother Nature to work her magic!
Read more: Check out these handy seed-starting tips and tricks!
Grow On
You’ll grow these seedlings on in the containers for a few more weeks after germination. Once the seedlings emerge, make sure to open the tops of the jugs as needed to keep your mini greenhouses from overheating. Transplant at the same time you’d normally transplant indoor grown seedlings.
These plants tend to be a little stronger than those started indoors because they haven’t been coddled with the perfect indoor environment. But all this means is there are certain seeds that work better than others.
I most successfully use this process for cold-hardy spring vegetable crops. Some of my favorites are the brassicas like kale, cabbage, broccoli, cauliflower and Swiss chard plus beets and lettuces. For flowers I’ve had great luck with poppies, calendula, marigolds and sweet alyssum.
I love placing these winter-sown jugs inside my cold frames as well. This “double layer” effect bumps up my harvests another few weeks. In a northern garden, we’ll take every extra week we can!
This can be a great additional system of starting seeds for home gardeners and farmers alike.
Want more information on starting growing garden seeds? Check out Michelle’s blog, Forks in the Dirt, and most recent book (co-authored with fellow Hobby Farms writer Stephanie Thurow), Small-Scale Homesteading.


