Raising day-old chicks to create or expand your backyard flock is an extremely fun and rewarding experience. However, you need to prepare for the job.
Once your baby poultry arrive, they’ll require frequent monitoring and care for the first six to eight weeks. Someone needs to be available for them daily during those critical first weeks. But it’s easy to successfully raise them. You just need the right equipment and to follow the practices outlined here.
Bringing Home Babies
Raising baby birds is a relatively inexpensive and easy way to get started with chickens. They’re typically much cheaper to purchase than older birds. And you’ll find several large, reputable hatcheries in the U.S. that specialize in shipping day-old chicks.
These hatcheries will ship just a few birds of one breed or combinations of different breeds if you want variety in your flock. You can also typically order straight-run (both male and female) chicks or just female chicks if you don’t want roosters.
When possible, it’s best to order birds from the nearest hatchery to minimize stressful postal system shipping times. The hatcheries will ship the chicks to your local post office, where you can pick them up.
Many feed-supply stores also sell locally hatched, day-old chicks in the spring. Buying locally hatched birds is usually safer. They won’t suffer the stress of shipping.
However, breed selection options are normally quite limited compared to the hatcheries. Of course, if you already have chickens, you can always hatch your own eggs to raise.

schankz/Shutterstock
Setting Up the Baby Room
Baby chickens need a constantly warm and draft-free environment. They also need to be protected from predators. And they create a great deal of dust plus droppings.
Consider carefully when choosing where to raise them.
If you raise them indoors, it’ll be easier to keep them warm and protected. But select a location where dust and dirt won’t be a problem. If you choose an outdoor location, the mess isn’t such an issue. Keeping them warm and protected, however, is.
Choosing when to raise them is also important. The first time we raised day-old chicks, we started them in the fall in an outdoor barn stall. The barn was great for dealing with the mess; however, because temperatures were falling at night, it was very difficult to maintain a constant temperature in their brooder with a heat lamp.
Read more: Check out these brooder tips for baby chicks!
Brooder Basics
If raising them outdoors, it’s much easier to raise them in the springtime as temperatures are rising. That way, you don’t need to adjust the heat source as frequently. By the time they’re 6 to 8 weeks old, it’s warm enough that they don’t need the heat lamp.
A container that provides good ventilation is generally used as the brooder to raise baby poultry. Initially, it should be sized to provide about 1⁄2 to 1 square foot per chick. But they grow quickly. The brooder will need to increase to about 2 square feet per chick as they grow.
The wall height of the brooder is also something to consider. Baby chicks fly well by 2 or 3 weeks, so the walls should be pretty high. Or, you can plan to use screening over the brooder to keep the chicks inside.
Finally, the brooder doesn’t need to be anything fancy. It’s going to get dirty and dusty. Cardboard boxes, old furniture or plastic storage containers are commonly used.
An Example
As an example of sizing, we used a discarded television armoire set-up in a barn stall for our first brooder. We took the drawers and shelves out and laid it down on the ground to create the container for the chicks.
Initially, it was 3-by-5-foot and 2-foot high for 30 chicks. But we had to extend it to 8-foot by the third week. The chicks could also fly out by that time, so we added screening to the top.
By week five, we released them into the entire 10-by-10-foot barn stall so they’d have sufficient room.
Keeping Chicks Warm
Day-old chicks need to be kept at a constant 95 degrees F their first week, 90 degrees the second week, and so on (reducing the temperature 5 degrees per week), until they’re 6 to 8 weeks old and have feathers to keep themselves warm.
A 250-watt, red infrared heat lamp suspended over the middle of the brooder is typically recommended as a heat source to achieve this. The red light helps prevent pecking issues and is less stressful to chickens than white.
It’s critical that the chicks are kept warm 24/7. So it’s a good idea to have a spare heat lamp bulb on hand.
Lesa Wilke
Monitoring Temps
By placing a thermometer on the floor of the brooder underneath the heat lamp, you can monitor the temperature and adjust accordingly. If the temperature in the brooder is too cool, then adjust the heat lamp down a bit, and vice versa.
When the chicks are cold, they’ll huddle under the heat lamp. When they’re hot, they spread out and avoid the lamp. By monitoring the thermometer, you can make sure they have the proper temperature for their age.
They can also huddle together or spread out as they find necessary.
Age Matters
As the birds get older, it’ll be obvious that some chicks are developing faster and can tolerate colder temperatures.
By watching the thermometer, you can maintain the recommended temperature in the middle of the brooder for the slower birds. Bigger birds can find their comfort zone by moving away from the lamp.
Watering the Chicks
The first thing that day-old birds need when they arrive is water. Thus, it’s important to have appropriate chick waterers.
Baby chicks can easily drown or hurt themselves if inappropriate waterers (too large) are used. There are simple, inexpensive watering bases available that screw onto mason jars and are recommended for baby chicks.
In regards to watering, veterinarian Melissa Holahan, creator of Goat Melk Soap Co. and owner of Chubb E. Acres Farm says one of the top problems she sees is dehydration. “I like to use 1 to 2 teaspoons of sugar or honey added to the water. And I use lukewarm water for the first few days,” she says.
The chicks will put pine shavings in their waterers, so you will need to clean and refill them several times daily. Elevating the waterers by placing them on blocks can help keep out the pine chips. But be sure not to elevate it so high that the birds can’t reach the water.
Remember not to place the chicken waterers directly under the heat lamp. The water will get too hot for the chicks if you do.

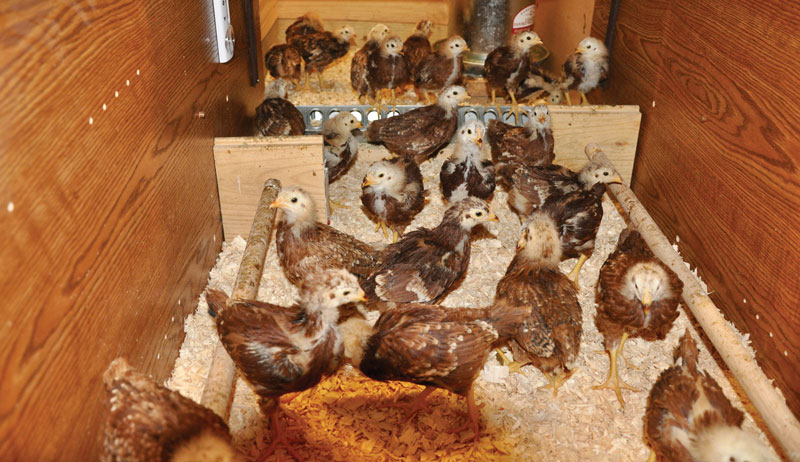
Lesa Wilke
Feeding The Chicks
There are also feeders sized specifically for chicks. Again, disasters can happen if the right equipment isn’t used. So it’s best to utilize properly sized feeders.
For feed, either medicated or unmedicated “chick starter” feed is recommended for the first eight weeks. These feeds have been formulated specifically to give growing chicks everything they need.
Holahan recommends using medicated feed to prevent coccidiosis. “I always feel that prevention is way better than treatment,” she says. “Since the chicks are growing babies, they should get as much of the starter feed as they want, but shouldn’t get too many treats.”
Read more: Make sure you’re feeding your chickens right for their age and stage of life.
When They Arrive
It’s a good idea to get everything set up and running the day prior to receiving baby chicks. That’s the time to get the brooder organized and the temperature inside stabilized at 95 degrees F. When the chicks arrive, immediately move them into the brooder, and make sure they’re finding the water.
If none of the babies drink, pick an energetic chick and carefully dip its beak into the water. The others will learn by seeing chicks drinking.
Follow the same procedure to make sure they eat.
Check for Pasting Up
Once all your chicks appear to be eating and drinking, they should be checked for “pasting up.” This is a condition where their droppings cake over their vent area, preventing them from passing more droppings.
The condition is fatal if not remedied. Therefore, it’s important to check the chicks daily for the first week.
You can remedy “pasting up” by taking a paper towel, dunking it in warm water and gently using it to remove the caked droppings. It’s important to do this gently. It’s easy to rub off their fuzzy down, then other chicks may peck on the area.
If the blockage doesn’t want to come off, dunk the chick’s back end in warm water until things loosen up.
Sad Reality
In each batch of day-old chicks, no matter how good the care is, it’s likely that a few won’t make it. It’s critical that they’re kept at the right temperature, have clean water, get a proper diet and are protected from predators.
But even with the best care, typically some losses occur. Some chicks simply are not hardy at birth.
However, the rewards for putting in all the work involved with raising day-old chicks are healthy, friendly, sociable chickens in your backyard that will provide you with high-quality eggs and years of entertainment.
More Information
Roosts For The Chicks
Roosts for baby chicks aren’t absolutely necessary, but providing them does help keep the waterers and feeders clean. If you give them roosts, they may hang out there rather than on a feeder or waterer.
A simple roost of whatever length needed can be constructed by taking two 4-by-4-inch, 1-inch-thick boards, drilling a 1-inch round hole in the middle of each, and inserting a 1-inch round dowel between the boards.
Even easier, find appropriately sized branches outdoors and add them to the brooder as roosts.
Socializing Your Sweeties
As your chicks grow, it’s a good idea to socialize them by handling them daily and giving them a few treats. (They tend to love grapes!)
That way, as they reach maturity, they’ll be familiar with being handled and will run toward you rather than away. Over time, it makes taking care of them much easier.
And friendly birds are just more enjoyable!
Bedding for The Brooder
A highly absorbent bedding material is needed inside the brooder. Chicks grow so quickly and create so much waste. (The brooder needs to be cleaned out frequently, too.)
Pine shavings are a popular bedding choice. However, the day the chicks arrive, they often confuse the pine shavings for food.
Veterinarian Melissa Holahan, creator of Goat Melk Soap Co. and owner of Chubb E. Acres Farm , advises using paper towels for the first two to three days. “Once they figure out where the feed is, switch to large style pine chips,” she says. “Paper towels aren’t a good long-term solution—not absorbent enough—but it works for the first several days.”
Sand, newspaper and cedar shavings should generally be avoided for chicken brooder bedding. Cedar fumes can damage chickens’ delicate respiratory systems, sand gets very hot under a heat lamp—plus, they tend to eat it—and newspaper is too slippery and not sufficiently absorbent.
This article originally appeared in the January/February 2022 issue of Chickens magazine.