Categories
Farm & Garden

What Are Silos Used For?

What are silos used for? For millennia, agricultural civilizations have realized that the ability to store excess grain produced by bumper crops provides a safety buffer against lean years, or even just a long winter. The most famous ancient account of this idea is probably the biblical story in Genesis 41, in which Joseph advises Egypt to stockpile grain so that it may survive the seven years of predicted famine.

Indeed, remains of ancient Egyptian storehouses are still in existence today. The same is true of those from ancient Greece, the Middle East, and North and South America.

Roman records indicate that pits stored grain in northern Africa. And the word “silo” actually comes from the Greek word “siros,” meaning “a pit to hold grain.”

What are Silos Used For? An Important Innovation

What are silos used for? They do much more than just hold dry grain or seed. They’re also responsible for one of the more important inventions in the history of modern agriculture: silage.

Developed through experiments in the 1800s, silage is essentially a foliage crop—perhaps an entire corn stalk, perhaps an entire alfalfa plant, perhaps something else—that has been finely chopped and then stored while the moisture content is still high, somewhere near 60 percent.

Because of the moisture content, silage maintains a higher energy and protein level than dried forage (hay). This fact has made it possible for dairy farmers to keep cows in reliable milk production even during the winter.

But one caveat exists. You need a way to keep the silage from spoiling.

When farmers make hay, the key to preservation is to ensure low moisture content and to keep the hay dry. But farmers put silage up fresh, so the key to long-term silage storage involves keeping oxygen levels to a minimum.

The silo is the key to this process. In essence, silage is pickled.

Storing the silage in the low-oxygen environment of the silo encourages anaerobic microbes to ferment the forage product, but in a way that ruminants—including sheep, goats and, significantly, cattle—can still digest.

In theory, the fermentation process and the silo will protect the silage from rot. Silage is an excellent invention. Over the years, there have been a number of different solutions to the silage storage unit: the modern silo.

Let’s take a field guide approach and examine some of the modern (post-1900) silo types you might discover while exploring rural America.
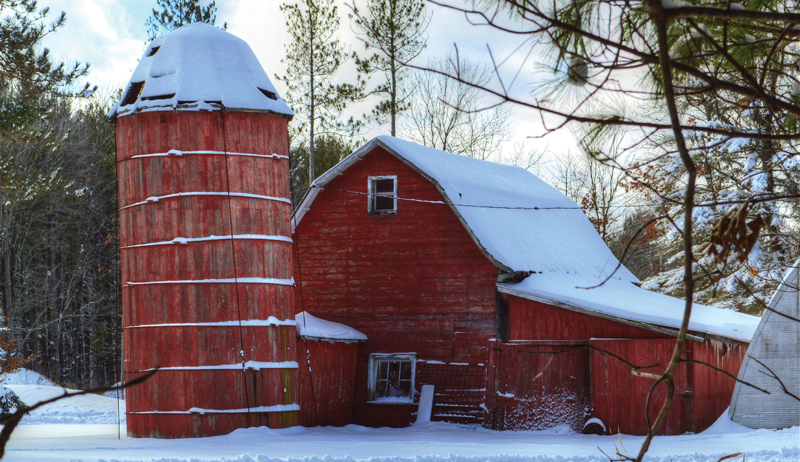
stone silos silos
Paulette Johnson

Tower Silos

Farmers experimented with silage for a few decades in the 1800s, mostly using pits or square structures constructed inside existing barns. It wasn’t until the late 1880s that John Steele, a member of the Wisconsin legislature, constructed the first round tower silo, dubbed the “Steele Silo.”

Agricultural scientist Franklin Hiram King of the Wisconsin Experimental Station furthered the innovation with his “King Silo” in 1891.

The round tower silo is what most people have in mind when they think of a silo. Like lighthouses dotting a shoreline, tower silos have something of a charming appeal.

Even people who don’t know their use instantly recognize them. Plus, they’re iconic symbols of country life.

Round silos are beneficial for several reasons. For one thing, a circle is strong, especially when reinforced by steel bands the way most silos are.

All the weight of the grain in the silo (think of it as a form of pressure) pushes outward on the sides and tries to spill in all directions. A circle helps to prevent that. Also, the contents of early square silos suffered from extensive spoilage in the corners.

But round tower silos aren’t without their downsides. The very fermentation process that preserves silage can create gases that are unhealthy and hazardous to humans.

Some silos, particularly glass/steel silos, are very effective at keeping oxygen levels to a minimum. This can present a danger to anyone entering the silo for maintenance or inspection. Silage can also be a fire danger.

But this hasn’t prevented tower silos from achieving widespread use.

You can fins tower silos built using many different construction methods, some of which went in and out of style over the years.


Read more: Here are 4 ways to use silage tarps in vegetable production.


Wood

Wood silos were popular up until around 1900, when they began to be replaced by other materials that were more resistant to deterioration from silage seepage.

Sometimes, they’re more octagonal or polygon-shaped than round. That’s likely because such shapes are easier to construct out of wood.

The wooden silos that still exist look quite beautiful and interesting—fascinating pieces of a moment in rural history that quickly disappeared.

wood silos silos
William Garrett/Flickr

Masonry

You might also see vintage silos of masonry construction, such as stone or brick. Some of these are quite attractive and unique.

These are often historical in nature, constructed during the experimental age of silos, when farmers sought alternatives to wood, but before concrete and glass/steel silos became the norm.

The cost of constructing a stone or brick silo was influenced by the need to hire masons for the work. But if the region was rich in stones, the material was readily available.

Concrete

Concrete was soon found to be an excellent construction material. And many classic tower silos are constructed of concrete walls with metal roofs. You’ll discover a few subvarieties here:

  • Stave concrete silos. With these silos, individual blocks of interlocking concrete called staves are used to build the structure. These blocks are generally fairly thin, only about 3 inches thick, and steel bands reinforce the entire structure. Stave concrete silos are very common and still in use on some farms today.
  • Poured concrete silos. These are different. Here, the entire silo is constructed from a single monolithic piece, and the walls are thicker, about 6 inches. Poured concrete silos require large forms to construct, whereas staves can be made from a small mold.
  • Concrete block silos. Some older silos are made of concrete blocks that are much thicker than staves.

Read more: Here are 4 reasons you need farm insurance for your hobby farm.


Glass-Lined Steel Silos

Starting around the 1950s, silos constructed of glass-lined steel plates increased in popularity. Steel sheets bolted together and effectively encased in porcelain comprise the walls.

Silage is loaded into these distinctive silos from the top and removed from below by use of an unloader. Glass silos like these are known as low-oxygen silos, since they are very well sealed and contain plastic air bladders to further protect the silage from oxygen exposure.

The bladders allow the air pressure inside the silo to match that of the outdoors.

While still in use on some farms, glass silos haven’t maintained their former popularity, due possibly to competition from bunker silos. Also, the unloading mechanisms prove difficult and expensive to repair.

Rectangular/Square Silos

The square silo design predates the round tower silo. But, as noted, the design led to spoilage in the corners.

Eventually, farmers abandoned the concept of the square silo design. Today’s farmers, however, find merit in square silos once again.

With new innovations to prevent spoilage, modern square silos allow farmers to maximize their storage space. (Square silos hold about 25 precent more than round silos.)

These silos can contain different compartments, allowing storage of more than one product in the same silo. Also, they assemble much more easily.

modern metal silos silos
Daniel Johnson

Horizontal Silos

As iconic as tower silos have been for the last 100-plus years, and as useful as they may be for housing silage, times do change. And with them, technology changes, too.

Today—in a kind of return to the past—horizontal silos take the place of tower silos, especially for large agricultural operations.

While perhaps lacking the pastoral charm of a majestic tower silo, horizontal silos have proven their worth time and again in recent years for their functionality and effectiveness at storing large amounts of silage and keeping it safe.

Horizontal silos are also faster to unload—a critical factor that makes them more desirable on many of today’s farms.

Silage Bunkers

Silage bunkers typically have two long, parallel concrete or wooden walls. You could find crops packed in and then sealed with plastic along a third wall on one end.

In an effort to squeeze additional oxygen out of the crop, farmers utilize large-wheeled tractors to drive back and forth across the silage bunkers during and after the filling process to help press oxygen out of the forage. Once filled, large plastic sheeting covers the bunker to seal against the air as much as possible.

Finally, the plastic is weighed down, often with tire walls, but occasionally by other means such as sandbags. This weight functions to secure the plastic from wind and applies pressure to the silage, forcing out additional oxygen.

Properly loading and maintaining a silage bunker requires quite a bit of skill and research. Massive amounts of spoilage and dangerous avalanching of the silage can occur if incorrect procedures are used. But when constructed and filled properly, these structures allow safe storage and faster removal for feeding of huge quantities of feed.

It’s no wonder they’re so popular in larger agricultural settings.

Trench silos utilize essentially the same concept, except the bunker is dug into the ground instead of using walls built on top of it.


Read more: A hay moisture tester can help with storing your hay bales.


Silage Piles

Another option similar to the silage bunker is a silage pile, sometimes known as a drive-over pile. This is sometimes used as backup solution during a bumper crop, when there is an excess of silage that won’t fit in the silo or bunker.

Some farms even use silage piles as primary silage storage. They provide permanent housing for the crop using nothing but a large concrete slab and adequate plastic covering.

As with silage bunkers, the pile is compressed by large-wheeled tractors in order to aid in oxygen removal. But without the concrete walls of a bunker, it’s more challenging to achieve the proper amount of compression.

Again, people often use tire walls to pin down the plastic covering.


Restoring an Old Silo

It’s always nice to see vintage farm buildings restored. And if you own property with an older silo, you may be considering restoration.

But with silos, you must remember to take extra care and caution—preferably with the help of a silo expert. This is especially true if the silo is intended to be put back into use.

But even if the goal is simply to stabilize the structure, be sure to get an inspection and advice on any cracks, foundational issues, and corrosion that may have formed from years and years of silage acid on metal supports.

Restoration companies may fix leaning silos, apply acid-resistant coating, and do whatever else it takes to make the structure safe and functional again.

This article about what are silos used for originally appeared in Hobby Farms magazine. Click here to subscribe.

Categories
Farm & Garden

Transplanting Blackberries With Care

Transplanting blackberries so they get the best start is important since blackberry plants are beloved additions to gardens and landscapes, offering delicious fruits and vibrant foliage. Sometimes relocating these plants becomes necessary. Whether you’re moving to a new home or seeking to optimize your garden layout, transplanting blackberry plants requires careful consideration and proper techniques to ensure their successful adaptation.

Here’s our guide through the process of relocating blackberry plants, ensuring a seamless transition and continued growth for these delightful additions to your garden.

Choose the Right Time for Transplanting Blackberries

Timing is crucial when it comes to transplanting blackberries. The ideal time for transplanting is during the dormant season, which typically occurs in late winter or early spring before new growth begins.

This ensures minimal stress on the plants and allows them to establish roots before the onset of summer heat.

Prepare the New Location

Before transplanting blackberries, it’s essential to prepare the new location for your plants. Select a site that offers well-drained soil, receives ample sunlight, and has sufficient space for the plants to grow.

Clear the area of any weeds or debris, and enrich the soil with organic matter to provide a nutrient-rich environment.

Prune & Dig

To facilitate ransplanting blackberries, prune your plants by cutting back the canes to a manageable height of about 12 to 18 inches. This helps reduce stress on the plants and encourages vigorous regrowth.

Next, dig a generous planting hole in the new location, ensuring it is wide and deep enough to accommodate the plant’s root system.

Transplanting Blackberries with Care

Gently lift the blackberry plant from its current location, taking care not to damage the roots. Place it in the prepared hole, making sure the crown is level with the soil surface. Backfill the hole with soil, firmly tamping it down to eliminate air pockets.

Water the transplanted blackberries thoroughly to settle the soil and provide essential hydration.

Post-Transplant Care

After transplanting, it’s crucial to provide proper care and attention to help the blackberry plants establish themselves in their new location. Water the plants regularly, ensuring the soil remains moist but not waterlogged. Apply a layer of organic mulch around the base of the plants to conserve moisture and suppress weed growth.

Monitor the plants for any signs of stress or nutrient deficiencies, and address them promptly.

Relocating blackberry plants can be a rewarding endeavor if done with care and attention. By choosing the right time, preparing the new location, pruning appropriately, and transplanting with care, you can ensure the successful adaptation of your blackberry plants.

Remember after transplanting blackberries, to provide post-transplant care and monitor their progress. Soon enough, you’ll be enjoying the delightful fruits and lush foliage of your thriving blackberry plants in their new home.

This article about transplanting blackberries with care was written for Hobby Farms magazine. Click here to subscribe.

Categories
Farm & Garden

How to Build a Basement Root Cellar

A basement root cellar is something many of us dream of having – the ideal root cellar where we can venture into its chilly depths and gather fresh fruits and vegetables held over from the summer season. The reality is that it isn’t a possibility for most of us. But even if you don’t have the means or the space to build a model of perfect cold storage, the good news is you can create a highly functional system right in your home.

What You Need for a Basement Root Cellar

The magical combination of temperature and humidity for proper basement root cellar storage depends on the particular type of fruit or vegetable you wish to keep in long-term storage. For example, root crops, such as potatoes and carrots, do exceedingly well when kept in an area roughly 32 degrees F with a 90- to 95-percent humidity level. Under these conditions, you can feasibly keep them until the following late spring or early summer. Squashes, including pumpkins, with their durable outer skins, need a slightly warmer temperature ranging between 50 to 55 degrees F and relatively dry conditions at 50- to 60-percent humidity. Given this environment, you can enjoy them well into the winter and sometimes into the spring. Once you know what produce you want to store, you can determine how to go about creating an environment where they’ll keep well.

Identifying Your Storage Area

root cellar basement
iStock/Thinkstock

Begin by looking at the setup of your basement to determine the best location to create a basement root cellar with a small cold-storage room or storage area. You’ll want a place that’s cool and properly ventilated. Be mindful to keep away from heat sources, such as the furnace or hot-water tank. Having a wood-burning or pellet stove in the basement can present a few challenges, though it doesn’t preclude you from successfully storing fruits and vegetables for the long term.

Ventilation is important in a basement root cellar because it allows fresh air to enter the room, as well as letting ethylene, a naturally occurring gas expelled by the fruits and vegetables during the ripening process, to escape. Without proper ventilation, your produce will break down at a faster rate. If you’re able to locate an area with a window, this is ideal. The window can be covered to block out light and opened on occasion for passive ventilation. You can also install a PVC ventilation pipe through the window opening to allow for consistent passive ventilation, or use a small fan (like you would in a greenhouse) attached to the PVC pipe to pull gases out of the cold storage. If the best storage area in your basement isn’t near a window, the other option is to drill a hole through the wall and insert a ventilation tube.

Building the Cold-Storage Room

Once you’ve determined your location and ventilation options, your next considerations are the walls and insulation. Concrete blocks with rigid foam insulation can create a snug storage space, though you might find it easier to build the walls out of 2×4 lumber with 3½-inch fiberglass insulation sandwiched in between. Use faced insulation—the kind with the foil paper on one side—if possible; otherwise, add plastic sheeting as a vapor barrier. It’s not necessary to put insulation on the exterior wall (aka the basement wall), but you will want to put it on the ceiling and along the walls dividing the basement root cellar from the rest of the basement.

Regulating your temperature and humidity can be as easy as opening a window or the vent. Many people take advantage of the cool fall nights to allow cold air to pour into the room, ultimately bringing down the temperature to the desired range. Humidity, which is a challenge in drier regions of the country, can be bolstered by setting a pan of water in the room.

The ideal temperature and humidity you want to maintain depends on what you want to store. If you’re storing several items, consider what you have the largest amounts of and make that your baseline gauge. Below is a chart of commonly stored fruits and vegetables, their ideal storage conditions, and how long they keep. Use this as a reference point when making your basement root cellar decisions.

winter vegetable storage root cellar basement

Containing Your Produce

Build shelves to hold burlap bags of produce, or create bins to keep everything in place. Here are some additional tips to keep in mind when working with specific produce in a basement root cellar.

  • Potatoes do best when placed in burlap bags, in order to prevent light from reaching them and turning the skin green, and either stacked in bins or set upon shelves.
  • Onions can also be stored in bags, but because they require more air circulation, avoid stacking them upon one another.
  • Sweet peppers will often keep very well in cold storage. Place them in a single row in a shallow box or container and cover with a plastic bag to retain humidity. Check them frequently, and use them before they show spots or softening. They will often keep for two to three weeks or longer.
  • Tomatoes, particularly green ones, can also hold up well in a similar storage system for months. Place them in a single row in boxes and cover with a plastic bag or towel. Use them as they ripen, and if many of them are already mature, simply be vigilant to use them before they rot.
  • Squashes will store well in a similar environment to tomatoes, where the temperature is closer to 50 or 60 degrees F. Simply set them on shelves and check them periodically to use any that show signs of degradation.

Other Storage Options

If you don’t have the means to build a separate cold-storage room as a basement root cellar, don’t feel that you can’t store produce throughout the winter. Many people make the best of what they have with perfectly acceptable results. As you’re looking for a place to keep fruits and vegetables, keep your mind focused on staying as close to the standard storage requirements (listed above) as possible. It doesn’t have to be perfect, but the closer you can get, the better the outcome will be.

Lauren Dixon of Creston, Mont., hopes to build a root cellar someday, but for the time being, she’s had impressive success simply segregating a bedroom in her 900-square-foot log cabin for produce storage.

“I turn that into a cold room,” she says. “I let it stay just above freezing.”

The interior walls of Dixon’s home are very well insulated, allowing her to open the window in the bedroom to cool it down after insulating the door with wool blankets. The room stays cold without kicking her furnace into overdrive. She uses easily stackable dairy crates as storage bins for potatoes and other root crops because they provide ample ventilation, and shelves are available to keep other foods organized.

“It works really well,” Dixon says. “Usually things start to turn on me around April, which is not that bad. I’ve had seed potatoes make it all through to spring planting.”

If a separate unheated room isn’t available, some people store produce in the space underneath a staircase because it’s usually dark and out of the way.

Although many of us love the idea of having an in-ground root cellar where we can keep the season’s bounty well into the winter months, knowing that we can successfully store many of these same fruits and vegetables in a basement root cellar offers equal satisfaction.

This article about how to build a basement root cellar was written for Hobby Farms magazine. Click here to subscribe.

Categories
Farm Management

Roadside Farm Stand: 9 Tips for Starting Your Own

A roadside farm stand can be a great income earner for large and small farms. We’ve all seen the signs strewn along highways and byways announcing corn for sale, farm-fresh eggs, Halloween pumpkins and fall chrysanthemums.

Roadside farm stands have endured for so long because they don’t require a lot of capital to run. A little creative ingenuity and some produce to sell is all you really need.

To give us some guidance on how to set one up, we talked to five farmers and producers who have successful roadside farm stands.

1. Setting up a Roadside Farm Stand

A roadside farm stand can be as simple as a cart with a few bins of veggies or as elaborate as a small walk-in shop with a refrigerator.

“If you’re just beginning, start out really basic,” says Jesalyn Pettigrew of Mossy Gate Flower Farm in Mount Vernon, Washington. “Your neighbors will enjoy seeing your stand evolve, and it makes them part of the story.”

Paul Meulemans of Wild Coyote Farm in Berrien Springs, Michigan, sells vegetables, microgreens, cut flowers and herbs from a stand on his property. He suggests starting out with a movable stand or one you can disassemble because you might have to experiment with different locations before you find the one that works best.

“Make it a small footprint, too,” he says. “It doesn’t need to be super large. You can put a lot of stuff in a small stand, especially if you make it vertical instead of horizontal. A vertical one makes a good display.”

Mandy Bodie runs the Sweet Peach Roadside Stand in Ward, South Carolina, out of a 30-year-old peach stand that was given to her. She and her family remodeled it and painted it a bright sea-foam blue with artistic peach decals.

In addition to a large permanent roadside farm stand, Emily Kwilos of Kwilos Farms in Angola, New York, has a small self-service shed with an overhang to shelter customers from the weather. She also has a small outhouse-style shed to the side where she sells the farm’s maple syrup. Pettigrew’s flower stand is made from a charming old truck with flower containers in the truck’s bed.

roadside stand stands farm market
Mandy Bodie/Sweet Peach Roadside Stand

2. Manned or Self-service?

Your stand can be manned or self-service. A self-service stand with an honesty cash box is a good choice if you don’t have the ability to stay there. Kwilos says not to leave valuable products, such as maple syrup, unattended. You also have to accept that there will be theft from time to time.

You make more sales with a staffed stand by explaining the produce, helping with selection, and providing information about you and your farm, how the produce is grown and how you care for the land.

You’ll also be there to refill the bins and protect your goods from theft.

Whether you need a permit for a roadside farm stand depends on your state and county. There may be a size restriction on your booth, rules on the kind of produce you can sell or how much you can sell from other producers.


Is it time to start an honor system farm stand?


3. Roadside Farm Stand Placement

Your roadside farm stand can be located wherever you’d like, such as at the front of your farm, on a corner lot or off a busy road. (Make sure to check with your local laws first.)

Try to pick a spot near a popular place, such as near a tourist area. Pettigrew has her flower roadside farm stand near a public boat ramp. Bodie has her tree-ripened peach stand close to the local dam and swimming hole.

Kwilos’ stand is on a busy road that catches the eyes of people coming home from work in the nearby city. “They can pull right into our stand,” she says. “If we were on the other side of the road, they would have to cross traffic to get to us.”

Consider parking, too. Can a car or two safely park near your stand? Is there a lay-by, public parking space or a quiet street nearby?

If customers have to struggle to get to your stand, they will most likely drive on by.

4. Signs & Advertising

One of the benefits of a roadside farm stand is that its location is its own advertisement. However, having a little bit of advertisement can pay off.

Tamera Mark, who owns Iron Creek Farm in LaPorte, Indiana, says that people locate her place through farmers’ market websites, so if you’re a vendor at a market, check to see if you’re listed there.

She also recommends a website called Local Harvest. There, you can make a listing for your roadside farm stand and include information about yourself, your farm, your locations, hours of business and what products you offer.

Pettigrew recommends the Nextdoor app, too, which can help you draw in people from outer neighborhoods. Trail-blazing signs will point the way from the main road to your stand’s location, but you can also have a list of what’s in season, such as fresh corn, ripe strawberries and local blueberries.

Roadside farm stand signs don’t have to be fancy. Kwilos’ signs are made from a sheet of plywood cut into quarters. She pairs two pieces and hinges them at the top so they can be flipped around when the next product is in season. The paint should be fresh with appealing colors and design to catch the attention of passersby.

Kwilos sets her directional signs about a tenth of a mile up the road.

Don’t forget social media. Start a Facebook page where you can list comings and goings on the farm. Create an Instagram feed where you can show off pictures of your beautiful produce. Post every day, and remember to use hashtags such as #supportlocal, #localproduce, #localfreshflowers, etc.

Include your social media information on a sign on your roadside farm stand, and encourage people to tag you on their posts.


Check out these 4 keys to marketing your farm and products online.


5. Make Your Roadside Farm Stand Appealing

If your stand is staffed, have everyone wear matching aprons or t-shirts so that customers know who to talk to. A “uniform” also gives your stand a professional look.

“Fill the baskets all the way up to the top,” Bodie says. “We display our peach stems down because it looks more attractive. Remove any produce that looks damaged. And make sure to replace your produce as it sells. You want people to think you have a lot.”

Keep things up off the ground so that people don’t have to stoop to see what you have. Decorate your roadside farm stand to show off your personality. Kwilos puts a little ditty on her signs each year, such as: Three People, Two dogs, 400 Gallons of Syrup.

“Be your own walking Pinterest post,” she says. Include recipes and bundle produce together so customers can find the ingredients easily, such as dill with the cucumbers to make pickles.

6. Produce

Depending on your state’s rules, there are various things you can sell on a roadside farm stand such as chicken eggs, baked goods, preserves, pickles, and even rabbit and poultry. One benefit of having a roadside farm stand is that you can sell things you’ve made in your own home, such as preserves and baked goods, that might require the use of an off-site kitchen if you’re selling to restaurants or stores.

Think about how you’ll supply refrigeration if you’re going to sell things like greens that will wilt easily or eggs that by law must be kept at a certain temperature. A small refrigerator plugged into your house via a long extension cord can work well.

Bodie adds that your electricity company might be willing to set up a temporary power pole for you.

roadside stand stands farm market
Wild Coyote Farm (www.wildcoyotefarm.com)

7. Roadside Farm Stand Pricing & Money

Pricing the produce at your roadside farm stand can be a challenge. You don’t want to undercharge and you don’t want to overcharge. You certainly don’t want to sell at a loss. The Meulemans’ goal is to set their price so that it’s sustainable for them and fair for customers.

Paul Meulemans suggests checking wholesale prices on the USDA website and adding 30 percent. Also, keep in mind that you can sell your produce cheaper at a roadside farm stand than wholesale or at a farmers market because your overhead will be very little.

Bodie says that it’s important to keep prices simple so it won’t be confusing for workers or customers. Sell by dollar so it will be easy to make change without having to use coins. The prices should be clear so that customers won’t be confused or have to ask.

Weighing out produce with a digital scale on the stand can create a headache, and you may be subject to a visit by Weights and Measures. Therefore, preweigh and measure your produce to sell by the bunch, quart, pint, bushel, pint or amount.

To protect soft produce, purchase small reusable baskets. Fill the produce inside a prebagged basket. Instruct the customer to remove the bag and leave the basket. Bundle greens and secure them with a rubber band.


We pulled together some tips to help you price your produce for sale.


8. Grow to Sell

If you’re thinking of adding something new to your roadside farm stand, look at the item in your grocery store to see if it is worth growing. “The store might be selling the item so cheaply that people will be used to buying it for a low price,” says Shelli Meulemans.

For instance, sweet corn is often sold for pennies on the dollar when in season. If you do sell common produce, make sure to educate your customers on the difference, such as the benefits of fresh farm corn and the amount of care needed to grow flowers.

Some items will fetch higher prices at your stand, however. Greens, such as kale and chard, are good examples. Stores often sell small bunches at high dollar, if all.

“We’ll sell a large bunch of kale for $2 on the stand when we have a lot,” Meulemans says.

Heirloom vegetables with a backstory are also worth selling, such as the dried bean variety called the Mayflower, which is said to have come over on its eponymous ship. Include the story on a label or attached to the display.

roadside stand stands farm market
Joey & Emily Kwilos/ Kwilos Farms

9. Roadside Farm Stand: Money Makin’

Get creative about accepting money. Bikers and walkers might not have cash with them, so join “send and receive” money apps, such as Cash App, Venmo, Square and Paypal, and post the information inside your stand. This is also a good choice for self-service stands.

Kwilos keeps change in her apron pocket so she’s not tied down to standing by a money box or register.

Securely bolt your “honesty money box” to something sturdy so it can’t be stolen, and padlock the lid. Kwilos and Pettigrew, who have self-serve stands, say that sometimes the box will be short money and sometimes it will be over. And sometimes there will be an IOU.

You can also sell to people on supplemental nutrition programs. Apply through the USDA to become a SNAP (Supplemental Nutrition Assistance Program) retailer. To become a WIC (a supplemental nutrition program for Women, Infants and Children) retailer, contact your state’s Department of Health.

Just like most things on a farm, a roadside stand can be a lot of work, but it can also be a lot of fun. Family and friends can join in by decorating the stand and signs, refilling produce and manning the stand to answer questions.

Your kids might even want to grow or make their own products to sell. Bodie says that her 10-year-old daughter became inspired this year to grow her own tomatoes to sell them on the farm stand and make her own money.

Most of all, a roadside farm stand can give you a chance to join the produce retail market without a lot of investment.

This article about best tips for a roadside farm stand originally appeared in Hobby Farms magazine. Click here to subscribe.

Categories
Crops & Gardening

Lettuce Bolting? 5 Things You Can Do With It

Lettuce bolting is one of the biggest problems when growing this popular crop for home gardeners. It’s easy to grow, and there’s a plethora of gorgeous and tasty varieties to include in your veggie patch. That said, since lettuce is a cool-weather crop, once the warm temperatures and long days of summer arrive, lettuce plants go to flower and set seed. Most gardeners rip out their lettuce plants when they bolt. If you do this, you’re missing a great opportunity. Here are five things to do when lettuce bolting strikes.

1. Feed Bolted Lettuce to Your Flock or Donate It to an Animal Shelter

Bunnies, guinea pigs and many species of birds, including chickens, enjoy munching on lettuce leaves, even after the plants have gone to flower and are too bitter for human consumption. Lettuce can be a good source of vitamins and minerals and the entire plant, including leaves, stems and flowers, can be fed to chickens.

chickens and rabbits eating lettuce
Adobe Stock/Iker

2. Cut Bolting Lettuce Plants Back to the Ground; Let Them Resprout

This is my favorite thing to do with lettuce bolting in my garden. Instead of pulling the plants out by the roots, simply cut the tops off and leave the roots intact. The stump will resprout when temperatures cool later in the season and go on to produce a second crop of lettuce in the late summer or fall.

3. Let Bolted Lettuce Plants Flower for Beneficial Insects and Pollinators

Lettuce blossoms are very attractive to many species of parasitic wasps, syrphid flies and other beneficial insects that help gardeners control pests in the landscape. Some species of pollinators nectar on them as well. Lettuce bolting flowers will be buzzing with insect activity soon after they open, and they’ll continue to bloom for many weeks.

4. Collect the Seeds for Next Year’s Garden

bolted lettuce seeds
Jessica Walliser

Lettuce plants are largely self-pollinating, so if you save the seeds of open-pollinated, heirloom lettuce varieties, there’s a good chance the seeds will come true-to-type (meaning you’ll get the same variety when you plant those collected seeds into next year’s garden). I save seeds from all my heirloom lettuces because even if they don’t come true-to-type, the results are still delicious. Plus, I often end up with some very unique coloration and leaf forms.

5. Lettuce Bolting? Use it as a Trap Crop

Slugs, earwigs and pill bugs much prefer lettuce to most other garden crops. If you want to keep these leaf-marring insects off broccoli, cabbage and other productive crops, just allow your lettuce bolting plants to stay right where they are. Sprinkle an iron phosphate-based slug bait, such as Sluggo or Escar-Go, between the lettuce rows to get a grip on slug numbers.

If you’re not willing or able to do any of these, there’s always the compost pile. Bolted lettuce plants are a great nitrogen source for the compost bin, especially when they’re used in combination with carbon sources such as autumn leaves and straw.

This article about lettuce bolting was written for Hobby Farms and Chickens magazines. Click here to subscribe.

Categories
Crops & Gardening

Basil Varieties: 10 To Consider Growing

Choosing from the array of basil varieties to plant might be the most difficult part of growing this herb. It has minimal growing requirements—full sun (at least six hours a day), warm temperatures (above 50 degrees F) night and day and fertile soil with adequate moisture—but there are more than 40 known varieties (as well as many ways to market it to sell). Your local garden center probably offers a few varieties as seedlings, but to grow the most unusual basils, you’ll need to start from seed.

To help narrow your selection, determine how you will use it: to color in the landscape, as an ingredient in food or drinks, as a garnish, or to make a year’s supply of pesto (or any of our five creative uses). Below is a list of 10 basil varieties and their uses to help you make your decision.

1. Christmas Basil

christmas basil

With 2-inch, glossy green leaves and purple flowers, Christmas basil adds fruity flavor to salads and drinks, and the plants are gorgeous in the landscape. A beautiful border plant, it averages 16 to 20 inches tall.

2. Cinnamon Basil

cinnamon basil

This variety has a delightful fragrance and spicy flavor. A beautiful, 25- to 30-inch-tall plant with dark-purple stems and flowers accented with small, glossy leaves, it’s my favorite basil to use for fresh arrangements and in fruit salads and garnishes.

3. Dark Opal Basil

dark opal basil

A must-grow among the basil varieties in my garden, Dark Opal basil adds color to fresh summer floral displays and depth to dried arrangements and wreaths. Beautiful and spicy in a salad or garnish, it can also be made into pesto, which adds an unexpected color and flavor to your pasta or bruschetta. The plants are attractive in the herb garden, ranging from 14 to 20 inches in height with purple stems, flower and leaves.

4. Holy Basil

holly basil

A revered plant in the Hindu religion, Holy basil is also referred to as Sacred basil or Tulsi. Its leaves can be used to make tea for boosting your immune system. It is a beautiful plant in the garden with mottled green and purple leaves and grows to about 12 to 14 inches tall.

5. Lemon Basil

lemon basil

This variety can be added to salads and fish dishes with abandon. A sprig of Lemon basil in a glass of iced tea is particularly delightful on a hot summer day. The 20- to 24-inch plants are light green with white flowers and 2½-inch-long leaves.

6. Lime Basil

lime basil

With small green leaves on compact, 12- to 16-inch plants with white flowers, this basil variety’s lime scent and flavor make it great in fish and chicken dishes. A simple syrup infused with Lime basil is a delicious addition to tea and margaritas.

7. Spicy Bush Basil

spicy bush basil

Basil varieties in the garden include Spicy Bush basil, which has tiny leaves on small, mounded plants; perfect for pots or lining the garden in bonsai-like fashion. It only takes a few of this variety’s intensely flavored leaves to add a punch to a sauce or soup. The plants are a soft green and about 8 to 10 inches in height and width, with 1/2- to 1-inch-long leaves.

8. Purple Ruffles Basil

purple ruffles basil

A feathery variation of Dark Opal, Purple Ruffles adds another dimension to the landscape, floral arrangements or garnishes. It has the same flavor as Opal and can be used similarly. It is a 16- to 20-inch-tall plant with 2- to 3-inch-long leaves.

9. Sweet Basil

sweet basil

Of the basil varieties, this cultivar is the best choice for Italian sauces and soups and for making pesto. Varieties include Genovese, Napoletano, Italian Large Leaf and Lettuce Leaf. Plants range from 14 to 30 inches tall and are prolific in hot, sunny locations. Harvest the top four leaves often to keep the plant growing and sweetly flavored.

10. Sweet Thai Basil

sweet thai basil

An Asian variety with a distinct, spicy, anise-clove flavor, quite unlike common sweet basil, sweet Thai is a must-have addition to Asian cuisine and makes a nice addition to the basil varieties in an herb garden for fragrance and color. It has purple stems and blooms with green leaves reaching 12 to 16 inches tall.

This article about basil varieties was written for Hobby Farms magazine. Click here to subscribe.

Categories
Crops & Gardening

Bucket Garden: Use a 5-Gallon Bucket To Grow Veggies

This project uses recycled 5-gallon buckets to grow a great container garden. Five-gallon buckets make terrific containers for a huge number of vegetables. Not only do they hold just enough potting soil for roots to thrive, but they don’t take up a lot of room on a crowded patio or deck. Each bucket is home to one vegetable plant and perhaps two or three smaller herbs or annual flowers. Using 5-gallon buckets, you can grow as many different vegetables as you’d like. They’re easy to move around the deck or patio to maximize sunlight exposure, and come fall, the plants can readily be protected from early frosts by simply tossing a bed sheet over them. Here’s how to build a 5-gallon bucket garden.

Pick The Right Buckets

When selecting buckets for your 5-gallon-bucket garden, try to avoid any that were used to store questionable materials, such as pool chemicals, tar, asphalt, pesticides or herbicides. Instead, look for buckets that were used for food-grade materials or clay-based kitty litter, or ones that were simply used for odd jobs around the house.

Pick The Right Vegetables

After you have your collection of buckets, focus on selecting the correct vegetable varieties. Seek out smaller-statured vegetable varieties for your 5-gallon-bucket garden whenever possible. Determinate or genetically dwarf tomato varieties perform the best in these buckets, as do bush-type cucumbers and winter squash. For this project, I used a pickling cucumber, but other good veggie choices garden include eggplants, tomatillos, ground cherries (Physalis pruinosa), pole beans (as long as you use a trellis to support them), zucchini, cabbage, peppers, broccoli and chard. You can also grow a broad range of salad greens in 5-gallon buckets.

What You’ll Need:

  • 1 plastic, 5-gallon bucket for each plant
  • roll of burlap (if you’d like to cover the bucket)
  • jute or plastic twine
  • enough 50/50 potting soil/compost blend to fill all the buckets
  • 1 feature plant for each bucket
  • 2 to 3 “filler” plants for each bucket
  • cordless drill with 1/2-inch drill bit
  • scissors
  • eye protection (for drilling)

Step 1

drilling drainage holes in a bucket garden
Jessica Walliser

Flip over each of the buckets and use the drill with bit to create three to five drainage holes in the bottom of each bucket. Do not push too hard on the drill as it may crack the bucket. Let the bit and drill do the work.

Step 2

cutting burlap for a bucket garden
Jessica Walliser

If you’d like to cover your buckets with decorative burlap, this is best done before the containers are filled. To do it, cut a piece of burlap slightly wider and longer than the bucket’s exterior. Fold and wrap the burlap around the bucket, tucking in any loose edges to keep them from fraying. Use two pieces of jute or plastic twine to fasten the burlap around the bucket, one toward the top and one toward the bottom.

Step 3

filling a bucket garden with dirt
Jessica Walliser

Fill the bucket with the potting soil and compost blend to within 1 inch of the bucket’s upper rim.

Step 4

planting herbs in a bucket garden
Jessica Walliser

Plant one larger, feature plant in the bucket, then add two or three smaller plants. For this project, I used a pickling cucumber as my feature plant and a thyme plant and nasturtium as the fillers. Water them in well.

Step 5

Repeat the process for each of your 5-gallon buckets, and then arrange the planted buckets with the plants that will grow tallest toward the back of the collection and those with trailing or low plants toward the front to maximize sunlight exposure and air circulation.

cucumbers growing in a bucket garden
Jessica Walliser

If you’d like to add a splash of color to your 5-gallon bucket garden, you can also paint the buckets with funky patterns or flowers using a spray or liquid paint formulated specifically for use on plastics. Clean the exterior of the buckets with an ammonia-based cleaner before painting. To prevent damage to any plants, allow the paint to fully dry prior to planting the buckets.

This article about planting a bucket garden was written for Hobby Farms magazine. Click here to subscribe.

Categories
Poultry

Fertilized Chicken Egg: Easy Signs to Identify

Knowing how to spot a fertilized chicken egg when you have a rooster in your flock is a good skill. Here’s how to tell.

Can you make this assessment just by looking at an egg? The simple answer is that you cannot eyeball an egg to identify it as either fertilized or unfertilized. The eggshell is merely an armored casing, protecting what is inside. It does not grow harder, become rounder or change color if a chick is growing within. If you bought your eggs from a commercial farm or a supermarket, however, you can safely assume that your eggs are not fertilized.

eggs fertilized unfertilized egg
Shutterstock

“Eggs produced by commercial farms are never fertile because the hens are never with a male,” notes Dr. Richard Fulton, a diplomate of the American College of Poultry Veterinarians with more than 30 years of experience in poultry pathology and medicine.

Identifying a Fertilized Chicken Egg From the Inside

You can tell whether the farm egg you just cracked open for your breakfast is a fertilized chicken egg or not. Examine the egg for the germinal disc, a white spot floating above the surface of the yolk. The germinal disk of a sterile egg contains only the hen’s cells and is fully white in color. In a fertilized egg, the germinal disk contains the merged female and male cells. These will divide and multiply, leading to the development of a chick embryo. A fertilized germinal disk looks like a tiny white donut or bullseye—a white ring with a clear center.

fertilized egg eggs
Suchandsuchfarm.com

If you’re still not sure whether a collected egg contains a developing chick, candling the egg should solve the mystery. When candled, fertile egg at six or seven days’ incubation shows a fine network of blood vessels as well as a dark spot, the developing chick’s eye.

Other Ways to Identify a Fertilized Chicken Egg

Collecting eggs multiple times a day, every day, will ensure that the shell (eating) eggs you collect to sell don’t contain any special surprises for your customers. If your flock includes a broody hen or two, the mama wannabes might have been sitting on an egg. If your hen is setting with your knowledge, clearly mark the egg so that your kids, your spouse or any helpers don’t accidentally collect the incubated egg along with the freshly laid ones. I mark my girls’ clutch eggs with a fine-point permanent marker; markings made in pencil and watercolor marker are quickly worn off by the humidity of the broody hen’s body heat.

Of course, if you raise only pullets and hens on your farm, there is no need to worry about fertilized vs. non-fertile eggs, as there is no rooster present to fertilize the eggs. Your broody girls can sit on a clutch of eggs for days on end, and nothing will develop inside those eggs (aside from bacteria).

broody hen fertilized egg eggs
iStock/Thinkstock

Our farm, however, is a breeding farm, with at least one rooster in every coop. Our roosters are very active fellows, so this is a safe supposition. Can fertilized eggs develop into chicks? Only if they are properly incubated, either by a broody hen or in an incubator. Collected fresh from the nestbox, a fertilized chicken egg is just as safe and tasty to eat as a non-fertile egg.

This article about fertilized chicken eggs was written for Hobby Farms and Chickens magazines. Click here to subscribe.

Categories
Poultry

7 Goose Breeds To Consider For Your Farm

Goose breeds are plentiful and picking the right breed for your farm can make all the difference. Geese are entertaining and useful farmyard companions. Some goose breeds are great for guarding property or other livestock, while others will keep an orchard or vineyard closely weeded. And believe it or not, geese make amazing pets thanks to their dedicated “imprinting,” closely bonding with the people who raise them.

Here are a few goose breeds to consider if you are thinking about adding geese to your flock.

1. African Goose

Contrary to their geographical name, African geese probably originated in China or another Asian country. One of the largest goose breeds, Africans are distinguished by the prominent black knob at the top of their beaks, and they often have heavy bodies with pendulous dewlaps and full abdomens. They carry themselves very upright and can be loud and occasionally aggressive.

African geese have been kept for a variety of purposes, but because of their heavy weight they are often kept for meat. Adult male African geese can reach 20 pounds, and they also are reliable egg layers. While they are occasionally aggressive, most Africans raised by hand are friendly and calm.

2. Embden Goose

The Embden is a large white goose with orange feet and bill. They’re heavyweight and originated in Germany in the 1800s. Raised largely for meat, Embdens were popular in early American settlements where their versatility was prized.

The Embden gander can reach 28 pounds, making it a desirable meat bird among goose breeds. Embdens are laid back and not as loud as other goose varieties, making them a great pet for a hobby farm.

3. Roman Tufted Goose

The comparatively diminutive Roman Tufted goose is an ancient breed that once guarded the temples of Rome. Today, they guard chicken flocks and property and delight farmers with their beautiful white plumage and top hat of tufted white feathers.

Currently critically endangered and hard to find on American farms, Roman Tufted geese are good egg layers and mature at around 10 pounds. Their loud voices make them excellent guards, but most are docile around the people that they know.

4. Toulouse Goose

The French Toulouse is a classic farmyard icon, with its rumbled gray feathers and orange legs and bill. The heavier variety, known as the Dewlap Toulouse, is a behemoth of the farm and the largest breed of domesticated goose. Both goose breeds are plain gray birds, but the Dewlap Toulouse is massive with a large “dewlap” under its bill and heavy keel and abdomen.

The Dewlap Toulouse was developed specifically for the production of foie gras, and even without a special diet it will grow quickly into a mature 20- or 30-pound bird. French Toulouse are slimmer, but still solid animals that lay large white eggs through the spring and summer months. Both varieties are known for their calm, docile personalities so make great farm pets.

5. Sebastopol Goose

Perhaps the most distinctive of the goose breeds, the Sebastopol is easily recognized by its unkempt white feathers. Looking like a bird that was put through a washing machine, the Sebastopol is usually raised for show, maturing at a light 10 to 15 pounds.

Originally bred in Eastern Europe, Sebastopols were popular with poultry fanciers in the early part of the 20th century before becoming more unusual on today’s farms. They need a warm space for winter and plenty of clean swimming water to keep their feathers in order, but with those considerations you can keep a happy, talkative flock of these very friendly and curious birds.

6. American Buff Goose

The American Buff goose was developed from a similar breed in the UK. It boasts unusual apricot feathers. Medium weight, these birds are a versatile, making for good eating and producing a reliable number of eggs each year.

Buff geese are usually very friendly and they will fit in well on a family farm. Their lovely coloring makes them particularly striking in a large flock, gliding across a pond or enjoying the greens of a large field.

7. Chinese Goose

Perhaps the most versatile of goose breeds, the Chinese goose is loud and active, making it a perfect weeder or guardian. Most commonly a solid white, Chinese geese have a prominent knob on their bills just like African geese. They are much lighter weight than Africans, only about 10 pounds, and carry their heads high and their chests upright.

Because of their piercing voices, Chinese geese are not ideal for an urban farm. In the country, however, a flock of Chinese geese can sound an alarm at any intruder, and their foraging nature means they’ll keep a field closely mowed.

Whichever goose breed feels right for your farm, hopefully, you will enjoy the unusual personalities and charming nature of geese.

This article about goose breeds for your farm was written for Hobby Farms and Chickens magazines. Click here to subscribe.

Categories
Poultry

Poultry Lice: 7 Facts You Need To Know

Poultry lice are a different story from human lice. How much do you know about this poultry parasite? Learn seven important facts about nobody’s favorite farmyard pest.

1. What Kinds of Poultry Lice are There?

poultry lice images under a microscope
Amy Murillo / University of California, Riverside

Just as there are three types of human lice, there are multiple kinds of poultry lice. Menacanthus stramineus, the body louse, is the louse most likely to infest your backyard flock. The body louse thrives on the warmth and moisture of your chicken’s vent but also can be found on the breasts and thighs. Other kinds of poultry lice include:

  • Menopon gallinae (the feather-shaft louse)
  • Lipeurus caponis (the wing louse)
  • Cuclotogaster heterographus (the head louse)
  • Goniocotes gallinae (the fluff louse)
  • Goniodes gigas (the large chicken louse)
  • Goniodes dissimilis (the brown chicken louse)
  • Menacanthus cornutus (the “other” body louse)
  • Uchida pallidula (the small body louse)
  • Oxylipeurus dentatus (the toothed louse)

2. What Do Poultry Lice Look Like?

The poultry louse is a wingless, six-legged insect with a squashed appearance: It looks as though it has been flattened by a tiny steamroller. Depending on its species, a louse can range in length between four-hundredths of an inch (the fluff louse) to one-quarter of an inch (the large chicken louse). Most of that length is occupied by the louse’s disproportionately elongated abdomen. These lice range in color from clear yellow to golden straw to dull brown; their nits, or eggs, are laid in white clusters.

poultry lice nits
Brad Mullens / University of California, Riverside

3. How Long Do Poultry Lice Live?

Once laid, poultry lice nits hatch in about four to five days. Their life cycle is a very short one. The young spend approximately nine to 12 days as nymphs (the immature life stage), molting three times before they become full adults. An adult louse lives approximately 12 days, during which an adult female lays an average of one to two eggs per day. Poultry lice are ectoparasites—parasites that live on the surface of their host’s body; a louse will usually live its entire life on one host.

4. How Do Poultry Lice Spread?

Just like with human lice, poultry lice spread from bird to bird through close contact. Your hens might not be using each other’s hairbrushes, but if they perch side by side or share a favorite nest box, they’re close enough to allow the lice to transfer from one bird to another. These lice do not hop (human lice don’t, either). They crawl from one host to another, although they usually prefer to remain on one host for the entirety of their brief lives. Poultry lice can also be introduced to your flock via infested chicken crates or egg flats, by the addition of new birds, or by wild birds. To help prevent lice from spreading, never borrow poultry equipment from other farms, use only new egg flats and cartons, and always quarantine new birds for at least three to four weeks.

5. Can I Get Poultry Lice From My Flock?

Poultry lice cannot infest humans; unlike human lice, they feed on feathers and poultry skin, neither of which we have, so they will prefer your chickens to you, so you can rest a little more easily. But only a little! Poultry lice will bite you, leaving itchy red marks, so take extra precautions when handling infested birds. Wear gloves, a long-sleeve shirt, boots and trousers when inspecting your flock.

6. How Do Lice Affect My Flock?

chicken being treated for a parasite infestation
Shutterstock

At the very least, you’ll have an uncomfortable chicken who’ll be scratching and pecking at herself, seeking relief. If your girls seem to be preening themselves with more vigor than normal, it’s time to inspect them, especially around their vents, under their wings, on their breasts and down around the base of their feather shafts. Red, patchy areas and chewed-looking shafts are an indication of a lice infestation. Clusters of white eggs are another telltale giveaway. Other signs include feather loss; pale wattles and combs, indicating anemia; a drop in egg production; lack of weight gain in chicks and juveniles; and a fluffed-up, sick appearance.

7. How Do I Treat Poultry Lice?

chickens dust bathing
Shutterstock

The simplest way to suppress a lice infestation is to offer your birds a large, deep dust bath containing play sand and food-grade diatomaceous earth, or DE. Use a mixture of approximately six cups of DE to 25 pounds of play sand. The DE will desiccate any poultry lice it touches and help prevent infestations by mites and other ectoparasites. For more severe infestations, use a pyrethrin-based insecticide. Pyrethrin-based insecticides are available as sprays, solutions and dusts. You might need to apply several applications over the course of a month to control the lice infestation. Read the label of any insecticide for guidelines regarding its effect on eggs. Also, wear gloves, long sleeves and trousers to protect your own skin from the insecticide and from any lice that crawl onto you. Do not use shampoos or sprays formulated for use on humans; these have no effect on poultry and might be harmful to your birds.

There is no social stigma involved in a poultry-lice infestation. Living with birds—and bugs—is simply part of co-existing with nature. With these seven facts, however, you’ll be able to better handle any lice that nature throws your flock’s way.

This article was written for Hobby Farms and Chickens magazines. Click here to subscribe.