The Atmospheric Steam Canner was approved as safe for home food preservation ten years ago. However, it seems that many people have never heard of it. Here’s what it is and how to use it to preserve homegrown foods.
What Is a Steam Canner?
The one I have is a two-part pan set. The bottom pan has sides that are a few inches tall, and a rack fits inside the base. It has a large lid that covers the bottom pan, which has a steam vent.
It differs from the boiling water bath canner because you do not fill a large pot with water. You only fill a couple of inches of water in the base of the steam canner. Therefore, it requires less water overall and it heats up and is ready to use faster than a large pot of water.
Once the canner heats up and steam starts venting from the hole on the side of the lid, it’s time to start your timer. Similar to when your water bath canning and the pot begins a rolling boil, that’s when you know to start your timer per the recipe you’re following. That’s how we know it’s reached the safe temperature to preserve the food.
What Food is a Steam Canner Used to Preserve?
This canner allows you to safely preserve acidic foods, the same as a water bath canner. Any food that you can safely preserve in a water bath canner can be safely preserved in a steam canner (see “Important Notes” at the bottom of the article).
High-acid foods or foods that have been acidified and have a pH of 4.6 or lower can safely be preserved with the steam canner. That means vinegar pickles, jams, fruits, jellies, tomatoes, syrups, chutneys, and so on. Steam canning can be used for both hot packing and raw packing.
The processing times for the steam and water bath canner are the same. So, if your recipe directs you to water bath jam for 10 minutes, then you’d process it in the steam canner for 10 minutes. Any recipe that requires you to process for 45 minutes or longer will have to be processed in a water bath canner, as the steam canner does not hold enough water to safely boil for that long.
How Do You Use a Steam Canner?
1. Add water to the noted line in the base of the steam canner, 2-3 quarts, less or more depending on how much you intend to preserve. If I’m canning one batch of jam for 10 minutes, I would add less water. If I’m canning several batches, I’ll fill the water to the max-fill line. Add the lid on the pot’s base and turn the heat up so that the water warms.
2. Fill your jars as you normally would when water bath canning. Add lids and rings just the same.
3. When you’re ready to place your jars in the steam canner, turn down the heat, and slowly lift the lid AWAY from you, so that if there is any steam, it does not go in your face.
4. Place your jars of food on the rack. Return the lid on the pot’s base and turn the heat up to high. Once steam starts venting from the canner, you can start your timer per the recipe you’re following. My steam canner notes in the instructions that if the lid begins rocking and water is spurting out, to turn the heat down.
5. Once the food is done processing, turn the heat off on the canner and allow it to sit covered on the burner to cool down. After a few minutes, open the lid AWAY from you once again, to not burn yourself with steam.
6. Using canning tongs, transfer the hot jars to a towel-lined surface and allow the jars to cool completely (12+ hours) before touching.
Important Notes
Read the instructions that come with your canner, as different brands vary.
Remember to only use trusted recipes. No low-acid foods can be preserved in a water bath or steam canner. Only a pressure canner can safely preserve low-acid foods.
Remember that elevation determines your boiling point temperature, so consult your altitude chart for added timing if you aren’t sure.
Have you seen those beeswax wraps for leftover food storage? They are used as an alternative to plastic wrap for storing leftover food. These kitchen pantry staples come in various sizes and come with a hefty price tag, considering how inexpensive they are to make yourself.
We’ve been using them for years in my household, but I purchased my first set. I didn’t realize how easy and inexpensive it would be to make my own. I’ve since made many sets for homemade gifts through the years. It’s fun to play with different patterns for different seasons throughout the year.
I developed my method by testing other methods online. The best combination of ingredients includes pine resin and jojoba oil. The addition of pine resin and jojoba oil is what makes the wraps sticky for the cling to hold. Plain beeswax wraps tend to not last as long, crack easier and not stick as well.
How to Make Beeswax Food Storage Wraps
Supplies
1.5 yards of 100 percent cotton fabric – Organic cotton is my go-to choice, but non-organic 100 percent non-organic cotton works just fine as well – it’s up to you. Consider checking your local “Buy Nothing” Facebook page for cotton fabric scraps or check for options at your area thrift shops.\
1 cup beeswax -We use organic beeswax pellets. They are easy to measure and I use them for making beeswax candles and beeswax salves and balms as well, so we always have some on hand.
2 tbsp. organic jojoba oil
6 tbsp. food-grade pine rosin
Scissors/Pinking Shears – Regular scissors work as well but pinking sheers reduce fraying on the edges of your fabric. If you use regular scissors, you can cut away any fraying thread from the fabric after they’ve been waxed.
A full-sized baking sheet
Double boiler set up or saucepan with a heat-safe dish or measuring cup for melting wax (a set that you’ll dedicate to crafts after this project)
A wooden skewer or other utensil to stir the melting wax
Paint brush – For brushing the wax on the cotton fabric. Use a brand new one and reserve it for making these wraps in the future.
Parchment paper or foil
Directions
Cut your fabric to the sizes and shapes you desire. We make a variety of sizes so that we have wraps that fit our large storage containers as well as smaller ones for fruits and vegetables. Cut enough to fit on a full-sized baking sheet, as that’s how much wax you’ll have made to cover the cotton.
Wash and dry the fabric.
Using a double boiler, over medium/high heat, warm your beeswax, jojoba oil and pine rosin until it’s liquid. This will take 20+ minutes. Stir often.
Line your baking sheet with parchment paper or foil.
Heat the oven to 300°F.
Lay the cut fabric onto a lined baking sheet and brush the melted wax in a thin layer onto one side of the cotton fabric. Try not to saturate any one spot too much. Once your fabric is coated and the baking sheet is full, place the baking sheet into the oven for 3 minutes, until the fabric looks wet. We are doing this step so that you can evenly brush the wax on all parts of the fabric since it hardens quickly as you brush it on the fabric. Flip the fabric over, brush any bare spots with the wax mixture and bake for an additional 2 minutes.
Remove the waxed fabric from the baking sheet and allow it to cool in the air while holding it. It will harden quickly.
That’s it!
How Long Will Beeswax Wraps Last?
The life of the wrap will depend on how often it’s used. Once it begins to lose its wrapping ability or if the wax wears off, it’s time to make more. Generally, you’ll be able to use the wraps for six-plus months before making more or re-waxing them.
How Do You Use Beeswax Wraps?
Just apply the size needed to cover your dish and use the warmth of your hands to press the wrap around the container to create a seal. The wax wrap sticks to itself and the container you’re using for food storage.
It’s safe to touch the wraps directly on the food you’re storing as well, such as cheese, a sandwich or leftover fruits and vegetables.
Never put the wrap in the microwave or over hot food as it would cause the wax to melt.
It is not recommended to use the beeswax wraps for storing raw meat.
How to wash and store beeswax food storage wraps
Wash with a soft sponge or cloth (not abrasive) and cool, soapy water. You do not want to use really hot water as it could melt the wax. Allow the beeswax wraps to fully air dry before storing.
You can store the cleaned and dried wraps in a bag or in a drawer. Just remember to keep them away from heat sources and direct sunlight so they do not melt.
Beeswax Food Storage Notes:
It’s recommended to line your entire workspace with paper as the wax mixture can become very sticky because of the pine rosin. Wear an apron to avoid ruining your clothing.
If you have any wax left over, you can save it and reheat it for future use. For more healthy home project ideas, check out Small-Scale Homesteading by Stephanie Thurow and Michelle Bruhn.
This article about making beeswax food storage wraps was written for Hobby Farms magazine. Click here to subscribe.
A dog killing chickens is a tough situation for any backyard chicken owner. Whether it’s a stray, a neighbor’s pet, or even your own dog, a single attack can be devastating killing many birds in one fell swoop. If it happens, many wonder what to do next. Understanding why dogs go after chickens, how to prevent future attacks, and what steps to take afterward can help protect your birds and keep the peace with your neighbors.
Dog Killing Chickens: A Personal Story
My husband, Jae, and I were a little worried when we discovered that our new neighbors, the Joneses, not only own two Jack Russell Terriers but planned to breed them. Jack Russell Terriers are amazing hunting dogs, outgoing and adventurous, with a reputation for chasing down birds. And here we were, with dozens of birds right next door.
To our surprise and delight, the Joneses installed an invisible electric dog fence soon after they moved in. They then invited us to meet their pups, Baba and Brown, to ease our concerns and let the dogs learn our scent. For our part, we minimized our chickens’ free-ranging so as not to tantalize the dogs. So far, everything is working out beautifully.
I wish I could say the same for our friends, Ted and Daniel. They raise chickens, turkeys and peacocks on a lovely lakeside farm not far from our own. Here’s a photo of two of their free-range chickens checking out a turtle.
T. Gillihan
Their acreage shares a property line with a person I’ll call Mr. X and his three dogs. Like the Joneses, Mr. X installed an invisible electric dog fence to keep his canines restricted. Unlike the Joneses, however, Mr. X did not maintain the batteries on his dogs’ collars, making the invisible fence ineffective.
The dogs started bounding onto Ted and Daniel’s property, where their chickens peacefully ranged. Ted came home one day looking forward to a sunset stroll… and instead came across a nightmare: dead hens scattered around his back acreage.
“They looked like they were shaken around and tossed like rag dolls,” Ted told me, his eyes blazing.
Daniel told me that Ted stormed over to Mr. X’s house and read him the riot act, demanding compensation for his massacred girls. Mr. X wrote a check and handed it to Daniel, who refused it, acknowledging that accidents happen.
The accidents kept happening, however. Every day, another hen met its demise. When Daniel approached Mr. X about keeping his dogs confined within the invisible fence, Mr. X responded that he didn’t feel like maintaining the collar batteries, nor did he feel like restricting his dogs. Daniel was beside himself. Ted was livid.
“What can we do?” he asked me.
Report Each Incident of Dogs Killing Chickens
If you discover your chickens have been decimated and you suspect your neighbor’s dog, start a paper trail by contacting your local law enforcement agency such as the sheriff’s office. Deputies will come out to investigate the scene, so do not touch or move anything. Once they have reviewed the scene, they might want to talk to the owner of the dog. Often, this is enough: Involvement of the authorities can be all the motivation required to jolt negligent neighbors into controlling their dogs and paying compensation. Occasionally, however, dog owners deny their dog was involved or simply don’t care. Should such an unfortunate situation be yours, continue reporting each incident so that an official log of the massacres exists.
Research Local & State Laws About Dogs Killing Chickens
The ordinance code of your county or municipality should have a section regarding the “keeping of animals,” including how nuisance dogs are to be handled. Many local governments include ordinances specifically relating to the interaction between dogs and neighboring livestock and chickens.
Familiarize yourself with these ordinances. Your local laws might clearly state what measures you can take against the nuisance dog as well as what compensation you are due. If your local government has no laws regarding the interaction between dogs and poultry, try an online search for your state’s legislation (“state name” dog law livestock). Michigan, for example, has a Dog Law (Act 339) which details every aspect of handling a nuisance dog, including a canine’s trespass onto a poultry farmer’s land, the payment for losses or damage, and how much local officials should receive for services rendered under the act.
Contact Animal Control
A phone call to your city or county’s animal control division might be all the action you need. Animal control can check to see whether the dog in question has previous complaints filed against it. An animal control officer can also verify whether the dog is licensed or not; in many jurisdictions, unlicensed dogs are considered public nuisances to be rounded up and confined.
Install a Fence
If your neighbor refuses to confine his or her dog or, like Ted and Daniel’s neighbor, expresses indifference to the harm the pet causes your flock, a fence might be your best course of action. The type of fence once again depends on your local ordinances as well as your wishes and finances. The old adage states that good fences make good neighbors; in this case, a fence near the property line, separating your land from a problem neighbor’s plot, would definitely get a message across. This might be the most costly choice, but it would also let your birds continue free-ranging. Another option is to create paddocks on your property that would let your flock forage safely within. You might also opt for permanent runs, which would keep your chickens safely congregated near their coops.
Dog Killing Chickens: A Last Resort…
Sadly, some owners are apathetic regarding the training and restraint of their dogs. This usually results in animals that do not recognize home boundaries, that roam as they please, that see chickens as either playthings or meals, and that might even attack humans who try to deter them from their intent. For owners of chickens, these dogs rank among the worst predators, as they kill indiscriminately, causing great financial and emotional stress to the poultry keeper and trauma to the surviving birds. Should you find yourself in this unfortunate predicament, do what is necessary to defend your birds, your livelihood and your property. Every state has some form of law regarding dangerous dogs and how to handle them. Michigan’s Dog Law states that:
“Any person, including a law enforcement officer, may kill any dog which he sees in the act of pursuing, worrying or wounding any livestock or poultry or attacking persons, and there shall be no liability on such person in damages, or otherwise, for such killing.”
After a lot of thought and discussion, Ted and Daniel decided to survey their property, identify the boundaries and install a fence to keep Mr. X’s dogs away from the chickens. They did not see why their birds should have their ranging restricted just because Mr. X was negligent. Jae and I hope that Ted and Daniel’s fence will protect their chickens, and we are very grateful that the Joneses are conscientious, considerate dog owners.
This article about what to do about a dog killing chickens was written for Chickens and Hobby Farms magazines. Click here to subscribe.
Pastured pig breeds can be raised on a hobby farm for perfect pork for the family and for selling to friends and neighbors.
When was the last time you sank your teeth into a real pork chop? Not a dry, tasteless chop from the supermarket but a succulent, rich chop from a heritage pig, pink-fleshed and juicy with a nice lacing of fat along the edge. That’s the type of meat hog farmers produced before factory-farmed pork pushed old-fashioned breeds to the brink of extinction. Now many of those breeds are back, and with them comes the flavor of luscious country pork.
Today’s consumers pay top dollar for humanely raised, flavorful pork. If you’d like to raise pork for today’s niche markets, look to heritage breeds to deliver the goods. The Livestock Conservancy has yet to define “heritage pork.” Some say it’s meat from historic breeds; others insist that only Conservancy-listed breeds produce heritage pork. For the purposes of this article, it’s pork from breeds developed before 1900.
Pastured Pig Breeds For Flavorful Foundations
It often comes as a surprise to consumers accustomed to supermarket meat that pork from old-time breeds isn’t uniform in appearance and flavor. Nicely marbled pink pork from Gloucestershire Old Spots tastes sweet and nutty; darker-hued Ossabaw Island pork has a robust, spicy flavor; and Berkshire pork has a subtly smoky, sweet taste. Before choosing a breed to raise for market, sample several cuts from the breeds that interest you. Contact breed associations to locate producers in your area who have USDA-inspected pork for sale. If you can’t find pork to sample locally, search for heritage pork producers online. Many ship throughout the United States.
Also, factor your location and facilities into the equation. White pigs sunburn and require additional shade in sunny, sizzling climates. Some states consider breeds like the critically endangered Ossabaw Island Hogs and Choctaw pigs feral swine and do not permit breeding and raising them in those states. Easygoing, flop-eared breeds, like Large Blacks and Gloucestershire Old Spots, are more easily handled and require less elaborate fencing and handling facilities than ultra-active breeds, such as Tamworths and Durocs. Long-snouted breeds, such as Tamworths and Ossabaw Island Hogs, are more aggressive rooters, causing more damage to pastures than short-snouted breeds, like Poland Chinas and Yorkshire; however, it also means they’re often better foragers, especially in woodland areas.
Consider consumers’ preferences. Some prefer the ultra-succulent, fatty flesh of old-style lard hogs, like Mulefoots, Guinea Hogs and Mangalitsas. Others choose leaner pork, such as that of Poland Chinas, Durocs and Tamworths. Chefs often pay premium prices for heritage pork from favorite breeds, so if you plan to market to restaurants and institutions, include them in your decision-making.
Another important consideration is your approximation to a proper processing plant. If you intend to sell live porkers from your farm or pigs delivered to the buyer’s choice of processing plants, access to local, custom-processing facilities and state-inspected slaughterhouses is sufficient. If you plan to market finished cuts of meat, your pigs must be processed at a USDA-inspected slaughterhouse. Not all USDA slaughterhouses accept swine from small-scale producers, so make sure your local one does before you commit to producing pork.
Consumers who pay top dollar for heritage pork expect it to be raised in humane surroundings. This generally means grassy pastures, mud wallows and acorn scrounging in the woods—not closed confinement. These are all considerations to account for before you purchase stock.
Finally, seek out producers of pastured pig breeds in your area and pick their brains. Find them online or ask your local cooperative extension agent or veterinarian who’s raising niche-market pork where you live.
17 Pastured Pig Breeds To Consider
Breeds on the the Livestock Conservancy’s Conservation Priority List include the critically endangered Choctaw, Gloucestershire Old Spots, Guinea Hog, Large Black, Mulefoot, Ossabaw Island Hog and Red Wattle, along with the threatened Tamworth. Other old but more common breeds include Berkshires, Chester Whites, Durocs, Hampshires, Poland Chinas, Spotted (formerly Spotted Poland Chinas) and Yorkshires. Two old, established breeds that are new to the American scene are New Zealand’s diminutive but meaty Kunekune and the woolly-coated Hungarian Mangalitsa.
1. Berkshire
Berkshire hogs originated in the Berkshire area of England some 200 years ago, where they were fattened on waste products from London’s dairies, breweries and distilleries. The American Berkshire Association, formed in 1875, was the first registry for pig breeds established in the world. The Berkshire is a medium to large hog that’s black with a white snout and boots and a splash of white on the tip of its tail. It’s a nicely proportioned pig with small, upright ears and a short, dished face. Berkshires are hardy, fast-maturing, good-natured pigs and famous for their nicely marbled, succulent and flavorful pink meat. It’s especially popular with Japanese chefs who call it kurobuta (black pig meat).
2. Chester White
Breeders in Chester County, Pa., developed Chester Whites in the early 1800s and formed their first breed association in 1884. Chester Whites are large, white pigs with semi-floppy ears and slightly dished faces. They have long bodies and extra-large hams. They’re known for hardiness, fast maturity, easygoing dispositions and lean but nicely marbled pork.
Chester Whites have thick coats, a trait that helps them perform well in pasture-based situations.
3. Choctaw
The Choctaw is a nearly extinct lard hog descending from swine brought to America by early Spanish explorers. Only about 100 remain, which means Choctaws aren’t readily available to pork producers at this time. The Livestock Conservancy hopes to restore numbers of pastured pig breeds such as the Choctaw to a stable level and make the breed available to producers within two to three years.
4. Duroc
Swine breeders in New York and New Jersey developed big, red Duroc hogs during the early 1800s. The breed was widely exported throughout the world and is a major contributor to modern hog operations throughout North America due to its fast maturity and ultra-efficient conversion of feed to meat. While mainly known as a commercial hog, this hardy, old pig breed produces flavorful, lean but well-marbled meat.
Michel Egloff2/Wirestock/stock.adobe.com
5. Gloucestershire Old Spots
A large, predominately white pig with a few black spots, the Gloucestershire Old Spots has huge lopped ears that droop over its face and a long, slightly arched back. It hails from Gloucestershire, England, where it was once known as the Orchard Pig and was raised on windfall apples. Old Spots are hardy, sweet-natured hogs and outstanding foragers. They produce sweet-tasting, well-marbled, exceptionally flavorful pork, including large hams. This breed is still being raised by the British royal family today.
6. Guinea Hog
The Guinea Hog is a compact, hairy, black or occasionally red pig with upright ears and a curly tail. It was a fixture on homesteads in the American Southeast for more than 200 years. Landrace pig breeds are great for a hobby farm, and this breeds was selected over a long period of time for conditions in the South, its type and size vary greatly.
Typical adults weigh 150 to 250 pounds and can have long or short snouts and erect or semi-lopped ears. As a lard breed, Guinea Hogs tend to pack on too much fat when raised in semi-confinement, but they’re hardy and peerless foragers, making them ideal heritage pastured-pork producers.
Their pork is so delicious that it’s listed as one of the pastured pig breeds on Slow Food USA’s Ark of Taste, a catalog of more than 200 foods in danger of extinction.
7. Hampshire
Kentucky breeders developed Hampshire hogs, originally called Thin Rinds, during the early 1800s. Hampshires are medium to large, black pigs with a white belt encompassing their front legs. They’re long, lean swine with erect ears, a slightly dished face and a straight to slightly arched back. Hampshires are known for their docility, hardiness, speedy growth and outstanding feed-to-meat conversion rates. Hampshire pork is lean and mild with very little back fat.
8. Kunekune
Most people consider Kunekunes pets, but the breed is a first-class porker. Introduced to New Zealand in the early 1800s by whalers and traders, the Maori raised this diminutive pig for meat. Its name, in fact, means “fat and round.”
Kunekunes come in a range of colors and have short legs and semi-lopped or erect ears. Due to their short snouts, they tend to root less. Kunekunes are known as hardy, easygoing and excellent foragers amoge pasture pig breeds. Their meat is nicely marbled, tasty and succulent.
9. Large Black
Large Blacks were a fixture in the English counties of Devonshire and Cornwall by the early 1800s. This is a large, long-bodied black pig with gray skin, a medium-long snout and huge lopped ears that cover its face. Large Blacks are hardy pigs with even temperaments. They’re peerless foragers and famed as efficient converters of feed into exceptionally tasty, nicely marbled pork.
10. Mangalitsa
Hungarian farmers developed the Mangalitsa lard pig during the 19th century. Mangalitsa lard, bacon and salami quickly became prized commodities throughout Europe. It remained Hungary’s most popular breed well into the 1950s. The Mangalitsa is a woolly coated, robust, slow-growing hog with short legs, floppy ears and a short, upturned snout. Chefs at high-end restaurants sing the praises of the Mangalitsa’s dark, sweet, juicy pork.
11. Mulefoot
While the origin of Mulefoot hogs is uncertain, it was well-established in Ohio, Indiana, Illinois and the Ozark region when the National Mulefoot Hog Record Association formed in 1908. By 1910, there were 235 breeders registered in 22 states.
Mulefoot hogs are a medium-sized, black pig breed with distinctive fused hooves. Some have cylindrical, fleshy appendages called wattles dangling from their necks. Mulefoot hogs are lard pigs, so they fatten easily and produce such succulent, well-marbled, red pork that it’s one of the pig breeds listed on the Ark of Taste. They are hardy, docile and outstanding foragers.
12. Ossabaw Island Hog
Ossabaw Island Hogs descend from swine that Spanish explorers left on Ossabaw Island almost 400 years ago. No additional genetics have been added over the years, so they’re as feral-looking as a recognized breed can be. Adults tip the scale between 100 to 250 pounds, and they carry an unusual “thrifty gene” that enables them to pack on weight when food is plentiful and live off stored fat when it isn’t. Ossabaw Island Hogs are hardy and adept foragers that are easy to bring to slaughter weight on a mainly pasture diet. Their red, spicy pork is a favorite of gourmet chefs, also earning them a place on the Ark of Taste.
13. Poland China
Farmers raising pastured pig breeds in Ohio’s Butler and Warren Counties developed Poland Chinas in the 1880s. Like Berkshires, Poland Chinas are black with white snouts, boots and tips on their tails. They’re long, lean pigs with large jowls; short, upturned snouts; and semi-lopped ears that turn toward the eyes. They’re fast-maturing, hardy, rugged and docile, and their pork is nicely marbled but lean.
14. Red Wattle
The Red Wattle’s origin is unclear, but this breed does trace its ancestry to several batches of large, red hogs with wattles that were captured from the wild in areas of East Texas. They’re large hogs, so they require more room to house than smaller heritage breeds. They are, however, fast-maturing, easygoing pigs and hardy, highly efficient foragers. Red Wattle pork is fine-textured, luscious and lean, earning this pig a spot as one of the pastured pig breeds on the Ark of Taste.
15. Spotted
During the 1880s, Hoosier farmers who raised pig breeds crossed local landrace hogs with Poland China swine from Ohio, adding a few Gloucestershire Old Spots to the mix in the early 1900s, thus creating a black-and-white-spotted breed called the Spotted Poland China. In 1960, the National Spotted Swine Record dropped “Poland China” from the name. Spotted hogs are large, fast-maturing, easygoing pigs that produce lean, tasty pork on less feed than most other pastured pig breeds.
16. Tamworth
The Tamworth hog descended from a type already well-established in the British Middle Ages, a time when there were yet to be established breeds. It’s named for the village of Tamworth in Staffordshire and came to Canada in 1877 and the U.S. in 1882.
This pastured pig breed is medium to large, narrow-bodied red hogs with long legs and bodies, upright ears and a long, straight snout. They’re active, intelligent pigs that don’t take well to confinement but are excellent foragers and rooters that do exceptionally well outdoors. They yield firm-textured, nicely marbled, lean pork.
17. Yorkshire
Its exact origin is unknown, but Yorkshires were well established in Britain by the early 1800s, where they’re called Large Whites. Early breeders often raised these hogs to gargantuan proportions: A 4-year-old boar pictured in Two Hundred Years of British Farm Livestock (Stationery Office, 1996) was 9 feet 10 inches long, measured 8 feet around the body and weighed 1,334 pounds. Yorkshires are big, muscular, fine-boned pigs with soft, fine hair, a dished face and small, upright ears. Yorkshires have very little back fat and produce prodigious quantities of lean pork.
Pastured Pig Breeds Are a Natural Fit for a Hobby Farm
Today’s consumers prefer old-fashioned flavored pork from pig breeds raised in a healthy, humane manner. If you can provide it, the market is there. But do your homework before embarking on a heritage pork venture to make certain it’s right for you.
This article about pastured pig breeds was written for Hobby Farms magazine. Click here to subscribe.
Coyotes are increasing in numbers across all of the U.S. (excluding Hawaii) and are posing more of a threat to livestock, poultry, and pets. Protecting your farm animals and poultry may not be easy, but with a little know-how, outsmarting these savvy predators is possible.
What is a Coyote?
Coyotes are members of the canine family, resembling a German shepherd but with a narrower muzzle. Mature adults weigh between 25 and 40 pounds, and their color varies from tan to buff to dark gray, often tinged with red or frosty-colored tips. A couple of distinctive characteristics that differ from most dogs are the black tip of the tail and yellow eyes. Compared to other wild “dog” species, a coyote should be smaller than a wolf and larger than a fox.
To understand coyotes, you need to understand their relationship to their habitat. They will eat anything that is available, including garbage, cat food, dog food, trash, animal feed, compost, fruits, vegetables, and, of course, meat (i.e., rodents, deer, livestock, poultry, etc.). Highly adaptable, elusive, and wily, coyotes will even change their habits to match those of their prey.
Even though they are primarily nocturnal (meaning they are most active at night), eastern coyotes are actually diurnal (daytime) hunters, preferring to do most of their hunting in the morning, or at dawn or dusk. Western coyotes will hunt anytime, day or night.
Fearless Hunting Style
Coyotes are fearless and savvy hunters, rarely caught in the act with the human eye. So if you suspect your livestock, poultry, or barn cats have been attacked by one, the only chance of knowing a coyote is the culprit is when filmed with a game camera.
Excellent at digging, climbing, gnawing through fencing, and jumping, they will do anything to get a free meal. They will take on small and medium-sized dogs (more on that later) and hunt in packs to catch larger prey.
But the one thing they don’t want to deal with is humans (keep reading for some safety tips to protect yourself against a coyote attack.). This includes confronting a human or entering a building occupied or frequently visited by people.
Coyotes are most likely to hunt at dawn, dusk, morning and nighttime, but they can hunt at any time. So extra vigilance is needed to ensure the safety of livestock, pets, and poultry at all times if coyotes frequent your area.
Will Coyotes Attack People?
Rarely. Coyotes are shy, and despite their frequent forays into suburbia, they’re still very wild. They generally avoid people and prefer to stay out of sight. However, the fragmentation of their natural habitat has forced them to use green spaces near civilization, such as parks and golf courses.
If a human should stray too close to a den of pups, a mother could become aggressive and attack to protect her litter. This is an instinct in all animals and not a random attack.
Left to themselves, coyotes rarely attack humans, so if one should try to attack outside of pup-rearing season (April through June), this could be a sign that the coyote is sick or injured. If attacked by a coyote, notify your local game warden immediately.
Concerned about your family’s safety? Following these tips should help keep coyotes away from you and your family.
Safety Tips for Humans
Carry Pepper Spray: You probably will never need to use it, but if coyotes are frequently spotted in your neighborhood, having some just in case never hurts.
Safety in Numbers: Coyotes can hunt solo, in a pair, or in a pack (the name given to a family of coyotes). If you have been seeing coyotes in your yard or hanging around the pasture or outbuildings, if possible, before heading out for chores, recruit someone else to come along with you.
Indoor Play: When coyotes are frequently spotted around the neighborhood or farm, it’s best to keep small children indoors. Only allow children out to play if a responsible adult is outside closeby keeping an eye out for Wiley Coyote.
Don’t Forget the Lights: Before heading out for winter evening chores or to take the dog out before bed, turn on the outdoor lights and carry a flashlight with you. Coyotes don’t like lights, so they are less likely to want to bother you. And you have the upper hand advantage of being able to see surroundings better, should a coyote be lurking in the shadows.
What Should You Do If a Coyote Is Spotted on Your Property?
If you see a coyote on your property, the animal has probably been hanging around for a while. Most people hear their howling and yapping at night rather than see them during the day. They are excellent at hiding in wooded patches or shrubs, and they probably know your routines better than you know theirs.
If confronted by a coyote, try these methods to scare them away.
make loud noises
clap and wave your hands
act large (hold out your arms and wave them about. Don’t forget to shout, too!)
Most reports of coyotes on residential property are the result of feeding birds or squirrels, outdoor pets, or directly feeding coyotes. Avoid feeding cats and dogs outside, and lock up livestock and poultry feed in metal trash cans to prevent coyotes from accessing the feed. Make sure garbage can lids are securely fastened, as coyotes like to raid garbage.
Never feed the coyotes, as it is an invite for trouble and illegal in some areas.
Respect Your Neighbors
As more coyotes take up residence in our neighborhoods, it’s crucial to learn how to protect ourselves, our families, pets, livestock, and poultry flocks from an attack. But it is equally important to respect all neighborhood wildlife, including coyotes.
Never poison or kill coyotes illegally. If coyotes become too much of a nuisance, pose a serious threat to humans, pets, livestock, or poultry, or if a coyote acts sick or injured, contact your local sheriff or game commission immediately.
In some situations, hunting and trapping coyotes is legal. Be sure to check with state laws and acquire the necessary licenses to hunt or trap coyotes legally. While hunting and trapping have a place in the natural cycle of life, it is never okay to kill wildlife illegally.
Will Coyotes Attack My Pets?
There are a growing number of reported cases of coyotes attacking small dogs and cats. However, if hungry enough or protecting their den (dens might be in a variety of protected places, such as brushy slopes, rocky ledges, or even a hollow log), coyotes will attack anything smaller than a German Shepherd.
Older dogs, small breeds, and puppies are at the highest risk of being attacked by coyotes, so be sure to keep these dogs on a leash and close to you, especially at dawn, dusk, and night when coyotes are most active.
Dog Safety Tips
Never leave your dog outside unattended. If farm dogs live outdoors, confine them to a garage, shed, or feedroom where a coyote will be unable to access them. Don’t allow farm dogs to roam throughout your entire property unattended. With training and confining your dog(s) at night and when no one is home, you can reduce the chances of them coming into contact with a coyote.
Can Coyotes Breed With Your Dog?
Technically, yes, but it’s not likely. Coyotes are biologically equipped to breed with most types of dogs and wolves. However, the Urban Coyote Research group explains the timing doesn’t necessarily sync up for these reasons:
Coyotes are highly seasonal breeders; dogs are not.
Coydog (the name for coyote-dog crosses) females have a shifted estrus cycle that does not coincide with the coyote period.
Coydogs might have lower fertility than either domestic dogs or coyotes.
Spaying or neutering your dog will prevent them from interbreeding with coyotes.
Also bear in mind that coyotes carry diseases such as distemper, mange, and rabies, so you don’t want your dogs intermingling with them even if pups are not in the future.
Will Coyotes Attack My Pet Cats?
Cats are at high risk for a coyote attack. While they may not be a staple food item in a coyote’s diet, if given the opportunity, they will not hesitate to kill a cat.
If coyotes live in the area, it’s only a matter of time until barn, feral, and indoor/outdoor cats become victims of an attack.
Cat Safety Tips
Keep your feline companions safe by keeping indoor/outdoor cats indoors. If barn cats are tame, feed them inside a garage, shed, feed room, or another enclosure each night before dark, and make sure to securely close the door to keep them safely indoors.
Once a routine is set, many cats will quickly figure out where they are fed and come running for the food. Some dedicated cat owners have even built wired, predator-proofed cat walkways so barn cats can move safely from building to building without the need to worry about a coyote attack.
Will Coyotes Attack Larger Animals?
Most coyotes will go for smaller prey if possible. Deer fawns are more likely to be prey than adults, so it only makes sense that calves, lambs, and kids (baby goats) are more likely to be attacked than adult livestock.
In some cases, coyotes have been known to hunt in packs and work together to bring down elk. So, it’s not impossible or uncommon for coyotes to attack sheep and goats, especially when hunting in a pack. However, the chances of coyotes attacking a fully grown, healthy cow are slim.
Protect livestock by confining them to a secure shed or barn every night. Don’t allow goats and sheep out into the pasture first thing in the morning to prevent early morning attacks on the herd.
If coyotes are a real threat, consider introducing guard donkeys to your herd to help prevent an attack, as donkeys are great deterrents.
Do Coyotes Prey on Poultry?
Coyotes often prey on chickens, ducks, geese, guinea fowl, swans and other poultry. Protect poultry from attacks by avoiding free-ranging unless directly supervised by an adult.
Attach predator skirts to the perimeter of the coop and run to prevent coyotes from digging into the enclosures. Erect tall fences made of sturdy 16-gauge, half-inch hardware cloth and cover the top of the run with the same hardware cloth.
Lock all poultry into a secure coop before dusk and do not allow them out again the next morning until an hour after sunrise.
Coyotes may not be a farmer’s best friend, but they don’t have to be your worst enemy. These wild dogs are a necessary part of the ecosystem, keeping rodent populations under control. Knowing what damage a coyote is capable of inflicting on pets, poultry, and livestock and what precautions are necessary to take to prevent an attack must always be the first course of action. With this knowledge, it is possible to protect our homes and barnyards while living alongside the coyote.
Can you have a chicken allergy when keeping backyard chickens? It’s not uncommon. To be sure, get tested and then take the necessary precautions.
Chicken Allergy: A Real Life Example
Jessica was head over heels for her trio of backyard birds which she’d longed to have for years. And when the opportunity came to adopt some of her work colleague’s chickens, she eagerly accepted.
Her brother helped her convert a garden shed into a coop, complete with a roosting ladder, two nest boxes and an automatic pop door.
Since her backyard was fenced in and she had no pets, Jessica was ready to bring her hens home. Her cell phone quickly filled with photos of Smoky, Shadow and Blackie, beautiful black Cochins who’d hatched and grown up together.
Jessica was equally thrilled by the bountiful eggs her hens began laying after just a few days of adjustment. She couldn’t be happier.
Chicken Allergy Symptoms
Everything was great—except for the scratchiness she felt in her throat whenever she was around her girls. And the watery, red eyes that also felt very itchy. And the alternating congestion and runny noses.
Jessica always felt better around bedtime after she had showered and turned in for the night. Her brother asked her: “Are you allergic to your backyard chickens?” After a few weeks of suffering and trying eyedrops and cold medicine, she finally arranged for an appointment with her doctor.
“The moment I finished describing my symptoms, she asked me how long I’d been feeling this way and if there’d been anything new at home or work I might have been exposed to,” Jessica informed me. “Then it hit me. Am I allergic to my chickens?”
It’s helpful to understand exactly what an allergy is before deciding this is what is happening to you. According to the National Institutes of Health (NIH), an allergy develops when your body’s immune system overreacts to seemingly harmless substances.
These substances, called allergens, trigger your immune system. The immune system treats allergens the same way it would react to germs. It produces antibodies to fight the supposedly harmful substances.
Your body becomes sensitized to these allergens. And, each time you come into contact with them, your body releases chemicals to fight them.
These chemicals cause allergic reactions including coughing, sneezing, watery eyes, hives and rashes. The NIH lists farm animals—specifically cattle, sheep and chickens—as one of the most common allergens.
Chicken Allergy Causes
When it comes to a chicken allergy—and we’re talking the live animal here, not what’s for dinner—the two main instigators are a bird’s feathers and its droppings. These two substances produced by chickens can cause allergic reactions as they are. But they take more of a toll on you when they break down.
The dust created by pulverized feathers and desiccated droppings spreads everywhere, carried on the feet and bodies of the chickens themselves. It also moves by circulating air, and by your own shoes, hair and clothing.
This poultry dust will find its way into every corner of your coop. And if your flock free ranges, it goes wherever the birds go, too.
Since it is difficult to raise backyard chickens without coming in contact with the birds or their poultry dust, you may have to seriously consider giving up poultry-keeping for the sake of your health if you are, in fact, allergic.
There may be many other substances causing you to be allergic to your backyard chickens. When it comes to allergies, never jump to conclusions unless the cause is obvious. (Like your face swells up minutes after swimming through a huge school of jellyfish.)
Set aside a few hours to thoroughly investigate your set-up for other allergen sources. Wear a face mask, protective eyewear and gloves to block out potential allergens. Use your phone or a notepad and pen and start listing everything that might be causing your misery.
Take note of everything from the type of bedding you use to the ingredients in your chicken feed. If you offer supplements, mark those down as well. Anything that was not in your yard before keeping chickens is suspect.
Sometimes an allergic reaction manifests itself in other ways. My youngest son, Bryce, started exhibiting terrible eczema when he was approximately 11 months old. The poor little guy experienced gastrointestinal distress and was absolutely miserable.
I was at a complete loss. None of the rest of us had reacted to anything.
Our pediatrician referred us to the university allergy clinic, where testing determined that Bryce was egg allergic. The irony of us owning a poultry farm was not lost on us.
Eliminating eggs from his diet, however, was not as simple as it may sound. Many baked goods, pastas, pizza, ice cream and other foods include eggs as an ingredient. We soon learned that eggs are the second-most common food allergy in the U.S. after milk. Quite a number of adults and children we know are also allergic to eggs.
Most experienced gastrointestinal distress and hives. A few, like Bryce, suffered from atopic eczema. Others experienced angioedema, or swelling, on their faces. Using egg substitutes and vigilantly reading product labeling are the key ways to keep this allergy under control.
Allergy Solutions
If you are experiencing any allergic reactions that manifested after you began keeping chickens, contact your primary care physician to request a referral to an allergy clinic. The allergist will most likely have you undergo a scratch or skin-prick test. This test involves exposing your skin to a number of substances and then observing the reactions.
You’ll want to avoid taking any allergy medications for several days prior to the test so that your results are accurate. Be sure to bring along the list of potential allergens you found in your coop, as this will help your doctor determine which substances to test.
If you are allergic to any of these, your skin will react with an itchy red welt or bump. Your allergist will sit down with you to discuss options for treating your allergies and address your concerns. They will also help guide you to your best options, should your allergies indeed be connected to your chickens.
Jessica shared her list of potential allergens with her allergist. This guided the doctor in determining what substances to use in Jessica’s scratch test.
Her results left her elated. She was not allergic to her beloved chickens after all! She was allergic to the pine shavings she was using in her coop.
Her brother pitched in and cleaned out the entire structure, scrubbing it until it was like new. Jessica now uses a mixture of timothy and alfalfa hay for bedding and in nest boxes, secure in the knowledge that she tested negative for hay allergies and that Smoky, Shadow and Blackie can happily remain with her.
This article about whether you can have an allergy to backyard chickens was written for Hobby Farms and Chickens magazine. Click here to subscribe.
Birdseed ornaments are fun to make and hang outside for the wildlife to enjoy. This recipe calls for coconut oil which is best used in cold weather before the weather gets too warm and the coconut oil melts.
For year-round feeding, you can also consider using unsalted nut butter as the base for your ornaments and skipping the liquefying step before mixing all the ingredients and putting them into your molds.
This project is no-bake and only requires a handful of supplies. It’s an enjoyable craft for all ages that encourages children to take an interest in nature.
Is Coconut Oil Safe for Birds?
If you’re wondering if coconut oil is a safe option for birds, it indeed is. It’s rich in Omega 3 fatty acids which according to birdsupplies.com, can help prevent heart disease in our feathered friends. They go on to say that coconut oil is one of nature’s most luxurious food sources and it’s easy for birds to digest and will not only help boost their immune systems, but coconut oil also supports healthy digestion, weight management and makes their feathers even more healthy and shiny.
Birdseed Ornament Project
Supplies
· 1 cup coconut oil (Can also substitute with smooth or crunchy peanut butter)
· Wild birdseed (as needed to fit your molds)
· Silicone molds, any size and shape you want
· Twine and scissors
· Saucepan
· Spatula
· Parchment paper
Note: Oats, dried corn, unsalted nuts and dried fruit can be also be added. Also, when selecting silicone molds, consider options without a lot of detail and angles, as it’s easier to pop out a solid shape versus a very detailed one.
How to Assemble Birdseed Ornaments
Melt coconut oil in a small saucepan on low until it’s liquid.
Line your workspace with parchment paper or newspaper to catch any spillage.
I recommend using silicone molds that are the shape and size you want for your ornaments. The silicone mold makes popping out the ornaments much easier than when using cookie cutters for this project – plus, it holds the coconut oil better than a cookie cutter (which the oil tends to seep out from under).
Fill the silicone molds with bird seed. Cut enough twine to loop the twine into the bird seed, with enough length to hang from a branch outside (about 8 inches). (Put photo above here)
Pour the liquefied coconut oil over the birdseed in the mold until it’s completely full. Make sure the twine is poked into the liquid so that it can securely harden within the birdseed and coconut oil.
Once the molds are filled with seeds and coconut oil, allow them to cool for many hours, until completely hardened.
Transfer to the refrigerator for quicker hardening. Keep the birdseed ornaments in the refrigerator until use.
Hang the ornaments from branches around your backyard bird habitat for the wildlife to enjoy. Consider placing the ornament where a bird can perch to enjoy the treat but maybe not somewhere that is strong enough for a squirrel to sit, as they are known for stealing these special treats.
Adobe Stock/Oksana Schmidt
Note: For nut butter ornaments, mix all the ingredients together, put them into the mold or shape as you would like them. Nut butter ornaments can be placed in a suet feeder instead of hanging. If hanging, a string threaded through a needle can be used to add a hanger.
This article about making birdseed ornaments was written for Hobby Farms magazine. Click here to subscribe.
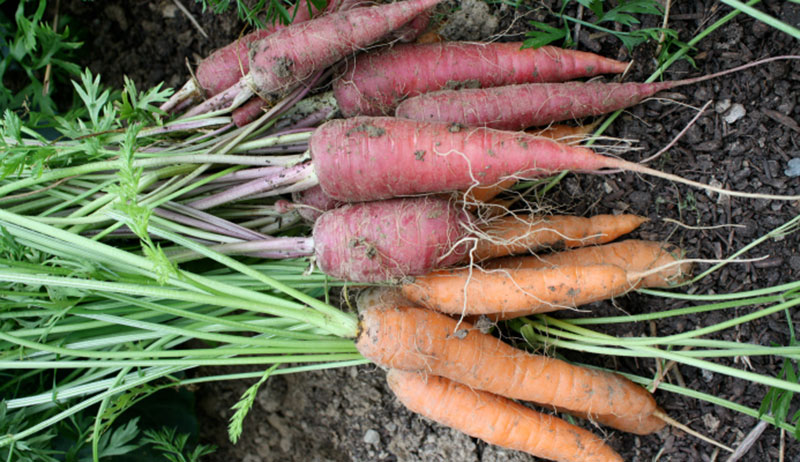
The best soil for carrots is something you can prepare yourself with a little knowledge and soil preparation.
While straight carrots might not taste any better than crooked or forked ones, they sure are easier to harvest and handle in the kitchen—not to mention a better sell at market. And no farmer enjoys tossing pest-damaged carrots onto the compost pile. While less-than-perfect carrots aren’t the end of the world, growing straight, pest-free roots isn’t as difficult as you might think. Here are six soil-management tasks to ensure your best carrot crop yet. If you’re looking for carrot seeds, try Jung Seeds.
1. Make a Cozy Bed
Depending on the variety, carrots can plunge 7 or 8 inches into the soil. This means that for straight, uniform roots, a deep seed bed is an absolute necessity. The best soil for carrots should be loose, friable soil tilled to a depth of 10 to 12 inches, and because they’ll fork when they hit an obstacle, removing rocks and debris from the soil is a must.
2. Fertilize with Phosphorus
Growing carrots, like most root crops, require a good amount of phosphorus to perform their best. Because carrots have a single, thick taproot rather than many small fibrous roots, the zone from which they can absorb phosphorus is relatively small. (Believe it or not, the root-surface area of even a large carrot is nowhere near as large as the root-surface area of a plant with more fibrous roots, like a tomato or pepper.)
Unlike many other nutrients, phosphorus isn’t absorbed by a plant as it draws in water. Instead, it’s absorbed via diffusion, naturally moving from an area of higher concentration (the soil) to one of lower concentration (inside the root). The soil area from which phosphorous can be absorbed is limited to a very small space around the root itself. If a soil test indicates a need for this essential nutrient, adding an organic phosphorus fertilizer, like bonemeal or rock phosphate, to the planting area a few weeks before seeding will ensure the growing roots have ready access to this nutrient right where they need it.
3. The Best Soil for Carrots Should Have a Balanced pH
Like most other vegetable crops, carrots grow best when the soil pH is between 6.2 and 6.8. Use a soil test to determine the pH of your garden’s soil, and then add the recommended amount of lime to raise it if the results show a pH that is too low (acidic) for optimum carrot growth. If the pH comes back too high (alkaline), you’ll need to apply the suggested amount of elemental sulfur to drop the pH to the desired number. Keep in mind, though, that a pH test should be performed every two or three years as the effects of lime or sulfur are eventually negated and the soil pH will return to its native range.
4. Water It Just Right
Keep the soil well-watered, but don’t overdo it. Once your carrots are up and growing, they’ll require a good amount of water to reach their full potential. Carrots are not drought-tolerant and will sometimes fork, gnarl or turn pithy if the soil gets too dry. On the other hand, if the soil gets too wet in the later stages of root development, carrots will split open and might show signs of rot. Irrigate at ground level, if possible, as wet foliage promotes fungal diseases, such as leaf blight, cankers, crown rot, powdery mildew and carrot rust. If overhead watering is necessary, water only in the morning to allow enough time for the foliage to dry before nightfall.
5. Keep Carrots Covered
As the carrots grow, their shoulders may might up out of the ground. If this happens, mound soil or mulch up over the exposed crowns mid-season. Exposure to sunlight can cause the shoulders to turn green and bitter.
6. Control Soil Pests
Carrot root maggots (the larvae of the carrot root fly) and wireworms (the larvae of click beetles) can become problematic in the carrot patch, causing tunnels and pitting throughout the roots. Thankfully, they are easily—and organically—prevented and treated by applying beneficial nematodes to the soil around your carrot crop. Beneficial nematodes are microscopic, worm-like organisms that seek out and attack ground-dwelling pests. Mixed with water and applied via spay or sprinkle on a cloudy or rainy day, Steinernema carpocapsae actively move through the soil, find the pests and eliminate them. Nematodes can be applied to the soil at the start of the gardening season before seeds are even planted (as long as the soil temperature is a minimum of 42 degrees F) or at any time throughout the growing season.’
This article about the best soil for carrots was written for Hobby Farms magazine. Click here to subscribe.
Top bar beehive style is distinct in shape and size. This popular style can easily be built at home with a few materials. They commonly feature a single, rectangular or tub-shaped hive body with parallel bars spanning the width of the opening. From each bar, bees build comb dangling down into the hive.
For many, top bar beekeeping is preferable because it focuses more on the natural state of the bees rather than the production of honey. Learning about and cultivating a practice that focuses on a more natural approach to beekeeping is the big draw to those who try their hand at using a top bar beehive.
The following plans are based on designs from beekeepers Carolyn Chaney from San Mateo, Calif.; Dean Cook from Houston, Texas; and Christian Torp from Lexington, Ky.
Project: Top Bar Beehive Level: Intermediate
Time: 8 hours
Materials
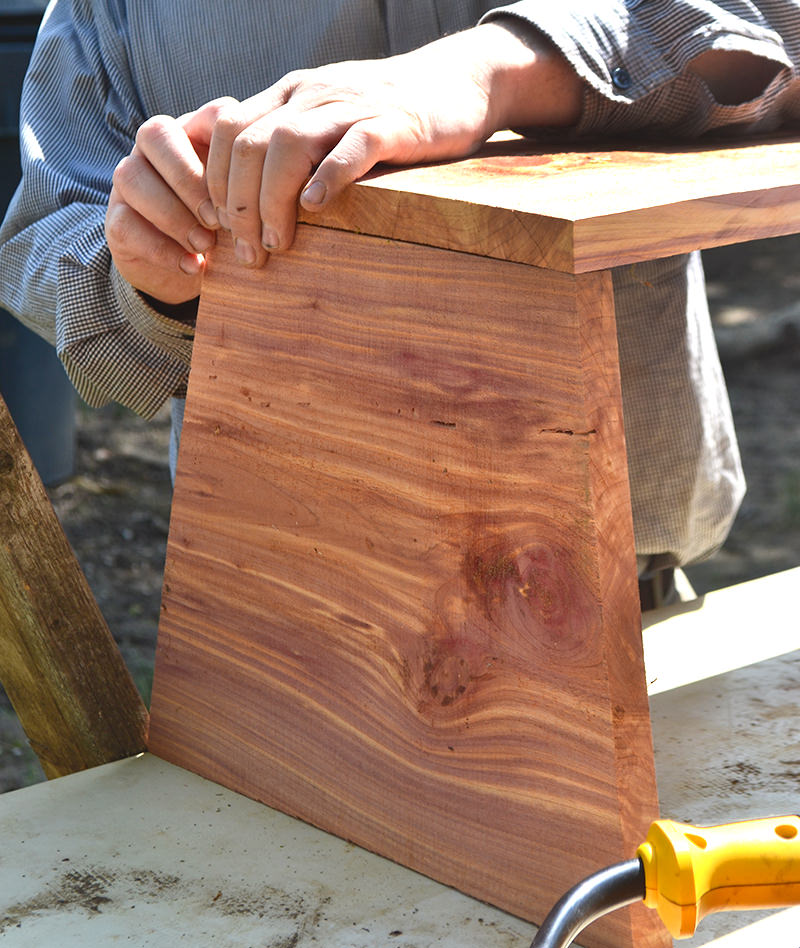
Make sure you use solid woods for your top bar beehive, such as cypress, cedar or plywood. The one photographed here was built with local cedar.
2 14½-by-12-by-1-inch pieces of lumber (for the hive end pieces)
1/2-inch hardware cloth
1 10-by-41-by-1-inch piece of lumber (for the hive base)
2 12-by-41-by-1-inch pieces of lumber (for the hive sides)
28 19-by-1⅜-by-1-inch furring strips (for top bars)
1 9-by-43-inch piece of lumber (for the lid)
1 box of wood screws (You’ll need between 15 and 25, depending on how close together you choose to use them.)
exterior grade glue
sheet of galvanized metal (for the lid)
28 strips of 16-by-3/4-inch plastic bee foundation, i.e., Plasticell
cinder blocks (Use the number you need to raise your hive to a comfortable level. We used three on each side for this project, making six total.)
Tools
framing square
circular saw or table saw
drill
1-inch hole saw
wire clippers
staple gun
utility knife
Step 1: Cut Hive End Pieces
Rachael Brugger
Take one hive end piece. On one 14½-inch side, make a mark 2¼ inches from each end. Draw a straight line from the left corner of the opposite 14½-inch side to the left-side mark; draw another straight line from the right corner to the right-side mark. Using a circular or table saw, cut along the two lines, creating a 10-inch length on one side of the end piece that will attach to the base of the hive. Repeat with the other end piece.
Step 2: Attach Ends
Rachael Brugger
You’ll need to bevel the bottom piece to fit the slant of the side pieces. Line up one end piece on one 10-inch end of the base piece, so it’s flush with the edge. Pre-drill your wood screw holes with a narrow drill bit, then affix with exterior-grade glue and wood screws. Place a screw every 3 to 4 inches along the connecting edges for the proper fit. It helps to have another set of hands to securely hold the pieces while you glue and screw them in place. Repeat with the opposite end.
Step 3: Drill Bee Entrances
Rachael Brugger
With the 1-inch hole saw and the drill, cut two circular holes in one of the end pieces; this will become the front of your hive. The hole centers should be 2 inches from the bottom and 3 inches from each side. Clip two 1 1/2-inch squares of hardware cloth, and staple them to the inside of the end piece to secure the top bar beehive from rodents.
Step 4: Attach Sides
Rachael Brugger
Using the same process as with the end pieces, affix side pieces to the hive one at a time, applying glue and following that up with wood screws every few inches.
Step 5: Cut Grooves On Bars
Rachael Brugger
In each top bar, cut a 1/4-inch-deep groove down the center length using a table saw or router.
Step 6: Attach Foundation
Rachael Brugger
Place a strip of bee foundation inside each of the top bar grooves. Using wood glue (or melted beeswax for a nontoxic option), fasten the foundation into the grooves. The bees will build their comb onto this foundation, which will hang down into the body of the hive.
Step 7: Place Top Bars
Rachael Brugger
Arrange the top bars snuggly between the end pieces with the foundation pointing down. The top bar beehive top bars are intentionally left long to give you more leverage to remove them when checking combs and harvesting honey.
Step 8: Mount Hive
Rachael Brugger
Stack the cinder blocks in two columns where you want to site your hive. They’ll serve as the legs of your hive, raising it to a comfortable height for you to access, while keeping the untreated hive bottom off the ground. Place the hive onto the cinder blocks, readjusting the placements as needed for the hive to rest securely.
Step 9: Place Lid
Secure the metal sheet to the wood top to make your hive lid, and it on top of the hive to protect it from the elements.
Finishing Notes
Remember that this design should be a jumping-off point: If there’s something you don’t like, make your own customizations. For instance, Chaney and Cook vary the sizes of their top bars: Chaney alternates 1⅜-inch-wide bars with 1½-inch-wide bars to better manage her hive’s comb. Cook uses 1¼-inch-wide bars to encourage brood comb construction, and when the bees start building for and storing honey, he adds 1½-inch-wide bars to give the bees different space for honeycomb. If either of these ideas sounds preferable to you, give them a try!
Other customizable parts of the design could include building a hinged lid or legs instead of using cinder blocks. Tapering the legs at the bottom so they sink into the ground could offer added security.
Building your own top bar beehive puts you in charge as the beekeeper, so customize it as you see fit; just make sure you’re not compromising the hive by doing so. For example, for the safety of the bees, never paint the interior of a hive. If you’re using scavenged materials, you can paint the exterior, but leave the interior untreated.
Inspecting a top bar beehive is different than in Langstroth beekeeping. The comb hanging from the top bar is readily accessible and, at the same time, fragile. Chaney says that new hives need an inspection every few days to prevent cross-comb or crooked-comb construction. Once a hive is well-established, Chaney recommends reducing the inspection frequency from every few days to every three to four weeks.
“Over time, you will be able to judge the health of the hive without going the whole way into the brood chamber,” she explains. This lessens the impact on the brood chamber, preserves comb the bees are working so hard to build and enables the hive to remain focused on comb and honey. Chaney does a complete hive inspection once or twice a year.
This article about a top bar beehive was written for Hobby Farms magazine. Click here to subscribe.
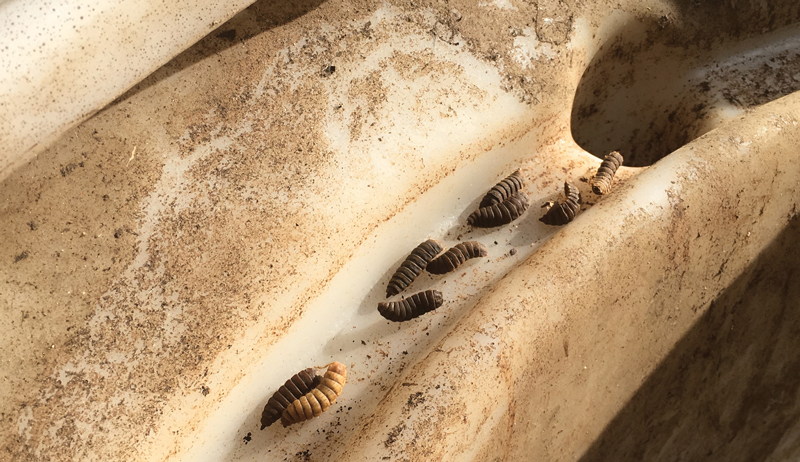
Black Soldier Fly larvae for chickens is a great way to provide nutrition on the cheap for a growing flock. It would make me so happy to set up a system for raising black soldier fly larvae (BSFL) to feed our hens, but my wife has vetoed anything with the word “fly” in it.
Calling them by their Latin name, Hermetia illucens, didn’t help one bit. So this will be the first column about something I haven’t actually done, but I called on a couple of BSFL experts to help me out.
Not All Flies Are Houseflies
Black soldier flies don’t look like houseflies. BSF are technically a “fly” because they only have two wings. They actually look like very small wasps. (Wasps have four wings—sorry, entomology nerd here).
OK, “look like wasps” probably doesn’t help my case much either. They do look like the kind of insect that is technically a wasp, but it’s not the kind of wasp that stings people. They look like a nonstinging wasp. Is that better?
OK. Never mind all that. Take a look at these important differences:
Black soldier flies have a scent that displaces houseflies.
Unlike houseflies, they are not disease carriers and actually eliminate harmful bacteria.
They self-harvest at their optimal stage for feeding chickens.
Yes, black soldier flies harvest themselves. You don’t even have to touch them.
The wiggling larvae graduate into crawling prepupae (I warned you—entomology nerd) and feel a compulsion to climb The Ramp of Death in a Biopod, Protapod or a DIY digester.
At the top of that ramp, they find The Hole of No Return and unwittingly drop through it into The Bucket o’ Free Chicken Feed that you provide. (These are not official names of the components.)
Then, every couple of days, you dump the bucket where your chickens can enjoy some high-protein snacks. How easy— and not gross—is that?
Karl Warkomski of Tar River Trading Co. sells the Biopods and Protapods that make it easy to raise Black Soldier Fly larvae for chickens as well as starter larvae. He raises them to feed his own chickens.
Warkomski says the larvae have a signature odor, like bees or crickets, that’s not foul. “It’s like a musk,” he says. “It’s exciting to smell when you first set up.” He also says that raising them is extremely rewarding: “[It’s] like beekeeping, except you don’t get stung.”
Black Soldier Fly Larvae for Chickens Benefits
Bioconversion by BSFL is faster than composting. The larvae convert kitchen waste in 24 hours. They don’t eat things such as paper and most garden scraps, but those materials will compost in the system at their own pace.
Shawn Jadrnicek dedicates a chapter in The Bio-Integrated Farm to his experiences and research on Black Soldier Fly larvae. He writes that BSFL tolerate wider temperatures and moisture levels than red worms. Plus, they consume food waste faster than red worms.
Depending on temperatures and actual feedstock, the Black Soldier Fly larvae attain a 50 to 95 percent reduction of the volume of food waste. What’s left at the end of autumn can be incorporated into the garden just like regular compost or added to a red worm bin for further digestion.
Warkomski’s home goal is to offset about a third of the cost of chicken feed with Black Soldier Fly larvae grown on kitchen waste. With a few years of experience under his belt, he’s easily past that level.
Frank Hyman
How to Get Started
Black Soldier Fly larvae are native to the wetter states as warm or warmer than zone 7, meaning the southeast and warmer parts of the Pacific Northwest.
In those states, they will show up on their own. But in drier and cooler parts of the country, you can introduce them each year.
According to Warkomski, if you have to buy, get larvae rather than eggs. They are more resilient. And buy from the U.S. for better survivability.
You’ll need a container, called a digester, in which to raise the larvae. You can buy one ready-made from vendors such as Warkomski, or build your own. A DIY digester will need to meet several criteria:
Position your digester near a mix of sun and shade to attract adult BSF. It has to be big enough to hold several pounds of moist kitchen waste, about the size of a laundry basket. Excess moisture must drain out of the container.
You’ll need a layer of burlap on top of the kitchen waste to make a place to lay eggs and a lid that allows airflow and BSF access but stops birds and other critters from getting inside and “hoovering” up your larvae.
There must be some kind of ramp inside the container that even a blind larva can find. (Manufactured digesters have well-designed ramps.) The ramp leads them to a hole or drop-off that’s above a bucket that holds the unfortunates until you harvest them for a poultry feeding frenzy.
Rarely, anaerobic clumps of food waste will form in the digester. They just need to be fluffed up with a hand rake.
Shawn recommends adding 2 to 3 pounds of food waste per square foot of digester per day. This optimizes the reproduction of larvae while minimizing the likelihood for odors from a buildup of rotting bacteria.
Warkomski’s Biopod and Protapod both drain liquids into a reservoir with a tap. Otherwise, you need some drainage holes to keep liquids from building up and getting stinky.
Annual Cycle of Black Soldier Fly Larvae for Chickens
Adult black soldier flies start looking for mates and lay about 500 eggs by mid-spring in the rainy parts of zones 7 to 11 in the southeast and Pacific Northwest. If you live outside that area, you will have to buy larvae (aka “neonates”) online.
Once the temps are in the upper 70s and the humidity is higher than 60 percent, they start laying eggs. That’s the time to start loading kitchen scraps into your BSFL container.
For the first two weeks you’ll have fruit flies and houseflies, but then BSFL will take over where they are native or have been added and will spread from there to the poop in your pen. Their musk will push houseflies away.
Shawn suggests speeding up the process in subsequent years by keeping some frozen liquid from the digester over the winter. Come spring, thaw this out and spray it on a stack of cardboard about the size of a deck of playing cards.
Position the scented cardboard in the digester with some food scraps as an attractant.
A few weeks after the arrival of adults, Black Soldier Fly larvae for chickens will start the climb up The Ramp of Death. The larvae that drop into The Bucket o’ Free Chicken Feed will cocoon within a week and become flying adults that can escape your clutches.
So harvest them every two to five days (unless you can position your pod to drop larvae directly into the hen pen). It won’t hurt to drop a few larvae into woodpiles and leaf piles during the growing season to boost the adult population.
For Warkomski, in Piedmont, North Carolina, around Thanksgiving, the last of the adults have died and no more larvae is left to harvest. He dumps whatever organic matter is left in his Protapod into the garden.
He then stows the pod away upside down until the spring when the BSF return naturally. Some of them will have overwintered as pupa in organic debris, such as leaf piles and wood-chip piles.
Black Soldier Fly Larvae for Chickens During Winter
Jadrnicek advises setting aside some BSFL for winter feeding. Put a container of larvae in the freezer to kill them. You can hold them there until you’re ready to slip them under your chickens’ Christmas tree.
Or run them through a dehydrator. That way you can store them in a jar in a cabinet instead of taking up high-value real estate in the freezer.
One other thing you can do over the winter: Think of a new name for these creatures that doesn’t include the word “fly.
This article about Black Soldier Fly larvae for chickens was written for Chickens magazine. Click here to subscribe.