“When my family’s farmland became available, I dusted off an old brewery business plan,” says Nick Sheets, looking back on founding Henmick Farm & Brewery in Delaware, Ohio. After shifting the business plan to a rural setting, Sheets pitched the brewery idea to his aunt and siblings, who were owners of the family farm.
The brewery officially opened in July of 2021.
Situated on land in the family since 1916, Henmick Farm & Brewery counts an 1860s barn as a focal gathering point for visitors. Priding itself on being a family-centric brewery, the rotating selection of brews on tap displays a commitment to utilizing ingredients sourced from Ohio.
We spoke to Sheets about reinventing family farms and the importance of locally-sourced ingredients. We also got into the appeal of winter brews.
“Craft beer has been of interest to me ever since I visited my first microbrewery up in Vermont more than 20 years ago and making my first batch of home brew with my cousin in his kitchen around the same time,” says Sheets.
“Since that first microbrewery experience and almost every one since then, the dream of owning and operating a brewery has been something I’ve wanted to do,” he continues, adding that founding the brewery has been a way to “reinvest and reinvent” the family land.
When it comes to linking farms to the creation of beers, Sheets highlights the brewery’s Ohio Pale Ale and Hard Apple Cider as drinks that benefit from using 100-percent Ohio-sourced ingredients.
“Our two primary suppliers of malt source the grain from either their own fields or from a network of growers in Ohio and surrounding states,” explains Sheets. “Although this isn’t directly linked to our farm, it is linked to many farms throughout the state, which was a conscious decision we made before we made our first batch of beer.”
“By buying our malt from companies that source the grain locally,” he adds, “it helps build a supply chain that will ultimately provide another crop choice for Ohio farmers.”
“Two of our more popular seasonal beers, the Mexican Style Lager and our Harvest Ale, use Ohio malted corn and roasted butternut squash, respectively,” says Sheets when asked to spotlight a couple of brews.
“The Harvest Ale’s butternut squash is grown in our garden onsite, picked in the fall, roasted and pureed with various spices,” he continues. “Combined with some caramelized brown sugar, it’s a smooth fall beer and a great alternative to the more traditional pumpkin ale.”
As winter gets into full swing, Sheets says that the brewery’s traditional Porter is a natural match for the frosty weather.
“It’s a lovely smooth dark beer with chocolate and coffee undertones—perfect for sipping in front of our taproom’s fireplace during those Ohio winters.”
“This place is very special to me. By opening it up to the public, we hope our guests see the beauty in the spaces we’ve created for them to gather with friends and family,” says Sheets as he considers the rewarding impact of running the brewery after its first year-and-a-half in business.
“It was my goal and vision for Henmick to reinvent our small family farm, honor those who came before us, celebrate fellowship and share the place I love most with others.”
Celina Ngozi is a Black/Igbo agrarian and the founder of Ala Soul Earthworks/Dry Bones Heal Bottomland, joining Hobby Farms Presents: Growing Good today to talk about her food-sovereignty work and earth-based practices.
Hear about the Central Texas land that has been in Celina’s family since 1876 and how she, her mother and other members of their family are coming together there. Learn about heirs property and the complexities of owning, enjoying and improving the land, particularly for Black land stewards in the South. Celina talks about her work as a Land Advocacy Fellow with National Young Farmers Coalition, land access issues in the Farm Bill and why that is so important to the future of small-scale farming.
Get some advice on starting a garden from scratch with no motorized equipment, as Celina has done on land that hasn’t been farmed in a few generations. Celina talks about adapting her farming practices from Colorado—where she learned about growing—to this new land, climate and community. She also talks about growing culturally relevant crops on subsistence farming and market gardening scales.
Stay tuned until the end to hear about community building in rural areas and—something a lot of listeners can identify with—Celina’s favorite farm meal.
More About Celina Ngozi Esakawu
Celina’s work with Ala Soul Earthworks/Dry Bones Heal Bottomland promotes connection to the earth through Afro-Indigenous practices, creativity and nurturing community.
For a decade, Celina has grown food and worked with frontline communities to develop creative solutions to inequities in the food system. Her work includes food distribution, coordinating community agriculture programs, living on farms, promoting SNAP at farmers markets, advocating for land access, teaching African Diasporic nutrition courses and supporting local food economies across Texas.
Her multi-ethnic background informs her earth-based practices. She focuses on growing culturally relevant foods of the Global South on land that has been in her family for 150 years. She is currently developing a program for people of color that promotes (re)membering ancestral knowledge in order to support future generations of agrarians. Celina is a 2022-2023 Land Advocacy Fellow with the National Young Farmers Coalition.
Even though the afternoons continue to be dappled with warm sunshine, the evenings are getting shorter and nights continually colder. The urge to stock the farm pantry, fill the nesting boxes with straw and get some extra feed lined up for the cattle bubbles up inside, growing stronger with each passing winter day.
Each season brings its own set of struggles and blessings. The warmer months are meant to be spent digging through the dirt as we plant, water and weed our gardens. But autumn and winter allow the weary soul some time to slow down and turn thoughts to inside the home.
Of course, chores will still need to be done and animals need to be cared for. But most of the time can be centered around indoor activities.
A good habit to put into practice toward the middle of autumn is to make a list of tasks that need accomplished before the snow starts to fall. From putting the garden to rest to preparing the animals and stocking up on hay, it’s best to take a walk around the yard and make notes of any odd jobs that need completed.
A variety of problems can be alleviated if proper care and maintenance is done ahead of time.
The same well-prepared mentality should be applied inside the home, from filling the pantry with shelf-stable goods in case a trip to town is unable to be made to loading up the wood racks with firewood earlier in the year. Learning what is needed to batten down the hatches before winter comes knocking on your door is helpful and practical and can often be fun as you check things off your list.
Yard & Garden
A variety of simple jobs can be tackled when you spend an afternoon cleaning up the yard. By now, most of the garden likely looks brown and dead. Large dead weeds can be pulled and removed, but a nice canopy of smaller dead plants can be left on the ground to rot and provide nutrients for the soil.
If you’ve noticed any signs of disease in plants during the previous season, remove and dispose them properly.
Otherwise, the remaining dead plants can be left as they are. Throughout the winter, they’ll act as a haven to a variety of small insects, from butterflies to bees. Foraging birds will also often visit your garden to look for hibernating insects on which to snack.
If your soil needs amended, fall is also a good time to go ahead and add any supplements or fertilizer (such as manure), so that it can soak in and mellow over the next few months. If it’s not too dry, tree limbs and debris can be piled up and burned in a brush pile (of course, following any local ordinances).
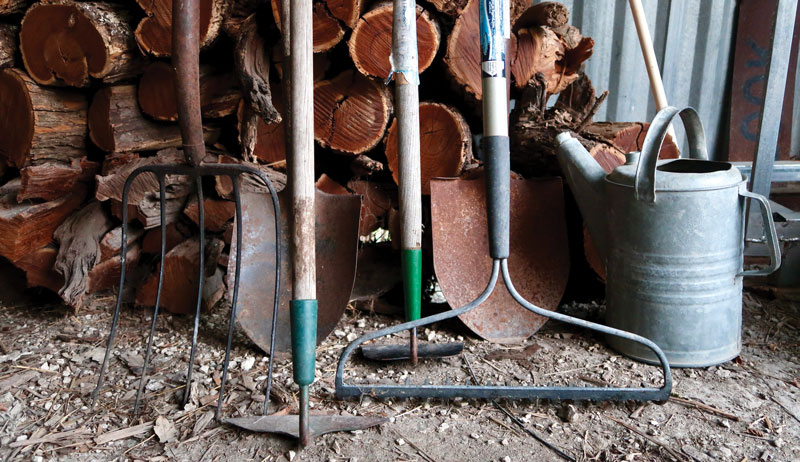
During the busy summer season, it’s easy for items to be scattered around and left in the garden or near where a project is being completed. Tools should be rounded up and put in their proper places.
Axes and ice picks for breaking ice, pitchforks for hauling straw or hay, snow shovels, heat lamps (and extra bulbs) to put with poultry, extra extension cords, etc. should all be put in easy-access locations. That way you won’t have to hunt for them later when needed.
Hoes and rakes can be cleaned off, sharpened (if needed) and tucked away in storage. Garden hoses should be emptied of any remaining water to avoid freezing and splitting in cold temperatures, then coiled away in the shed.
Some perennial plants (whether in the garden, orchard or flowerbeds) can also be carefully cut back during the fall, although it’ll depend on the individual plant, as some do better if pruned in the spring. Perennials that flower and have dried seedheads on them can be left over the winter as a farm ood source for foraging birds and wildlife.
Ashleigh Krispense
If you have bulbs planted around the homestead, autumn is also a good time to dig them up. They can be separated and dried for a period before being carefully packed in lightly moistened sawdust and stored in a dry, dark area such as a basement.
After the garden is cleaned up and everything is stored away, write a review of how things did the last season. If you don’t keep a journal already, note the things that grew well, what didn’t thrive, what varieties you might try next year, etc. Even if you think you’ll remember things next spring, you might be surprised how a few months can make you forget!
Poultry Coops
Sheds should be checked for any signs of disrepair. Broken or missing windows can be replaced and sealed with caulk. Drafts should be closed while keeping in mind a means of proper ventilation. This will be especially important in smaller buildings such as the chicken coop.
If you’re questioning how much ammonia has built up already inside a coop, do a quick sniff test. Lean over within 10 to 12 inches of the floor (around the height of your chickens), and give it a sniff. If your eyes and nose begin to burn, then the ammonia level is already too high and you’ll need to clean it and provide a fresh layer of bedding.
Even if you don’t have a problem with ammonia level, consider cleaning out and disinfecting the coop again in the fall.
Some poultry-keepers prefer to implement the deep-litter method of bedding inside their coops as it can provide more insulation and a barrier between the poultry and cold temperatures outside. This offers thicker bedding on the floor, and as the soiled bedding is turned over and new bedding is added, the old bedding and droppings will decompose over time, producing some heat inside the coop.
Nesting boxes should also have new (or extra) material added to them. Roosts can be checked for any broken boards or problems that could cause chickens to start roosting on the floor where it’s colder.
Waterers and feeders can be cleaned out and left to dry thoroughly in the sun before using again. If you use heat lamps in your coop, they should be checked to be in working order and extra bulbs can be purchased and stored away until needed.
For your poultry, keep extra feed and grain on hand if you have a good way to store it away from moisture and pests. Consider purchasing a heavy-duty plastic trash can with a lid or even a plastic tote to premix the feed and supplements in, and then store it.
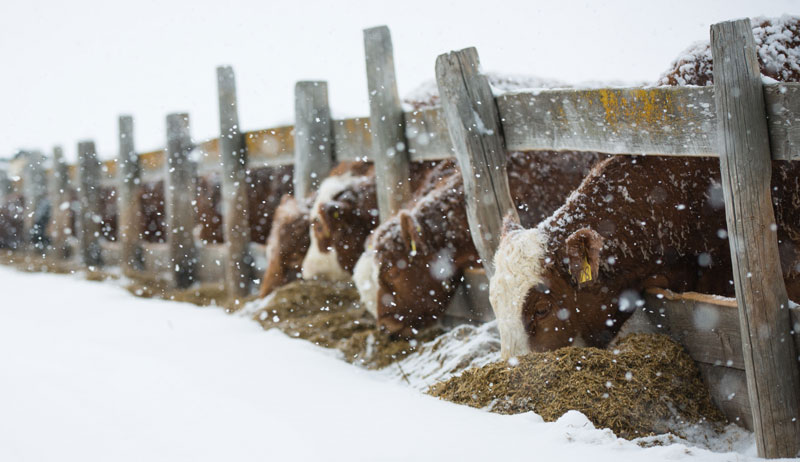
Farm livestock can generally handle winter temperatures better than people, if cared for properly. Body condition is especially important when entering the colder months.
While it isn’t the same for all cattle—for instance, cows won’t need grain but rather a protein supplement and plenty of good quality hay—cattle such as feeder steers should be fed plenty of grain during the colder months to give more energy and generate body heat.
It isn’t just a matter of feeding farm animals plenty of grain during the cold months but in the time leading up to winter. They should be fed enough to be in good body condition when entering winter, with enough fat to withstand colder temperatures comfortably.
Water is just as important on the farm during the winter as it is during the summer. While dehydration is a great danger in high temperatures, it’s also a danger when frozen water isn’t broken or fresh water quickly freezes over. If heated waterers are available, make sure to thoroughly check them over and see that they’re in working condition.
The structures that your livestock inhabit are also important to give a look over. Check for drafts and any damaged areas to the building that might need repaired to help block the cold wind. Keep in mind that proper ventilation is necessary to avoid too much ammonia build-up and keep the air from becoming stagnate.
Broken or weak (sagging) fences generally need tended to quickly regardless of the season, but they can be especially important when there is a threat of cattle getting out in bitter cold weather or a snow storm. It’s best to stay on top of them and mend problems before the weather turns nasty.
Other things to look at include:
feed storage (such as bulk or overhead grain bins)
proper places to store any supplemental cattle cubes
a nonfreezing location (such as inside the house) to store cattle medications
Plenty of feed and hay should be stocked on the farm in the months leading up to winter to avoid a shortage and price hike. During summer, cattle can graze on grass. Options are much more limited during the winter months when farm growth goes dormant. Grain, supplemental cubes, and round and/or square bales can all be rounded up from farm supply stores and local farmers or ranchers, then stored away until needed.
Ashleigh Krispense
Equipment
Keeping the equipment on your homestead in good working order during the colder months (or at least able to be stored away safely) can help eliminate costly mistakes and problems. Once the temperatures get cold enough, fuel can gel and machines might not be able to run without a good amount of effort unless proper maintenance is done ahead of time.
The kind of preparation needed will vary from machine to machine, depending on if you plan to use them throughout the colder season or if they’ll be stored away in a shed. Implements such as lawn mowers and rototillers will likely be put away until spring. Larger equipment that might be needed for feeding livestock, moving hay bales and running power generators should be serviced for continual use.
Here is a basic checklist of things to look over on your equipment.
Cabs
Mice and rats love to look for cozy spots to make a nest in, and they don’t seem to mind at all if it’s in your machinery or vehicles.
“The last thing you want is to open the barn in the spring to find a flourishing rat population,” says Nicole Williams, chief strategy officer at SenesTech. “Just two rats, a male and a female, can produce 15,000 descendants in about a year.”
We try to get the equipment with cabs cleaned out so there are no extra reasons for them to crawl inside and make a nest. A blow gun and air compressor can be used to blow off any dirt, chaff or trash inside and outside of the machines. The cab can be dusted, and the floor brushed free of debris. While it’s possible that some dust will accumulate over the winter months, do a thorough cleaning before farm machines are tucked in the shed.
Engines
Antifreeze should be checked in all engines on the homestead, for the level of antifreeze in the motor and the concentration or strength of the formula. This will help prevent the motor from freezing and causing engine issues, with the most extreme case being that the engine block could crack and break.
On farm machines with hydraulics, change filters before winter hits to avoid very slowly moving oil if a filter becomes plugged. Air systems can also have airline antifreeze added to the lines if in a very cold climate.
On vehicles with air tanks, drain the air tanks to avoid condensation, which can eventually freeze and break air pop-off valves. In cabbed farm machines, heater valves should be turned on and a winter front or canvas can be put over the radiators. This can help trap enough heat to the help the engine operate properly and heat the coolant enough that it will blow warm air into the cab.
Fluids
If you plan to park a farm machine for the winter, don’t change the engine oil as the temperature change from outside in the cold to inside a warm shop (when changing it) could put condensation in the crank case. This would cause water in the oil for when you go to run it next spring.
Instead, just consider it one less thing to do this fall and change it next spring.
As for fuel, a good quality anti-gel fuel additive can be added to machines to help remove water from the fuel and prevent gelling in cold climates. For farm equipment you plan to park over the winter, make sure it has winterized fuel in it.
Batteries
Double check the batteries and battery connections to make sure they’re not broken or too corroded. If there is a good connection it will help machines start much easier.
If you plan to still use the farm machine quite a bit throughout the winter, test the battery with a load tester or find someone that is able to do it for you. By putting a load on the battery, it’ll tell you if it’s considered bad and needs replaced or not.
The Home
If there is ever a time that the farm house is busy and full of activity, it’s during the winter months. Families spend less time outdoors and more time together inside. While there can often be bouts of cabin fever or winter blues, they can be made less prevalent with a few simple practices!
Make a few plans earlier in the year for fun activities that be done while everyone’s inside. Games and books can be purchased and tucked away until later, crafts or other mind-challenging projects can be saved, and produce stored in the freezer during the busy summer months can be pulled out and turned into delicious jams and jellies to gift.
(Plus, it’ll feel better to heat up the kitchen now, too!)
As far as your physical home goes, you can check several things around the farm before winter hits.
Exteriors should be examined for damaged or rotten wood that needs repaired.
Drafts can be sealed, and windows might need covered or sealed with caulk.
Gutters should be cleaned.
There should be proper drainage around the home to avoid water pooling up and causing issues.
Water wellheads should be covered if exposed to the elements (you can even use just an old blanket).
The fireplace and chimney should be cleaned and prepped for use.
Trees around your home should be checked for low-hanging or potentially hazardous limbs that could come down in an ice or snowstorm.
The heating system should be tested to make sure it functions properly.
Ceiling fans can be switched over and reversed.
Exterior faucets (and hoses) can be drained and turned off.
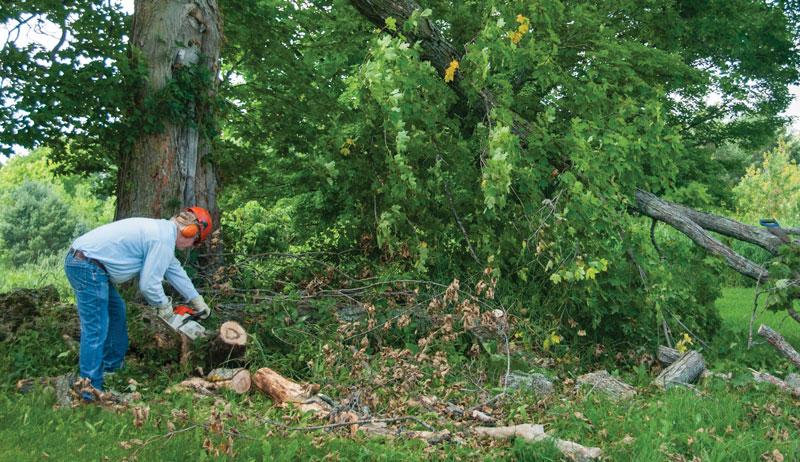
If you heat with wood, firewood should be cut and set aside to cure earlier in the year.
If fuel (such as propane or natural gas) is used to heat with, contact your supplier and have the tank filled at the beginning of the season. While they might contact you with a reminder in the fall, it’s good to check the tank every once in awhile to stay on top of the fuel level and avoid the risk of running out during a cold snap.
Filling Your Pantry
If I hear that there is a nasty bit of cold weather headed our way, I do a quick mental search for anything I might need to pick up in town before it hits. Usually, we keep a well-stocked pantry and do a majority of shorter shopping trips for fresh produce or other random items. Here are some items you might check to make sure you have plenty of in case of bad weather.
basic cooking and baking ingredients
bottled water for drinking and humidifiers (if not using tap water)
canned goods (and a can opener!)
fresh fruit, veggies, milk and eggs
bread (if you normally use it!)
personal hygiene products
laundry detergent
lantern fluid and wicks
matches
plenty of warm blankets
first-aid kit
flashlights
batteries
regular medications or cold medicine
pet food
baby food and supplies
games or books and projects to pass the time
snacks or candies (or supplies to make them)
a full tank of fuel in your vehicles
While it’s wise to be prepared, it’s also good to learn to enjoy each season to its fullest. Do your prep work, then sit back and enjoy the calm, peaceful evenings.
Winter brings colder temperatures and more neutral-toned landscapes to the farm. But it also brings opportunities to recap the previous busy months and catch up with our family and the relationships that need nurturing, just as our gardens and livestock do. Embrace the slower routines and look for the simple blessings in each day.
Before you know it, the garden will be ready to plant again and spring will be just around the corner.
This article originally appeared in the November/December 2022 issue of Hobby Farms.
It’s amazing to consider the versatility of wood. In a single sustainable resource, we’re offered the opportunity to create three distinct essentials: heat, light and shelter. Besides that, we can use wood to create any number of wonderful objects: furniture, boats, crafts, even works of art. The possibilities are endless.
And while many people must rely on purchased wood grown and harvested miles from their home, hobby farm owners may have a unique opportunity available to them: a woodlot on their own property.
In some cases, this woodlot may consist of trees that were specifically planted with harvesting in mind. But many times a homestead woodlot is simply a natural forest that exists within your property’s boundary. And with some planning and a little care, a woodlot may have the ability to provide you with multiple useful products for years to come.
Picture the scene: It’s spring and your garden beds are filled with tiny seedlings pushing toward the sunlight. Maybe you’ve planted some larger tomato plants from a nursery. Perhaps the pumpkin plants are starting to grow their first true leaves.
Yes, your garden is growing beautifully. But now the weather forecast calls for frost danger with a nighttime low temperature of 30 degrees F.
Yikes! Is your lovely young garden in danger of being leveled by frost in a single evening? Not necessarily. Before you admit defeat, give cloches a try.
What’s a Cloche?
Every gardener needs a collection of garden cloches at their disposal. In its truest form, a cloche is a piece of glass or transparent plastic shaped rather like a bell. In fact, “cloche” is the French word for bell.
A cloche is placed over cold-sensitive plants to trap heat and protect them from frost and chilly temperatures. On cold nights, a cloche can determine whether a plant lives or dies.
Garden cloches come in many forms. Some are bells, others resemble miniature greenhouses … and some are random items gathered together in a hurry when the forecast turns chilly and you have dozens or hundreds of plants to protect.
In the latter instances, garden cloches need not be attractive or designed for long-term use. Any object capable of trapping heat (particularly heat radiating up from the ground) can serve as a suitable cloche when cold temperatures loom. You’ll want to remove them come morning (after temperatures warm back up), but the time spent covering and uncovering is worthwhile if it saves your garden.
Here are a few items to use as garden cloches in a pinch.
1. Cardboard Boxes
Cardboard boxes are everywhere, and they come in many sizes, making it simple to adapt them to your specific garden layout. Some cardboard boxes are big enough to cover multiple plants at once, reducing the number of cloches you need.
But you may have to cut the flaps off to fit multiple boxes side by side.
Keep in mind two potential pitfalls. First, cardboard boxes are lightweight, so you may have to set rocks or other heavy items on top so they don’t blow away. Second, cardboard boxes can deteriorate if they get wet. It would be unfortunate if a cardboard box crumpled under the weight of rocks and wound up crushing the plants it aimed to protect.
Paper and plastic cups look a lot like tiny cloches. Indeed, they can be used in the same way. Cups make fine covers for small seedlings, though if you have many seedlings planted in rows, it might be more practical to opt for a few large covers (like big cardboard boxes) than use dozens of cups.
3. Baskets & Buckets
Provided their handles don’t get in the way, baskets and buckets make effective cloches. They’re not as inexpensive or widespread as cardboard boxes, but they’re sturdier.
If you have a large collection of apple-picking baskets sitting around waiting for fall, call them into service as cloches.
Similar to baskets and buckets, planting pots (ceramic, plastic, etc.) are sturdier than cardboard boxes, and chances are you have a few of them around. Just keep in mind that the holes in the bottom will let heat escape when the pots are flipped upside down. You’ll want to find a way to cover the holes.
These are just a few of the many possible items you can put to use as emergency garden cloches. What items have you tried?
Raising beef cattle can be a rewarding and educational experience. Not only will you gain a variety of skills along the way, but the end result will be a freezer full of fresh meat. Even though much is learned best through trial and error, it can be helpful to educate yourself before jumping in with both feet.
For this article, fourth-generation farmer and rancher (he’s also my brother-in-law) Konrad Krispense shared his thoughts on a variety of mistakes people might make when raising beef cattle. Here are seven suggestions we have compiled to help make your experience more pleasant!
1) Starting with the Wrong Animal
Beef cattle can be bought and started from a variety of ages, all the way from a few-days-old bucket calf to a several-hundred-pound animal. It really is dependent on the amount of money and time you want to invest.
Sure, it might be cheaper to start with a young bucket calf and raise it over a longer period of time. But this will require more feed and care as opposed to a larger, already started animal.
No matter what the age of the animal you start with, make sure you look for a healthy, good-quality calf. Even healthy calves can eventually have problems that can be tricky to deal with, so avoid buying a small, sickly calf at a local cattle auction.
While rescue animals certainly have a time and place, if you’re intending to raise this animal to butcher you will want to start out with a healthy one.
2) Poor Pasture Management
As your steer grows, the amount of feed and space it needs will grow too. Cattle are herd animals and prefer to stay in a group. But it’s not always possible to maintain and care for an entire herd.
Consider keeping a pair of calves (as long as they will be butchered within a short amount of time so as to avoid loneliness) or a couple of goats for companionship.
Another concern to watch for will be the quality of grass in your pasture or grassland. Try to avoid overgrazing the grass to where it appears like a golf course landscape. If possible, it’s helpful to have more than one fenced area to allow for livestock to be held in a separate pasture while the previous one regrows. Basic rotational grazing is a common sense approach to grazing and can be very helpful.
Maintaining the grassland via the occasional prescribed burn and removal of noxious weeds and unwanted trees are also important to keep your pasture functioning as it should.
Access to fresh, clean water is extremely important for almost any animal. Whether you have a stock tank that water is hauled to (or pumped into via a windmill) or a continually running stream or river, the water source should be one of the most carefully watched aspects of your pasture.
If your cattle are kept in a dry lot or pen, be careful to avoid access to stagnant mud puddles (such as after a rain), as cattle often will choose to drink from the puddles as opposed to a clean water tank. Bacteria that can cause coccidiosis can be picked up in these puddles and cause sickness in the herd.
4) Misunderstanding Nutritional Needs
Cattle require not only fresh water, but a source of energy (such as grain, which will help to fatten them), roughage (hay) and protein, although this can be dependent on the quality of grass they’re fed and the season of year.
If cattle are out on grass as opposed to in a pen, they might need a protein supplement when the grass has lost a majority of its nutritional value. “Just like people, a well-balanced diet is essential for a healthy animal,” Konrad points out. “Beast cannot live on salad alone!”
5) Poor Parasite Management or Treatment
Even a single animal or pair of calves should receive worming. While a generic wormer can be given, it might only kill specific varieties of worms and leave many left over.
It’s good to talk to a trusted local cattle rancher or veterinarian to get their recommendation for a good parasite prevention plan or treatment, should the need ever arise.
6) Lack of Education on Common Illnesses
It’s important to gain some education on common illnesses (bloat, foot rot, coccidiosis, pneumonia, etc.) before you run into a problem can be extremely helpful. For example, bloat can be caused by overfeeding grain (or even alfalfa), so it’s important to make sure your feeding rations are appropriate for the animal.
Books on cattle nutrition or care can be helpful. So can people working at the places from which you source your feed (local feed mill, co-op or vet). A feed mill is likely to have a nutritionist on hand or know of a contact that can help you.
As Konrad puts it, “Cattle are more self-sufficient then you think. If it’s eating, pooping and displaying normal behavior, it’s probably fine.”
If given the proper feed, water and care, cattle can withstand quite a bit. They don’t need to have every scrape treated or constant scrutiny. Consistent care and a watchful eye can go a long ways.
With some common sense, a bit of preplanning and education, and a knowledgable local vet or rancher to contact with questions, you should have a great experience raising beef cattle!
The winter is full of many livestock ills. Most have to do with feed, water, mud and muck. One infectious disease in cattle that occasionally throws a weird loop when it’s cold out, however, is the neurologic form of coccidiosis. Let’s take a closer look at this cold-weather conundrum.
All About Coccidiosis
Coccidiosis is a diarrheal disease in livestock caused by single-celled protozoa called coccidia. Different species of coccidia infect different hosts. There are specific coccidia for cattle, sheep, goats, camelids and poultry.
Coccidia are very common in the environment. When they are ingested, they invade the intestinal lining. The bacteria have a complex life cycle once situated in the gut. Suffice it to say, though, that after a few rounds of reproduction, they create pretty significant damage to the inside lining of the intestines.
Severe diarrhea and subsequent weight loss then occur. Infective spores (called oocysts) are shed in the manure, completing the cycle and contaminating the environment for other animals to then ingest them. This starts the whole process over again.
These oocysts are very hardy and can survive in the environment for a surprisingly (and frustratingly) long time.
Diarrhea is the most common clinical representation of coccidiosis and one that hobby farmers likely will encounter at some point in their animals. A drug called amprolium is frequently used to help treat and control a disease outbreak. However, when the weather gets cooler and calves are sent to feedlots, something odd can sometimes happen.
Newly arrived calves in a feedlot occasionally start to show neurologic signs, starting with incoordination, rigid legs and jerky eye movements. If this progresses without intervention, signs may progress to the inability to rise and seizures.
These signs are not limited to the winter, but the majority of cases show up in the colder months.
A Curious Condition
What’s weird about this condition, called nervous coccidiosis, is that animals with coccidiosis and neurological clinical signs don’t have any detectable brain lesions. In fact, researchers don’t really know why this neurological form occurs.
One theory is that the diarrhea associated with coccidiosis hastens the loss of electrolytes and a resultant imbalance of minerals such as magnesium and calcium then cause neurologic signs.
Other researchers suspect a toxin is to blame. Intriguingly, if serum from infected calves is injected into mice, the mice develop neurologic signs, too, despite not being directly infected with the coccidia.
Treatment of coccidiosis (whether nervous or not) should be started quickly to prevent further spread to other animals and reduce clinical signs in those already infected. Amprolium can be given in the drinking water—read the directions on the label for proper dosing calculations.
Clinically dehydrated animals may also benefit from supportive care, such as IV fluids and supplemental electrolytes. Contact your veterinarian if you have an outbreak of diarrhea on your farm. Accurate diagnosis and prompt treatment can save animals from severe disease.
Prevention is always worth a pound of cure. Coccidiosis is no exception.
Since this is a disease associated with a contaminated environment, keeping the barn clean is one of the best ways to prevent severe coccidial infections. Avoid crowding animals in tight spaces for long periods of time, and clean manure-contaminated feed bunks.
Keep water troughs clean and regularly clean manure from aisles and other heavily used areas. This will help reduce the number of oocysts in the immediate area, which lessens infection pressure in the herd.
Sure, we’re in the cold, dark days of winter at the time of this writing. Everything outside (or almost everything—gotta love those little green garlic shoots!) may be brown and dormant, but it’s the perfect time to think ahead to this spring’s garden.
Your coffee table is probably piled high with seed catalogs right about now. But as you plan this year’s garden, also take some time to consider the aesthetic extras that make a growing space so much more enjoyable.
For me, these fun extras include custom signage for my crops. Signs, of course, provide the all-important value of telling you what’s where in your beds. And knowing what’s what can help with everything from monitoring growth to weeding to watering your seedlings.
But signs can also be fun and colorful additions to your growing space, providing a pop of hue to the bare ground of a just-planted bed. And when a garden is in full swing later in summer, handmade signs can liven up the landscape with complimentary colors, playful fonts and even special messages!
Check out the video above to see how I make handmade signs for my garden! And bonus for frustrated growers: It’s a perfect DIY project to occupy your green thumb, your mind and your creative spirit during the cold, monochromatic days of midwinter.
December of 2021, I shared my method for making fermented sauerkraut here at Hobby Farms. The basic recipe I shared is the groundwork for making any sauerkraut flavor combination your heart desires.
I find myself making small batches of various fermented foods each January. Maybe it’s because the holidays can be filled with such rich foods, sugary treats and spiked beverages. Or maybe it’s just because I want to kick off a new year with good intentions.
Whatever the reason, I do enjoy this tasty, healthy tradition and highly recommend the following recipe for beet sauerkraut.
Yield: 1-2 quart jars
Ingredients
1 head of green cabbage
1 small beet, end and greens trimmed, grated
2″ hunk of fresh ginger, skin removed, grated
1 to 1.5 tbsp. kosher salt
Directions
Remove the outer leaves from the cabbage and discard. Wash the cabbage with cold water. Cut in half lengthwise, and remove the core from each half.
Shred the cabbage into thinly sliced shreds, about 1/8 inch thick. You can also use a mandolin or cabbage shredder for this step if you have one. Try to keep the shreds uniform in size so that they ferment evenly.
Collect shreds in a nonreactive bowl, such as glass, plastic or solid stainless steel. Grate beet and ginger and combine with the cabbage. Add in salt and mix well.
Use clean hands (nail polish and jewelry removed, or wear food-safe gloves) to mix the salt with the shredded produce, squeezing and mashing with your fists to tenderize the cabbage. You can also use a wooden tamping tool for this process, but be intentional about not over mashing the produce or it will turn into a mushy ferment.
Massage the cabbage mixture until you can pick up a fistful and squeeze liquid from your fist. Once liquid drains out, you can transfer the cabbage shreds into a clean quart jar. Leave 1 to 2 inches of headspace (room from the cabbage mixture to the rim of the jar). Use your fist or cabbage tamper to tightly fill the jar.
Pour in any excess liquid from the bowl in the jar(s) as well. This liquid is the brine that the beet sauerkraut will ferment in.
Once filled, there should be enough brine to cover the kraut shreds. If there is not enough liquid, check again in the morning. More often than not, there will be enough produced.
You will need some sort of weight to keep the cabbage pushed under the brine. Keeping the shreds submerged under the brine is the key to a successful ferment. There are weights specifically made to fit jars, but you can also get creative. (See below for alternative options.)
Wipe off the rim of the jar, add the canning jar lid, and tightly screw the ring on your beet sauerkraut.
This beet sauerkraut will ferment two to three weeks. The temperature in the space where you ferment will determine how long it takes. The warmer a room, the faster it will ferment.
Ideally, you will ferment between 60 to 75 degrees F (15-23 degrees C). Keep out of direct sunlight.
Burp the jar daily, especially at first when the ferment is very active. Unscrew the lid briefly and tighten it back on to allow any built-up gas to release. At least once per day, you’ll have to use a clean utensil to push down the weight and submerge the cabbage again. Scoop away any pieces of food floating on top of the brine to avoid mold.
Taste test the beet sauerkraut ferment after week two. If it still tastes of raw cabbage, allow it to ferment another week and taste again. Some people prefer a very sour and soft sauerkraut and therefore will ferment closer to the six week range.
Once fermentation is complete to your liking, transfer the jar into the refrigerator, with the brine and all.
Fermentation does not stop once the ferment is transferred to the refrigerator. However, it does slow the process way down. The taste and texture will continue to change, therefore it’s best enjoyed within six months.
We enjoy this beet sauerkraut with many meals in our household. View it as a finished veggie side dish that can be added to a variety of meals. It’s not just for bratwursts and porkchops!
Notes
If you do not have a glass jar weight, you can improvise by using an easily removable small food-grade glass dish that fits inside the jar. Or, if you have a smaller glass canning jar that can fit into the mouth of the jar you are fermenting with, you can use that to keep the produce pushed under the brine.
You may substitute fine sea salt instead of coarse kosher salt if you prefer. Consult a salt conversion chart.
Expect foam-like bubbling, at least in the first week of this ferment. It’s completely normal.
This recipe has been adapted from Can It & Ferment It (expanded 2020 edition) with permission from Skyhorse Publishing, Inc. For more sauerkraut recipes, check out WECK Small-Batch Preserving and WECK Home Preservingby Stephanie Thurow.
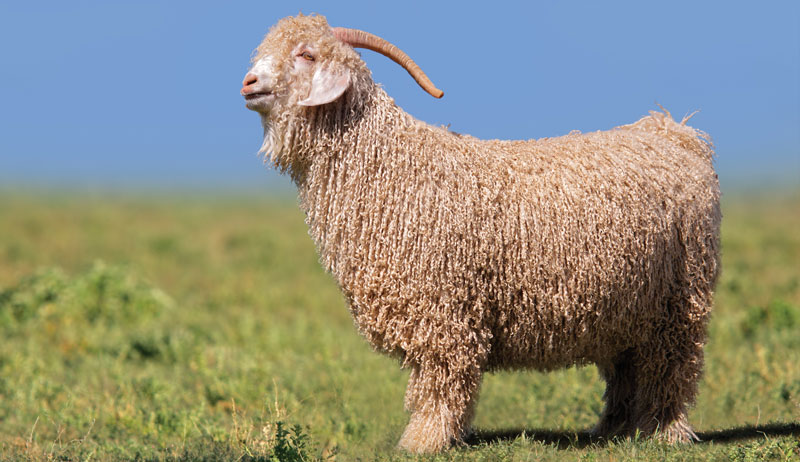
Angora goats are considered the most efficient fiber producers in the world. Mohair grows 1 inch per month, and fleeces average between 5 to 10 pounds each. They produce fiber for two shearings per year (unlike sheep, which are shorn once).
Angora Goats Are an Easy-Keeping Breed
Quiet, docile and easy-going, Angoras are generally easy to keep. As seasonal fall breeders, they don’t possess the strong odors often associated with other goats.
Angora goats enjoy the company of others. Keeping at least two of these animals is always the best plan. Castrated bucks (wethers) produce the softest mohair for a lifetime.
Angoras are typically respectful of their surroundings. A woven wire fence of at least 48 inches in height is standard. Treacherous terrain full of thorny plants poses no challenge for this breed. Rocks and boulders are rather seen as opportunities to play and reach for tree limbs.
Shelter requirement for Angora goats are minimal. A simple lean-to roof on higher ground often fulfills a shelter. This offers a place to get out from the weather.
However, solid walls to block cold winds, especially after shearing, will be essential.