We love working with nature on our little homestead. Making fire starters from natural ingredients is a great way to quickly bring fires to full flame.
There are many kinds of fire starters. But this way is our favorite because it is easy and uses just two main ingredients: pine cones and beeswax. Using these two things together combines the fast-burning heat of pinecone resin with the clean and slow-burning power of beeswax.
In my opinion, this pine cone project makes the perfect fire starters for our woodstove needs.
Gather Items
Pine cones
Beeswax (1/4 to 1/2 cup)
Cotton or jute string or candle wick
Double boiler (with dedicated vessel for melting wax)
Chopstick and/or small (child’s) paintbrush
Newspaper or egg carton
Forage for Pine Cones
Cedar cones are actually our favorite for this project, and some of the smallest. Any pine cone will work. Just make sure they have time to dry out before using, as cones with moisture trapped in them can pop and crackle more than you might like.
White and red pine cones are great and usually sticky with resin. Coating them with melted beeswax makes them easier to handle and much more effective. Spruce cones can work but are harder to get the wax to soak in. And they take longer to dry out.
This step takes the longest, depending on how much wax you try to melt and the double boiler you’re using. Be patient and take time to prepare the rest of the project while it melts.
I use a 2-cup Pyrex measuring cup. Being able to mix the melting wax with a chopstick speeds it along.
Set up Work Area
Make sure you’ve got space to move around, as you’ll be working fast with hot wax. Lay out some newspaper.
Opening up an egg carton to let the dipped cones dry and harden on also works great, as you can add them to your own fire after the project.
Add a Wick to the Cones
I add jute or 100-percent cotton garden twine to my cones. I start at the base and weave in between the lowest few layers of scales (that’s what the individual plates on the cones are called) and tie a knot with a few inches of extra string to hold onto as I dunk into the melted wax.
Then I continue to weave along between the scales (you’ll notice there’s a beautiful winding pattern to them) and leave 1 or 2 inches of extra string on the top to use as a wick.
Once the wax is melted, you’ll hold on to the string you tied on the base and simply dip them in quickly to coat with wax. If you’re doing just a few or don’t have deep enough wax to fully submerge, you can use a chopstick to roll the cones in the wax or a small paintbrush to help spread the wax.
One dunk per cone is enough. Make sure to get wax on the wick as well. Place on an egg carton or newspaper to cool and dry.
They last indefinitely.
Enjoy
You can tie on dried herbs or flowers or add natural bows if gifting. Simply light the wick end and watch it ignite the rest of your kindling.
We’ve found a basket of these pine cone fire starters is essential to our sanity as we burn wood all winter long in our wood stove. You’ll find these don’t need to be big in size to get big fires going.
Tillage rightly has a bad rap. It can destroy soil aggregates and create compaction layers (or plow pan, a result of excessive plowing at a constant depth and/or the tiller’s slapping effect). Tillage can lead to loss of nitrogen, nutrients and soil organic matter. It can pulverize mycorrhizal fungi hyphae and, over all, really disturb the soil ecosystem.
However, we shouldn’t dismiss tilling altogether. Rather, tillage benefits can be achieved though lower impact usage, as defined by what I call S4-tillage principles:
Permabeds have a maintained raised form because they are usually formed higher and designed for both stable soil structure and well-defined soil horizons. Permabeds are also never plowed under, and as a result possess routine soil building processes and dedicated systems to strengthen the soil life’s ability to stabilize the own environment for mutual benefit.
To reform Permabeds, you can use a power ridger or rotary plow alongside other equipment. But mechanizing this operation requires some forethought.
Powered machines can manage for disease/weeds (usually by plowing the field) without harming the soil conservation core. Crops connect quickly with soil organisms to outgrow pests, disease and weeds. And plants are able to develop natural pest defenses, such as rich lipids forming in their leaves.
courtesy of Zach Loeks
Consider higher Permabeds (4 to 6 inches) in wetter climates for drainage and reduced compaction. Use lower Permabeds (2 to 4 inches) for sandy soil to conserve water. For perennials taller beds (6 to 8 inches) improve root growth.
I make 14-inch beds covered with weed barrier for husk cherries. When ripe, they roll into the dry clean aisle for easy picking.
Now let’s look at the 4 principles involved with careful and considered tillage.
Seldom:Only essential tillage in tandem with alternative techniques
Shallow: Adjust equipment for task-appropriate depth.
Softly:Soften the blow with “soft tillage” through soil horizon design. Using task-specific horizons to buffer soil life communities in aggregates. This will improve water, nutrient and air storage, cycling and release in an undisturbed soil conservation core.In a garden system where waste material is cycled in situ, soil can horizons develop; the soil surface holds mostly a diverse crop cover in all seasons. This is nature’s design. You can see it in a woodland or prairie ecosystem’s thriving and resilient productivity.
Sorted: Organizing earthworks in a pattern to avoid larger landscape issues of erosion from expanses of bare soil.A percentage is always covered with either a cover crop or food crop. Never till both adjacent areas (alternate beds).
Grow On, Zach
For more on growing with two-wheel tractors, check out Zach’s new book, The Two-Wheel Tractor Handbook, available for pre-order from New Society Publishers.
Wild rice has been a staple of the northern portion of our country for thousands of years. Members of the Ojibwe tribe harvested it from the Great Lakes region long before Minnesota was even a state. In the 1970s, Minnesota even made wild rice the official state grain (who knew there was such a thing?).
Once summer fades into fall and the cooler weather and snow blows in, our minds naturally drift to warmer, cozier meals. This is the time of year when I make a lot of hot dishes, soup and other oven-baked meals.
One of our absolute favorite soups to make is chicken wild rice soup. The chicken in my recipe can be substituted for turkey or even goose.
In a large pot, combine chicken broth, garlic, celery, carrots, mushrooms, onions and chicken bullion. Bring to a boil, then reduce heat to a simmer for about 20 minutes, until the vegetables are tender.
In another large pot, make a roux with the butter and flour. Whisk continually until it creates a paste. Slowly pour in the veggies and broth, and stir well. Increase the heat to high and stir for two to three minutes, until the soup thickens.
Add in the chicken, cream of mushroom soup, parsley and rice. Heat thoroughly and enjoy.
Serve with slivered almonds.
Notes
If using goose for this recipe, cook it in a crockpot to tenderize it. Pull it apart before mixing into the soup.
Skip the dried parsley if you have fresh. Instead, simply garnish the soup before serving.
With just over a week until Christmas—and even less time until Hanukkah and other winter holidays—many of us are sitting, stress free, on a stash of gorgeously wrapped gifts hidden away in our closets, basements, and garages.
The rest of us? Well, we’re running around like the ol’ proverbial chicken without a head looking for the perfect gifts.
If your real-life obligations got the best of you these past few weeks and you find yourself scrambling to complete your holiday shopping, you can rest a little more easily. Santa’s Hobby Farms helpers are here with their annual gift guide for the chicken lover in your life, with all gifts guaranteed to arrive via Prime before Christmas as of print time.
Poultry Picnic Table
Handcrafted from untreated pine, this rustic table allows your birds to feast in style! Measuring 15 inches in length, this table features a lip to keep the feed from spilling out the sides.
An adorable addition to any yard or run! $39.99 plus shipping and taxes.
Talk to Chickens T-Shirt
Don’t we all? Proclaim your poultry patter to the world—or at least to your neighbors—with this amusing T-shirt. Available in unisex, women’s, and youth sizes in gray, red, green, and blue.
Give it as a gift or stuff it in a stocking! $19.97 plus shipping and taxes.
Chicken Math Sign
The perfect gift for the chicken mathematician in your life, this comical (and truthful!) sign is made from weather-resistant PVC and has holes for easy mounting on a coop wall or anywhere you choose!
Measuring 9 inches by 12 inches, the sign cleans easily and is certain to bring smiles to a flock owner’s face. $9.99 plus shipping and taxes.
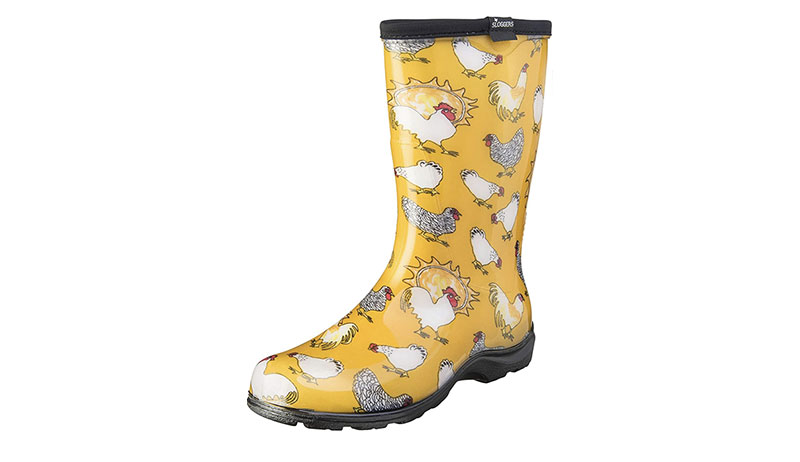
Poultry Harness
Tired of seeing just dogs and cats at those pet-friendly businesses? Show them that chickens are pets, too, with this clever harness and leash set (pictured above)! Available in three sizes, the breathable nylon vest fits snugly without restricting your bird’s movements.
Take Hennifer for a walk around the block, at the park or at your farm-supply store! Suitable for use with ducks and geese, too. $9.99 plus shipping and taxes.
Practical and whimsical, these waterproof women’s boots by Sloggers are ideal to pull on for a quick dash out to the barnyard, garden or run. Made from latex-free, medical-grade material, these calf-high boots feature dozens of chickens on a daffodil-yellow backdrop.
Dirt and mud rinse right off. They can be used as rain boots, too! Prices range by size from $36.21 to $46.87 plus shipping and taxes.
Chicken Scratch Note Pads
Keep track of your daily chores, your grocery list and more with this cute set of notepads. Featuring a variety of chickens ready for business, these lined, self-stick notepads help keep you organized in a cute and colorful way.
The set includes six 4-inch by 6-inch notepads and 300 sheets total. $16.99 plus shipping and taxes.
Chicken Cookie Cutter
Just in time to make treats for that jolly old elf, this chicken cookie cutter adds barnyard charm to your home-baked goodies.
Made of food-grade stainless steel and fully dishwasher safe, the cookie cutter makes an adorable stocking stuffer or small gift for the cookier in your life. $8.99 plus shipping and taxes.
Chicken Dad T-Shirt
We’ve all heard of the crazy chicken lady and about chicken moms. It’s time to give the dads their due! This Chicken Dad shirt celebrates the man, myth and legend: the man with the backyard flock.
Available in black, blue and green, this shirt runs in men’s sizes S to 3XL. $15.99 plus shipping and taxes.
Chicken Journal
Wish you could remember all of your chickens’ zany antics? Write them all down in this handy lined journal! This 5-inch by 8-inch notebook features beautiful watercolor hens and roosters on its paperback cover and eight blank pages in the back just in case you want to sketch something instead of describe.
You’ll never forget another funny chicken story again! $5.99 plus shipping and taxes.
Chicken Wine Glass
Perfect for the end of the work week or after a long day cleaning out coops and mending fences, this stemless wine glass allows you to kick back with your favorite bird and beverage. A frosted hen stands beside a witty “I don’t give a cluck” saying, engraved by hand to ensure durability.
This wine glass is dishwasher safe and is a fantastic gift for fans of farmhouse décor. $19.95 plus shipping and taxes.
I sensed my hens had developed a pretty expensive mealworm habit, but it wasn’t until I sat down and did the math that I realized something had to change. See, a 30-ounce bag of dried mealworms sells for just under $25 at my local farm supply store. (That works out to about $12.59 a pound!) At the rate we go through them, I’d be spending nearly $300 per year on desiccated insect larvae.
By contrast, I could buy 500 live mealworms for $13.49 from my local pet store. With a few extra supplies and a little setup work on my part, I knew I could raise my own mealworms—and so can you!
This video shows you how to get started with a basic one- or two-container system. (If you have a really large flock of chickens and need thousands of mealworms, you might want to consider starting a larger multi-container mealworm system instead.)
The Mealworm Lifecycle
The mealworms that chickens love to eat are actually the larval stage of the yellow mealworm beetle (Tenebrio molitor). These adult beetles mate with one another, then the female beetles will lay hundreds of eggs over a period of a few months. Tiny mealworms emerge from the eggs and subsequently go through a series of growth stages.
When a mealworm hits the large-and-juicy stage—perfect for feeding to one’s chickens—it’s about to pupate. During this part of its lifecycle, it sheds its last mealworm skin and begins to look much more beetle-like.
In time, the pupa morphs into an adult beetle. Then the whole cycle begins again.
The speed with which mealworms complete this process depends on the temperature and humidity of their environment. Warmer, more humid conditions speed things up, and, far from ideal, conditions that are too cold and dry will slow their growth.
Shelter—Use an old aquarium or large plastic storage container fitted with a screened lid.
Food—Choose rolled oats, wheat bran or rice bran.
Moisture—Add small bits of raw carrot to provide extra food and moisture.
Warmth—Use a seedling heat mat or reptile mat to keep temperatures between 75 and 80 degrees F.
Livestock—Purchase live mealworms (Tenebrio molitor) from a reputable pet store or bait shop. (Avoid “jumbo” mealworms as these may have been treated with growth hormone.)
Step by Step
Wash and sanitize container with soapy water and a dash of bleach. Rinse and dry container thoroughly. Place on top of heat mat.
Because grain sources can contain mites and other critters, you should heat it in a 130-degree oven for 30 minutes. This should kill any preexisting eggs and guard your mealworms against pests. (I also briefly pulsed my rolled oats in a food processor to make it easier for my mealworms to eat this food source.)
Put 2 to 3 inches of your grain source in the bottom of the container, along with a few small bits of carrot.
Move live mealworms into a prepared container. (At first, these will be your purchased livestock. Later, however, these will be mealworms that have hatched from your adult beetle eggs.)
Block out light by covering with a roomy cardboard box or scrap of fabric.
Remember, how long each mealworm lifecycle stage takes depends on environmental factors like temperature and humidity.
Two-Container Option
As new beetles emerge, you might want to move them to a second container where they will lay new eggs. Then, once many of the mealworms in your first container complete their lifecycle, you can harvest the remaining worms to feed to your chickens.
Finally, empty and clean out this container, so you can start the process over again.
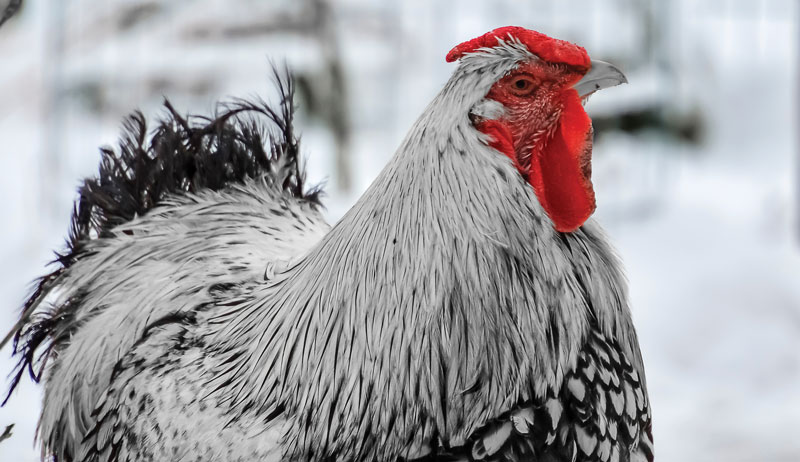
Chickens and other poultry members come in all sizes, shapes, colors and personalities. Nearly 400 recognized breeds and varieties of poultry exist, including large-fowl and bantam chickens, ducks, geese, turkeys and guinea fowl. Using our illustration and a few selected hints, can you guess which chicken breed we have depicted here?
Find out the answer below!
Hints
This ancient breed from Japan were originally kept in the imperial gardens.
Individual males were given special care and the tail feathers sometimes developed to the fantastic length of 20 feet.
Murray McMurray says that “modern fowl are still unusually handsome in color and combinations” and “tails are striking, although of more ordinary length.”
There has been much confusion as to the proper name for this breed, but you could say the commonly accepted name today has risen from the ashes.
Answer
The breed depicted above is the Silver Phoenix, which is typically kept as an ornamental bird. Hens aren’t reliable as layers, but they’ll become broody and make good mothers. Although it’s sometimes referred to as an Onagadori, the Phoenix is distinctly different from its ancient Japanese ancestor when it comes to lifespan and tail length.
Standard Phoenix cocks weigh 5 1/2 pounds; hens, 4 pounds; bantam cocks, 26 ounces; and bantam hens, 24 ounces.
The Phoenix requires a lot of attention and a patient handler. To learn more about this beautiful breed, visit HobbyFarms.com/phoenix. To purchase the superbly elegant Silver Phoenix, visit Murray McMurray Hatchery online.
This mystery chicken breed was brought to you byMurray McMurray Hatchery, which provides the highest quality poultry and auxiliary products to its customers and has been a trusted, knowledgeable industry resource for more than 100 years. Whether you are an experienced or novice enthusiast, Murray McMurray is sure you will enjoy its wide selection of breeds and supplies to assist you with raising your flock!
This article originally appeared in the November/December 2022 issue of Chickens magazine.
Chickens are fun, easy and so rewarding. But to successfully raise chickens, it’s important that you plan carefully, follow basic healthcare practices, feed them properly and select appropriate breeds. These 75 expert tips will help you do just that and make your chicken-keeping operation nearly effortless!
Coop Size
1.The best coop size for your flock depends on how many birds you have or want, what breeds you have and whether there’s outside run access.
2. Build a larger coop than you believe you’ll ever need. Chickens multiply magically!
3. For bantam breeds, plan 2 square feet per bird with outside access or 5 square feet per bird without.
4. Standard size birds need 3 square feet per bird with outside access and 8 square feet per bird if there’s no outside access.
5. For heavy breeds, plan 4 square feet per bird with outside access, or 10 square feet per bird without.
jpr03/Adobe Stock
Coop Location
6. Before you build, be sure to check local ordinances. Some governments may restrict where you can place a chicken coop and run.
7. A coop located near the house is preferable, especially if you’ll be collecting eggs daily.
8. Locate chicken housing where there’s room for an outside run (sized for at least 10 square feet per chicken).
9. Take advantage of available light, breezes and shade to help stabilize temperatures inside the coop and run.
10. In hot weather regions, this typically means placing the chicken housing in a shaded location.
11. Facing the coop south with protection from northerly winds is often ideal in cold weather areas.
12. Locate the structure downwind from prevailing winds that pass your home to minimize odors and noise.
13. Make water and electricity available at the chicken house. Chickens drink lots of water and carrying it gets old fast. Electricity powers conveniences such as heated waterers, an automatic door-opener and winter “lights-on” for better egg production.
Access & Storage
14. In order to clean, water, feed and care for your chickens, easy access and room to work are essential.
15. Include a human-sized access door and room to stand up inside your chicken house.
16. For smaller coops, incorporate a hinged roof that can be lifted to allow access.
17. Include a separate area within the coop for storing chicken feed, oyster shell, grit and medicinal items.
Ventilation
18. Chicken housing must be well ventilated year-round to remove the large amounts of moisture, ammonia, dust and heat that chickens generate.
19. The amount and location of vents needed varies as weather conditions change throughout the year. So, create many ventilation options that can be closed or opened as required.
20. In hot weather areas, entire sides of the coop can be constructed to be removed to maintain sufficient ventilation.
21. In areas where hot weather is not a problem, plan 1 square foot of vent opening per 10 square feet of floor space.
22. Cold weather vents should be high up (above roosts) and protected from rain and snow by roof overhangs.
23. Warm weather vents can be lower in the coop so they provide a cooling breeze.
24. Making the coop and run predator-proof is essential. Many predators consider chickens an excellent meal and will do anything to get them.
25. There should be no coop openings that a predator can get through at night, and all windows or vents should be covered with 1⁄2-inch hardware cloth (even when open).
26. The small pop-hatch door that chickens use to enter and exit must close securely at night (with them safely inside the coop).
27. Consider an elevated coop to eliminate unwanted entries from below. It will keep predators from burrowing in and provide your chickens shelter from both sun and snow.
Flooring Material
28. The common choices in flooring are dirt, concrete or wood. They all have pros and cons that you should consider.
29. Dirt floors are very cost-effective but are difficult to clean. It’s also difficult to keep predators or rodents out.
30. Concrete floors prevent predator access and are the easiest to clean, but they’re also the most expensive.
31. Wooden floors are inexpensive and work well if the coop is elevated to prevent rot and keep predators out. However, they’re difficult to clean. Covering them with linoleum or a protective finish makes cleanup easier.
Wirestock Creators/Adobe Stock
Roosts
32. At nighttime, chickens instinctively sleep off the ground to protect themselves from predators. So, provide your chickens with appropriate roosts.
33. There should be at least 8 inches of roosting space in the coop for each standard size bird and at least 10 inches for heavy breeds.
34. Don’t locate waterers, feeders or nest boxes below roosts because chickens do most of their dropping at night while sleeping.
35. Roosts should be placed higher in the coop than the nest boxes so the chickens aren’t tempted to sleep in them. (This causes dirty eggs.)
36. Locate roosts at heights from about 1 foot off the coop floor to a couple of feet from the ceiling. But stagger heights so chickens can easily hop from lower to higher roosts.
37. Wide roosts are beneficial in winter so chickens can tuck their feet under their feathers to stay warm. Place 2-by-4 boards so their feet sit on the 4-inch width.
38. Plastic or metal piping isn’t suitable for roosts because it’s too slippery for the chickens to grip.
Nesting Boxes
39. Chickens prefer to lay their eggs in a dark, protected location, so appropriately sized nesting boxes are needed in housing for laying birds.
40. Nesting boxes should be 12-inch square for standard-size birds or 14-inch square for heavy breeds.
41. Unlike coops and runs, nesting boxes shouldn’t be too spacious or multiple birds will crowd into the same box and cause broken eggs.
42. One nesting box for every four hens in the coop is usually sufficient.
43. A nesting box front lip that is about 2 inches high will hold in bedding material, while a sloped roof will prevent the birds from roosting on them.
44. Some coop designs incorporate nesting boxes that can be accessed from outside by lifting a hinged lid. These make collecting eggs and keeping the nest boxes clean quite convenient.
Coop Conveniences
45. Install a chicken coop door opener to automatically let the chickens out every morning and close them up at night. That way, you don’t have to rise early to let them out or worry about closing them up at night.
46. Keep waterers from freezing in cold weather by using heated chicken waterers.
47. If you want your chickens to continue producing eggs during winter, add artificial lighting so your chickens receive a minimum of 14 to 16 hours of light throughout the fall and winter months.
48. Practice biosecurity by restricting access to your property and your birds. Wild birds, new chickens or human visitors may carry diseases that can quickly infect your flock.
49. Make it a priority to observe your flock daily. This will allow you to learn each of your birds’ typical behaviors, spot any health issues and appreciate the joy of chicken-keeping!
50. Provide chicken dust-bathing stations. Chickens need dust baths to get clean and rid themselves of parasites.
51. Use the deep-litter method to maintain a cleaner coop with less work. In addition to being easier, it’s also beneficial for your chickens’ health. (You can find out more about the deep-litter method here.)
52. Feed your poultry flock pumpkins, melons, cucumbers and squash (members of the Cucurbitaceae vegetable family) to entertain them.
53. Add culinary herbs and edible flowers to your chickens’ coop and run. They contain vitamins, minerals and other components that improve flock health.
Feed & Water
54. Chickens need feed that is nutritionally appropriate for their age (chick, pullet, hen, etc.) as well as type (meat, laying or dual-purpose) for optimal health.
55. Commercially available feeds are convenient and are expertly formulated to provide ideal nutrients for each type and age of chicken.
56. Every bag of chicken feed sold in the U.S. is required to have a nutrition tag specifying the ingredients. Learn to read these labels to control what you feed (think added omega-3s, no soy, etc.).
57. For chicks, feed should be available 24/7. They grow and create feathers at an incredible rate, so chicks continuously need high levels of nutrients and protein.
58. Medicated feeds are available to help prevent chick losses due to coccidiosis. They can be fed to egg breed chicks up to 16 weeks of age and meat breeds up to five days before slaughter.
59. Up to about 6 weeks of age, feed egg-laying breeds a chick-starter feed and meat chicks a broiler-starter.
60. After 6 weeks of age, switch egg-laying breeds to a pullet-grower and meat breeds to a broiler-finisher.
61. As female chicks approach laying age, their dietary needs change. They don’t require as much protein, but they need much higher levels of calcium, phosphorus and vitamin D.
62. Start young hens (egg-laying or dual-purpose breeds) on layer rations at about 18 weeks of age, or when the first egg arrives, whichever comes first.
63. A continuous supply of fresh, clean water is critical for chickens. Chickens won’t eat if they are thirsty, which can stunt their growth and inhibit egg production.
64. An adult chicken needs to drink two to three times the weight of water that they eat in feed.
65. Egg-laying hens need large amounts of calcium to produce eggshells, so offer free-choice oyster shell or calcium grit. When fed free-choice, hens will self-regulate the amount of calcium they consume.
66. Chickens don’t have teeth, so any chickens that free-range or are fed scratch need grit. Grit is the only mechanism a chicken has for grinding its food into pieces small enough to swallow.
Build Your Best Flock
67. Owning a backyard flock means you get to mix and match chicken breeds to meet your individual goals. Want many eggs, love colorful eggs or prefer quiet birds? There are breeds for all that and more! (Read on for more on breeds.)
68. If you want “friendly” chickens, then it’s important to handle your birds frequently and give them treats from chick age on. Many breeds will come when called, eat out of your hand and enjoy cuddling and petting.
69. When choosing breeds, consider your climate. Most chicken breeds handle cold, but many struggle in heat. For hot climates, choose breeds that have smaller bodies and large combs (think Mediterranean breeds such as Leghorn). In cold climates, choose larger bodied chickens with smaller combs (think Golden Buff or Barred Rock).
70. Roosters are an individual choice; it all depends on your situation. (Remember: Some locations prohibit them.) The positive aspects of roosters are flock protection and fertile eggs, while the negatives are crowing and possible aggression.
Final Five!
For our final five tips, we’ll look at which breeds to get for what you’re looking for.
71. Quiet: If a quiet flock for city or suburbia is your goal, consider the Ameraucana, Australorp, Brahma, Cochin, Java, Orpington, Plymouth Rock, Rhode Island Red, Sussex or Wyandotte breeds.
72. Kid Friendly: Larger breeds are usually quite docile and good choices, such as Australorps, Cochins, Orpingtons, Sussex and Wyandottes.
73. Egg Laying: Top breeds for egg-laying include Australorps, Austra Whites, Golden Comets, Leghorns and Rhode Island Reds.
74. Dual Purpose: Great dual-purpose breeds (good for egg-laying and meat) include the Buckeye, Delaware, Dominique, Plymouth Rock and Rhode Island Red.
75. Colorful Eggs: Chickens that produce colorful eggs include Araucana (blue), Ameraucana (blue), Easter Eggers (many colors), Marans (dark chocolate brown), Olive Egger (olive green) and Welsummer (speckled chocolate brown).
No matter where you are in your chicken-keeping journey, following the guidelines outlined in this article will lead to a happy, healthy flock that you can be proud of and enjoy for years to come.
It’s not uncommon for a beginner or an advanced chicken-keeper to raise a brood of chicks without the help of a mother hen. Maybe you’ve hatched the chicks from eggs in an incubator, or perhaps you ordered them through a parcel delivery service and they arrived in a box of peeping yellow fluff. In either case, it’s critical to keep the new chicks warmed to a safe temperature over the next several weeks.
For many people, a heat lamp is the obvious go-to choice for keeping the brooder box warm. These devices—looking like a robust clamp light—often utilize a 250-watt or similar bulb to keep the chicks’ area warm.
But heat lamps aren’t perfect, and there are a couple of downsides. For one thing, heat lamps are … well, hot. The bulbs put out plenty of light in the visible spectrum, but they also emit a great deal of infrared light. Infrared is the “color” below red on the spectrum. You can’t see it, but you can feel it as heat, and heat lamps deliver plenty of it.
Because one bulb can easily heat a small space such as a chick brooder to 100 degrees Fahrenheit, the temperature of the bulb itself and its reflector can become very high indeed. While plenty of people utilize heat lamps without incident, there are more than enough sad stories of heat lamps that fell off their support and started a fire—stories that make some people think twice about using them.
Heat lamps also represent a potential burn hazard for the handlers.
So if not a heat lamp, what are your alternatives? How are you going to keep those chicks happily warm in their cozy but artificial environment until the 6-week mark, when they can safely join the rest of the flock outdoors?
Happily (and maybe surprisingly), you actually have several options. If you’d like to experiment with saying bye-bye to the heat lamp, consider some of the following.
Stand-Alone Brooders
An easy way to move past a heat lamp is to utilize a commercially built stand-alone chick brooder box. These are essentially similar to egg incubators, except they’re designed specifically for a brood of hatched chicks.
Some models are designed to automatically keep the temperature inside consistent by running the heater only as needed. This saves you effort and offers some peace of mind.
In any case, it eliminates the possibility of a hot heat lamp falling from its stand or accidentally coming into contact with other objects. Some stand-alone brooders even include handy built-in chick feeders and waterers, saving you some time.
While these products can be more expensive than a simple heat lamp or some the other options here, stand-alone brooders offer a level of convenience and value that may be particularly appealing to beginning chicken-keepers.
This option has a lot of benefits going for it. Low-energy brooder plates are basically small electric radiant heaters, only a few inches high, that chicks can crowd directly underneath or press up against. They often have adjustable stands that allow you to raise the height of the heater plate to accommodate the specific size of your chicks.
On these types of products, the temperature of the heating element is lower. But the chicks make up for it by being able to stand much closer without getting too hot. Because of this, these products may represent less of a fire hazard than a heat lamp.
Another benefit is that they use lower power—often below 40 or 50 watts, so they’re less expensive to use. Some versions are shaped like a mouse pad that the chicks stand on instead, although they may be designed for older chicks rather than just-hatched.
Most brooder plates designed for chicks of all ages feature the heating element as a “roof” that the chicks stand beneath to feel the heat.
You’ll still need some sort of brooder area/box the same way you would with a traditional heat lamp setup—a place to keep the chicks contained and to create a smaller area to keep warm.
Hot Water Bottles
Some folks seek a simple heating method for their chicks—something that is easy, nonelectrical and passive, with no moving parts. Surprisingly, there is such a method: hot water bottles.
When filled with heated water and then wrapped with an insulated cover (to help make the heat last and to protect the chicks from touching something too warm), hot water bottles can successfully keep chicks warm in a small area. Some people seem to have good luck with this method, while others dislike the idea.
One problem is that great care has to be taken to make sure that the hot water bottles indeed keep the chicks warm. Unlike the steady reliability of a heat lamp or even a brooder plate, hot water bottles immediately start losing their heat the moment you finish filling them. This means that you have to frequently check the temperature of the area and refill bottles (even during the night).
Nevertheless, this option is reasonably popular, especially for off-grid situations. It’s also a fine backup plan for power outages. (Some people experiment with chemical hand warmers as well during outages.) But you really must take care not to let the chicks get too cold.
Let There Be Light
Even if you’re not utilizing a heat lamp, you’ll still want to supply your growing chicks with a light source, of course. Because you no longer need the light source to supply heat, a low-wattage LED bulb can easily produce plenty of light, while maintaining a low temperature and decreasing your fire danger.
And you won’t have to run the light during the night, so you can better simulate a day/night cycle for your chicks.
Use a Thermometer
No matter what heat source(s) you ultimately choose to keep your growing chicks warm, it’s a good plan to place a reliable thermometer in their vicinity so that you can accurately keep an eye on the temperature and carefully decrease it slowly as the chicks grow feathers. This will also help you monitor that your alternative heat sources are indeed doing their job and maintaining the required temperature.
The behavior of chicks can also be an indicator. If they’re huddled tightly together, they may be too cold. If they’re spread widely apart, it may indicate the brooder is too warm.
Raising chicks is one of those rewarding pursuits that helps larger-scale homesteaders on their goal to self-sufficiency. And the endeavor can also offer small-scale beginners a chance to get a taste for farming without a major investment of time, money and land.
Along with beekeeping, raising chicks is the perfect way to ease into a farming lifestyle. And if some of these heat lamp substitutes can help bring you a step closer to that reality, or make your current setup easier, than they just might be worth looking into.
Take care to keep those chicks warm and safe!
More Information
Off-Grid Homesteading
Some of these ideas may be helpful to homesteaders living in an off-grid situation. An average heat lamp running nonstop and operating at a common wattage such as 250 watts will use 6,000 watts (6 kilowatts) over a 24-hour period. And you’ll need to keep it running for weeks!
That’s a large additional load to place on an off-grid system that is functioning off solar panels or perhaps a wind turbine.
And yet it’s often the very people trying to live in a sustainable off-grid lifestyle that are most interested in small-scale farming pursuits such as raising chicks. Being able to incorporate some of the simple methods here can help bridge the gap between a functioning brooder and a major drain on your off-grid power system. Chick brooder plates, for instance, may require only 1/5 the electrical draw of a heat lamp.
This article originally appeared in the November/December 2022 issue of Chickens magazine.
Every farm needs at least one yard cart. These small four-wheeled carts can be put to use in so many ways. You probably already have one and are nodding your head as I explain how they’re perfect for transporting rocks, compost, plant materials, bricks, water, hay bales, tools and more around a farm. Whether pulled by hand or towed behind a tractor or ATV/UTV, yard carts travel a lot of miles.
But maybe you haven’t yet realized the full versatility of yard carts. If you looking to be inspired with new ways to use yard carts, you’ve come to the right place. Depending on the type of yard cart you have (and we have a simple guide to help you choose which you need), here are three creative ways to use a yard cart around your farm.
1. Bring potted plants inside (and out again)
Are you growing cold-sensitive plants that risk being damaged by your local nighttime temperatures? A yard cart can simplify the process of moving plants inside and out as temperatures shift.
Maybe you have potted seedlings you’re waiting to plant until all danger of frost is past. You bring them outside for sunshine during the day and tuck them in a heated garage at night.
Or maybe you’re growing a potted citrus tree that is too heavy for one person to lift by hand. In either instance (moving a large volume of plants or moving one heavy plant), placing the plants on a yard cart saves time and/or effort when moving them from one location to another.
A metal yard cart with a mesh bed can be perfect for drying crops like onions and garlic. The mesh surface provides lots of airflow for proper drying. And you can pull the yard cart along with you as you harvest.
Once your crop is harvested and stored on the yard cart, it’s easy to pull the yard cart to a well-ventilated location suitable for drying (out of direct sunlight in the case of garlic). You can also pull it into a garage if rain threatens or at night if you’re concerned critters will stop by and munch on your harvest.
3. Plant flowers
Some yard carts have flat beds, and these are perfect for drying onions and garlic. But if you have a polypropylene yard cart with raised sides, you can convert it into a flower planter.
Since proper drainage is important for any planter, you’ll want to drill a few holes in the bottom of the yard cart. After that, you can fill the yard cart with gardening soil and plant a beautiful selection of flowers.
The best part? You can readily pull the yard cart to different locations, so you can easily introduce a burst of beauty to any spot in your garden or yard. Change it up as often as you like.
Now that we’ve started the ball rolling, your mind is probably brimming with your own ideas for creatively using yard carts. Have fun thinking outside the box!
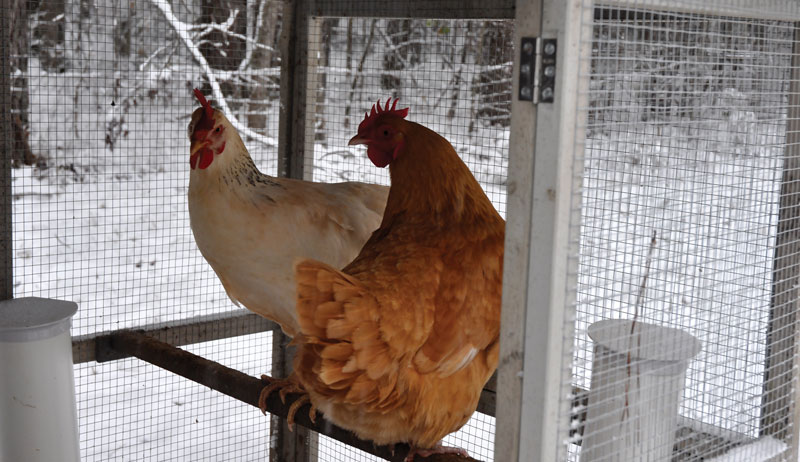
When the time comes that robins ascend upon our yards and chicks hatch right and left, it can be tempting to start bringing home just about any little fluff ball you see. However, it’s especially important for those of us that live in climates with colder winters to be aware of how cold-hardy our potential new chickens are. (And likewise, the opposite is true when picking out birds for a hotter climate.)
Growing up surrounded by chickens, I remember seeing some cases of frostbite when the combs would start to turn black after a winter cold spell. Things like that are never fun, and it can be challenging to know how to help your birds best. Of course, the longer you tend to a flock, the greater a chance that you’ll run into illnesses or injuries. But we want to do what we can to help prevent maladies and encourage good health in our birds.
If you live where freezing temperatures are often a part of the winter months, consider breeds that have certain attributes, such as:
smaller combs & wattles, as this will allow for less exposed skin to succumb to frostbite.
breeds with heavy feathering or a thick coat of feathers to help shield against the bitter winds. (Be careful if you also have hot summers, because some of the heavier-feathered chickens will also be more susceptible to overheating.)
feathered feet or heads. Some chicken-keepers choose breeds that have feathered feet or a pompom of feathers on their heads instead of a comb (e.g., Silkies) as this can also help keep the bird warm and cut down on the chances of frostbite.
Some cold-hardy chickens to look for include Australorps, Chanteclers, Barred Rocks, Rhode Island Reds, Wyandottes, Dominiques and Opringtons.
Winterizing Your Coop
I generally get a kick of motivation as autumn begins to wrap up and I can feel a little bite in the air each evening. I start cleaning up around the homestead, putting tools away that were used often during the warmer months, finishing any last little jobs outside and somewhat preparing for the promise of colder days.
Our coops should also benefit from these last-minute clean-up sessions as we run through a checklist to prepare them to function at their best for our flock. After all, even if you give them the option to free-range, chickens will likely spend a bit more time inside the coop during winter than they would during summer. From sealing up major drafts to adding a new layer of litter on the floor to cleaning out any waterers and feeders, there’s plenty we can do to help our chickens transition smoothly into winter.
If your coop tends to have several major drafts, make it a point to cover openings with boards (and even a layer of plastic if you can), caulk around any loose windows that might be about to come out, check the floor for any broken or weak spots, and repair any damaged nesting boxes or roosts. Look for loose nails or broken pieces of glass that could damage their feet.
While you’ll want to reduce as many of the drafts as possible, be careful that there’s still proper ventilation to avoid ammonia buildup from the droppings. Some drafts are OK so long as the birds have a way to get up off the floor when they roost and can warm themselves sufficiently.
To do a quick check of ammonia levels, bend down and put your face within 10 to 12 inches off the floor. If your eyes and nose start to burn, there’s already too much ammonia. If high levels are present, it can cause your chickens to quit eating and slow (if not halt) egg production, as well as cause serious health issues such as respiratory damage.
To help prevent this problem, it’s best to have good air movement and dry litter, as moisture, poor ventilation and a large quantity of birds in a confined area can all cause ammonia levels to rise. If there is an attached run, check it for any holes or openings. Look for debris or anything that could be harmful.
Consider wrapping the pen in a tarp or heavy plastic to help cut down on the amount of wind blowing through and offer a little more protection.
SusImage/Shutterstock
Health Check-Up
Summer can be difficult with the extreme heat and humidity at times. But winter is also a struggle for chickens when the wind picks up and temperatures drop. For this reason, it’s good to do a health check-up on your birds before the snow falls, as well as periodically throughout the year.
Regardless of the season, there are several things to look for.
Behavior: Are your birds lethargic, withdrawn or depressed?
Combs & wattles: They should be the appropriate pink (depending on age and rooster/hen), full and fleshy.
Eyes: They should be bright and clear with no signs of discharge.
Crop: Check for a sour crop by smelling the chicken’s breath. If it smells like rotten milk, it has a sour crop.
Vent: This is where poop and eggs exit the body. It should be clean and moist, pink in color. Watch for mites.
Legs & Feet: Look for any injuries or wounds. If found, watch for discharge from the area.
Feathers: Check for mites or flies as well as major bare spots anywhere on the bird. Any birds with open wounds should be removed from the flock to prevent damaging pecking.
Poop: Watch for worms. It’s also important to look for signs of blood (especially if the poop is runny) as it could indicate coccidiosis.
Sometimes there are simple fixes to whatever injury or ailment your chickens have run into. But other times (especially if a bird has failing health due to old age) it’s best to humanly put chickens down rather than let them struggle through the winter.
Winter Tips
During the nights, chickens should be kept from sleeping on the floor of the brooder house if possible and trained to sleep on a roost or other elevated surface.
Oftentimes, if you enter the hen house at night you’ll find several of the birds clustered together asleep to help keep warm. They will fluff their feathers and settle in together, covering their feet and tucking in their heads.
While we humans must bundle up to venture outside, chickens can often adapt quite well to cold weather if given the proper tools.
Heat Lamps
While a properly functioning coop and plenty of fresh water and feed will likely be enough for your chickens to make it through the winter, sometimes during a particularly cold spell it’s helpful to try and make them a little more comfortable.
There are many opinions on the safety of using heat lamps. But if hung properly away from anything flammable and checked now and then, they can be helpful to warm your hens.
Deep-Litter Method
Implementing the deep-litter method in your coop will also allow more of a barrier between the floor of the coop and the outside elements, especially if your coop is elevated (like mine is).
Instead of the routine cleaning where the coop is emptied of all current dirty straw and debris, the deep-litter method allows you to leave the soiled bedding that is already there, turn it over and add new straw to it. The droppings and soiled bedding will decompose over time on the floor of the brooder house, naturally creating heat inside the coop.
Another benefit this method can offer to your chickens is that, as helpful microbes grow in the litter, they help your flock build immunity.
Good Nutrition
The nutrition of your flock is always important, and chickens will need greater quantities of protein provided during the winter months. For free-range chickens, their winter diet will generally be much less varied as greenery and plants will no longer be available. Even if they’re let outside to roam, brown, dead grass will be the main dish available.
One way to offer them more greenery is by sprouting grains ahead of time in your home and then feeding them gradually over a period (but before they start to mold or go bad). You can do this with grains like wheat or barley.
Providing safe kitchen scraps can supplement their diet and help keep your chickens from getting too bored. Before they go to roost in the evenings, a bit of scratch grains can be offered as a snack. As the birds digest it throughout the night, it will help warm them from the inside out.
Be careful of how much you feed, though, as scratch grains and cracked corn are full of carbohydrates. As you limit those treats, offer plenty of their regular feed around the clock so they can continue to feed if they want.
Vadim65/Shutterstock
Stocking Supplies
The term “stocking up” happens to be a favorite of mine. I love the feeling of a well-prepared home and full pantry. The same feeling also applies when I finish filling the storage containers with grain or feed for our outside animals.
Taking the time to make sure your inventories are well stocked will be beneficial not just in case of a price hike or a run on certain products, but for weather-related issues as well. You don’t have to prepare months in advance. But it’s good to get into the habit of having a least a week or two’s worth of feed in case the roads are icy, or you just aren’t able to make it into town.
I try to keep an adequate supply of our regular feed on hand. There are also several other things you might want to put in your cabinet:
commonly used medications (including saline, wound-treatment spray and extra electrolytes)
extra equipment (feeders, waterers, heated waterers, heat lamps, etc.)
While some of this (feed, bedding and some medication) you’ll need to continue to use and then replenish to avoid mold or degrading quality, items such as feeders, waterers and heat lamps can all be picked up at garage sales or farm auctions and stored in a shed until needed. If you patiently hit the sales and auctions around your local area (especially if you live near any rural areas), you’ll be able to find most things without having to purchase them for a higher price at the farm store.
Just this past summer, I went to a garage sale a few miles from home and was able to get a chick feeder, waterer, heat lamp and extra bulb for a small amount. If nothing else, consider it a little extra money you can put toward new chicks!
As the days get shorter and nights get colder, there are a few common ailments you might find popping up in your flock. Although you can do a thorough health check-up early in the season, sometimes the weather can take a toll on their bodies.
Frostbite
One of the more common problems to show up in the cold months, frostbite is most likely to affect any exposed skin or extremities such as the feet, combs and wattles. Frostbite occurs when the fluid in the cells becomes so cold that the cells freeze and die. This will eventually cause a change in both color and texture of the affected area.
If you believe a chicken has become a victim of frostbite, it’s best to move it to a warmer location and let the affected areas gradually warm up again. Don’t try to rub the areas or quickly warm them. Watch the rest of your flock closely in case others are suffering, too.
Some ways to prevent frostbite include:
Apply petroleum jelly to the combs and wattles before your chickens roost at night
Make sure the coop is dry and not too drafty
Provide roosts or elevated surfaces for your flock to roost off the floor
Use supplemental heat such as a heat lamp (although this can be a fire hazard if not used properly)
Pneumonia
This is caused by a fungus that typically grows in warm, moist places (which might include feed or bedding). The spores travel by air and can affect multiple birds in a flock.
Birds can be even more susceptible to catching pneumonia if their immune system has been weakened after a spell of extremely cold weather or high levels of ammonia present in the coop.
One of the best ways to deal with pneumonia in your flock is to work hard on prevention. Keep the coop dry and clean with good ventilation. If the litter becomes wet and moldy, remove and replace it.
Dehydration
While it might seem like this is a more heat-related problem, it is extremely easy to run into the problem of waterers freezing solid (if they’re not heated waterers) and chickens being unable to drink. If your hens are unable to drink, they’ll eventually stop eating and then quit laying eggs.
If you’re unable to provide a heated waterer (or just don’t feel comfortable with the extra heat or electricity in your chicken coop), bear in mind that you’ll need to go out and break/refill their waterers more often.
Most common breeds of chickens are able to handle winter fine if properly cared for and in good health. Don’t overthink it and try to coddle them too much. They have warm, dense feather coats to keep them toasty. To keep your flock from getting too bored during the long, chilly days, offer a small amount of treats (such as sprouted grain) or scratch grain. This will not only give them something to peck at and digest, but it will entertain you as well to watch them!
More Information
Winter Emergency Kit
If any of your chickens has gotten too cold, there are some simple ways you can help warm them back up after the bite of winter.
Watch to see if the other birds are pecking at the ill one. Determine if it needs to be brought inside, whether because of the rest of the flock or just the extent of its chilliness.
If so, take it into a warm room and allow it to gradually reheat. Avoid putting any direct heat right onto it and give it plenty of time.
Offer water with some extra minerals or vitamins added to it. After this much trauma, it will have likely caused quite a bit of stress on the animal’s body. Be patient and try to do what you can to help replenish its natural reserves.
If you notice the comb, wattle or another area starting to show signs of frostbite and turn black, leave it alone. Don’t try to cut it away or pop any blisters.
Watch for signs of infection, and allow the dead skin to dry up and fall off. New skin should be waiting underneath.
Continue to monitor the rest of your flock for any signs of a cold core temperature or frostbite.
A few things that you might find handy to have on standby include:
disposable gloves
bandages and non-stick gauze
a small, sharp pair of scissors and a pair of tweezers
syringe or eye dropper
petroleum jelly (to prevent frostbite on combs and wattles)
wound care liquid that can be sprayed on open wounds or infections
saline solution
electrolytes (to help replenish a worn-down bird)
cornstarch (to help stop bleeding of wounds)
Epsom salt (which can be used multiple ways, including soaking foot infections, cleaning a vent or in case of an egg-bound hen)
contact information for your local veterinarian or extension agents in case of a situation that feels a little overwhelming
This article originally appeared in the November/December 2022 issue of Chickens magazine.