Categories
Poultry

Langshan Chicken: Get to Know This Rare Breed

The Langshan chicken is one of the rarest breeds today. These majestic dual-purpose chickens have a lot to offer homesteaders, backyard chicken owners and rare breed enthusiasts. Here’s what you need to know about the Langshan chicken.

What is a Langshan Chicken?

Langshans come in two distinct breeds, the Croad and the German. While both of these breeds make ideal chickens for both egg and meat production, the Croad Langshan is the best choice if you are looking to win a blue ribbon with this rare breed, as the American Poultry Association (APA) does not recognize the German Langshan chicken.

But besides their exhibition purposes, what else sets these two breeds apart?

#1 Croad

The Croad Langshan chicken was the first of the two breeds to be developed. With reported sightings dating back to 1872, the Croad Langshan was first imported from China to England by Major F.T. Croad.

Major Croad’s niece was later credited with establishing the breed. Miss Croad worked tirelessly to keep the breed close to its original imports. However, the Modern Langshan was quickly bred, creating a taller, more “showy” chicken for the show table.

Soon heated arguments were taking place across Great Britain with enthusiasts for both strains of the Langshan chicken claiming their birds were the best.

The Black Croad Langshan chicken arrived in America in 1878 and was admitted into the APA standard of Perfection in 1883. Just ten years later, a second color, white, was added to the breed’s standard. In 1987, over one hundred years after the breed was first admitted to the Standard of Perfection, the APA recognized blue as the third and final color variety for the breed.

#2 German

The German Langshan chicken was developed in Germany by crossing the original Croad Langshans with Minorcas and Plymouth Rocks.

There are several physical characteristics that set the Croad Langshan and the German Langshan apart. One of the most notable differences is that German Langshans have smooth legs and feet.

Another interesting fact about the German Langshan chicken is their brown-tinted feathering versus the black, white, and blue varieties the Croad Langshan is recognized in.

While they are good producers of eggs and meat, the German Langshan chicken never gained the popularity of the Croad Langshan and is rarely seen in the U.S. or Great Britain.

langshan chickens grazing in a backyard
Adobe Stock/AndyMellow

What Does the Langshan Chicken Look Like?

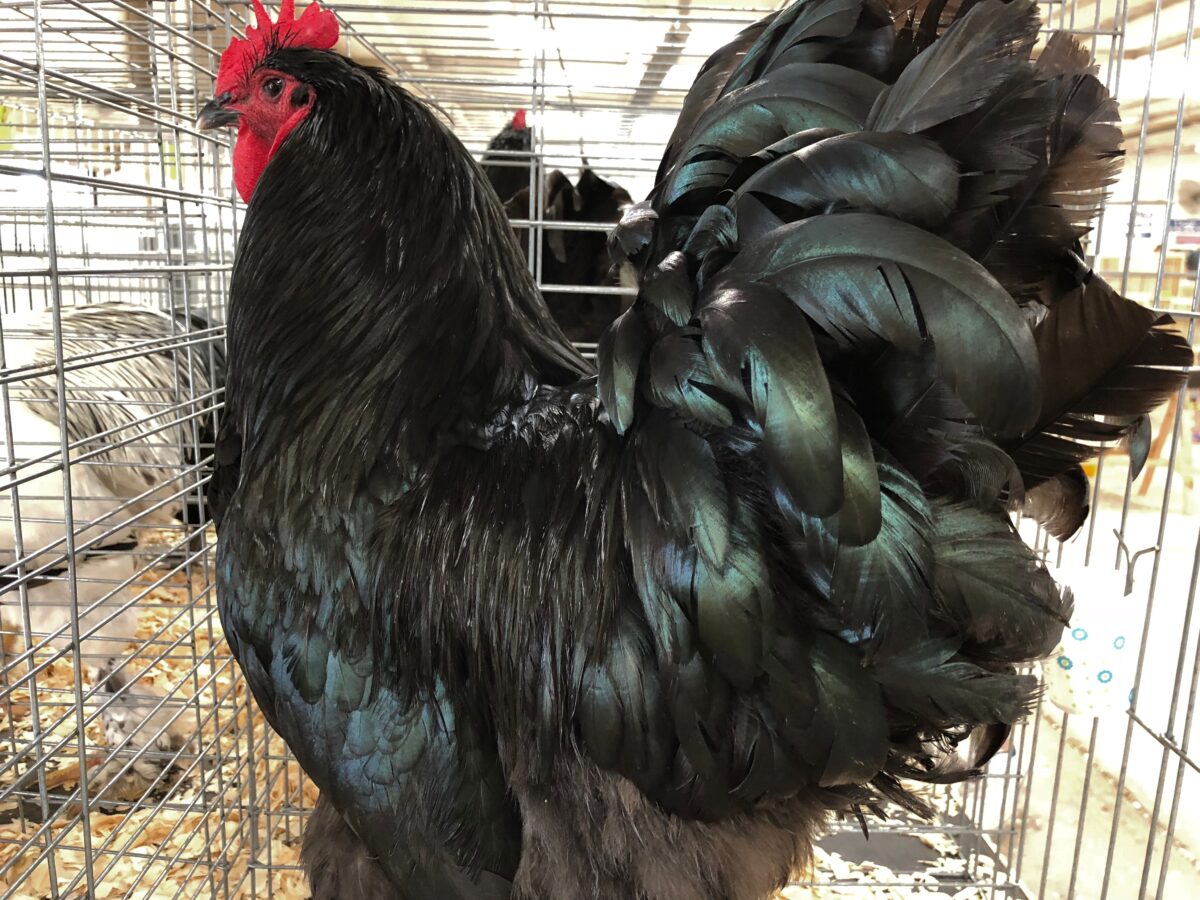
Tall and stately, the Langshan chicken has a large fanned tail. While the breed is recognized in three colors (black, blue, and white), black is the most popular, with hens and roosters sporting tight black feathering with a beetle-green sheen.

Unlike their German cousins, Croad and Modern Langshans have lightly feathered legs and feet, with feathering often appearing only on the outsides of the legs.

The Langshan chicken should have a medium-sized single comb, a small head, and an erect head and tail, giving them a distinct U-shaped body when viewed from above.

Is the Langshan Chicken a Rare Breed?

According to the Livestock Conservancy, the Langshan chicken is a threatened breed with fewer than one thousand annual show registrations in the U.S. and an estimated fewer than five thousand registrations globally.

While this does not paint the entire picture, as many Langshan chickens may be dwelling in backyard flocks around the world, it does showcase the need for increased popularity if breeders and other poultry enthusiasts want to prevent this majestic breed from going extinct.

Here are four facts you need to know about this breed.

#1 Average Lifespan

The Croad Langshan chicken has a life expectancy of five to eight years (about the average lifespan of most backyard chicken breeds).

The German Langshan’s life expectancy averages five to seven years, but with proper care and a good diet, some individuals may live up to ten.

#2 Health Concerns

Due to their lightly feathered legs and feet, the Langshan chicken should be checked regularly for scaly leg mites, as breeds with feathering on the shanks are more prone to this than breeds without feathering.  Also, be sure to check the feathers on the legs and feet frequently for dried, caked-on mud.

Like other feather-legged breeds, the Langshan chicken should not be given access to the outdoors during wet and muddy conditions. The coop should be kept dry and be cleaned regularly (no deep litter method for these chickens) to keep them healthy and looking their best.

When fed a well-balanced diet, with access to clean, fresh water, and kept in clean living conditions, Langshan chickens are fairly healthy birds.

Like all chicken breeds,  they can suffer from crop problems, internal and external parasites, and other common poultry diseases.

#3 Egg and Meat Production

Langshan hens are excellent layers, averaging 5 large, light brown to dark brown eggs with a purplish hue (also known as plum-colored eggs) per week. Hens yearly production varies from about one hundred and fifty eggs annually to as many as two hundred and twenty.

Hens may go broody, but they are not as likely to hatch out eggs as many other brown egg layers.

The Langshan chicken is an excellent dual-purpose breed, as roosters make delicious roasters and are often castrated into capons to help them grow larger.

#4 Temperament

The Langshan chicken has a sweet, calm, and friendly disposition. Hens and roosters are both considered to be gentle, peaceful birds and should not pose a problem for the novice. These gentle giants make an excellent addition to mixed flocks. While they do not bully other chickens, they are not afraid to stand their ground when necessary.

Because of their sweet and gentle nature, this chicken is an ideal pet for families and gets along well with children. Friendly, inquisitive, and intelligent, these chickens can even be trained to do tricks and respond well to simple commands.

For best results, handle hens and roosters several times a week and spend time interacting daily with your flock to prevent them from becoming shy and nervous.

Important note: While the roosters are usually calm and friendly, extra care should be taken to ensure that these big boys do not attack children, as roosters and children are not always the best mix.

The Langshan chicken may not be as popular as the Buff Orpington or Barred Plymouth Rock, but this ancient breed still offers backyard flock enthusiasts and homesteaders a lot of bang for their buck.  So, if helping to preserve a rare breed is on your bucket list, why not give the Langshan chicken a try?

This article about was written for Chickens magazine. Click here to subscribe.

Categories
Poultry

Chick Brooder Temperature: Raising Healthy Chickens

Chick brooder temperature is critical for raising healthy baby chicks. As with most things in life, there are pros and cons to heating a brooder.  Here are two of the most commonly used heat sources for maintaining good chick brooder temperatures and what you should know. 

Is a Heat Lamp for Chicks Safe?

Heat lamps are the most popular heat source used to keep a chick’s brooder temperature snug and warm. Let’s take a look at a few of the heat lamp pros.

heat lamp keeping the chick brooder temperature warm and baby chicks huddling underneath it
Adobe Stock/John

3 Heat Lamp Pros

#1 Created Equal

One of the main reasons heat lamps are chosen to maintain a chick brooder temperature is that all are created equal. Unlike some heating sources, heat lamps are generally crafted the same way and work fairly well, maintaining a snug 95°F. to keep chicks warm.

When it comes to the ease of maintaining chick brooder temperatures, heat lamps are hard to beat, as they work extremely well, are easy to set up and adjust, and usually last for several years.

#2 Budget Friendly

Heat lamps are one of the least expensive heat sources to maintain chick brooder temperatures, with costs usually falling between fifteen and thirty dollars. The combination of low cost and reliability is why so many chicken keepers choose heat lamps for brooding purposes.

A bonus to the affordable pricing on heat lamps is that it is more affordable to have extra lightbulbs and more than one heat lamp on hand in case of a malfunction.

#3 Availability

Another plus to choosing the heat lamp is the ease of availability. If you find yourself with a dead lamp and without a spare on hand, a new one is just a trip to the feed mill or farm supply store away.

Some farm supply stores carry heat lamps all year round, while others do not. Being prepared is always the best option, but if you do find yourself in a pinch, heat lamps are almost always available for purchase.

3 Heat Lamp Cons

Heat lamps have a lot of pros, and while they may be the most popular heat source for maintaining chick brooder temperatures, they also have some cons.

#1 Fire Hazard

It’s commonly known that heat lamps are a fire hazard. If you ever performed a quick internet search or picked up a book on how to raise chickens, you probably already know this.

The high wattage in heat lamps (what creates the heat from the lightbulb to keep chick brooder temperatures from falling) is hot enough to cause a fire, especially if the heat lamp malfunctions or is accidentally knocked over.

Heat lamps are easy to knock over, even on a stand, so avoid using them in areas with high foot traffic (kitchen, living room, or whatever rooms of your house or garage that are most frequently visited) and areas with small children and pets.

Never use heat lamps in a barn where they are most likely to cause accidental fires.

#2 Artificial Light

Another consideration when choosing a heat source to keep chick brooder temperatures steady is whether you want to introduce your chicks to artificial light.

Unless you plan on supplying your chicks with artificial light throughout their entire life, at some time you will need to remove the light source at night. Chicks find the transition to the dark to be frightening and will frantically chirp when the brooder becomes dark. This can be stressful for owners, as nothing is more heartbreaking than hearing your chicks chirping in distress.

#3 Stressed Chicks

Chicks raised with artificial light (even as a heat source to maintain chick brooder temperatures) are often more stressed and prone to behavior problems such as pecking order disputes and cannibalistic behavior than chicks raised without artificial light.

What is a Chicken Brooder Plate?

In recent years, brooder heat plates have started to gain popularity as a way to keep a chick brooder temperature steady without the risks of a heat lamp.

3 Heat Plate Pros

#1 Natural Lifestyle

One of the main reasons backyard chicken keepers choose to use a brooder heat plate to keep a chick brooder temperature cozy is a natural lifestyle.

Chicks can go under the heat plate whenever they are chilled, and then once warmed, come out to resume exploring the brooder. This behavior imitates how chicks raised by a mother hen bury into her feathers when chilled.

#2 Happy Chicks

Yes, chicks really do seem happier when raised with a brooder heat plate versus other heating sources.

With a brooder heat plate, chicks can monitor their own body heat (when to go under the brooder heat plate and to come out again once warmed), without you needing to worry about them overheating.

With no artificial light, chicks can rest well at night and experience lower stress levels.

#3 Worry-Free Heat Source

Brooder heat plates allow you to brood chicks successfully without a mama hen and keep the chick brooder temperature stable without the risk of a fire hazard.

Heat plates create a softer heat than heat lamps, offering a safe, worry-free brooding experience for you and your chicks.

These handy chick brooders are also less likely to knock over and are safe to use around children and pets.

Note: Brooder heat plates should not pose a fire hazard, but if you brood chicks in a barn, be sure to keep the area clean from dust to prevent barn fires, as the large amounts of dirt, dust, and flammable materials such as hay and straw in a barn make any electricity usage more risky.

3 Heat Plate Cons

While there are many pros to using a brooder heat plate to maintain chick brooder temperatures, there are also a few cons. Below is a list of the most common problems poultry keepers face when using this heat source.

#1 Not Created Equal

Unlike heat lamps, brooder heat plates are not all created equal. While some work well for maintaining chick brooder temperatures, others give off very little heat, causing chicks to become chilled and stressed.

After purchasing a brooder heat plate, be sure to test it out before setting it up in your brooder. Raise the legs to the height of a newly hatched baby chick and place a thermometer underneath for several hours. Check the thermometer reading multiple times during the tryout period to see if temperatures are holding a steady 95°F.

Reading reviews online can help you avoid purchasing lesser-quality brooder heat plates with problematic features, such as inadequate heat, lack of height adjustments, or other malfunctions.

#2 Pricey Purchase

Most brooder heat plates are more expensive than heat lamps. However, if you do not want to worry about the risk of fire while ensuring the chick brooder temperatures are warm enough for chicks to thrive, the peace of mind is well worth the cost.

There are many kinds of brooder hot plates available; check out reviews to see what other poultry keepers are saying. A general rule of thumb when purchasing a brooder heat plate is you get what you pay for, so purchasing the most budget-friendly heat plate may not be a wise choice.

#3 Scared Chicks

While this isn’t usually the case, some chicks are scared of the brooder heat plate and refuse to go under to get warm. Have a spare heat lamp or other heat source as a backup just in case a chick doesn’t take to the brooder heat plate.

This behavior seems to only happen with certain brands, so research a brand well before making a purchase.

Chicks seem to prefer darker-colored heat plates, so stay clear of brightly colored ones.

Choosing a heat source to keep your chick brooder temperature warm is an important decision. While these heat sources have pros and cons, they both work well to help you raise your next generation of chickens successfully.

This article about your chick brooder temperature was written for Chickens magazine. Click here to subscribe.

Categories
Poultry

Broiler Chickens: 6 Tips to Raise Healthy Birds

Broiler chickens are one of the most commonly raised meat sources by people who want to grow their own food. 

What is a Broiler Chicken?

If you eat chicken, whether it’s from a high-end organic store or the corner grocery, you’re almost certainly eating what’s known as a broiler breed (unless it’s a stew hen or labeled “heritage”). And, yes, they’re kind of genetically modified. They’re produced via a strict breeding program that’s been used for decades to produce birds that eat voraciously, mature quickly and do look pretty weird, with huge legs and feet and oversized breasts.

When we use the term “genetically modified” in reference to broilers, we’re not talking about lab coats, pipettes and microscopes, but rather deliberate breeding intended to reproduce and amplify desirable traits. This kind of breeding is common practice on many farms—hog farmers swear by the offspring of Berkshire and Yorkshire pigs—and the most common of barnyard dwellers are bred for desirable (and profitable) traits. As with plants, there are heritage breeds such as Red Rangers that boast minimal cross-breeding as well as hybrids, such as the Cornish Cross, that are the product of breeding programs.

The term “broiler” predates the birds we eat now; it came into use in the early 20th century when it was used as a catchall for birds sold for meat. In the 1940s, however, a promotion kick-started the breeding program that led to today’s meat birds.

According to the document “A Brief History of Broiler Selection,” produced by Aviagen International, The Great Atlantic & Pacific Tea Co.—better known as the A&P, the largest U.S. grocery chain at the time—partnered with the U.S. Department of Agriculture to stage its first-ever “Chicken of Tomorrow” contest in the mid-1940s. This tasked breeders with producing superior meat-type chickens. Chickens were hatched and raised by a third-party hatchery, where they were slaughtered and rated in several categories.

Henry Saglio’s Arbor Acres White Rocks won the 1948 and 1951 purebred contests, and Saglio was, upon his death in 2003, called the “father of the poultry industry” by The New York Times. A few other breeders gained notoriety from the event as well, including Vantress Hatchery, whose Red Cornish crosses were eventually bred with Arbor Acres birds to produce what we commonly call “chicken” today: the Cornish Cross.

broiler chickens in chicken tractor in a backyard
Rodney Wilson

In 1964, Nelson Rockefeller purchased Arbor Acres because of its dominance in the poultry industry. Over the years, big-name breeders consolidated and sold to multinational corporations, and today’s broilers are known by a few different “product” names, variations on the ever-popular Cornish Cross.

So what did midcentury breeders produce, exactly? The program aimed to create chickens that ate a lot over a handful of weeks to produce carcasses with more breast meat and bigger drumsticks. Secondary traits were bred into the chickens later, such as greater tolerance for cage-raising and easy-to-pluck feathers, but bigger, faster has driven broiler production over the years.

Since the 1950s, Chickens of Tomorrow have gone from a growth time of 16 weeks to, for breeds such as Cornish Cross X and Jumbo Cornish Cross, a finish weight of 5 pounds in just six weeks (harvested earlier than that, the chickens are known as Cornish game hens).

Broilers boast large breasts and giant legs. Commercial breeders—by and large corporations—rely on artificial insemination to fertilize eggs, as the broiler’s body proportions make mating difficult to impossible. They grow faster than they produce feathers, so you can often see patches of exposed skin. They’re hardly hearty, with a propensity for heart attacks and overheating that requires constant management.

Much of that sounds pretty bad, and, for chickens raised in battery cages on industrial farms, life can be pretty rough. But many sustainable farmers, raise Cornish Cross chickens, for their family’s dinner and to sell at market. Here are six tips for raising healthy broiler chickens.

#1 Monitor Light and Feed

Monitoring the light and feed intake of young chicks is critical for raising healthy broilers. Unlike egg-laying breeds, commercial broiler chickens (i.e., Cornish Rocks and Cornish Rock crosses) suffer from Sudden Death Syndrome (SDS). This syndrome causes healthy broilers to go into a sort of seizure before dying.

There are no known treatments for SDS, so prevention is the best way to control it. To prevent this fatal condition, allow broiler chickens access to feed twenty-four hours a day for the first day only.

After the first day, reduce feeding times by removing the feed and light source at night to prevent stress and overeating.  Feeding a low-carbohydrate feed will also help to prevent SDS.

Consider using a red light bulb in heat lamps to avoid excessive amounts of light at night.

#2 Clean Water

Just like our laying hens, broiler chickens need access to fresh, clean water at all times. Water should be changed twice daily, and water founts rinsed thoroughly before filling to ensure they are kept clean and free from dirt and manure.

Due to their larger bodies, broiler chickens are prone to heat-related illnesses, such as heat stroke, so providing cool water at all times is critical.

Encourage broilers to drink more by placing water founts in shady locations to keep water cool. Provide plenty of water founts to ensure all flock members have access to water.

#3 Feed Them Right

“You are what you eat” is a common saying to remind humans to make healthy food choices. Just like we make good food decisions for ourselves, the same rule applies to our flocks.

Raising healthy broiler chickens means raising healthier meat for you, your family, and potential customers. The good news is that raising good quality meat does not mean breaking the bank. In fact, all you need is a little extra garden space and some beneficial herbs.

You may have heard that Perdue has been adding oregano to their broiler chickens’ diet since 2002, and for good reason, too. Oregano has many health benefits for broilers, including being considered antiviral, an excellent immune booster, anti-coccidial, and helping to fight off E. coli infections in chickens.

Oregano is also known for its natural ability to fight against and prevent Ascites syndrome. In a research study, broiler chickens fed oregano saw a decrease in mortality rate of fifty-nine percent caused by ascites.

Other herbs to boost longevity and support a healthy immune system in broiler chickens include fennel (fennel being very beneficial in preventing heat stress in both layers and broilers), parsley, and thyme.

#4 Pasture-Raised

Everyone thinks of free-range eggs as a healthier option, but did you know that pasture-raised broiler chickens are also healthier for the consumer?

Pasture-raised broilers contain higher levels of omega-3s, iron, and vitamins A, D, and E.  And have lower levels of saturated fat and lower omega 6:3 levels than commercial broiler chickens.

While broilers should be allowed access to green pastures, confining them to a chicken tractor is necessary for predator protection, as due to their large bodies, broiler chickens can not move quickly and are picked off easily by predators.

#5 Coop and Run Maintenance

Once fully feathered, broiler chickens require good airflow to ensure they don’t overheat. To solve this problem, many small-scale farmers house them in chicken tractors.

Chicken tractors allow plenty of airflow and access to pasture and are easy to move daily. They also feature a tarped roof to protect against rain and aerial predators. However, the downside to chicken tractors is that they do not offer much protection from digging or nighttime predators.

If digging predators are a concern in your area, consider lining the perimeter of the coop and run with a 19-gauge half-inch hardware cloth. Run the wire twenty-four to thirty-six inches out. Hammer stakes every couple of feet into the ground to hold the wire in place, creating a makeshift predator skirt.

If weasels try to attack your flock during daylight, attach half-inch hardware cloth to cover the larger-gapped wired sides of the chicken tractor.

House broiler chickens in a completely predator-proof coop attached to the chicken tractor. The coop should have a wooden floor. Holes larger than one half inch need to be covered with half-inch hardware cloth. Leave plenty of windows to allow airflow and ventilation. Cover windows and openings with half-inch 19-gauge hardware cloth to keep predators out and good airflow moving through the coop.

#6 Add Probiotics

Probiotics are long recognized and proven to have a positive effect on laying hens and chicks. But what about meat birds? Broiler chickens fed probiotics have reduced amounts of harmful bacteria and other pathogens in their meat, including reduced amounts of E. coli and salmonella. In fact, chickens raised without probiotics are ninety-nine percent more likely to spread these harmful pathogens onto consumers.

Probiotics also help prevent coccidiosis and internal parasites in broiler chickens and help to produce an overall healthier chicken for consumers to enjoy.

Raising broiler chickens is a great place to start if you are looking to raise your own meat and become more self-sufficient. By following these six tips, you can raise healthier broilers for you and your family to enjoy and provide your meat birds with a healthy life.

This article about raising broiler chickens was written for Chickens magazine by Erin Snyder and Rodney Wilson. Click here to subscribe.

Categories
Equipment

How to Wax a Tractor & Protect Your Farm Investment

Learning how to wax a tractor will climb your priority list as soon as you learn all the benefits a well-applied coat of wax provides.

You might doubt whether the effort is worthwhile. Isn’t waxing for fancy cars? Why should you wax your tractor when it’s going to be tackling dusty and dirty farm work the next day?

Well, tractors aren’t inexpensive. Think of waxing as taking care of your investment. Waxing can keep your tractor looking nice for years to come, potentially raising its resale value.

3 Benefits of Waxing a Tractor

The benefits of waxing a tractor include:

1. Protection from UV rays. Waxing protects against harmful ultraviolet (UV) rays that can otherwise fade and degrade paint.

2. Protection against grime, corrosion, and more. Waxing creates a layer of protection against dirt, grime, residue, water, bird droppings, etc. that might otherwise damage the surfaces of your tractor. It can also help guard against corrosion and oxidation.

3. Protection from scratches. Waxing helps protect your tractor against the scratches that come with life around a farm, such as when driving around brush and low-hanging tree branches.

How to Wax a Tractor

Before waxing your tractor, carefully and thoroughly clean the exterior surfaces so they’re free of dirt and debris. Otherwise, there’s a good chance the grime will damage the paint in subsequent steps.

Speaking of which, once your tractor is clean, you’ll want to polish it. This will help remove minor scratches and make the paint shine.

Now you can tackle the actual waxing. Don’t wax your tractor out in the sunshine; park in a shady location. Wait for a warm day, and don’t attempt to wax in cold weather—definitely not if the temperature is below freezing.

Exactly how to wax a tractor will depend on the type of wax you use. There are natural waxes (like carnauba wax), synthetic waxes, and combinations of both. Some are pastes, some are liquids, and some can be sprayed on. Paste waxes tend to last the longer, but they’re the hardest and most time-consuming to apply.

Whichever wax you choose, follow the instructions carefully. If a particular wax shouldn’t be applied to some types of surfaces, you may need to cover parts of your tractor for protection prior to waxing.

Based on the instructions, make sure you have all necessary tools and supplies before you begin. You’ll likely want to have a microfiber cloth on hand, as a well as a tool for buffing the wax. A powered buffing tool can reduce the time and effort involved.

How Often Should I Wax My Tractor?

Knowing how often to wax a tractor is just as important as knowing how to wax a tractor. If you let the wax coating wear off, you’re tractor will no longer be protected.

Many factors influence how often a tractor needs to be waxed. A tractor that spends all its time outdoors in the weather and sunlight needs to be waxed more often than one that lives in a warm garage. Plus, different types of wax can last for different lengths of time. How much wear/tear/dirt/grime your tractor encounters on a daily basis plays a role too.

Figure on waxing your tractor at least twice a year, and even more often if—for one reason or another—the wax coating isn’t lasting. Drop a small amount of water on one of the waxed surfaces; if the water forms small beads, the wax layer is in good shape and doing its job. If not, it may be time for a new wax application.

Cleaning, polishing, and waxing a tractor takes time. But the benefits are worth the effort.

This article about how to wax a tractor was written for Hobby Farms magazine. Click here to subscribe.

Categories
Farm & Garden

Digging Fence Post Holes: 6 Tools to Get the Job Done

Digging fence post holes is easy when you have the right tools. Whether you’re replacing an old fence post or putting up a whole new fence line, here are six tools you can use to dig the holes for your fence posts.

1. Shovel or Spade

If you’re in a pinch and have no better tools available, a simple shovel or spade can be used for digging fence post holes. Just be aware it’s not the easiest or fastest way to complete the job, and you may have to dig a wider hole than ideal to get down deep enough.

2. Manual Post Hole Diggers

Manual post hole diggers are a solid step up from a shovel or spade. They’re basically two digging/scooping blades hinged together and operated with long handles. Using post hole diggers, you can dig a narrow hole straight down to suit your post.

The manual nature of post hole diggers does make them slower and harder to use than powered machines. But if you’re digging fence post holes only occasionally, they’re an effective and relatively inexpensive option.

3. Handheld Manual Auger

A handheld manual auger can drill narrow, vertical holes into the ground by rotating handles at the top of the auger. It generates much the same result as manual post hole diggers, but with a different approach. If you’re able to put in time and effort, a handheld manual auger is another satisfactory option for occasionally digging fence post holes.

4. Handheld Powered Auger

If you want to reduce the time you spend digging fence post holes, consider using a handheld powered auger. They operate in much the same way as a manual auger, but replace human muscle power with a small gasoline engine or electric motor to turn the auger.

You’ll still need strength to guide and steady the auger while it does its drilling—some are even designed to be operated by two people—but the speed and power boost shouldn’t be underestimated if you have a lot of holes to dig.

5. Tractor-Mounted Auger

An awesome tool for farmers digging fence post holes is a tractor-mounted auger. While designs can vary, they typically mount on the three-point hitch and are powered via the PTO.

Tractor-mounted augers offer many benefits. They’re fast and can quickly drill a large number of holes. They’re easy to use because the tractor does all the work. And since tractors are strong, you can dig deep or wide-diameter holes more easily than with other options.

The one downside is price, as tractor-mounted augers can be a bit pricey compared to manual tools. But buying or renting one may be worth the investment if you have dozens of holes to dig.

6. Towable Auger

If you don’t have a tractor with a three-point hitch, but you want the benefits of a large, powered auger, consider using a towable auger. Hook it up to any vehicle with a suitable hitch (your ATV or UTV, perhaps) and you can tow it wherever you need it.

A typical towable auger uses hydraulics powered by an onboard gasoline engine to operate, so it doesn’t need to borrow power from a tractor. Large models are strong and capable of digging wide, deep holes. They don’t come cheap—they’re generally the most expensive option we’ve outlined—but a towable auger makes digging fence post holes fast and easy.

This article about digging fence post holes was written for Hobby Farms magazine. Click here to subscribe.

Categories
Farm & Garden

Starting Seeds Indoors: 5 Benefits for Your Farm

Starting seeds indoors can start as early as mid-January. There are many plants that need a longer head start for growing than the warm season in many parts of the country will allow for, such as rosemary, onions and leeks.

Have you considered starting your own seeds but haven’t given it a try yet? Here are five reasons why it’s worth trying.

5 Benefits to Starting Seeds Indoors

1. Seed starting is less expensive overall. There are some upfront costs to growing your own seeds but many of them are a one-time expense. Once you have the supplies (seed starting containers, supplemental light, heat mats), you’ll be able to use them year after year. But honestly, I’ve started my seeds in reused plant containers and clean plastic food containers (yogurt and cottage cheese) for over a decade and I just bought my first heat mat this past spring. Besides grow lights, I haven’t purchased anything specialized and each year I start hundreds of seeds. I’m telling you this so you understand that expensive seed-starting equipment isn’t required.

Consider how much you pay per plant at the nursery and what it would cost to grow that plant yourself. For example, one nasturtium plant start at the nursey near my house is $5. I can purchase a packet of nasturtium seeds for $3 and grow 20+ starts. Better yet, once you grow your own, you can save the seeds from them and grow them the following year without spending a dime on seeds.

2. Starting seeds indoors allows you to grow a larger variety than what’s available at the nursery. Have you ever paged through a seed catalog? Wow, they have some unique plants that are sure to surprise you. Did you know there are 19 different options for beets that range nearly every color of the rainbow? There are many more plant options in seed form compared to what you can find at your local nursery. It makes growing your own food and plants even more exciting.

3. Starting seeds indoors generally results in healthier plants. When you start your own seeds with a quality seed starting mix, lovingly tend to them for months and make sure they are watered and healthy, they generally result in a more quality plant than what you can purchase.

4. Starting seeds indoors is a great way to get through the long winter, at least for the northern gardeners. A lot of people have great setups for growing inside but I don’t and end up taking over the living room of my house as my growing space. Thankfully, my family enjoys the plant starts being inside – it helps make the cold and brown winter a tad easier to navigate. It somehow shortens our cold season by starting our summer gardens in the dead of winter.

5. It’s incredibly satisfying. I relish the fact that nearly all of my vegetables and flowers are grown from seed (and most from saved seeds!). It’s so satisfying to harvest flowers and food from teeny tiny seeds you started months ago. All the effort of watering and weeding paid off and now you get to enjoy the literal fruits of your labor.

This article about starting seeds indoors was written for Hobby Farms magazine. Click here to subscribe.

Categories
Farm & Garden

Growing Microgreens: A Comprehensive Guide

Growing microgreens is different than growing sprouts, but both offer fresh flavor and crunch to salads, sandwiches, tacos, eggs and so much more. Here’s how they’re different and how to grow microgreens even if you have a small space.

What is the Difference Between Sprouts and Microgreens?

While both are sprouts and microgreens are young plants eaten after about a week of growth, however, sprouts are grown in the dark, while microgreens are not. Sprouts are eaten in the whole form, while microgreens are clipped off and eaten after leaves have developed. Also, sprouts don’t tend to last as long, while growing your own microgreens allows you to let them live in the tray until harvest.

The main difference is that sprouts are germinated legumes and seeds, while microgreens are edible vegetables and herbs in the young stage and therefore, very nutrient-dense.

Despite their differences, they are both delicious, easy to grow and said to be incredibly healthy.

There are many setups for growing microgreens, but typically they are grown in dirt-filled trays. An alternative option is to grow them on germination seed mats.

Growing microgreens is a great option for people with limited space since you can grow them in trays that fit your space.

5 Supplies Needed for Growing Microgreens

1. A packet of seeds of your choice (broccoli, cabbage, radish, arugula, beets, kale, collards, peas, herbs)

2. A germination mat to grow microgreens

3. A food-safe tray to hold the seed mat and water

4. A cover for the tray (only for the first 24-48 hours, until germination)

5. A sunny window to grow in once the seeds have germinated

6 Steps for Growing Microgreens

1. Place your germination mat in a food-safe tray with sides (to hold water), such as a glass Pyrex dish or a repurposed plastic food container.

2. Saturate the growing pad with water for one hour, allowing the germination mat to become completely soaked with water. After one hour, pour away excess water that did not soak into the pad.

3. Evenly sprinkle a packet of seeds onto the mat. The amount of seeds needed will depend on the size of your mat. For example, I use a 10-ounce packet of arugula seeds for a 10-inch by 10-inch square growing mat. Some seeds, such as pea seeds, will benefit from soaking overnight before sprinkling them onto the seed mat.

4. Once the seeds are evenly distributed onto the seed mat, cover with a clear plastic cover, such as plastic wrap or other food-safe material. This will keep the moisture in and the seeds damp. Place the tray out of the sunlight, in a dark space until they germinate. Depending on the seed, this will only take 24 to 48 hours.

5. Once the seeds have germinated, remove the plastic cover and place the tray in a sun-filled window to grow.

6. From this point on, you’ll have to continually keep the mat moist, adding water every other day or so and turn the tray so that the microgreens grow straight up and not far over to one side as the seeds grow toward the sunlight.

How Do You Harvest Microgreens?

Once the true leaves have grown on the microgreens, you are ready to harvest and enjoy. This growing process will take about seven to fourteen days, depending on the type of plant you’re growing.

To harvest, use clean, sharp sheers to clip away as many microgreens as you need. Allow the greens to keep growing in the tray until you’ve enjoyed them all.

Rinse before eating and enjoy!

Growing Microgreens Notes

  • Wash tray and all supplies used for watering and harvesting.
  • Recommended supplies from FarmerYou. Save 10% with code: SPRINGPLANTING
  • For more information on how to grow sprouts in a jar or how to grow your own garden, check out Small-Scale Homesteading, written by Stephanie Thurow and Michelle Bruhn.

This article about growing microgreens was written for Hobby Farms magazine. Click here to subscribe.

Categories
Farm & Garden

Groundhogs on the Farm: All About These Fabled Rodents

Groundhogs take center stage on Groundhog Day, but there is more to a woodchucks on a farm than just one day. Are they a nuisance or a help? Here’s more about these fabled critters.

What is Groundhog Day?

Long ago, some people decided that if a groundhog sees his shadow on February 2nd there will be six more weeks of winter. Cities all over the United States and Canada keep groundhogs on call just for shadow-spotting on Groundhog Day.

The most famous shadow-seeking groundhog is Punxsutawney Phil of Punxsutawney, Pa. Some others are Buckeye Chuck of Marion, Ohio; General Beauregard Lee in Atlanta; Staten Island Chuck in New York City; Sir Walter Wally of Raleigh, N.C.; Smith Lake Jake in Graysville, Ala.; and Queen Charlotte of Charlotte, N.C. Canada has Wiarton Willie of Wiarton, Ontario; Sutton Sammy in Sutton, Ontario; Winnipeg Willow in Winnipeg, Manitoba; Fred la Marmotte of Val d’Espoir, Quebec; and Shubenacadie Sam in Shubenacadie, Nova Scotia.

Because there are no groundhogs in Louisiana, down in bayou country, nutrias take their place. Two shadow-spotting Groundhog Day nutrias are Pierre C. Shadeaux of Iberia and T-Boy in New Orleans.

Whistle Pigs on the Farm

Most groundhogs, however, are simple country animals that like to bask in the sun, raid gardens and dig in the earth.

Groundhogs are ground-dwelling rodents belonging to the squirrel family. They’re also called whistle-pigs and woodchucks. Have you ever heard the saying… “How much wood would a woodchuck chuck if a woodchuck could chuck wood?” It doesn’t matter because woodchucks don’t chuck wood. Their name comes from an Algonquin Native American word wuchak, that’s all.

Groundhogs are cute. They have chubby bodies covered with grizzled grayish brown fur; short, powerful legs with thick, curved claws on their front feet; broad heads with short, rounded ears; and flattish, medium-long, bushy tails. They vary from 16 inches to 28 inches in length, tail included, and weigh 5 to 15 pounds. Male and female woodchucks look alike, though males are often a little bit bigger than females.

Groundhogs dig fantastic dens to live in. According to Mammals of the Eastern United States (John O. Whitaker and W.J. Hamilton; Cornell University Press, 1998), a typical groundhog moves 35 cubic feet of earth weighing about 5,500 pounds while building its home. Dens can be 5 feet deep and 60 feet or more long. The groundhog builds one primary entrance and two to five smaller “getaway” holes in case it needs to beat a hasty escape. Some groundhogs build two dens: a big, roomy one for summer living and a smaller one to hibernate in. Groundhogs are solitary creatures and usually live one groundhog per den, but occasionally several share the same digs.

Do Groundhogs Hibernate?

Groundhogs are true hibernators. They stuff themselves with yummy food as autumn approaches and then retire to a cozy compartment below the frost line in their dens. They go to sleep, and soon their heart rate slows so they can live all winter on stored fat supplies.

Groundhogs tend to stay within about 100 feet of their dens but will travel farther to find a mate or procure food they especially like. They dine on many types of vegetation, including garden goodies like peas, beans, corn, carrots and lettuce. They also love tree fruit that falls on the ground.

4 Steps to Keep Woodchucks Out of the Garden

It’s no fun when groundhogs raid your garden. It’s hard to fence out groundhogs because they dig and climb with equal ease. If groundhogs steal too much of your garden goodness, these scare-em-away tactics sometimes work.

1. Try motion-activated devices that spray water, flashlights or make noise. Keep in mind that groundhogs get used to these pretty quickly, so get several kinds and rotate them to keep groundhogs on their toes.

2. Sprinkle Epsom salts in your garden. The National Gardening Association says Epsom salts add magnesium to the soil and benefits many plants. It rinses away when you wash garden produce and groundhogs don’t like it at all. You must reapply Epsom salts after heavy rains.

3. Soak rags in ammonia and scatter them around your garden. Renew the ammonia as the smell dissipates.

4. Give your dog access to the garden. Dogs don’t like groundhogs and vice versa!

How Woodchucks Can Be Helpful

Groundhogs can be a nuisance, but they have their good points too. For instance, their digging helps aerate soil. Also, many other species occupy abandoned groundhog dens, ranging from foxes to snakes to rabbits to mama tarantulas and even some birds. Groundhog dens help those species survive.

This article about whistle pigs was written for Hobby Farms magazine. Click here to subscribe.

Categories
Poultry

Raising Ducks: 8 Tips For a Friendly Flock

Raising ducks who are friendly and calm will make it easier and more enjoyable to work with your flock. Whether you raise ducks for pleasure or profit, check out these eight tips for raising calm waterfowl.

#1 Choose a Friendly Breed

Raising ducks should begin with choosing a calm breed. Many duck breeds are friendly and make excellent pets, but a few breeds are more nervous. Nervous breeds to avoid include Khaki Campbells, Crested, and Runners (females only; Runner drakes make good pets) and some strains of Cayugas.

Friendly breeds include Welsh Harlequins, Saxony, Buff, Silver Appleyards, Rouens, and Pekins. These breeds are calm and docile and make ideal family pets.

#2 Get Ducklings

Raising ducks who have calm personalities and enjoy being handled means starting with ducklings. Ducklings imprint on the first thing they see, believing it to be their mother.  Ducklings that are imprinted on humans are friendlier, generally less skittish, and build a lifelong bond with their owner. (More on maintaining a lifelong bond with your ducks later.)

When handling ducklings, place the duckling in the palm of your right hand. Gently cup your left hand over the top of the duckling to prevent it from trying to jump out of your hand. Speak gently to the ducklings while handling them. For the best results when raising ducks as pets, handle each duckling for several minutes two to three times a day.

As with all poultry, never kiss ducklings, as they can carry diseases that could make you or your family sick.

#3 Calm and Careful:

Ducks are often more nervous in nature than chickens, so it is extremely important to avoid scaring them at all times. Two of the ways that experienced duck owners have found to keep ducks calm and happy are to avoid sudden movement and speak in a calm, quiet voice. A few tips to work with your flock while prioritizing a calm environment include:

  • Hand signals: To those new to raising ducks, it may be surprising that ducks respond extremely well to small hand signals. When herding your duck flock into the coop for the night, don’t wave your arms about. Instead, hold your arm out and gently move your fingers in the direction you want the ducks to move. With a little practice, your flock will understand the hand signals, and you will soon be herding your ducks with ease.
  • Speak calmly: Never raise your voice when you are around your flock, even if it is to be heard above their quacking. Keeping your voice gentle at all times goes a long way in raising ducks who are calm.
  • Secure Loose Items: Ducks are easily startled by unsecure objects blowing in the wind. Whether a piece of newspaper or a blown-away trash can, ducks frighten easily and will sound an alarm call, alerting all other flock members that something is wrong.

#4 Be Firm

Just like raising teenagers, raising ducks means setting rules and sticking with them. When ducks reach their “teenage years” (about five to eight weeks of age until the point of lay), ducks will often try to break the rules you have set for them. Whether it’s refusing to go into the coop at night, not getting off the pond each night with the rest of the flock, or refusing to be handled, teenage ducks will “test the water” any way they can.

Being consistent and sticking with the routine is necessary during this critical time to maintain a calm, happy flock for years to come.

#5 Treats

When raising ducks that have not been handled, the best way to help them get over some of their fear of humans is through their stomach.

Start by sprinkling a handful of wheat berries or peas into a bucket or dish of water. Take a few steps back until you are far enough away that the ducks feel comfortable approaching the water source.

As ducks become more relaxed, gradually decrease the amount of space between you and the water. When you are close enough to touch the ducks, it’s time for the next step of hand feeding.

Some ducks will immediately eat treats from your hand, but if you have a shy duck, sit on the ground and sprinkle treats near you. You can also try placing your hand on the ground with a few treats in it until the duck either eats the treats or moves away.

#6 Handle Frequently

One of the most common mistakes many duck owners make is believing that ducks handled as ducklings will remain friendly throughout their entire lives, but unfortunately this isn’t true without consistent handling.

Before picking up your duck, be sure to speak your intentions and tell them that you are going to pick them up. (Speaking your intentions no matter what you are doing, such as when carrying water buckets or a pitchfork through the duck pen, will also help reduce panic in the flock.)

When raising ducks as pets, frequent handling is vital for a calm and friendly flock. Our flock is handled daily to ensure all flock members stay in the habit of being handled, and they all enjoy being picked up for a snuggle.

#7 Female to Male Ratios

It may sound strange, but one of the best ways to raise calm ducks is by maintaining a good male-to-female ratio. Too many males for the number of female ducks will not only cause tension between the drakes (male ducks), but it will also cause the female ducks to be stressed from unwanted attention.

Stressed ducks quickly become nervous, so be sure to keep male-to-female ratios within manageable numbers.

Light and Medium-Weight Breeds: 4-6 females per male

Heavyweight and Bantam Breeds: 2-3 females per male

Housing excess drakes separately from the flock will cut down on the number of homeless drakes without causing stress and tension among flock members.

#8 Teach Them Young

One of the best things my family has learned about raising ducks is that in order to raise calm and friendly ducks, we need to start introducing everyday routines to ducklings as soon as possible.

Even simple things, such as gently pouring a bucket of water into the kiddie pool while the ducklings are swimming, are key to helping adult ducks stay calm when a bucket of water is added to the pool.

Another example is if your dog tags along with you while doing the evening chores, be sure your ducklings get used to seeing him from the safety of their brooder or dog-proof enclosure.

Whatever your daily routine looks like, being consistent is the best way to help your ducks learn the routine and realize there is no need to be nervous or scared.

Raising ducks to be friendly and calm takes slightly more work than chickens, but with time and consistency, you will soon reap the benefits of a happy, healthy, calm duck flock.

This article about raising ducks was written for Chickens magazine. Click here to subscribe.

Categories
Poultry

Why Does My Rooster Have Red Legs?

Why does my rooster have red legs? Here are three possible reasons a chicken might develop red legs.

A Personal Story: Red Rooster Legs

“Mom, should Bean’s legs be red?”

Jaeson stood in the kitchen doorway, a squawking rooster in his arms. As I approached, I started thinking about shank-color standards for Orpingtons. But I stopped in my tracks when I caught sight of Ginger Bean’s legs.

Instead of their usual white chicken color, Ginger Bean’s legs were a bright red, as if he’d gotten a severe sunburn. The webbing between his toes and the backs of his shanks was practically neon.

I went to get a closer look, but Ginger Bean’s cooperation ended there. He thrashed out of Jaeson’s arms, scrambling off our deck and dashing out to the back before I could inspect him more thoroughly.

Once I took care of the red on Jaeson’s legs (courtesy of the fleeing Ginger Bean’s talons), I contacted my trusted poultry pathologist, R.M. Fulton, DMV PhD, a Diplomate of the American College of Poultry Veterinarians. Recently, he’s also acted as one of my son Michael’s professors at the College of Veterinary Sciences at Michigan State University.

As more detail was necessary for a reasonable diagnosis, I lured the technicolor rooster back with some sunflower seeds. The redness wasn’t raw, thank heavens, nor was it bloody. No blistering or pus was noticeable, and there was no discernible odor.

There was sensitivity, however. Ginger Bean most definitely did not want me to touch the irritated areas on his legs and between his toes.

I was mystified. I had never come across this condition in all my years of poultry keeping. Fortunately, Dr. Fulton had.

Here are some reasons a chicken might develop red legs.

#1 Scald

Improperly kept coop litter can cause myriad health issues for chickens, and scald is one of them. Instead of boiling water causing the injury, the culprits in scald are wet bedding and chicken droppings.

The sodden litter accelerates the decomposition of the feces, releasing ammonia. The combination of ammonia and wetness causes acute irritation, increasing blood flow to the affected area.

Scald is as painful as its name implies but can be easily treated by:

  • Clearing out the wet litter
  • Letting the coop air out to dissipate the ammonia
  • Putting an even layer of fresh litter down.

An analgesic ointment may be applied to the afflicted bird’s toes and shanks if permitted by the patient. but the condition will fade on its own in a week or so.

#2 Hormones

Increased blood flow to the legs and toes once again comes into play, but this time the root cause is not an environmental condition but an internal one.

A rooster’s hormones may go into overdrive as spring establishes itself and his hens’ egg production starts up again. The layers’ reproductive reawakening causes a natural, hormonal reaction in the rooster, indicated by his bright red toes and shanks.

This condition also may occur as cockerels reach sexual maturity.


Check out these 6 changes you may observe as a hen ages.


#3 Weather

Sharp, chilly winds make children’s cheeks rosy as they play outside and turn ungloved fingers and ears bright red from the cold. When chickens are exposed to adverse wintry weather, the flow of blood to susceptible areas—wattles, combs, earlobes and toes—increases to adjust the temperature of these body parts upwards.

Rapid, repeated changes in climate can result in these areas becoming suffused with blood, a condition that reverses itself once the weather evens out.

Why Does My Rooster Have Red Legs? – Conclusion

My conclusion for why does my rooster have red legs was that Ginger Bean’s red legs resulted from the crazy weather Southeast Michigan had been experiencing: sunny 70-degree days mixed in with gusty below-freezing flurries and torrential rain since our hens had been in lay for more than a month and the coop interiors were dry

This story about why does my rooster have red legs was written for Chickens magazine. Click here to subscribe.