Categories
Recipes

Start a Home-Baked Goods Business

This is not only our final post related to starting a food business from your home kitchen—it’s also our final Farmstead Chef post. We’ve enjoyed taking you along on our culinary journeys across the country, meeting with amazing farmstead and farm-to-table chefs, and revealing new recipes prepared with ingredients found in our backyards, farm fields, or an ocean or lake.

While our blog has come to an end, we’d like invite you to visit our farm Inn Serendipity, as a bed-and-breakfast guest or for a summer open house. Better yet, come for our newly expanded and annual Soil Sisters event, a jam-packed weekend held July 31 to August 2, 2015. The itinerary includes a farm-to-table dinner held on our property; hands-on “green acres” workshops; a tour of farms, featuring chickens, cows, emus and goats; and a Taste of Place culinary event. More than 20 women-owned farms in Brodhead and Monroe, Wis., will be participating.

Over the years, we’ve increasingly focused on the role change plays in our life—from climate change to the rapid pace of technological innovations—and the need for farmers to build resilience by diversifying what they grow, building soil health, or by learning to cook using the fruits, vegetables and herbs grown themselves or by neighboring farmers. Thanks to the cottage food laws on the books in most states, cookies and other baked items are among the “non-hazardous” foods many states allow to make in home kitchens and sell to the public with little governmental regulation. This freedom to earn translates to more diverse, vibrant, local and sustainable economies.

Farmer Regina Dlugokencky, of Seedsower Farm in Centerport, N.Y., for example, has used baked goods to diversify her farming operation, boost her bottom line and provide a way to express a passion she’s always had for baking. (Check out her story in our new book Homemade for Sale. You can enter to win a free copy by visiting our Facebook page through the end of the month.) Dlugokencky sells both sourdough breads and collection of jams she makes from various fruits grown on her farm.

If you choose to start a cottage food business that includes baked goods, simple family recipes, like your grandma’s sourdough recipe or your famous banana nut muffins, are great to use. Many cottage food operators find success with sugar cookies, especially hand-decorated ones. Dig through your recipe box and search for that one recipe that sets you apart, and remember, it doesn’t have to be showy.

We discovered Erica Roth’s shortbread cookies at our holiday cookie swap. They were a huge hit at the swap and are the perfect example of baked good you can sell out of your own kitchen: The recipe is short and easy to make, but it makes a desirable end product.

“The shortbread recipe is directly from the lips of the sweetest Scottish lady you’ll ever meet, Lily Graham,” Roth says. “She’s a friend of my Mom’s, and it is her family’s recipe that she brought with here when she came to the United States after World War II.”

We wanted to end our Farmstead Chef blog on a sweet note, and Roth’s shortbread seemed the perfect fit.

Recipe: Scottish Shortbread

By Lily Graham via Erica Roth

Yield: about 4 dozen cookies

Ingredients

  • 1½ pounds butter
  • 1½ cups sugar
  • 5½ cups flour

Preparation

Preheat oven to 300 degrees F.

Mix butter until creamy. Gradually add sugar, then flour.

Spread mixture into a 12-by-17-inch jelly roll pan. To achieve traditional look, pierce repeatedly with fork tines.

Bake for 25 to 30 minutes or until very lightly browned, which may take 45 minutes or more. Cut in diagonal strips (parallelograms), roughly 1½ inches wide and 2 inches long.


Categories
Crops & Gardening

Bilberries for the Common Cold

Bilberries for the Common Cold - Photo by Tatiana Bulyonkova (HobbyFarms.com) #bilberries #herbs

Once again, the “ick” is ranging around in our communities. The Internet is alight with articles giving us advice on how to fight off cold and flu germs, but there’s a difference between these two illnesses. Most people currently dealing with a sore throat, congestion and cough are suffering from the common cold.

When treating a cold, it’s always a good idea to increase your intake of vitamin C. This is why so many people mistakenly reach for the orange juice. It’s much better to eat the fruit itself, along with plenty of the white pith, which is too often peeled off—that’s where the bioflavonoids are. We know less about the need for zinc, but it’s also an important nutrient in the battle against the cold.

Benefits of Zinc

Zinc is a metal required by the human body. It plays a major role in maintaining healthy skin and nails, helps heal wounds properly, supports a healthy pregnancy, benefits eye health, and preserves our sense of taste. In the case of the common cold, zinc supplements have been known to shorten the time of suffering by more than half.

Most adults only get about 7½ mg of the 15 mg of zinc the need per day, so it’s worth finding a way to get more. I often recommend that my clients seeking help with their fertility munch on pumpkin seeds to get zinc into their systems, but I recently found another food that contains much more zinc: the bilberry (Vaccinium myrtillus).

Bilberry is one of the plant sources with the highest amount of zinc. The first time I heard about bilberries, I assumed it was just another name for blueberries. While it’s related to the blueberry, the bilberry fruit is smaller and darker. This plant is sometimes called a huckleberry, and many old herbals refer to it as such.

Growing Bilberry

This hardy little perennial shrub originated in Europe but can be grown in many climates. It’s hardy between zones 2 and 7 and prefers poor, acidic soils. Here in Ohio, acidic soil is hard to come by, so I plan to put some seedlings on the sunny side of my evergreens this spring. These established trees have dropped their needles over the years, creating an acidic oasis on an otherwise alkaline property.

If you’d like to plant bilberries, you’ll most often find seeds rather than plant starts. The seeds typically come dried and must be soaked before planting. They have a reputation for being poor germinators, and do best if you treat them like they are weeds. Late winter is a good time to get them in the ground unless you want to wait for the fall to plant.

Using Bilberry

In addition to zinc, the bilberry is very high in anthocyanidins, a phytochemical found in the berry’s pigment known to have benefits in the human body. In World War II bilberry was used by pilots to increase their night vision, and it remains an important eye supplement today. It seems to improve circulation to the tiny capillaries in the skin, eyes and surface of the brain. For this reason it has a reputation in preserving our youth. This ability also makes it popular for gout, varicose veins, arthritis and bruising.

The nice thing about bilberry is that unlike many other herbs, which can have a strong or disagreeable flavor, it tastes great. The berry has been used in jams, jellies and confections in Europe for years. You can eat the fruits fresh, make them into juice, or dry them for winter use. I make a delicious tea with them to support my eyesight, and this season, I’m happy with their double duty: providing both vitamin C and zinc to protect my immune system.

Get more home-grown remedies from HobbyFarms.com:

  • The Bone-Healing Properties of Boneset
  • 3 Natural Ways to Boost Your Energy
  • Got Adrenal Problems? Grow Borage
  • Chase Away the Blues with St. John’s Wort
  • 8 Ways You Can Use and Love Burdock 

« More of the Prescription Gardener »

Categories
Urban Farming

Winter Squash Stuffed with Lamb

Lamb-Stuffed Acorn Squash - Photo by Judith Hausman (UrbanFarmOnline.com) #squash #recipe

It’s a pleasure to find that the winter squashes I hauled home from Vermont this fall are still sound—and delicious, as it turns out. They sat patiently in a corner of the kitchen counter, with no special care taken to store them, and were ready to become a special winter dinner.

The recipe below for stuffed squash would be wonderful with any variety of winter squash or pumpkin, though the cooking time will vary with size and variety. Mine squash was a bumpy, turban-shaped kabocha—big enough to feed four easily. The seeds are also roastable if you’re looking for a snow day project.

The spicing I chose is eclectic: Mediterranean with some Indian heat. From there, my meat choice of lamb made sense, though the beauty of a stuffed squash recipe is you can use whatever ground meat you have on hand. To stretch the filling, add a cup cooked rice, small bread cubes or cracked wheat (bulgur) with at least one additional cup of liquid.

I generally microwave large squash to soften them before stuffing them but you can skip this step and simply put a bit more water around the squash in the baking dish and cook them longer. Just poke them with a fork to be sure they’re soft. Serve the stuffed squash halves individually or carefully scooped, drizzled with a little refreshing vinegar. Choose a slightly acid side dish, as well, such as a Moroccan-style grated carrot salad or fennel-orange salad.

Yield: 4 servings

Ingredients

  • 1 very large or 2 medium-sized winter squash, such as acorn or kabocha
  • 2 T. olive oil
  • 1 medium onion, chopped
  • 1 medium apple, chopped
  • 2 cloves garlic, chopped
  • 1 carrot, chopped
  • 1-3 medium hot peppers, chopped (optional)
  • 1 tsp. dried oregano
  • 1 tsp. cumin
  • 1 tsp. garam masala or good-quality curry powder
  • 1/4 tsp. cinnamon
  • 1/4 tsp. nutmeg
  • 1/4 tsp. hot pepper flakes, ground cayenne or similar
  • 1/2 tsp. salt
  • 1 pound ground lamb
  • 1/4 cup raisins or dried cranberries (optional)
  • balsamic vinegar to drizzle (optional)

Preparation

Cut squash in half, and remove thin slice from bottom surface so the halves will sit flat in large baking dish. Scrape out seeds and membrane. With large squash, I like to microwave them cut side down for about 10 minutes, covered and with 1/4 inch water in dish, to assure that cook through.

Sauté vegetables in olive oil until softened. Add in spices and herbs, cooking few more minutes until fragrant. Add lamb, breaking up chunks, and cook until thoroughly browned. Add raisins, if using.

Preheat oven to 375 degrees F.

Turn over squash so flesh side is up. Add more water to bottom of baking dish. Pack as much lamb mix as possible into cavities. Cover and bake for 40 to 60 minutes, until the squash pierces easily with fork.

Before serving, drizzle balsamic vinegar over stuffing.

Read more of The Hungry Locavore »


Categories
Homesteading

Customize Your Own Homemade Cotton Paper

Customize Your Own Homemade Cotton Paper - Photo by Patricia Lehnhardt (HobbyFarms.com) #crafts #paper #homemadepaper #diy #homemade

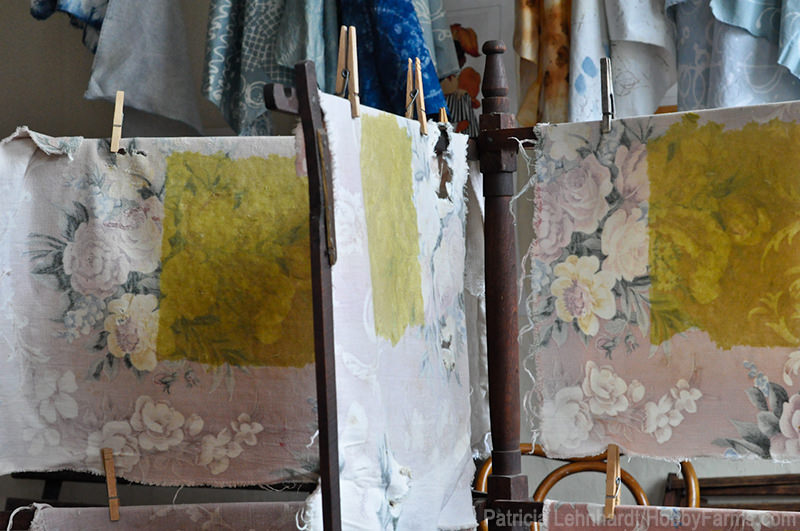
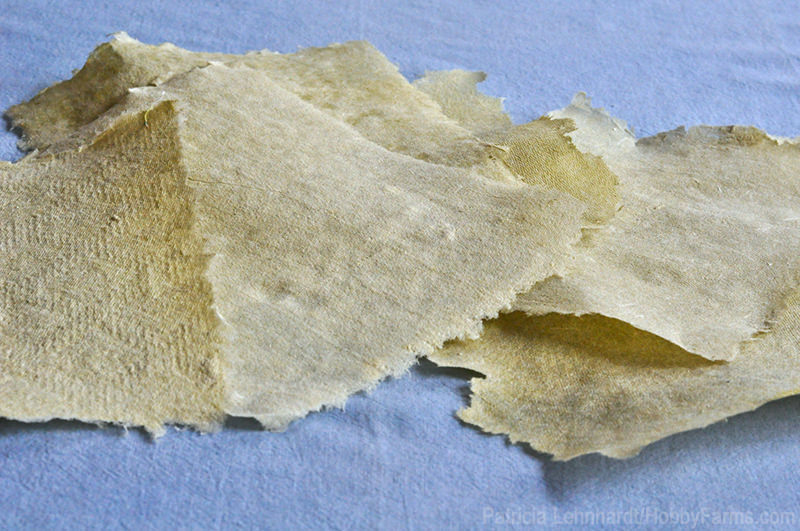
I haven’t made paper in several years and decided it was time to give it another try. When I first started papermaking, I made it from recycled paper, but later moved to making 100-percent cotton rag paper from cotton linters. Cotton paper is beautiful and strong, with options for natural dying and for inclusions like dried flowers, pressed leaves or shiny oat straws. Last summer, I was dying some fabrics and yarn with indigo I grew, and the linters were sitting there, tempting me to throw them into the vat. Why not? It turned a beautiful blue as I squeezed out the liquid and let it oxidize on a strainer. It sat in the strainer in the garage for many months, and now I have beautiful blue paper!

Customize Your Own Homemade Cotton Paper - Photo by Patricia Lehnhardt (HobbyFarms.com) #crafts #paper #homemadepaper #diy #homemade

According to the Robert C. Williams Museum of Papermaking at Georgia Tech, paper was first made around 100 B.C. in China. Early Chinese paper was made with hemp, beaten with a wooden mallet and made with a coarse sieve. The primitive paper I produced was beaten in an old kitchen blender, and the mold was made of old picture frames with dime-store tulle stretched across and stapled to the edges. Another improvement made by the Chinese was the use of starch as a sizing material; I used gelatin water.

As papermaking moved into Korea the pulp expanded to include rattan, mulberry, bamboo, rice straw and seaweed. It took almost 500 years for papermaking to reach Europe. Techniques improved over time, and different regions began using their native fibrous plant.. Paper can be made out of most any cellulose fiber or combination of fibers. I can’t wait to experiment with the plants in my yard, once the snow and deep freeze is a memory. For now, I’m using the tough greens of leeks from the grocery store, cotton linters from Earth Guild and some recycled packing paper.

If you’d like to try your hand at homemade paper, follow the directions below.

Customize Your Own Homemade Cotton Paper - Photo by Patricia Lehnhardt (HobbyFarms.com) #crafts #paper #homemadepaper #diy #homemade

Tools

  • old kitchen blender (used only for crafting)
  • old picture frames or craft frames, sized for a sheet of paper
  • tulle or fine net
  • scraps of pellon (sewing interfacing; optional)
  • heavy-duty stapler
  • large plastic tub
  • scissors
  • needle
  • thread
  • couching cloths (squares of old heavy fabric or felt): I used my grandma’s old curtains cut into 20-inch squares
  • sponge or towels
  • flower press

Paper Materials

  • 4 cups fibrous plant material (leeks, iris, yucca, hostas, grasses, hemp, linen), recycled paper with minimal printing and prepared cotton linters https://www.earthguild.com/products/papermak/lintpulp/pappulps.htm
  • water
  • unflavored gelatin
  • dried flowers or leaves (optional, for texture and design)

Step 1: Make the Molds

Customize Your Own Homemade Cotton Paper - Photo by Patricia Lehnhardt (HobbyFarms.com) #crafts #paper #homemadepaper #diy #homemade

Cut the tool or fine netting 3 inches larger than the frame you’ll be using as your paper mold. Stretch and staple the net to the frame, wrapping it over the edges.

Customize Your Own Homemade Cotton Paper - Photo by Patricia Lehnhardt (HobbyFarms.com) #crafts #paper #homemadepaper #diy #homemade

If you want to make special shapes, cut them from pellon and sew the outside section to the stretched screen, close to the edges. I used a heart shape.

Step 2: Cook the Fiber

Cut the plant material into 1/4- to 1-inch sections with strong kitchen scissors or a knife. (You should get about 4 cups worth.) Place in a large pot with cotton linters and cover with water. Bring to a boil, lower the heat and simmer for an hour or two, depending on the toughness of the plant.

Drain the plant material through a piece of net, and squeeze out as much water as you can. Rinse it with fresh water, again, squeezing out as much water as you can until the water runs clear.

Spread out the fiber and dry it for later use, or proceed with the papermaking.

Step 3: Make the Pulp

Customize Your Own Homemade Cotton Paper - Photo by Patricia Lehnhardt (HobbyFarms.com) #crafts #paper #homemadepaper #diy #homemade

Fill an old kitchen blender fill the jar three-quarters full of water. Add a small handful of fibrous material, and blend until it’s suspended—it could take as long as two or three minutes for the plant material and as short as 30 seconds for recycled paper. Make sure the fibers don’t wrap around the blade and burn out the motor. (Mine was smoking at one point—I caught it just in time.) Dump the blended pulp into a bucket, and continue processing the rest of the fiber material.

Dried flowers or leaves can be added during the blending process. You can choose to sprinkle them over the pulp in the tub or over the newly formed sheet of paper before it’s pressed (see step 5).

Step 4: Prepare Your Workspace

Select a table or counter space where you’ll be processing the paper. Lay down two to three sheets of couching fabric or a piece of thick blanket next to your large tub. Have a towel or sponge readily available for cleaning up spills.

Step 5: Make a Sheet of Paper

Fill your large tub with at least 3 inches of water. Add up to 4 cups of pulp to the tub, and stir with your hand to evenly distribute the pulp.

Customize Your Own Homemade Cotton Paper - Photo by Patricia Lehnhardt (HobbyFarms.com) #crafts #paper #homemadepaper #diy #homemade

Hold the mold screen side up, with your hands on both sides. Dip it under the pulp and lift up with the screen perpendicular to the water to collect pulp on the screen. If the pulp isn’t even, dump it back into the vat and mix again with your hand. Hold the screen over the tub to let excess water drain. You can tilt it to let the water run off.

Customize Your Own Homemade Cotton Paper - Photo by Patricia Lehnhardt (HobbyFarms.com) #crafts #paper #homemadepaper #diy #homemade

Carefully flip the screen over onto the couching cloth, using a steady movement so the paper doesn’t wrinkle. Use the towel or sponge on the back of the screen to collect excess water. Carefully lift up on one edge of the screen to release the paper onto the couching cloth. You may have to urge it to release with your fingertip or a flat utensil, such as a palette knife. Lay another couching cloth on top of the paper.

Repeat the process to make more sheets of paper, creating a stack of paper between couching cloths. You can generally do six to 10 sheets in one stack. Add more pulp to the tub if the sheets get too thin.

Customize Your Own Homemade Cotton Paper - Photo by Patricia Lehnhardt (HobbyFarms.com) #crafts #paper #homemadepaper #diy #homemade

Once you’ve created a stack, place the entire stack in a flower press and secure the pressure. (If you don’t have a flower press, a board and weights will work.) Press the stack for 30 minutes to an hour. This will allow the fibers to settle and help them adhere to each other.

Customize Your Own Homemade Cotton Paper - Photo by Patricia Lehnhardt (HobbyFarms.com) #crafts #paper #homemadepaper #diy #homemade

Hang up the couching cloths with the paper adhering to them to dry. I used clothespins on a drying rack. Let dry overnight.

Step 6: Size Your Paper

Sizing or size is a material added to your paper to reduce its tendency to absorb liquids once dry. It will prevent pen ink from bleeding, though it’s not necessary if you use ballpoint pens or acrylic paints.

For writing with ink, I used a gelatin size. (You can also use a clear gesso.) Dissolve 1/2 teaspoon of unflavored gelatin into 1 cup warm water. Brush with a soft brush over the surface of the paper while it’s still attached to the couching cloth. Hang up to dry.

Step 7: Press Your Paper (optional)

Customize Your Own Homemade Cotton Paper - Photo by Patricia Lehnhardt (HobbyFarms.com) #crafts #paper #homemadepaper #diy #homemade

When the paper is dry, gently peel it off the cloth. The texture of the cloth will be impressed on the paper. If the paper is too wavy for your taste, press again under weight for a day or more until flat. You can also use a warm dry clothes iron.

Alternative Project: Silk Paper

I’m not sure this product actually qualifies as paper, but it can be fun to try.

Spread netting out on a smooth worktable and cover a 6-by-8-inch section with silk noil fiber, gently teasing it apart and distributing it fairly evenly. Covered with another sheet of netting—or fold the first piece over, creating a silk sandwich with net on each side.

Make a paste with 1 tablespoon cornstarch with 1 cup water, cooking until thick and clear; let it cool. Scoop up a handful of the paste, and work it into the silk-and-net sandwich. When one side is covered, flip it over and added more paste to areas that are still dry.

Carefully removed one side of the net and hang it to dry overnight. The following day, peel the other sheet of netting from the silk, and press the silk under weight for a day.

Patricia Lehnhardt at The Craft Hub
About Patricia Lehnhardt
Patricia Lehnhardt is a shop owner, freelance writer, photographer, gardener and long-time crafter of all things natural from the Midwest.

« More of The Craft Hub »


Categories
News

Will GMOs Get Labeled Already?!

Will GMOs Get Labeled Already?! - Photo by Cedar Circle Farm & Education Center/Flickr (HobbyFarms.com) #gmos #gmolabeling #righttoknow

At the beginning of this year, HobbyFarms.com managing web editor Rachael Brugger asked a group of writers for our predictions about 2015’s food and farming trends. I didn’t need a crystal ball to predict that labeling of genetically modified food would be up for discussion again this year. I didn’t expect it to show up so quickly, though, and I’m delighted it has.

First introduced in 2013, the Genetically Engineered Food Right-to-Know Act (H.R. 1699/S. 809) has been reintroduced by Senators Barbara Boxer (D-CA) and Richard Blumenthal (D-CT) in Congress and Representative Peter DeFazio (D-OR) in the Senate. The bill amends the Federal Food, Drug and Cosmetic Act to require that genetically engineered food and foods that contain genetically engineered ingredients be labeled as such.

If enacted, the statewide labeling acts passed by Connecticut, Maine and Vermont will be void, as labeling will be a federally mandated issue. Likewise, there will be no more statewide labeling fights like we saw in Oregon and Colorado last year. What will food activists and major food corporations spend all of their time and money on now?

In This Bill

This Right-to-Know Act outlines several reasons behind the bill:

  • The process of genetically engineering food results in material changes to food.
  • The Food and Drug Administration already requires the labeling of more than 3,000 ingredients, additives and processes.
  • We have a right to know if food has been produced with GMOs, just like people in the more than 60 other countries that already label their food.
  • GMO labeling plays into the economic value of exports or domestically sensitive markets

Please notice that nowhere does it say GMOs are bad for you, GMOs are dangerous or GMOs should not be eaten. This act is being passed as a right to know—hence the title—and not a barrier to GM-food access.

Things that won’t be labeled under this act include:

  • food served in restaurants
  • food produced using a GM vaccine, which I assume would include GM livestock vaccines
  • medical food—that is, food specifically required to treat a disease or condition
  • Food processed with a GM yeast or enzyme

Labeling’s Arch Nemesis

With the Right-to-Know bill on the table, reintroduction of the Safe and Accurate Food Labeling Act (H.R. 4432) into Congress isn’t far behind. This bill was also first introduced in 2013, though it is is the antithesis of a labeling act. It’s designed to shut down states’ mandatory GMO labeling efforts and will not require GM foods to be labeled unless the FDA finds them materially different than the same foods not made with GMOs.

Opponents to this bill, including Just Label It and the Environmental Working Group, call the Safe and Accurate Food Labeling Act the “Deny Americans the Right to Know”—DARK—Act. At least the language for this bill (as it stood last year, anyway) doesn’t prohibit voluntary labeling of non-GM products.

What’s Your Stand?

I know this blog entry is going to ignite a shitstorm of comments, and that’s great. But you spewing off to me about either how ignorant I am to be excited about a national labeling bill or about how ignorant someone else is for attacking my views is not going to do anyone any good. Sure, tell us in the comments how you feel, but then go tell someone who can actually make a difference: your legislators!

Your legislators don’t pay attention to my blog or the Hobby Farms Facebook page, I’m quite sure. What they do pay attention to is feedback from their constituents—that’s you. What you actually need to do is call your representatives and senators. Yes—you need to call these people, because a simple phone call carries so much more weight than signing a petition online or sending an email. Leave a message for your legislators—or talk with the very nice legislative aides who answer the phone—and clearly state your position on the Genetically Engineered Food Right-to-Know Act or the Safe and Accurate Food Labeling Act.

It’s simple. I promise. Please do it—whether you are for or against labeling!

« More The News Hog »

Categories
Crops & Gardening

5 Steps for Using Saved Seeds as Currency

About 60 percent of the food my family eats comes from what I’ve hunted, fished or grown, but when I’m unable to obtain food through my own means, I trade. For a successful barter, you need to have a desirable currency: Mine are excess seeds I’ve saved from the garden and extra plant starts I grow myself. To ensure my currency holds up to all my bartering needs, it’s necessary to build a seed bank. If you’re also looking to trade seeds for other homestead needs, like grain, eggs or meat, use these tips for starting a collection of viable seeds that others will be hungry for.

1. Choose the Right Crops

When choosing seed that will make good currency in a barter, stick with crops that most families like to eat and that store well. I choose tomatoes, beans, squash, peas and cucumbers because they’re easy to grow and produce plenty of seeds. Don’t get fancy. Stay away from designer crops, and instead, opt for ones that grow well in your area.

2. Start With Good Seeds

If you don’t start with high-quality seeds, you won’t have any for later use. I purchase heirloom seeds from a company called Botanical Interests, but many other reliable companies have heirloom seeds available. Generally speaking, heirloom vegetables have remained genetically unchanged for at least 50 years. Most are open-pollinated, with the plants growing from those seeds being true to the parent plant. Heirloom seeds are more expensive, but you’ll only have to buy them once. Not only will they provide you with seeds to plant for years to come, but they’ll produce plenty to trade. Before buying seed, read the package or catalog description so you know what you’re getting and how to grow it.

3. Dedicate Garden Rows to Seed Saving

How much you plant is proportional to the space you have available. I have a 20-by-20-foot garden, and after planting the crops I need to sustain my family, I dedicate a row to seed production. Here, I’ll plant crops like extra beans and peas that will be used solely for trade. There’s no need to dedicate extra rows to crops like pumpkins and squash, though, as the fruits you eat will produce more than enough seed to use in trade.

4. Package and Store Seeds Properly

5 Steps for Using Saved Seeds As Currency - Photo by Sarah R/Flickr (HobbyFarms.com) #seedsaving #barter #trade #seeds
Dana Benner

All seeds have a limited shelf life, and to maximize their viability, proper storage is key. I package my seeds in plastic containers with airtight lids and store the containers in a dark, cool, dry location. I also put the dates on the containers and rotate my stock often. Any unused seed is discarded after two years. When I package the seed for trade, I usually put it in resealable plastic bags.

Keep in mind, not all seeds have the same shelf life. Beans and peas, for example, will store longer than squash and pumpkins. The Colorado State University Extension has a good seed shelf-life guide. I rotate my seeds more frequently than recommended in the storage guide. You don’t want to gamble with viability when using seeds as currency.

5. Make the Trade

How you use your seeds as currency is only limited by your imagination. I regularly trade seeds for eggs, produce I don’t grow myself, and chickens or a roast. I’ve also used seeds, along with some cash, to have some welding done. Finding people to trade with can be the tricky part. It’s based on need: both yours and theirs. I never sell my seeds, but if I seek out a service or item and the provider is willing to trade for seeds, a transaction is made. The value of your seeds is based on what you can obtain with them. If someone will give you a dozen eggs for 20 or 30 seeds and you’re OK with that, then that is what your seeds are worth.

The good that comes out of using seeds as currency is a win-win. You get a product or service that you need and the other party gets the seeds they need. With the cost of food today, those seeds will go a long way. Just like the old saying, “Give a man a fish and you will feed him for a day. Teach a man to fish and you feed him for life,” money will buy food for a short time, but seed will provide an endless supply.

Categories
Homesteading

Garden Design with Children

Garden Design with Children - Photo by Tessa Zundel (HobbyFarms.com) #garden #kids #gardenplanning

I have five kids, and to be honest, some years, they’ve been more of a hindrance than a help in our family gardening efforts. When they were all very little, as I’d plant something, they’d “help” by “planting” it again. I’d put down labels, only to have the current toddler rearrange them for me. And on it went.

When all is said and done, though, those gardens produced just fine, and more importantly, I was able to share my love of growing food with my children. A family that plants carrots together, stays together, I say. I should embroider that on a pillow.

Room to Grow

In our family garden, each child gets their very own garden bed to cultivate for the year. (If you have limited space, you can assign each child a generous-sized pot.) We practice biodiversity techniques, so the children are used to planting beets with chamomile and pumpkins with lettuce. By the middle of summer, the garden beds looks like crazy quilts.

Growing vegetables with children takes planning, though. The best season to plan the vegetable garden is early spring, especially if you’d like to start some of those plants from seed indoors. Where we live, we’re usually still covered in snow and biting cold come February, and the last thing the kids want to do is think about gardening. To inspire their green thumbs in the middle of a gray winter, I have to get creative.

As the seed catalogs start rolling, my kids like to cut them up and use the bright-colored photographs for various projects. One of my girls always seems to have a “flower journal” kicking around her room: a paper notebook with dozens of flower pictures glued inside. This is her garden. It inspires her. I decided to harness that inspiration and creativity to help us plan the vegetable garden for the coming spring. I’m convinced nothing can stand in the way of the genius produced by a child with a crayon, some scratch paper and some dirt.

Garden Planning—Child-Style

Taking some scratch paper and crayons, I sat the kids down and told them to let their garden dreams loose. I plunked a casserole lid filled with dirt into the center of the table, broke it up into a grid with some bamboo skewers (aka, a square foot garden) and told them to fill it with pictures of whatever plants they wanted. Anything we want? Yes, anything they wanted. In this photo, you’ll notice the peach tree in the raised garden bed.

Garden Design with Children - Photo by Tessa Zundel (HobbyFarms.com) #garden #kids #gardenplanning

The point of this exercise is not to accurately plan every minute detail of your vegetable garden. You can get specific later, when you’re putting down mulch and compost and planting seeds. The point is to inspire your children with a sense of ownership of the coming year’s garden. At the same time, you’ll be motivated by their enthusiasm. You’ll hear what they must have in their garden, watching them move over zukes to make room for zinnias. You’ll notice that three children cut out watermelon for the garden; looks like we really want watermelon this year, you’ll note.

One of my daughters colored and cut out a watering can, which lead to a great discussion about how a garden is an everyday commitment. You have to make sure your plants have enough access to water, food and light. You have to take out the weeds. If you spend all day swimming and no time tending, you do not reap. This was a lesson we learned the hard way last year, when we lost an heirloom tomato to dehydration. And this, my friends, is what a children’s garden is for.

A Teaching Tool

Garden Design with Children - Photo by Tessa Zundel (HobbyFarms.com) #garden #kids #gardenplanning

There are so many life lessons just outside our back doors disguised as dirt, bugs and plants. Connecting a child to those lessons by allowing and encouraging them to engage in gardening (and even to fail at it every now and then) is a blessing that will serve them well for the rest of their lives. Gardens are a lot of work. As G.B. Hinckley observed, “Without hard work, nothing grows but weeds.” Isn’t that true of every worthy endeavor we engage in as children or adults?

To get the children connected to the coming garden—to help them remember the “why” of all that work—let them engage in a bit of creative, whimsical planning right now. Even though it’s still cold and the equinox is far away, talk about the merits of a peach tree in the vegetable garden or growing zinnias to give to the fairies. A bit of whimsy now just might produce a watermelon later.

« More Farm Sprouts »


Categories
Urban Farming

Know Your Beneficials: Spiders

Know Your Beneficials: Spiders

Not all bugs are bad! Many insects and spiders have a reputation for doing good deeds around the garden, such as preying on unwanted species or pollinating plants. These creatures are known collectively as beneficial insects. This is the first post in a semi-regular series I’m calling “Know Your Beneficials,” which takes an in-depth look at some common beneficial insects and spiders found your garden. Each post will talk about role these species play, how to identify them and their distribution range in the United States.

Salute to the Spider

Of all the creepy crawlies around us, spiders especially tend get a bad rap as some of the creepiest bugs out there. In reality, spiders are not insects. They’re arachnids, a class that includes well-known creatures like ticks and scorpions. Arachnids differ from insects in several ways, but the most telling feature is the number of legs: They have eight legs while true insects have only six.

The fear of spiders tends to be greatly exaggerated. Of the more than 4,000 spider species found in the contiguous United States, only three species of venomous spiders pose a significant risk to humans: the well-known black widow, the rather non-descript brown recluse, and the hobo spider, primarily found in the Pacific Northwest. The remaining 3,997 spider species (or more) are relatively harmless to humans and some can even play a helpful role around your garden or yard.

Argiope Spiders

This week, I am going to highlight one of the most visible spiders found in my South Carolina garden: the black-and-yellow argiope spider (Argiope aurantia). By visible, I mean easily spotted because of its large size and distinctive markings. You may know the black-and-yellow argiope spider by one of its many common names: black and yellow garden spider, golden orb-weaver, writing spider or zipper spider. It’s large, egg-shaped abdomen (up to 1 inch in length) is black and decorated with a yellow or orange pattern that varies among individuals. When leg span is factored into its size, the adult female can reach upwards of about 2½ inches. Adult males reach only one-third the size of their adult female counterparts.

As one of the largest orb-weaving spiders found throughout the continental United States, the black-and-yellow argiope earns the name writing spider or zipper spider from the zigzag pattern of bright-white silk it often creates near the center of its web. Webs are found in sunny spots sheltered from the wind, such as gardens or meadows. This predatory spider uses its web to catch flying insects, include some noisome garden and yard pests like grasshoppers, flies, wasps and mosquitoes. If you happen to find a black-and-yellow argiope, let it be. Watch this amazing creature go to work and enjoy the benefit of a garden with a few less mosquitoes!

Read more of Garden In Front »


Categories
Equipment Farm Management

When Is a Barn Too Old to Use?

Every time an old farm structure is torn down, it becomes ever more noticeable that our country’s agricultural heritage seems to be dwindling away slowly. It sometimes feels like we live in a disposable society, even when we farmers do our best to repurpose items whenever possible. Although I prefer to reuse items instead of buying new and encourage the preservation of historical farm structures, there are times when safety concerns force us to retire a beloved barn.

Making the tough decision to tear down an old barn can be a struggle, and unless it actually falls off of its foundation, many old timers will allow it to stand as a symbol of their hard work in the past. In a lot of cases, it’s possible to target structural problems in old barns and renovate them so the barn can be used for many more years. When making this decision for a barn on your property, there are few things to consider.

Safety of the Current Structure

As a general rule of thumb, if the four outermost walls of a building are structurally sound, then it’s possible to rebuild the inside. The base structure is your immediate concern, and replacing rotted wood inside can follow in the near future. Here are a few structural items that may give you some insight into the viability of your barn’s restoration:

1. Foundation

When Is a Barn Too Old to Use? - Photo by Rick Sosebee (HobbyFarms.com) #barn #oldbarn #farmhistory

Be sure the foundation of the barn is solid. Many old buildings were built on piles of strategically placed rocks to hold the load. This worked for years in many cases, but it’s likely not suitable for the future of your barn. A qualified restoration team can replace these old footings with more modern brick and breathe new life into the barn’s foothold. If the foundation is solid and the ground that the barn sits on hasn’t washed away from the supporting pillars, then you’re already on your way to preserving your old barn. However, if the foundation is falling away and the ground isn’t stable, it’s no longer usable without some major work.

2. Outer Walls

When Is a Barn Too Old to Use? - Photo by Rick Sosebee (HobbyFarms.com) #barn #oldbarn #farmhistory

The outer walls of a barn can tell you many things. If the siding or slats are leaning abnormally, you could have structural issues that need attention. Similarly, siding that runs from the ground or foundation up to the top of the wall in a vertical direction can give away secrets inside the walls. If you observe directional lean, it means the barn has shifted on its foundation and will need propping up to make structural repairs. Siding or boards that run lengthwise or parallel to the wall framing or studs in the walls can be a little more tricky to examine, but looking closely for nails popping out or boards that are less than perpendicular to the wall studs will reveal a leaning situation, as well. Also, be sure to look for bulging walls: If the weight of the roof is suddenly weighing heavy on degraded walls, they may tend to bulge outward.

3. Ridge Beam

When Is a Barn Too Old to Use? - Photo by Rick Sosebee (HobbyFarms.com) #barn #oldbarn #farmhistory

Looking at the roof beam or truss system inside a barn can give you insight as to just how far gone it is. If you stand at a point where you can look directly down the roof ridge, you can observe the condition under the tin or roofing material. In deteriorating barns, the backbone or ridge board may tend to sag and even sway from left to right along the ridge. If the ridge has serious dips along the main beam of the barn, then you must consider what is causing this and take notes inside the building. Sometimes old tin will rot and allow the wooden beams under it to get wet, thus rotting that beam. It’s possible that you can replace just one or two of the bad beams and support the roof back to its former glory, but sometimes this can be an indication of other structural concerns.

Cost to Rebuild or Renovate

When Is a Barn Too Old to Use? - Photo by Rick Sosebee (HobbyFarms.com) #barn #oldbarn #farmhistory

Financial limitations often dictate much of what happens around the farm. Think about what would it cost you to make the old barn on your property structurally sound. Remember, some states offer financial incentives to preserve historical structures, so take that into account. Compare that cost to what it would take to build a replacement barn. Even if the barn isn’t something you need at the present moment, there may be time in the future when you need to shelter animals or store hay. Construction costs and lumber prices are steadily rising. If you can’t afford to hire a contractor, do you have the time and skill set to do the work yourself?

Expert Opinions

When Is a Barn Too Old to Use? - Photo by Rick Sosebee (HobbyFarms.com) #barn #oldbarn #farmhistory

Of course, it’s always best to have an expert look over your barn and give you the final verdict. Hopefully with these few tips, you can get an idea for yourself if you want to tackle a renovation project or take down the building. I’ve never been one to give up on anything: A little hard labor combined with spirited friends or neighbors can do wonders to breathe life into old outbuildings and restore a sense of history to the land. Looking in the doors of an old barn might make you queasy when you think of the cost or time required to improve an existing structure, but in my humble opinion, preserving is always better than eliminating. Remember this, when you look into the walls of an old barn you see what our country was founded on. I think you get the point.

Get more barn help from HobbyFarms.com:

Categories
Beekeeping

9 Hive Jobs of Honey Bees

A healthy honey-bee hive functions as a polished and well-oiled machine, thanks to tens of thousands of bees, each performing their jobs dutifully. The life of a honey bee is all work and very little play: From the moment it emerges out of its hatching cell to the moment of its last breath, a honey bee is working. Functioning as a unit, bees produce a workforce capable of pollinating thousands of acres of flowering plants, producing upwards of 100 pounds of honey per year and continuously rearing more bees to replace those lost throughout the season. When you understand just how hard honey bees work, the phrase “busy as a bee” begins to take on new meaning.

Without doubt, the female worker bees in a honey bee colony comprise the largest population (about 50,000 female workers to about 500 male drones) and are arguably the hardest working (aside from the queen, of course). As an individual bee grows older, its age dictates its role in the hive. Most female bees will work in each of the roles listed below at one point their lifetimes, beginning with nursing—an occupation that is taken on by newly hatched bees—and ending with foraging, which is a task reserved for the oldest bees only.

1. Nurse and House Bee

Upon hatching, each fledgling bee immediately cleans out its hatching cell to prepare it for the next egg. Its first duty as a working member of the hive is to care for the young: As a nurse, a young bee will feed the brood, the collective term for honey-bee young, pupae and larvae.

2. Undertaker

Honey bees are sticklers for cleanliness. With so many live bodies coming and going from the hive, there are sure to be a few dead ones. Undertaker bees are responsible for carrying out the hive’s dead, cleaning up bee parts and removing other debris.

3. Architect

Several tasks fall under this category. As a young bee ages, its wax glands mature. When its able to secrete wax, it’s able to build comb. Wax-producing bees are also required to cap pupae and ripen honey cells. Bees in this category repair damaged comb and fill cracks in the hive with propolis, a sticky substance bees collect from tree resin.

4. Cleaners, Organizers and Honey Makers

Some female bees are tasked with the duty of cleaning their sisters in the hive and tending to others when they return from foraging trips. These workers remain in the hive to collect pollen and nectar from returning bees, packing it into cells and putting it away for later. Some of these same bees might be put on “honey” duty. Raw nectar requires digestive enzymes from select worker bees, as well as diligent fanning to reduce moisture and create honey.

5. Queen’s Attendants

Not many worker bees get this prestigious status. The queen is so busy in her own duties that she’s unable to groom or feed herself. For this, she enlists a dozen or so attendant bees. These workers—her daughters—care for the queen as she goes about the hive.

6. Forager

Don’t be fooled: Every role in the hive is critically important to its success and survival, but forager bees receive the most press and the most prestige. This is because the result of foraging—pollination—is one of the hive’s byproducts that we humans benefit from the most (the other being honey production, of course).

When a worker bee matures, it develops a working stinger stocked with venom. At this point, it may leave the hive and become a forager bee. Foragers are the breadwinners of the hive: They’re tasked with scouring a 3-mile radius from the hive for suitable nectar and pollen. Once its stomach is full and its pollen baskets filled to the brim, a forager will return to the hive to drop off its bounty to one of its sisters. Then it leaves again and starts over, continuing this cycle as long as the sun shines. This work, flying hundreds of miles per day, will eventually leave its wings torn and tattered. Foraging is one of the last duties a worker bee will perform: It will work until it collapses from exhaustion.

7. Guard

The role of a guard bee is one of the few that requires a worker to develop a mature stinger. As a guard, a bee stands watch over any of the hive’s entrances—there can be more than one—to keep intruders out as necessary. Guards allow foragers from the hive to enter, but keeps everyone else out: bumblebees, wasps, honey bees from other hives and even humans. If you’re ever stung walking up to a honey-bee hive, it’s likely a guard giving you a warning.

8. Queen

The queen’s job is crucial: She ensures the future population of the entire hive. She lays up to 2,000 eggs per day, choosing where to lay them and how many of each type (worker or drone eggs) to produce. For the majority of her life, she’s sequestered to the hive, only leaving with a swarm of bees or for her mating flight as a young virgin queen. Unlike a worker bee, which may live for three to six weeks during the summer or several months over the winter, a queen bee can live between two and five years.

9. Drones

Drones have a bad reputation. These male bees are often seen as lazy, hungry and fat members of the hive that mooch off of their sisters’ hard work and produce very little in return. There is a bit of truth to this: Drones don’t carry their weight in the hive. They don’t make honey but they do eat it; they don’t protect the hive or the queen; and they don’t help rear the young. Their job is outside of the hive, to mate with neighboring queens and spread healthy genes.

It may seem like an easy job (and let’s be honest, it is!), but it’s no less important than what the ladies do. For the greater survival of the species, healthy drones are critically important. Their population, a mere 500 or so, peaks in spring and early summer, when mating occurs. Some drones may hang around in the hive through the summer, but any drones left in the hive come autumn are kicked out by their sisters. The harsh reality is that every hand is needed for winter’s survival, and stores of honey are too precious to waste on drones whose contributions have ended for the year.