Categories
News

Scientists Target Deadly Swine Diseases

The USDA is taking action against widespread viruses that affect pigs in different parts of the world before they cause problems in the U.S. Photo courtesy Regis Lefebure/USDA (HobbyFarms.com)

USDA scientists are stepping up their efforts to help fight deadly swine viruses that are prevalent in other countries and pose a threat to the United States.

Microbiologist Manuel Borca, with the Agricultural Research Service Foreign Animal Disease Research Unit, located at the Plum Island Animal Disease Center in Orient Point, N.Y., is developing vaccines, diagnostic tests and other strategies to help control classical swine fever. The highly contagious disease has been eradicated in the United States, but it’s still present in wild boars in Europe, where it can infect domestic pigs. All pigs within close proximity of an infected animal must be destroyed to prevent spread of the disease.

Borca and his colleagues are developing CSF virus strains for vaccines that would make it possible to differentiate between animals that have been vaccinated and animals infected with a wild type of the virus. In patented research, Borca introduced a genetically manipulated marker virus that can be distinguished from a wild virus. The marker virus produces early immunity against CSF within the first week after vaccination.

Scientists also have developed a polymerase chain reaction assay that detects the CSF virus in infected animals before signs of the disease appear.

Another disease of major concern is African swine fever, which is spreading in Europe and Asia. There is no cure or vaccine for this virus, which kills all infected pigs within a week. Scientists at Plum Island have renewed efforts to help control ASF. In the past, they identified several genes that, if eliminated, would reduce the virus’ ability to cause disease, and used the technique to develop less virulent viruses that protected animals against ASF.

Today, Borca is using this same approach to develop genetically modified viruses that could lead to vaccines to protect against the ASF strain that is killing thousands of animals in the Republic of Georgia and the Caucasus region. Testing is under way to discover if these viruses will make vaccine candidates.

Categories
Homesteading

Kick Into Overdrive

If you turn left into our driveway, you’re taking a chance—a big one. In fact, turning out of our driveway, regardless of direction, is a major risk each and every time. 

Our driveway is positioned just past the crest of a hill so that you cannot see oncoming traffic. It’s an illegal drive that was definitely not approved and most likely a rough access to the original farmland that was later broken into tracts and sold.

This little hazard has led to me and my passengers to experience some very close and unpleasant calls with drivers who, by my accounts, need to slow their roll. I’ve nearly been T-boned not once, not twice, but more than five times since purchasing this property. Even with every precaution—gauging potential oncoming traffic before reaching the end of the driveway, rolling down the window to listen for potential traffic and even stretching to try to glimpse it—this nasty little predicament has almost wreaked havoc on the physical well-being of my family and our truck.

My first step in remedying this situation was to call the state highway department to come out and mark an acceptable (and legal) entry point for the new driveway. This step was fairly easy and painless, and the employee gave me a fairly wide berth to place the new entrance so that we would have flexibility when it came time to involve the utilities and water districts in the plans.

The next step sounds easy: contact utilities and water company. I called 811 just like we’ve all been told to do before digging, they marked the existing lines, and we prepared to have the lines spotted (aka dug up to determine actual depth)—the latter of which has to be done by the company that owns the lines. The water district dug the line and recommended we contact the cable and Internet providers whose lines also crossed the area. I tried six times (kid you not). Both companies had no idea who to connect me to, left me on hold, disconnected me four and five times respectively, and passed me along to numerous individuals who were also less than helpful in getting me to the right person.

At my wit’s end, I called in tickets three times and decided I had done all that a reasonable person could be expected to do. (Mind you, it took a mere three sentences to cover it here, but it was hours on the phone, mostly spent on hold or explaining that I had already contact 811 and was directed to contact them.)

All this effort should have paid off. Instead, we found ourselves stuck between a rock and hard place. The water line was too shallow in the area approved for the driveway, so it would need to be lowered—a task I was assured was no easy matter and that regardless of my husband’s qualifications (he does this for a living, after all), we would be prohibited from performing ourselves. The water-district contractor’s labor quote tallied around $3,000—a hefty fee for moving one piece of this complicated puzzle and funding that we lacked.

With still no contact from the other companies, I called the water district to discuss other options. It seems there are no funds available to help someone in this predicament, even when it relates to public safety and rectifying an illegal issue—I spoke with judges, federal employees, more government officials and even some other contractors.

In a last-ditch effort to ensure the safety of my family with a legal and visible driveway, I called the highway department back out to resurvey the driveway options. They were more than happy to oblige, especially since they came through about two weeks after marking the drive and paved over their marks. With their assistance, we marked out some alternative options that pushed the bounds of their preference but opened the door to less interference with the existing lines.

The water line in the new location was just deep enough for us to dig down and still have the minimum 20 inches of cover in addition to the gravel bed. This was a big sigh of relief that proved a little ingenuity and a lot of connecting the dots could get us the result we so desperately needed without blowing up the piggy  bank.

Every time we turn out of the new driveway, I appreciate the time spent tracking down contacts and solving the impossible problems. (Oh, and the other companies finally got back to me within two days of our planned dig—surprisingly, they weren’t as difficult to deal with but they definitely had their moments.)

The effort of moving Stephanie Staton's driveway was not without its fair share of hassels. Photo by Stephanie Staton (HobbyFarms.com)
Photo by Stephanie Staton

« More Restore Farmhouse Order»

Categories
Animals Poultry

How to Care for Molting Chickens

Question

We have five Rhode Island Red chickens that are 1½ years old. When they started laying, we were getting eggs from all of them, but for the past several months, we have only been getting one egg per day, if that. We have one that’s missing her tail feathers and one that is missing feathers under her neck. We are first-time chicken keepers and are stumped. Can you shed some light on this problem for us? —Linda

Answer

Linda, there are lots of reasons why chickens lose feathers. Some include diseases like fowl pox, parasite problems such as mite or lice infestations, and chickens that spar with each other and yank out a few of their adversary’s feathers. Considering the timing and that your hens have practically stopped laying eggs, my guess is that your chickens are molting.

Chickens usually molt once a year. Molting typically begins in late fall as daylight decreases, though older hens sometimes molt twice a year. Molting means their feathers fall out and are replaced by new ones. Feathers are 85-percent protein. And it takes a lot of energy to grow new feathers, leaving little energy for egg production, so most hens stop laying during molt.

Some chicken keepers delay molt by artificially lighting their hen houses 24 hours a day, but hens will eventually molt anyway. According to “Why Did My Chickens Stop Laying?” by Oregon State University, it’s best to turn off supplementary lighting for six weeks each winter so chickens can go into molt all at once.

Molting chickens lose most of their feathers in a set order. It begins with the head, then the neck, chest, body, wings and finally the tail. Some lose a lot of feathers all at once so they’re nearly bald in places. Others molt so gradually that you might not notice feather loss at all. Hybrid layers were developed for quick molt and feather re-growth. They might be through their molt in four to six weeks. Heritage-type breeds tend to molt over a longer period, sometimes taking up to three or four months from start to finish.

Feed Needs

Some chicken owners think that because their hens aren’t laying during molt that they don’t need a high-protein ration. On the contrary, they need extra protein. It stimulates re-feathering and gets them back to laying as quickly as possible. It’s important to keep your hens on a 16-percent protein layer feed or even switch them to 18-percent broiler feed for a month or so. You can also provide high-protein, high-energy treats. Examples include cooked eggs, black oil sunflower seeds, fishmeal, soybean meal, canned tuna, cooked ground beef or cat food.

Molting is stressful to your chickens. Try not to add additional stressors to your their routine. Don’t introduce new birds while your flock is molting, don’t move them to new quarters and don’t handle them any more than necessary.

Keep in mind that molting chickens are otherwise healthy. If your hens seem ill or out of sorts, it best to consult your veterinarian or county extension agent for advice.

Categories
Crops & Gardening Farm Management

Prevent Disease and Dried-out Soil with Plasticulture


According to Ron Goldy, senior extension educator at Michigan State University, plasticulture—the method of growing vegetables using raised, plastic-mulched beds with drip irrigation—can easily be adapted to small-scale growers.Upfront costs associated with plasticulture might have prevented small-scale producers from adopting this growing method in years past, but today it’s becoming a more affordable choice, even for the hobby farmer with little land.

“They will have all the benefits that come with plasticulture—earliness, increased production, higher quality [produce], weed control, moisture retention, drip irrigation, et cetera,” Goldy says. “The biggest drawback used to be the cost and size of equipment. It took a pretty sizable tractor to handle most early bed shapers, but smaller ones can now be found.”

While commercial use of plastic mulch in combination with drip tape was first introduced in the 1960s, Goldy says plasticulture is now becoming the standard for many crops due to higher, earlier yields; weed and moisture control; and reduced inputs for fertilizer and pesticides due to decreased land use. He says vegetable brokers also like it because it gives a higher­-quality ­product with longer shelf life. (Soil often carries diseases, and the plastic reduces soil splash onto the product.) Crops commonly grown in plastic include strawberries, tomatoes, peppers, cucumbers, squash and many other, mostly above-ground, crops.

To get started, growers need access to a pr­­operly­ sized tractor (usually a four-wheel drive for extra traction and weight), a bed shaper that will be pulled behind the tractor and a drip-tape inserter. They also need plumbing components, including filters and connections, from their water source to the drip tape. Goldy estimates a one-row bed shaper costs between $3,000 to $5,000 new, and around $2,000 used. Drip-system costs vary depending on size and water source. “Plastic is around $180 and tape around $125 per acre,” Goldy says. “Other plumbing can be done for under $1,000 for a small-scale operator. The plastic and tape is the only thing that needs to be replaced every year.”

Plasticulture farming can be particularly profitable for market gardeners, who are often stretched for both time and money, Goldy says, because after the initial investment, it’s possible to grow the same amount of produce on half the land due to high-density planting, increasing efficiency in both time and materials. One of the main benefits of growing in plastic is that it extends the growing season on both ends, meaning growers can take their crops to market sooner and extend production later in the year.

“Most market gardeners are growing for CSAs or farmers’ markets, and if the season can be extended, their income is increased,” Goldy says. “One of the drawbacks with a market garden is that not all the crops need the same amount of fertilizer or water at the same time. [With plasticulture], it is possible to valve off the sub-lines so only certain rows with similar demands are irrigated or fertilized at the same time.”

Since 2005, plasticulture has become a more affordable option for more than 300 small-scale growers­­ in Oklahoma through the Oklahoma Department of Agriculture, Food and Forestry’s Plasticulture Program, which helps limited-resource farmers get their produce to consumers and increase the business of farmers already growing specialty crops in the state. ODAFF assists program participants in the installation of up to 1 acre of plasticulture. “On an acre of land, we spend about $500 on material, such as drip irrigation, plastic, shut-off valves and a fertilizer injector,” says Micah Anderson, who runs the plasticulture program at ODAFF. “Then we spend about $600 for labor. The total cost is about $1,100 per acre to be ready for planting.”

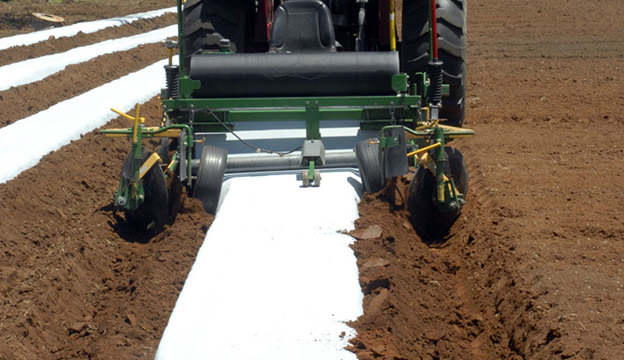
The program helps install beds with its plasticulture machine, eliminating the need for the farmer to own a tractor and row-bed shaper, equipment that Goldy estimates can run up to $30,000 new or $10,000 used. The machine raises the beds, lays the plastic, and puts down the drip line all at once.

Starting out, the ODAFF plasticulture program built 25 plasticulture gardens a year, but with extra funding from the USDA Specialty Crop Grant Program in 2009, it’s now able to install more than 60 gardens per year.

“We feel this program has been great for small ­farmers in Oklahoma,” Anderson says. “It has created some new farmers and helped others obtain more production on a small acreage.”

For farmers who aren’t eligible for plasticulture programs or who think their acreage is too small to justify the upfront costs of implementing plastic, Goldy recommends sharing equipment and supply purchases with local small-scale farmers.

Categories
Homesteading

Starting Fresh

Every man should be born again on the first day of January. Start with a fresh page. –Henry Ward Beecher (HobbyFarms.com)

If you’re like me, this year’s holiday season passed me by in the blink of an eye. I hardly believe it’s over. I barely got the Christmas tree up, and the garland, well, it was sadly left behind in a box in the attic. Now, in this week between Christmas and Jan. 1, we have a little down time to think and prepare for the new year ahead.

This is a much needed time for all of us: a time to clean up the holiday trimmings—unless you skimped on them like I did this year—a time to tinker with the new gadgets and tools you received  as holiday gifts; a time to spread those seed catalogs out and start plotting your spring garden; a time to get your files and farm records in order; and a time to sit back and think of all the projects that went by the wayside this year and what we most want to accomplish on our farm, or farm dream, in the coming months. 

If you didn’t buy the new property, paint the fence, repair the roof, start the CSA you intended to, or generate the farm income you needed to make ends meet, looking back on this year can seem a little disappointing. Cast those worries aside. The year is over and those are things you probably cannot change before midnight on Jan.  1. We can’t start the year over but, fortunately, we have a new one in front of us to work on all those things leftover from last year’s list and a few more. Now is the time to ask ourselves why certain things didn’t get accomplished—if they were in our control or not. It’s not the time to beat ourselves up over what went wrong or didn’t pan out—it’s time to think positively about all that can go right and all that can happen in the next 12 months.

So, this week, I challenge you to not only make a list of what you want to get done in 2014, but also to back up your list items with some actions and first steps that can help you get a jumpstart on making things happen. Look at your list every week to see how things are progressing and determine items you’ll need to work on sooner than later to achieve them in a timely matter. Be realistic and prioritize so you’ll be able to achieve the things that matter most for you and your farmstead. The new roof might require a new loan—research a few lenders to contact the first week of January. A painted fence might need warm weather. Pick a week in late spring and go ahead and ask friends and family to keep that date free to help out. An askew ledger book might mean you need a little financial consulting. Write a reminder to check online for free resources for farmers in your community.

Goals without action will always be goals—never accomplishments. So let’s learn from the events of this closing year, listen to others, reach out for help when we need it and think positively about all we can achieve in 2014. It’s time to turn the page and start fresh. Happy New Year!

« More Farm Inspiration »


Categories
News

Mutant Corn Key to Insecticide-free Pest Control?

A genetic mutation in corn leads to discoveries about how to control the western corn rootworm beetle, which threatens U.S. corn crops. - Photo courtesy Anoop Sindhu/Purdue University (HobbyFarms.com)

Researchers at Purdue University and the University of Illinois have discovered a corn mutant whose leaves are highly susceptible to attack by western corn rootworm beetles, a pest that feeds primarily on corn silks and pollen.

While western corn rootworm beetles were previously thought to avoid corn leaves based on food-source preference, study of the mutant suggests that normal corn plants have an active defense mechanism that deters the beetles from feeding on their foliage. Identifying this mechanism could lead to new strategies for controlling western corn rootworm, which is the most destructive insect pest of corn in the U.S.

“This opens up a whole new opportunity to understand more about the mechanism of defense in corn to control this beetle,” says Gurmukh Johal, professor of botany and plant pathology at Purdue. Johal and Stephen Moose of Illinois independently discovered the mutant around the same time.

“In identifying the genetic pathway involved in resistance, we can develop better ways of controlling this pest without having to use insecticides,” Johal says.

Western corn rootworm causes more than $1 billion damage a year in yield losses and control costs in the U.S., earning it the nickname “the billion-dollar bug.” The rootworm larvae chew on the roots of corn plants while the adult beetles eat the silks and pollen. Current control measures include crop rotation, transgenic corn plants and insecticides, but a rise in continuous corn systems, increased rootworm resistance to transgenic plants and changes in rootworm behavior have rendered these management strategies less effective.

Because the leaves of the corn mutant are singularly attractive to western corn rootworm beetles, the mutant could be used in a “push-pull” pest-management strategy, luring the beetles to a specific location where they can be controlled, says Christian Krupke, assistant professor of entomology at Purdue and co-author of the study.

“Once you can get them where you want, you can use efficient, cost-effective ways of controlling them, either by directly targeting and eliminating them or by keeping them away from your main crop,” Kurpke says.

In the absence of the beetle, the mutant is virtually indistinguishable from normal corn plants, which could be why it was not discovered earlier, Johal says. Its leaves do not become vulnerable to attack by rootworm beetles until it reaches the vegetative stage, about five to six weeks into the growth process.

On finding the mutant, western corn rootworm beetles scrape away the leaf tissue from the upper epidermis, resulting in a transparent “window pane” appearance. If the beetle infestation is severe, the plants can become completely defoliated, which also can reduce grain yield.

A combination of structural and biochemical changes in the mutant leaves make them particularly vulnerable to attack. The cellular lobes that interlock to provide structural strength are smaller and weaker in the mutant leaves. The leaves also have substantially reduced levels of hydroxycinnmates and lignin, compounds that are responsible for cross-linking microfibers in cell walls.

Further research is being done on the possibility of using the mutant in pest-control strategies and identifying the genetic pathway in normal corn plants that prevents western corn rootworm beetles from consuming their leaves. The genes could be used to make corn plants more pest-resistant, Johal says.

The paper was published online in PLoS ONE.


Categories
Crops & Gardening

New Year’s Resolution: Vermicompost Kitchen Scraps

Resolve to start a worm compost bin in the new year! Photo by Jessica Walliser (HobbyFarms.com)
Photo by Jessica Walliser

If you’re looking for a New Year’s resolution that will be easy to keep, I’d like to propose one that’s both slightly out of the ordinary and very rewarding. Make 2013 the year of the worm! 

Raising composting worms is fun, fascinating and simple—and it’s a great project for kids and adults to do together. We have had our worm bin for 10 years now, and it’s something I think every gardener should have. The castings (code for “worm poop”) are nutrient-rich, friable and odor-free. They make a great addition to containers and in-ground plantings, and you can steep a piece of cheesecloth filled with them to make a power-packed liquid fertilizer known as “worm tea.”

To start your own worm composting bin, cut a dozen or so 1/4-inch holes in the bottom and the lid of a large plastic storage bin. Mine has a snap on lid, and holds between 8 and 10 gallons. Choose a container that’s opaque, as worms prefer darker conditions.

Begin by filling the bin halfway with lots of shredded newspaper, avoiding the shiny, colored inserts. Add a few handfuls of kitchen scraps and coffee grounds. Continue by adding another 2-inch-thick layer of shredded newspaper and then more kitchen scraps until the bin is filled to the top. Add a pound or so of red wriggler worms (you can purchase these mail order through companies like UncleJimsWormFarm.com or TheWormFarm.net), sprinkle the top with two to three cups of water—just enough to barely moisten the paper—and you’re ready to go.

Hint: Do not use worms from the garden as they don’t do well in confinement and won’t process the scraps as quickly. Plus, they are prone to “escaping,” and despite the joyous shrieks from your 5-year-old son, they are not a fun thing to find crawling around the garage. (Ask me, I know…) Place a large tray under the bin to catch any runoff out of the bin.

When deciding what kitchen scraps to feed your worms, follow the same basic rules of outdoor composting: no dairy, meat or oils, and keep in mind that thick citrus and banana peels will take a long time to be consumed. Feed your worms a new cup of kitchen scraps every few days, and store the bin at room temperature in a dark place, such as your basement, garage or a closed cupboard. Don’t allow the bin to freeze.

As long as you don’t add too much food scraps, there should be no odor. The nutrient-rich castings will be ready to harvest and use in a few short months. After harvesting the castings, rebuild the bin in the same fashion, carefully transferring as many worms as you can to their new digs.   

« More Dirt on Gardening »


Categories
Recipes

Lavender Lemon Coffee

After talking to my favorite coffee roaster regarding options for cold coffee drinks, she suggested trying infusions, knowing that I had been infusing liquors with herbs and flowers all summer. After trying a number of herb and citrus combinations, I settled on lavender and lemon zest. The resulting drink takes coffee in a culinary direction. The soda water brings a light, cocktail-like feel to the beverage, while lavender brings a strong floral note without being overly perfumy, and lemon zest adds a strong citrus quality without taking the acidity to unpalatable levels.

Yield: 6 servings

Ingredients

  • 100 grams (3.5 ounces) coffee beans, freshly ground
  • 200 grams (7 fluid ounces) boiling water
  • 500 grams (17 fluid ounces) ice-cold water
  • 2 sprigs lavender
  • 1 lemon, zest only
  • soda water

Preparation

Pour boiling water over ground coffee in heat-proof bowl. Wait 2 minutes. Pour ice cold water into bowl, and let sit at room temperature for 12 to 18 hours. Pour entire mixture through a coffee filter. Add lavender and lemon zest to strained coffee concentrate. Let sit 4 to 6 hours. Strain lavender and lemon zest, and serve three parts coffee with one part soda water over ice.

Categories
Crops & Gardening

The History and Health of Holly

The holly genus has been around for more than 50 million years, so this holiday berry comes with a remarkable history. Photo by Dawn Combs (HobbyFarms.com)
Photo by Dawn Combs

At this time of year, we sing of holly and decorate with it in our homes. It is firmly tied in our minds to Christmas, but have you ever wondered why?

The genus that we call “holly” is actually well over 50 million years old. There are most likely some forms of holly that died out before we started a record of the ancestors that would give us the plants we know today. There are 400 to 600 species in the Ilex (holly) genus. They are mainly temperate and subtropical, but there are specimens almost everywhere in the world. They have similar berries everywhere they grow, though they come in a variety of colors. Most well known is holly’s evergreen glossy foliage.

Holly shrubs, vines or small trees are dioecious, meaning they carry male and female flowers separately. This makes an individual plant either entirely female or entirely male. Perhaps it is this “separate house” feature of the plant that lends to some of its folklore regarding its use as a decoration in the home. Depending on when the leaves are gathered and whether they’re sharp or smooth is said to speak for whether the man or the woman will rule in the household for the year. 

Because holly plants so widely range across our planet—and because they are so old—there are stories about them in almost every culture.

Ilex aquifolium
The holly species most often depicted in association with Christianity and Christmas is Ilex aquifolium. Its red berries and evergreen foliage are synonymous with holiday cheer. Originally, the holly was sacred to the Roman god Saturn, and as the Christian population increased in areas where he was celebrated around the winter solstice, Christians also decorated with holly to protect themselves from persecution. Inevitably, as their numbers grew, Christmas eclipsed the Saturnalia celebration. Holly remained, but its symbolism changed.

In England, a sprig of holly was used to decorate bee hives. This was done because it was believed that the bees hummed for the Christ child at the first Christmas.

“At the birth of Christ on Christmas
eve, the bees are said to stir in
their hives and hum a great song of
praise, but one must not disturb
them, for, as they are careful not to
intrude upon the celebrations of
mankind, so man must not interfere
with their celebration of the
birth of the Christ child”
—Encyclopedia of Superstitions, Folklore, and the Occult Sciences of the World (1903)

Ilex paraguariensis
Yerba mate, or Ilex paraguariensis, is the holly most well known in South America. It’s perhaps best known for the concentration of theobromine (similar to caffeine) that is found in the Ilex genus. Yerba mate is a well-known tonic and stimulant in the areas where it grows.

I hope this post finds you and yours basking in the glow of Christmas morning. May the love of your family and friends (and piles of discarded wrapping paper) be all around you. Merry Christmas!

« More of the Prescription Gardener»